squid: 实现网络全局代理
Squid本质上是一种用来缓冲Internet数据 + 服务器代理的软件。
- 用来做前置的Web缓存,加快用户访问Web的速度
- 代理内网用户访问互联网资源
- 设置访问控制策略,控制用户的上网行为
- 主要支持http、ftp等应用协议
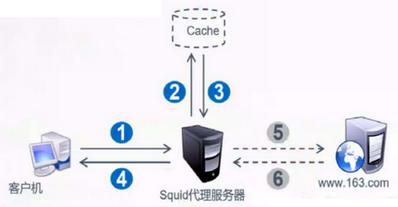
代理工作的机制和好处
- 缓存网页对象,减少重复请求
- 访问速率提高
- 隐藏客户机真是ip地址
1. 代理的基本类型
-
传统代理
适用于internet ,需要指定服务端,开启代理ip地址。
-
透明代理
客户机不需要指定代理服务器的地址和端口,而通过默认路由,防火墙策略将web访问定向给代理服务器处理。
-
反向代理
squid反向代理服务器中缓存了该请求的资源,则将该请求直接返回给客户端;否则反向代理服务器将向后台的web服务器请求资源,然后将请求的应答返回给客户端,同时也将该应答缓存在本地,供下一个请求者使用。
- 客户端设置代理IP
- 客户请求的IP地址仍是WEB页面 ,不是squid代理服务器,因为客户端设置了一个代理IP。
- 客户端正常访问,但是会优先找代理服务器拿资源
- 如果缓存空间有资源,则不用找WEB拿资源
如果缓存空间没有资源squid去找WEB拿资源
2. 安装与部署
环境安装:
yum install squid  # 由于squid_v4.0+需要依赖c++11,centos7提供的是v3.5版本
# 或者
apt install squid
添加squid运行的用户及组
echo 'cache_effective_user squid' >> /usr/local/squid/etc/squid.conf
echo 'cache_effective_group squid' >> /usr/local/squid/etc/squid.conf
定义配置文件 /etc/squid.conf 或 /etc/squid.d/squid.conf:
-
访问控制:acl+http_access来实现
Replay_body_max_size 10 MB # 允许下载最大文件大小 http_access allow all # 允许所有客户机访问,放在deny(拒绝)前 -
监听端口:TCP/3128
2.1. 修改默认端口
将 http_port 3128 这行中的3128修改为期望的端口号,比如8080,或是非常用端口,这样可以避免服务被 shodan 之类的搜索引擎探测到。
2.2. 设置访问密码
为了安全,我们通常会给代理服务器设置密码。
先安装htpasswd工具,使用如下命令:
apt install apache2-utils -y
创建密码文件:
htpasswd -c /etc/squid/passwd proxy_username
在squid.conf中添加以下内容:
auth_param basic program /usr/lib/squid/basic_ncsa_auth /etc/squid/passwd
2.3. 允许外部访问
squid默认只能从本地访问,是因为它设置了 http_access allow localhost。
但正常情况下,我们都是需要从外部访问的,这就需要添加以下两行配置:
acl net src 0.0.0.0/0
http_access allow net
2.4. squid的运行与控制:服务管理(启动、停止、重启)
- 语法检查:
squid -k parse - 初始化缓存目录:
squid -z - 启动:
sudo squid或者systemctl start squid - 停止:
killall -9 squid
2.5. 允许CONNECT所有端口
squid默认只可以CONNECT443端口,如果要开放所有端口,需要注释掉 http_access deny CONNECT !SSL_ports 这行。
2.6. 修改安全端口
squid默认策略只允许代理访问以下端口:
acl Safe_ports port 80        # http
acl Safe_ports port 21        # ftp
acl Safe_ports port 443        # https
acl Safe_ports port 70        # gopher
acl Safe_ports port 210        # wais
acl Safe_ports port 1025-65535    # unregistered ports
acl Safe_ports port 280        # http-mgmt
acl Safe_ports port 488        # gss-http
acl Safe_ports port 591        # filemaker
acl Safe_ports port 777        # multiling http
因此,会有部分端口无法访问,直接返回403 Forbidden。如果需要访问这些端口,可以增加以下配置:
acl Safe_ports port 1-1024
2.7. 允许所有访问
如果觉得以上操作过于繁琐,在不考虑安全性的情况下,也可以修改 http_access deny all 为 http_access allow all。
3. 配置文件详解
3.1. 创建传统代理
# And finally deny all other access to this proxy
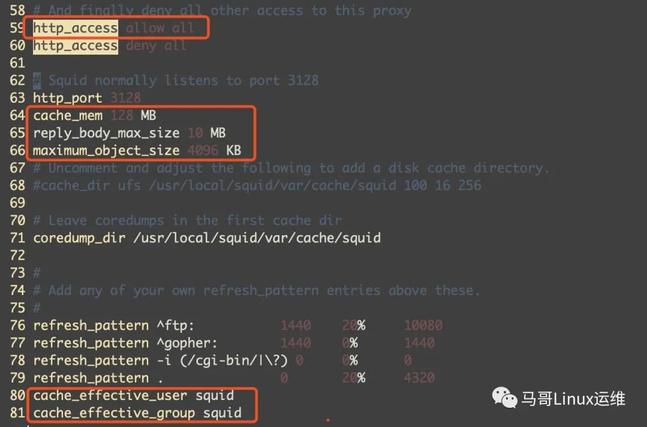
http_access allow all #在deny all前添加allow all
http_access deny all
# Squid normally listens to port 3128
http_port 3128 #squid对外端口
cache_mem 128 MB #指定缓存功能所使用的内存空间大小,便于保持访问较频繁的WEB对象,容量最好为4的倍数,单位为MB,建议设为物理内存的1/4
reply_body_max_size 10 MB #允许用户下载的最大文件大小,以字节为单位。默认设置0表示不进行限制
maximum_object_size 4096 KB #允许保存到缓存空间的最大对象大小,以KB为单位,超过大小限制的文件将不被缓存,而是直接转发给用户
# Uncomment and adjust the following to add a disk cache directory.
#cache_dir ufs /usr/local/squid/var/cache/squid 100 16 256
# Leave coredumps in the first cache dir
coredump_dir /usr/local/squid/var/cache/squid
#
# Add any of your own refresh_pattern entries above these.
#
refresh_pattern ^ftp: 1440 20% 10080
refresh_pattern ^gopher: 1440 0% 1440
refresh_pattern -i (/cgi-bin/|\?) 0 0% 0
refresh_pattern . 0 20% 4320
cache_effective_user squid #squid运行用户
cache_effective_group squid #squid运行组
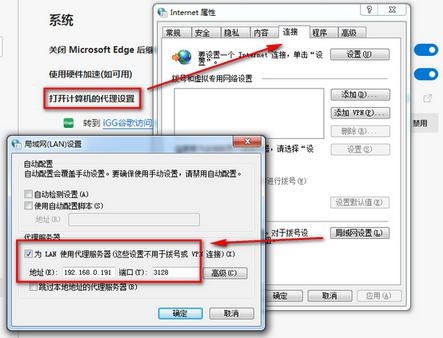
4. 客户端连接到代理服务器
Windows设置
Linux配置
export all_proxy="http://192.168.0.191:3128"
export proxy="http://192.168.0.191:3128"
export http_proxy="http://192.168.0.191:3128"
export https_proxy="http://192.168.0.191:3128"
export ftp_proxy="http://192.168.0.191:3128"
以上为临时设置代理,如需默认执行,将其添加到 .profile 文件中即可。

 浙公网安备 33010602011771号