Python剪切板提取、截图、图片粘贴,操作汇总
1. PIL::ImageGrab(不适用于Linux)
只适用于Windows & MacOS系统。Linux系统支持XCB的X11,详细说明。
1.1. 截图Grab
- ImageGrab.grab() ⇒ image: 截全屏
- ImageGrab.grab(bbox) ⇒ image: 截区域
>>> im = ImageGrab.grab()
>>> im.size
(1366, 768)

>>> im2 = ImageGrab.grab((300, 100, 1400, 600))
>>> im2.mode
'RGB'
1.2. Grabclipboard
截至v7.1.2,尚不支持Linux系统,官网API说明。
- ImageGrab.grabclipboard() ⇒ image or list of strings or None
含义:抓取当前剪贴板的快照,返回一个模式为“RGB”的图像或者文件名称的列表。如果剪贴板不包括图像数据,这个函数返回空。
用户可以使用函数 isinstance() 来检查该函数返回的是一个有效图像对象或者其他数据。
from PIL import Image, ImageGrab

im = ImageGrab.grabclipboard()

if isinstance(im, Image.Image):
    print "Image: size : %s, mode: %s" % (im.size, im.mode)
    im.save("D:\\Document\\mdoc\\python\\pic\\12\\grab_grabclipboard.jpg")
elif im:
    for filename in im:
        try:
            print "filename: %s" % filename
            im = Image.open(filename)
        except IOError:
            pass #ignore this file
        else:
            print "ImageList: size : %s, mode: %s" % (im.size, im.mode)
else:
    print "clipboard is empty."
1.2.1. Error: 'NoneType' object has no attribute 'save'
官方文档有说明,grabclipboard() 函数有一个缓存的问题,操作太快,有时候它就会读取上一次的内容,因为第一个没有读取到图像,所以报错了。
所以解决方案也很简单,既然是操作太快导致读取了缓存,那就让它慢一点呗,我们加上一个时间的延迟就可以了: time.sleep(0.1) 。
2. MSS: 多屏截屏工具
MSS stands for Multiple Screen Shots.
2.1. 安装
You can install it with pip:
python -m pip install -U --user mss
Or you can install it with conda:
conda install -c conda-forge python-mss
2.2. 使用
结合PIL使用。
import mss
from PIL import Image


with mss.mss() as sct:
    # Get rid of the first, as it represents the "All in One" monitor:
    for num, monitor in enumerate(sct.monitors[1:], 1):
        # Get raw pixels from the screen
        sct_img = sct.grab(monitor)

        # Create the Image
        img = Image.frombytes("RGB", sct_img.size, sct_img.bgra, "raw", "BGRX")
        # The same, but less efficient:
        # img = Image.frombytes('RGB', sct_img.size, sct_img.rgb)

        # And save it!
        output = "monitor-{}.png".format(num)
        img.save(output)
        print(output)
3. pyscreenshot: 截图工具
其目标是,适配多种backend,表现为 PIL.ImageGrab 的调用形态。
import pyscreenshot as ImageGrab
im = ImageGrab.grab()
im2 = np.asanyarray(im)
4. pyperclip
pyperclip只支持文本内容,windows下不依赖其它第三方库,非常轻量易用。
pip install pyperclip
使用示例
>>> import pyperclip

>>> dd = pyperclip.paste()
>>> print(dd)
python大法好!

>>> pyperclip.copy("docs.python.org")
>>> pyperclip.paste()
'docs.python.org'
5. 调用其他程序实现
目前Linux和Mac,对剪切板的操作原生支持还不是很完善(说白了,就是不行……),而且如果不是自己写脚本的话很难原生支持剪切板里的图片读取和写入。
5.1. MacOS for text
自带 pbcopy 和 pbpaste 工具。
# 写入剪切板
$ echo 'hihihi' | pbcopy
#或
$ pbcopy < echo 'hello'

# 读取剪切板
$ pbpaste
# 保存剪切板内容到文件
$ pbpaste > ~/test.txt
5.2. MacOS::pngpaste
目前没有原生支持剪切板的文字之外的类型。所以必须要下载第三方应用。
pngpaste : 最简单的剪切板图像转文件工具.
- 不支持直接在文件上ctrl+c这样拷贝来的图片
- 不支持gif
5.3. xclip
原本是在linux常用的剪切板操控工具,后来可能流行起来在mac也支持了。
粘贴图片的关键在于 -t 选项:
-
See what targets are available:
$ xclip -selection clipboard -t TARGETS -o TARGETS image/png text/html -
Note the image/png target; go ahead and get it:
$ xclip -selection clipboard -t image/png -o > /tmp/avatar.png
$ see /tmp/avatar.png    # yep, that's it
不过,令人郁闷的是,在我的 Xubuntu20.04 中,xclip(v0.13)并不支持 image/png ,原因未知。
额,是支持的——原来这个命令是动态检测当前剪切板内容的格式,而不是静态测试所有支持的类型。先复制一张图片,就可以看到打印出了 image/png 项。
具体使用方法,可以参考以下代码:
import subprocess

CMD_XCLIP = {
    "has_jpg"   : "xclip -selection clipboard -t TARGETS -o | grep image/jpeg",  # .split()
    "has_png"   : "xclip -selection clipboard -t TARGETS -o | grep image/png",
    "has_txt"   : "xclip -selection clipboard -t TARGETS -o | grep text/plain;charset=utf-8",
    "save_jpg"  : "xclip -selection clipboard -t image/jpeg -o > ",
    "save_png"  : "xclip -selection clipboard -t image/png -o > ",
    "get_txt"   : "xclip -selection clipboard -t text/plain -o",
}

def call_xclip(file_name):

    def run_shell(key, path_save=None):
        str_cmd = CMD_XCLIP[key]
        if path_save:
            str_cmd += path_save
        proc = subprocess.run(str_cmd,
                               shell=True,
                               # stdin=subprocess.PIPE,
                               stdout=subprocess.PIPE)
        return proc.stdout

    if run_shell("has_jpg"):  # != b"":
        run_shell("save_jpg", file_name)
        return b"img\n"

    elif run_shell("has_png"):
        run_shell("save_png", file_name)
        # 格式转换
        subprocess.call("mogrify -format jpg {}".format(file_name), shell=True)
        return b"img\n"

    elif run_shell("has_txt") != b"":
        txt = run_shell("get_txt")
        return   # bytes

    return b"err\n"
5.4. gpaste
看上去很强大(支持剪切板图片操作),直接使用 apt install gpaste 就可以成功安装了,还提供了libgpaste-dev用于功能调用。
安装之后,系统会提供一个 gpaste-daemon 的后台进程,而用户则是调用 gpaste-client 客户端实现操作。
不过……我的Xubuntu系统环境下,似乎对该程序的支持并不友好。
5.5. parcellite
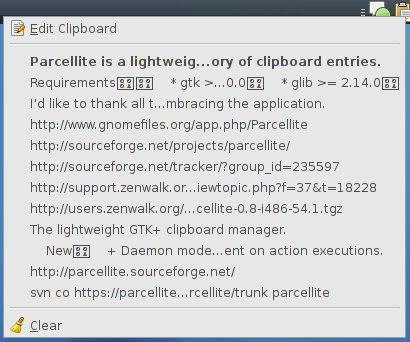
同样是使用GTK+开发的剪切板工具。直接使用 sudo apt install parcellite 安装即可使用。
- 支持编辑剪切板
- 全局快捷键
- 不支持图像的处理
- 支持自定义Action
一款中规中矩的产品,但运行比较稳定,不会出什么岔子。
6. 终极解决方案
6.1. Qt5
from PyQt5.QtWidgets import QApplication

cb = QApplication.clipboard()
if cb.mimeData().hasImage():
    qt_img = cb.image()
    pil_img = Image.fromqimage(qt_img)  # 转换为PIL图像
    pil_img.save(path, "PNG")
6.2. GTK
import gtk

clipboard = gtk.clipboard_get()
image = clipboard.wait_for_image()
if image is not None:
    image.save(fname, "png")

 浙公网安备 33010602011771号