nginx的安装
nginx的安装有好几种安装方式,我就简单的来介绍一下常用的两种方式吧:源码安装和yum安装 (系统是Centos7的系统)
1、源码安装
1.1 pcre库和openssl检查安装
在安装nginx之前我们需要先检查安装pcre库,这个库是为了使Nginx支持具备URL重写功能的rewrite模块,如果不安装pcre库,则nginx不能使用rewrite模块的功能,但是在企业中我相信没有不使用这个功能的,所有必须安装
openssl这个模块是在nginx使用HTTPS的时候用到的,如果不安装openssl相关包,在安装nginx的过程中会报错,所以也是必须安装的
检查pcre库和openssl有没有安装:
[root@Nginx ~]# rpm -qa pcre pcre-devel openssl openssl-devel
没有安装则进行安装(推荐使用yum安装,简单不容易出错):
[root@Nginx ~]# yum -y install pcre prce-devel openssl openssl-devel
1.2 安装nginx
nginx的源码包的下载地址:
http://nginx.org/download/nginx-1.6.3.tar.gz
下面是按照的操作具体的过程:
[root@Nginx ~]# useradd nginx -s /sbin/nologin -M   # 创建nginx用户,不允许登录系统
[root@Nginx ~]# mkdir -p /home/nginx/tools            # 创建nginx安装包的目录
[root@Nginx ~]# cd /home/nginx/tools/
[root@Nginx tools]# wget -q http://nginx.org/download/nginx-1.6.3.tar.gz  # wget下载nginx
[root@Nginx tools]# ll
总用量 788
-rw-r--r--. 1 root root 805253 4月   8 2015 nginx-1.6.3.tar.gz
[root@Nginx tools]# tar zxf nginx-1.6.3.tar.gz           # 解压nginx
[root@Nginx tools]# cd nginx-1.6.3
[root@Nginx nginx-1.6.3]# ./configure --user=nginx --group=nginx --prefix=/opt/nginx-1.6.3/ --with-http_stub_status_module --with-http_ssl_module # nginx安装前的配置
[root@Nginx nginx-1.6.3]# make && make install   # 编译安装
[root@Nginx nginx-1.6.3]# ln -s /opt/nginx-1.6.3 /opt/nginx   # 做个软链接
[root@Nginx nginx-1.6.3]# ll /opt/nginx/
总用量 4
drwxr-xr-x. 2 root root 4096 3月  20 15:14 conf
drwxr-xr-x. 2 root root   40 3月  20 15:14 html
drwxr-xr-x. 2 root root    6 3月  20 15:14 logs
drwxr-xr-x. 2 root root   19 3月  20 15:14 sbin
此时的安装就已经完成了
1.3 启动并检查结果:
启动前语法检查:
[root@Nginx tools]# /opt/nginx/sbin/nginx -t      # 语法检查,显示OK则没有问题
nginx: the configuration file /opt/nginx-1.6.3//conf/nginx.conf syntax is ok
nginx: configuration file /opt/nginx-1.6.3//conf/nginx.conf test is successful
启动nginx服务:
[root@Nginx tools]# /opt/nginx/sbin/nginx
查看nginx服务对应的端口是否启动成功:
[root@Nginx tools]# lsof -i :80
COMMAND   PID  USER   FD   TYPE DEVICE SIZE/OFF NODE NAME
nginx   20797  root    6u  IPv4  42383      0t0  TCP *:http (LISTEN)
nginx   20798 nginx    6u  IPv4  42383      0t0  TCP *:http (LISTEN)
[root@Nginx tools]# netstat -lntup | grep 80
tcp        0      0 0.0.0.0:80              0.0.0.0:*               LISTEN      20797/nginx: master
在windows上面检查nginx的实际启动效果:(在浏览器输入服务器IP地址)
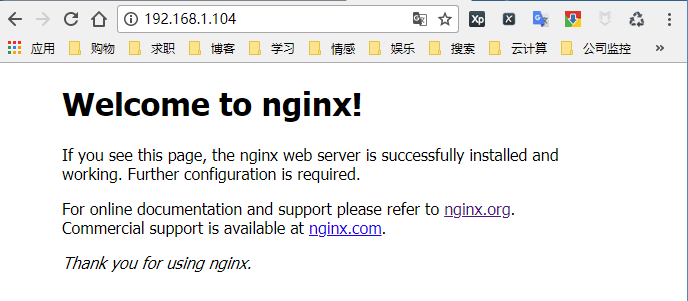
在Linux中测试安装结果有两种方式:
[root@Nginx tools]# wget 127.0.0.1
--2018-03-20 15:33:16--  http://127.0.0.1/
正在连接 127.0.0.1:80... 已连接。
已发出 HTTP 请求,正在等待回应... 200 OK
长度:612 [text/html]
正在保存至: “index.html”

100%[=================================================================================================================================================================================================================================>] 612         --.-K/s 用时 0s

2018-03-20 15:33:16 (15.6 MB/s) - 已保存 “index.html” [612/612])
[root@Nginx tools]# curl 127.0.0.1
<!DOCTYPE html>
<html>
<head>
<title>Welcome to nginx!</title>
<style>
    body {
        width: 35em;
        margin: 0 auto;
        font-family: Tahoma, Verdana, Arial, sans-serif;
    }
</style>
</head>
<body>
<h1>Welcome to nginx!</h1>
<p>If you see this page, the nginx web server is successfully installed and
working. Further configuration is required.</p>

<p>For online documentation and support please refer to
<a href="http://nginx.org/">nginx.org</a>.<br/>
Commercial support is available at
<a href="http://nginx.com/">nginx.com</a>.</p>

<p><em>Thank you for using nginx.</em></p>
</body>
</html>
2、yum安装
yum 安装就相对的来说简单多了,但是想要扩展功能就必须安装完成在通过其他的方式进行扩展了,具体的方法如下:
因为在默认的yum仓库中是没有nginx的安装包的,所有我们要修改yum仓库:
下载对应当前系统版本的nginx包(package):
wget http://nginx.org/packages/centos/7/noarch/RPMS/nginx-release-centos-7-0.el7.ngx.noarch.rpm
建立nginx的yum源仓库:
[root@Nginx /]# yum install nginx-release-centos-7-0.el7.ngx.noarch.rpm -y
下载安装nginx:
[root@Nginx /]# yum -y install nginx
检查语法和启动服务:
[root@Nginx run]# /usr/sbin/nginx -t    # 检查语法  yum安装的包启动文件在/usr/sbin/下
nginx: the configuration file /etc/nginx/nginx.conf syntax is ok
nginx: configuration file /etc/nginx/nginx.conf test is successful
[root@Nginx run]# systemctl start nginx  # 启动nginx
[root@Nginx run]# lsof -i :80    # 检查启动状态
COMMAND   PID  USER   FD   TYPE DEVICE SIZE/OFF NODE NAME
nginx   20986  root    6u  IPv4  46048      0t0  TCP *:http (LISTEN)
nginx   20987 nginx    6u  IPv4  46048      0t0  TCP *:http (LISTEN)
[root@Nginx run]# netstat -lntup | grep 80
tcp        0      0 0.0.0.0:80              0.0.0.0:*               LISTEN      20986/nginx: master
测试的方式和上面源码安装的测试方式一样
3、部署一个简单的web站点(按照上面的源码安装的方式,进行部署)
Nginx的默认站点目录是在/opt/nginx/html 目录中,这个可以在nginx.conf中看到,路径在:/opt/nginx/conf/nginx.conf
我们要部署一个站点就是把我们做好的程序放到/opt/nginx/html下面,默认下面有个index.html的默认页面,我们需要进行修改此文件或者删除重新编辑一个index.html的文件
具体过程:
[root@Nginx html]# cd /opt/nginx/html/
[root@Nginx html]# rm -rf index.html
[root@Nginx html]# vi index.html
index.html中的新内容如下:
<html>
<head><title>one test nginx</title></head>
<boby>
HI one test nginx file
<a href="http://www.cnblogs.com/brianzhu/">http://www.cnblogs.com/brianzhu/</a>
</boby>
</html>
现在用windows在浏览器上输入服务器IP测试:
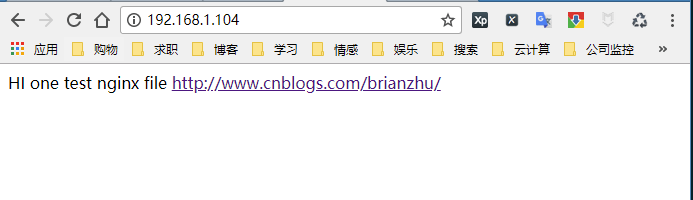
显示的内容就是我们修改后的index.html的内容

 浙公网安备 33010602011771号