WEB服务器----Apache 安装配置
1、官网下载需要的安装包(包括主安装包和依赖包的下载)可以直接使用Linux的wget进行下载:
httpd安装包下载地址:http://mirrors.hust.edu.cn/apache//httpd/httpd-2.4.29.tar.gz
arp安装包下载地址:http://mirrors.tuna.tsinghua.edu.cn/apache//apr/apr-1.6.3.tar.gz
arp-util安装包下载地址:http://mirrors.tuna.tsinghua.edu.cn/apache//apr/apr-util-1.6.1.tar.gz
pcre安装包下载地址:ftp://ftp.csx.cam.ac.uk/pub/software/programming/pcre/pcre-8.38.tar.gz
我们可以使用wget的邪恶方法,实现批量下载这几个文件,首先把这几个链接地址放到一个文件中:比如software.txt


http://mirrors.hust.edu.cn/apache//httpd/httpd-2.4.29.tar.gz
http://mirrors.tuna.tsinghua.edu.cn/apache//apr/apr-1.6.3.tar.gz
http://mirrors.tuna.tsinghua.edu.cn/apache//apr/apr-util-1.6.1.tar.gz
ftp://ftp.csx.cam.ac.uk/pub/software/programming/pcre/pcre-8.38.tar.gz
然后使用wget的方法下载这个文件中的地址安装包:
wget -i software.txt
2、下载完成后就要开始解压下载下来的安装包了,我们也使用一个快速的方法对下载下来的这四个包进行批量解压:
ls *.tar.gz | xargs -n1 tar zxf
解压完成后的目录里面有下面这些文件:
[root@BrianZhu software]# ll
total 12060
drwxr-xr-x 27 1001  1001    4096 Oct 18 22:50 apr-1.6.3
-rw-r--r--  1 root root  1072661 Oct 23 01:33 apr-1.6.3.tar.gz
drwxr-xr-x 20 1001  1001    4096 Oct 18 22:51 apr-util-1.6.1
-rw-r--r--  1 root root   554301 Oct 23 01:33 apr-util-1.6.1.tar.gz
drwxr-xr-x 11  501 games    4096 Oct 18 02:53 httpd-2.4.29
-rw-r--r--  1 root root  8638793 Oct 21 03:39 httpd-2.4.29.tar.gz
drwxr-xr-x  7 1169  1169    4096 Nov 23  2015 pcre-8.38
-rw-r--r--  1 root root  2053336 Mar 13 11:05 pcre-8.38.tar.gz
-rw-r--r--  1 root root      267 Mar 13 11:03 software.txt
3、创建用户:
首先我们先要创建一个Apache的专属用户,用户名是:httpd(可自定义)
[root@BrianZhu software]# groupadd httpd
[root@BrianZhu software]# useradd -g httpd -s /sbin/nologin -M httpd
4、对主安装包和依赖包进行源码安装:
为了防止在安装是时候出现一些不必要的错误,我们在安装的时候最好是按照依赖包主安装包的顺序来安装:
apr --> apr-util --> pcre --> httpd
在安装之前要检查一下C++的环境有没有安装成功
[root@BrianZhu software]# rpm -qa gcc gcc-c++     # 检查
[root@BrianZhu software]# yum -y install gcc gcc-c++ expat-devel  # 安装
源码安装apr软件包:
[root@BrianZhu software]# cd apr-1.6.3/    # 切换到解压好的目录
[root@BrianZhu apr-1.6.3]# ./configure --prefix=/usr/local/apr && make && make install  # 配置指定路径、编译、编译安装
源码安装apr-util软件包:
[root@BrianZhu software]# cd apr-util-1.6.1/  # 切换解压好的目录
[root@BrianZhu apr-util-1.6.1]# ./configure --prefix=/usr/local/apr-util --with-apr=/usr/local/apr/bin/apr-1-config && make && make install # 配置路径,指定apr的安装路径 、编译、编译安装
源码安装pcre软件包:
[root@BrianZhu software]# cd pcre-8.38/   # 切换解压好的目录
[root@BrianZhu pcre-8.38]# ./configure --prefix=/usr/local/pcre && make && make install  # 配置指定路径、编译、编译安装
源码安装httpd软件包:
[root@BrianZhu software]# cd httpd-2.4.29/  # 切换解压好的目录
[root@BrianZhu httpd-2.4.29]# ./configure --prefix=/usr/local/apache/ --with-apr=/usr/local/apr --with-apr-util=/usr/local/apr-util/ --with-pcre=/usr/local/pcre/ && make && make install  # 指定安装和依赖包路径、编译、编译安装
安装过程无报错说明安装成功,安装完成后会在/usr/local/下面有个apache目录
[root@BrianZhu /]# cd /usr/local/
[root@BrianZhu local]# ll
total 56
drwxr-xr-x  14 root root 4096 Mar 13 11:56 apache   # 我们编译安装好的Apache
drwxr-xr-x   6 root root 4096 Mar 13 11:39 apr      # 编译安装的依赖包
drwxr-xr-x   5 root root 4096 Mar 13 11:48 apr-util # 编译安装的依赖包
drwxr-xr-x.  2 root root 4096 Aug 12  2015 bin
drwxr-xr-x.  2 root root 4096 Aug 12  2015 etc
drwxr-xr-x.  2 root root 4096 Aug 12  2015 games
drwxr-xr-x.  2 root root 4096 Aug 12  2015 include
drwxr-xr-x.  2 root root 4096 Aug 12  2015 lib
drwxr-xr-x.  2 root root 4096 Aug 12  2015 lib64
drwxr-xr-x.  2 root root 4096 Aug 12  2015 libexec
drwxr-xr-x   6 root root 4096 Mar 13 11:51 pcre     # 编译安装的依赖包
drwxr-xr-x.  2 root root 4096 Aug 12  2015 sbin
drwxr-xr-x.  5 root root 4096 May 23  2017 share
drwxr-xr-x.  2 root root 4096 Aug 12  2015 src
在安装的过程中我们使用./configure的时候跟了很多的额外编译参数,下面我们来说一下在安装Apache的常用参数:
| 选项 | 意义 |
| --enable-so | 启用动态装载模块功能 |
| --enable-ssl | 启用ssl功能。注意要先安装 |
| --enable-cgi | 启用cgi功能 |
| --enable-rewrite | 启用URL重定向功能 |
| --enable-modules=[all | most | ……] | 指定启用哪些模块。可指定具体的模块名,也可使用all表示启用所有模块,most表示启用大多数常用模块。一般使用most即可 |
| --enable-mpms-shared=[prefork | worker | event | all] | 指定编译哪些MPM模块。可使用all表示全编译 |
| --with-mpm=[prefork | worker | event] | 如3种MPM模块都编译了,则通过此项指定默认使用哪种 |
| --with-zlib | 依赖zlib库用于页面压缩 |
| --with-pcre | 依赖pcre库用于解决正则表达式问题。 |
| --with-apr=PATH | 指定依赖的apr路径。注意必须指明路径,否则编译时会自动去找/usr下的apr,而不是编译的高版本apr,下同 |
| --with-apr-util=PATH | 指定依赖的apr-util路径 |
| --sysconfdir=PATH | 指定配置文件在安装在哪个路径。如不指定,配置文件就在程序安装的目录;如指定/etc目录,注意起个别的名字,不要覆盖httpd2.2的 |
在apache这个目录下面有很多子目录,我们来简单说一下这些目录都是干什么的:
[root@BrianZhu local]# cd apache/
[root@BrianZhu apache]# ll
total 56
drwxr-xr-x  2 root root  4096 Mar 13 11:56 bin     # 程序命令目录
drwxr-xr-x  2 root root  4096 Mar 13 11:56 build   # 目录存放的是编译过程中产生的文件
drwxr-xr-x  2 root root  4096 Mar 13 11:56 cgi-bin
drwxr-xr-x  4 root root  4096 Mar 13 11:59 conf    # 配置文件目录
drwxr-xr-x  3 root root  4096 Mar 13 11:56 error   # 记录了各错误页面内容。404等错误页面就放在这里,报错时显示的就是这些页面内容
drwxr-xr-x  2 root root  4096 Oct 18 02:53 htdocs  # 网页文件放置位置。
drwxr-xr-x  3 root root  4096 Mar 13 11:56 icons
drwxr-xr-x  2 root root  4096 Mar 13 11:56 include
drwxr-xr-x  2 root root  4096 Mar 13 11:56 logs    # 日志。httpd的pid文件也在此目录
drwxr-xr-x  4 root root  4096 Mar 13 11:56 man     # man手册
drwxr-xr-x 14 root root 12288 Oct 18 02:53 manual  # 官方文档
drwxr-xr-x  2 root root  4096 Mar 13 11:56 modules # 各模块
5、现在我们来启动Apache服务,并测试是否安装成功:
我们可以先对配置文件做个简单的修改,修改的文件和配置参数如下:
[root@BrianZhu /]# cd /usr/local/apache/conf/   # 切换到配置文件目录
[root@BrianZhu conf]# vim httpd.conf             #修改配置文件(主要修改“Listen”和“ServerName”属性)
修改后我们可以使用命令对配置文件进行检查
./bin/apachectl configtest # 没有问题会显示 Syntax OK
启动Apache服务:
/usr/local/apache/bin/apachectl start | stop | restart
或者
cp /usr/local/apache/bin/apachectl /etc/init.d/httpd
/etc/init.d/httpd start
检查是否启动成功:
[root@BrianZhu conf]# netstat -lntup
Active Internet connections (only servers)
Proto Recv-Q Send-Q Local Address           Foreign Address         State       PID/Program name
tcp        0      0 0.0.0.0:22              0.0.0.0:*               LISTEN      943/sshd
tcp        0      0 127.0.0.1:25            0.0.0.0:*               LISTEN      896/master
tcp6       0      0 :::80                   :::*                    LISTEN      82232/httpd     # 启动成功
tcp6       0      0 :::22                   :::*                    LISTEN      943/sshd
tcp6       0      0 ::1:25                  :::*                    LISTEN      896/master
udp        0      0 0.0.0.0:11714           0.0.0.0:*                           548/dhclient
udp        0      0 0.0.0.0:68              0.0.0.0:*                           548/dhclient
udp        0      0 127.0.0.1:323           0.0.0.0:*                           904/chronyd
udp6       0      0 ::1:323                 :::*                                904/chronyd
udp6       0      0 :::30037                :::*                                548/dhclient
浏览器检查:
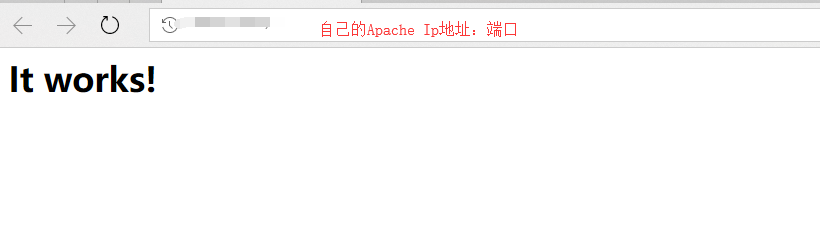
就此安装完成!!!
安装完成后,那我们怎么使用呢?
点击这里 进入Apache的学习世界
朱敬志(brian),成功不是将来才有的,而是从决定去做的那一刻起,持续累积而成。

 浙公网安备 33010602011771号