podman+openresty+openssl,https双向认证demo测试
前言
暂不讨论https原理,单论配置的话:
1. https单项认证
- server: server.crt + server.key
- client: server_ca.crt
2. https双向认证
- server: server.crt + server.key + client_ca.crt
- client: server_ca.crt + client.crt + client.key
关于podman环境,可以参考:
https://www.cnblogs.com/brian-sun/p/16694334.html
OpenResty® 是一个基于 Nginx 与Lua 的高性能 Web 平台
正文
1. podman 拉取并配置 openresty
1. 检查podman镜像配置
$ cat /etc/containers/registries.conf
unqualified-search-registries = ["docker.io"]
[[registry]]
prefix = "docker.io"
insecure = false
blocked = false
location = "docker.io"
[[registry.mirror]]
# location = "j3m2itm3.mirror.aliyuncs.com"
location = "docker.mirrors.ustc.edu.cn"
2. 拉取openresty的 alpine 版本
podman pull openresty/openresty:alpine
3. 检查openresty镜像
$ podman images
# REPOSITORY                        TAG         IMAGE ID      CREATED        SIZE
# docker.io/openresty/openresty     alpine      e8525d25acd9  6 weeks ago    87.4 MB
4. 试启动openresty容器,拉取openresty到本地
# 启动openresty容器,将容器的80端口映射为本地的12123端口,允许容器登录,允许容器后台运行,命名容器名称为openresty
$ podman run -itd -p 12123:80 --name openresty openresty/openresty:alpine
474650d9317c37e31dad4a6dd9aa48260b35af35091e25204a7673119ee9ab9f
# 检查podman正在运行的全部容器
$ podman ps -a
CONTAINER ID  IMAGE                                 COMMAND               CREATED        STATUS            PORTS                  NAMES
474650d9317c  docker.io/openresty/openresty:alpine  /usr/local/openre...  4 seconds ago  Up 4 seconds ago  0.0.0.0:12123->80/tcp  openresty
# 拉取容器中的openresty文件夹到本地
$ podman cp openresty:/usr/local/openresty ./
# 停止并删除原容器(镜像文件可以理解为vmware中的.iso镜像,容器就是安装好的一个虚拟机,拉取容器中的文件夹为的是以后做文件映射,让容器使用本地的配置)
# podman stop 和 rm 后面可以跟容器的name或容器的id
$ podman stop openresty
#openresty
$ podman rm openresty
#22e336479ac85be56561b06fd7a9157ca3d720d53047893eba9590ed021961bf
$ podman ps -a
#CONTAINER ID  IMAGE       COMMAND     CREATED     STATUS      PORTS       NAMES
5. 用脚本启动podman openresty容器
start.sh
#!/bin/bash
#podman run -id --rm -p 12123:80/tcp -p 12443:443/tcp\
podman run -idt --rm -p 12123:80/tcp -p 12443:443/tcp\
    -v /home/brian/podman/openresty/openresty/nginx/conf:/usr/local/openresty/nginx/conf:Z \
    -v /home/brian/podman/openresty/openresty/nginx/html:/usr/local/openresty/nginx/html:Z \
    -v /home/brian/podman/openresty/openresty/nginx/logs:/usr/local/openresty/nginx/logs:Z \
    -v /etc/localtime:/etc/localtime \
    --name=openresty  --privileged=true openresty/openresty:alpine
    #--name=openresty --net host  --privileged=true openresty/openresty:alpine
其中 --rm 表示容器退出就自动删除容器
-v 表示文件映射,格式为 -v 本地文件:镜像内部文件,后面的:Z告诉Podman标注有私人非共享的标签内容
(参考Podman run -v /HOST-DIR:/CONTAINER-DIR:Z详解)
运行脚本,启动。
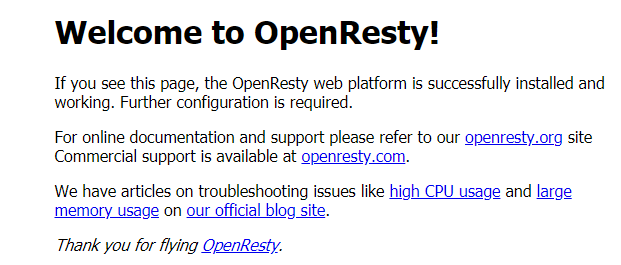
在浏览器中输入 http://你的ubuntu的ip:12123
2. openssl 制作证书
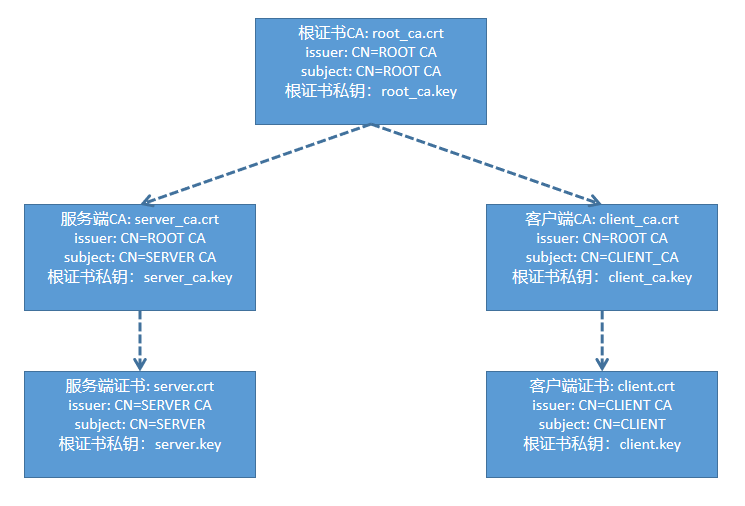
https双向认证,这里准备一个复杂一点的证书结构
1. 知识补充
在证书中:
Version: 版本号
Serial Number: 证书序列号
Signature Algorithm: 签名算法
Issuer: 签发者(签发证书的CA实体)
Subject: 证书主体(证书持有者实体)
Validity: 有效期
	Not Before: 开始生效时间
	Not After: 证书失效时间
Subject Public Key Info: 主体公钥信息
	Public Key Algorithm: 证书主题持有的公钥密钥算法
	RSA Public-Key: 具体的公钥数据
issure和subject 用 X.509 DN 表示,DN 是由 RDN构成的序列。RDN 用 “属性类型=属性值” 的形式表示。常用属性类型名如下:
| 属性类型名称 | 含义 | 简写 |
|---|---|---|
| Common Name | 通用名称 | CN |
| Organizational Unit name | 机构单元名称 | OU |
| Organization name | 机构名 | O |
| Locality | 地理位置 | L |
| State or province name | 州/省名 | S |
| Country | 国名 | C |
一般证书的签发流程是:
- 申请者把自己的申请做成证书申请文件csr(csr中放入了申请者的公钥以及申请者的信息)
- 然后把csr发送给签发者CA进行证书签发,签发过程就是CA用自己的私钥给csr生成签名,然后制作为证书文件(.crt或.pem)
nginx判定证书的时候,是根据证书中的两个字段:Issuer 和 Subject
如果 Issuer == Subject 那么 nginx 就会认为这是一个自签名的根证书
如果 Issuer != Subject 那么 nginx 就会认为这不是一个自签名的证书,验证时需要带上签发这个证书的根证书
正式使用时,subject 中的 CN 字段需要填写使用者的域名,也就是 nginx 所在主机的域名
2. 证书制作
本次使用的是符合x509标准的证书,openssl 工具生成比较简单。除此之外,还可以使用 c语言、python、java、或java提供的keytool工具生成,读者可以自行探索。
openssl 工具可以使用openssl.conf的形式进行更加专业的配置,此处只演示较为简单的命令行方式。
配置文件方式可参考:
OpenSSL自建CA和签发二级CA及颁发SSL证书
使用OpenSsl自己CA根证书,二级根证书和颁发证书(亲测步骤)
进入到你的物理机目录 "openresty/nginx/conf",新建一个目录 certs
cd /home/brian/podman/openresty/openresty/nginx/conf
mkdir certs
# 生成ROOT CA
openssl genrsa -out root_ca.key 2048
openssl req -x509 -new -nodes -key root_ca.key -subj "/CN=ROOT CA" -days 3650 -out root_ca.crt

# 生成SERVER CA 和 CLIENT CA
## 基本约束扩展,注明这个二级CA可以颁发证书,不添加则证书链无法认证
cat > certV3.ext << EOF
basicConstraints=CA:TRUE
EOF

## SERVER CA
openssl genrsa -out server_ca.key 2048
openssl req -new -key server_ca.key -subj "/CN=SERVER CA" -out server_ca.csr
openssl x509 -req -in server_ca.csr -CA root_ca.crt -CAkey root_ca.key -CAcreateserial   -extfile certV3.ext -out server_ca.crt -days 3650

## CLIENT CA
openssl genrsa -out client_ca.key 2048
openssl req -new -key client_ca.key -subj "/CN=CLIENT CA" -out client_ca.csr
openssl x509 -req -in client_ca.csr -CA root_ca.crt -CAkey root_ca.key -CAcreateserial   -extfile certV3.ext -out client_ca.crt -days 3650

# 生成server证书和client证书
## server
## 基本约束,声明证书用途为服务端证书,测试发现添加与否应该都可以
cat > certV3.ext << EOF
extendedKeyUsage=serverAuth
EOF
## 注意!!!server的subject中的CN一定要填自己的域名,https认证过程中会对比证书中的subject.CN和实际域名是否一致
openssl genrsa -out server.key 2048
openssl req -new -key server.key -subj "/CN=httpstst.com" -out server.csr
openssl x509 -req -in server.csr -CA server_ca.crt -CAkey server_ca.key -CAcreateserial  -extfile certV3.ext -out server.crt -days 3650

## client
## 基本约束,声明证书用途为客户端证书,测试发现添加与否应该都可以
cat > certV3.ext << EOF
extendedKeyUsage=clientAuth
EOF

openssl genrsa -out client.key 2048
openssl req -new -key client.key -subj "/CN=CLIENT" -out client.csr
openssl x509 -req -in client.csr -CA client_ca.crt -CAkey client_ca.key -CAcreateserial  -extfile certV3.ext -out client.crt -days 3650

# 将 CA 证书拼接为证书链,测试发现不一定要按照根证书在前的顺序,不过最好还是把根证书放到最前面
cat root_ca.crt server_ca.crt client_ca.crt > caAll.crt
几个证书查看指令:
# 查看csr证书申请文件
openssl req -noout -text -in server.csr

# 查看证书内容
openssl x509 -noout -text -in server.crt
3. openresty 配置 https 双向认证
1. 新建配置文件
在实体机 openresty/nginx/conf/sites-enabled 目录下执行
touch https.conf
新建配置文件 https.conf
2. 编辑配置文件
使用vim或nano或其它编辑器,打开 https.conf,编辑内容如下:
server {
        listen       443 ssl;
        server_name  httpstst.com;

        ssl_certificate      certs/server.crt;
        ssl_certificate_key  certs/server.key;
        ssl_client_certificate  certs/caAll.crt;
        ssl_verify_client on;

        #ssl_session_cache    shared:SSL:1m;
        ssl_session_timeout  5m;

        ssl_protocols TLSv1.1 TLSv1.2 TLSv1.3;
        ssl_ciphers ECDHE-ECDSA-CHACHA20-POLY1305:ECDHE-RSA-CHACHA20-POLY1305:ECDHE-ECDSA-AES128-GCM-SHA256:ECDHE-RSA-AES128-GCM-SHA256:ECDHE-ECDSA-AES256-GCM-SHA384:ECDHE-RSA-AES256-GCM-SHA384:DHE-RSA-AES128-GCM-SHA256:DHE-RSA-AES256-GCM-SHA384:ECDHE-ECDSA-AES128-SHA256:ECDHE-RSA-AES128-SHA256:ECDHE-ECDSA-AES128-SHA:ECDHE-RSA-AES256-SHA384:ECDHE-RSA-AES128-SHA:ECDHE-ECDSA-AES256-SHA384:ECDHE-ECDSA-AES256-SHA:ECDHE-RSA-AES256-SHA:DHE-RSA-AES128-SHA256:DHE-RSA-AES128-SHA:DHE-RSA-AES256-SHA256:DHE-RSA-AES256-SHA:ECDHE-ECDSA-DES-CBC3-SHA:ECDHE-RSA-DES-CBC3-SHA:EDH-RSA-DES-CBC3-SHA:AES128-GCM-SHA256:AES256-GCM-SHA384:AES128-SHA256:AES256-SHA256:AES128-SHA:AES256-SHA:DES-CBC3-SHA:!DSS;
        ssl_prefer_server_ciphers  on;

        location / {
                    root   html;
                    index  index.html index.htm;
                }
    }
其中如果只配置
ssl_certificate      certs/server.crt;
ssl_certificate_key  certs/server.key;
那么就是https单向认证;
配置完毕,执行脚本 ./start.sh
然后使用指令
podman ps -a
检查镜像是否启动
正常启动:
CONTAINER ID  IMAGE                                 COMMAND               CREATED         STATUS             PORTS                                          NAMES
ea379f5d44f0  docker.io/openresty/openresty:alpine  /usr/local/openre...  33 minutes ago  Up 33 minutes ago  0.0.0.0:12123->80/tcp, 0.0.0.0:12443->443/tcp  openresty
如果没有正常启动,大概率是nginx脚本 https.conf有问题,可以修改启动脚本 ./start.sh中的
podman run -idt --rm
修改为
podman run -it --rm
禁止openresty在后台运行,然后执行 ./start.sh 即可打印出详细报错信息
4. 测试环节
1. 本地 curl 测试
进入到存放证书的certs文件夹,执行curl指令访问https接口:
curl https://httpstst.com:12443 --cacert caAll.crt --resolve httpstst.com:12443:0.0.0.0 --cert client.crt --key client.key
其中:
- https默认端口是443,我映射为物理机的12443端口了,所以直接访问12443端口;
- --cacert 后跟ca证书链。因为是自签发的ca,不是官方ca,所以要添加ca证书链来验证。也可以添加参数 -k 来跳过证书ca验证;
如果没有这个配置或者没有添加-k,会报错:
curl: (60) SSL certificate problem: unable to get local issuer certificate
More details here: https://curl.se/docs/sslcerts.html

curl failed to verify the legitimacy of the server and therefore could not
establish a secure connection to it. To learn more about this situation and
how to fix it, please visit the web page mentioned above.
- --resolve httpstst.com:12443:0.0.0.0 添加自定义域名解析,因为httpstst.com并非正式申请注册的域名,官方的DNS无法解析httpstst.com。格式为 自己的域名:端口号:映射的IP。
ps: 也可以不用这个选项,在 /etc/hosts文件中添加一条0.0.0.0 httpstst.com,这种的风险就是万一有一天真想访问这个域名,很可能会访问你配置的ip; - --cert 后跟客户端证书
- --key 后跟客户端私钥
访问成功,可以看到返回了:
<!DOCTYPE html>
<html>
<head>
<meta content="text/html;charset=utf-8" http-equiv="Content-Type">
<meta content="utf-8" http-equiv="encoding">
<title>Welcome to OpenResty!</title>
<style>
    body {
        width: 35em;
        margin: 0 auto;
        font-family: Tahoma, Verdana, Arial, sans-serif;
    }
</style>
</head>
<body>
<h1>Welcome to OpenResty!</h1>
<p>If you see this page, the OpenResty web platform is successfully installed and
working. Further configuration is required.</p>

<p>For online documentation and support please refer to our
<a href="https://openresty.org/">openresty.org</a> site<br/>
Commercial support is available at
<a href="https://openresty.com/">openresty.com</a>.</p>
<p>We have articles on troubleshooting issues like <a href="https://blog.openresty.com/en/lua-cpu-flame-graph/?src=wb">high CPU usage</a> and
<a href="https://blog.openresty.com/en/how-or-alloc-mem/">large memory usage</a> on <a href="https://blog.openresty.com/">our official blog site</a>.
<p><em>Thank you for flying <a href="https://openresty.org/">OpenResty</a>.</em></p>
</body>
</html>
还可以通过添加参数 -v 的方式查看详细的https通讯过程
* Added httpstst.com:12443:0.0.0.0 to DNS cache
* Hostname httpstst.com was found in DNS cache
*   Trying 0.0.0.0:12443...
* Connected to httpstst.com (127.0.0.1) port 12443 (#0)
* ALPN, offering h2
* ALPN, offering http/1.1
*  CAfile: caAll.crt
*  CApath: /etc/ssl/certs
* TLSv1.0 (OUT), TLS header, Certificate Status (22):
* TLSv1.3 (OUT), TLS handshake, Client hello (1):
* TLSv1.2 (IN), TLS header, Certificate Status (22):
* TLSv1.3 (IN), TLS handshake, Server hello (2):
* TLSv1.2 (IN), TLS header, Finished (20):
* TLSv1.2 (IN), TLS header, Supplemental data (23):
* TLSv1.3 (IN), TLS handshake, Encrypted Extensions (8):
* TLSv1.2 (IN), TLS header, Supplemental data (23):
* TLSv1.3 (IN), TLS handshake, Request CERT (13):
* TLSv1.2 (IN), TLS header, Supplemental data (23):
* TLSv1.3 (IN), TLS handshake, Certificate (11):
* TLSv1.2 (IN), TLS header, Supplemental data (23):
* TLSv1.3 (IN), TLS handshake, CERT verify (15):
* TLSv1.2 (IN), TLS header, Supplemental data (23):
* TLSv1.3 (IN), TLS handshake, Finished (20):
* TLSv1.2 (OUT), TLS header, Finished (20):
* TLSv1.3 (OUT), TLS change cipher, Change cipher spec (1):
* TLSv1.2 (OUT), TLS header, Supplemental data (23):
* TLSv1.3 (OUT), TLS handshake, Certificate (11):
* TLSv1.2 (OUT), TLS header, Supplemental data (23):
* TLSv1.3 (OUT), TLS handshake, CERT verify (15):
* TLSv1.2 (OUT), TLS header, Supplemental data (23):
* TLSv1.3 (OUT), TLS handshake, Finished (20):
* SSL connection using TLSv1.3 / TLS_AES_256_GCM_SHA384
* ALPN, server accepted to use http/1.1
* Server certificate:
*  subject: CN=httpstst.com
*  start date: Sep 19 08:26:33 2022 GMT
*  expire date: Sep 16 08:26:33 2032 GMT
*  common name: httpstst.com (matched)
*  issuer: CN=SERVER CA
*  SSL certificate verify ok.
* TLSv1.2 (OUT), TLS header, Supplemental data (23):
> GET / HTTP/1.1
> Host: httpstst.com:12443
> User-Agent: curl/7.81.0
> Accept: */*
>
* TLSv1.2 (IN), TLS header, Supplemental data (23):
* TLSv1.3 (IN), TLS handshake, Newsession Ticket (4):
* TLSv1.2 (IN), TLS header, Supplemental data (23):
* TLSv1.3 (IN), TLS handshake, Newsession Ticket (4):
* old SSL session ID is stale, removing
* TLSv1.2 (IN), TLS header, Supplemental data (23):
* Mark bundle as not supporting multiuse
< HTTP/1.1 200 OK
< Server: openresty/1.21.4.1
< Date: Mon, 19 Sep 2022 09:22:28 GMT
< Content-Type: text/html
< Content-Length: 1097
< Last-Modified: Tue, 02 Aug 2022 08:14:27 GMT
< Connection: keep-alive
< ETag: "62e8dce3-449"
< Accept-Ranges: bytes
<
<!DOCTYPE html>
...
2. openssl 测试
# 注意:一定不要写成 https://0.0.0.0:12443,添加了https://后openssl就识别不了了
openssl s_client -connect 0.0.0.0:12443 -servername httpstst.com
返回:
CONNECTED(00000003)
depth=0 CN = httpstst.com
verify error:num=20:unable to get local issuer certificate
verify return:1
depth=0 CN = httpstst.com
verify error:num=21:unable to verify the first certificate
verify return:1
depth=0 CN = httpstst.com
verify return:1
---
Certificate chain
 0 s:CN = httpstst.com
   i:CN = SERVER CA
   a:PKEY: rsaEncryption, 2048 (bit); sigalg: RSA-SHA256
   v:NotBefore: Sep 19 08:26:33 2022 GMT; NotAfter: Sep 16 08:26:33 2032 GMT
---
Server certificate
-----BEGIN CERTIFICATE-----
MIIDEDCCAfigAwIBAgIUMXdNIxO1jK3nbIzblvdWhCITeAcwDQYJKoZIhvcNAQEL
BQAwFDESMBAGA1UEAwwJU0VSVkVSIENBMB4XDTIyMDkxOTA4MjYzM1oXDTMyMDkx
NjA4MjYzM1owFzEVMBMGA1UEAwwMaHR0cHN0c3QuY29tMIIBIjANBgkqhkiG9w0B
AQEFAAOCAQ8AMIIBCgKCAQEAlXh7Zr6XgSL+PKe7NV4v9LVieyn/n5iGemkmhq0n
opFBO/CcO3uJMkMPvjvtHRO+hC5+qgcuGH8OKcu7jRKKN/AfmX9MPr+Z69OnmV14
R504W8VjdBKyq5pRoTZn8165tDOgEOjw+YNpO8WdPSlcIxhIllq+UDF6S9MVPNcI
7zEyQ+janRfBGy1/y0Q2LRMx0uBqMmO5BfU5n4cu4F40T8cj/DUKUJMxHZnq91eW
N/RSeADsos01itRXSIpgq8sb5ELt1fMDGMizd7tElx8V5rRcAm5KidOQjr6+e9gm
7r3k9rv/OYj/5nID/fVIELivJR0x6rJvEGulMqDbBQvynQIDAQABo1cwVTATBgNV
HSUEDDAKBggrBgEFBQcDATAdBgNVHQ4EFgQUBwmZmXdJ+eervnfi3IVfdhK+YEIw
HwYDVR0jBBgwFoAU0IoGUViHqIg+8lYN72CP3BZKihUwDQYJKoZIhvcNAQELBQAD
ggEBAGl96s7ryBcnNhIADEzkTjIMMk4UHeRS7XvXM2o881uo3FyxQD+R4sLLRRbc
/ZtVVRxOftTQsXKWOx2Ys0l0aozKLExs7woyTwyCz2/HxOtAPG+Z8tqZ1eNF1kAb
ZASVt+biq3r7NG2vNuL1OvOH8GALADl+PpgHybZFZDR3i8I0fRgBWEaxZQE048g8
QtA/T27DR6Ci82yPoES8Bis4pxXJWbGQk9mCy2ZcHRMVo6SXCOFNEvdUEtKYJ6vA
9CoV0xJw8nT8IKD4CE8mNZX+YkwHhYW2YtvUlkAy2FmGsw28XQU/whT5cwNWZIqY
IL9TNZoqSVeKfa85/twdkZCPpHo=
-----END CERTIFICATE-----
subject=CN = httpstst.com
issuer=CN = SERVER CA
---
Acceptable client certificate CA names
CN = ROOT CA
CN = SERVER CA
CN = CLIENT CA
Requested Signature Algorithms: ECDSA+SHA256:ECDSA+SHA384:ECDSA+SHA512:Ed25519:Ed448:RSA-PSS+SHA256:RSA-PSS+SHA384:RSA-PSS+SHA512:RSA-PSS+SHA256:RSA-PSS+SHA384:RSA-PSS+SHA512:RSA+SHA256:RSA+SHA384:RSA+SHA512:ECDSA+SHA224:ECDSA+SHA1:RSA+SHA224:RSA+SHA1
Shared Requested Signature Algorithms: ECDSA+SHA256:ECDSA+SHA384:ECDSA+SHA512:Ed25519:Ed448:RSA-PSS+SHA256:RSA-PSS+SHA384:RSA-PSS+SHA512:RSA-PSS+SHA256:RSA-PSS+SHA384:RSA-PSS+SHA512:RSA+SHA256:RSA+SHA384:RSA+SHA512
Peer signing digest: SHA256
Peer signature type: RSA-PSS
Server Temp Key: X25519, 253 bits
---
SSL handshake has read 1495 bytes and written 424 bytes
Verification error: unable to verify the first certificate
---
New, TLSv1.3, Cipher is TLS_AES_256_GCM_SHA384
Server public key is 2048 bit
Secure Renegotiation IS NOT supported
Compression: NONE
Expansion: NONE
No ALPN negotiated
Early data was not sent
Verify return code: 21 (unable to verify the first certificate)
---
---
Post-Handshake New Session Ticket arrived:
SSL-Session:
    Protocol  : TLSv1.3
    Cipher    : TLS_AES_256_GCM_SHA384
    Session-ID: FAC2FE1D2BC148DDF3DC5E96D1C6AF7FA0B67FD06222C3E6793B0EB6148C51C0
    Session-ID-ctx:
    Resumption PSK: FA224BA78C71AF0DD6B07AA6031162B7EC725733D1392C909A52BB5F99B9A5ADA265DEC5499780F01C91B3EB9D306800
    PSK identity: None
    PSK identity hint: None
    SRP username: None
    TLS session ticket lifetime hint: 300 (seconds)
    TLS session ticket:
    0000 - 4b 15 19 73 67 7e 86 ca-84 e8 40 87 50 2d 53 00   K..sg~....@.P-S.
    0010 - 78 bb ce d3 f8 f8 ad e4-72 8e 16 d0 84 13 f8 ba   x.......r.......
    0020 - e5 91 d3 8d a3 43 a8 fd-16 3e 9d 51 b9 4a 5f f7   .....C...>.Q.J_.
    0030 - 68 6d 21 da 19 97 a4 34-96 9b 1e 39 ed 24 1b 35   hm!....4...9.$.5
    0040 - 1a 70 cb e2 30 81 78 76-96 e7 e1 ba a1 7b a3 5a   .p..0.xv.....{.Z
    0050 - a6 45 d5 b5 a4 e9 26 8d-81 13 02 2a 27 79 77 b5   .E....&....*'yw.
    0060 - cb e3 b1 27 a4 3e 21 26-ac 03 40 3a ca cd 4d c1   ...'.>!&..@:..M.
    0070 - a8 eb 77 9a cb 85 3d 6e-06 38 68 0a 9a f9 c3 1d   ..w...=n.8h.....
    0080 - 2f f6 8d 7d 7f 60 9c fa-d2 27 4f 87 35 cd bb d4   /..}.`...'O.5...
    0090 - ea bb bb 7e 67 79 13 e4-b0 b0 f3 c6 9a 4e 42 94   ...~gy.......NB.
    00a0 - 84 59 a0 d0 57 b7 1a 9e-10 64 d0 19 03 ec 82 b5   .Y..W....d......
    00b0 - d2 ea 1f cd c7 47 46 ea-bb 56 de 23 a1 72 da 7e   .....GF..V.#.r.~
    00c0 - a6 eb 43 b8 28 ad 2c c4-f6 f1 06 13 7d 16 7a 98   ..C.(.,.....}.z.
    00d0 - 7c 31 1d 79 49 e2 f7 c1-d8 0b a4 b6 3d 3b f5 21   |1.yI.......=;.!
    00e0 - 08 17 d0 ae 97 e5 f1 28-85 ad a9 af 1e f5 2b 90   .......(......+.

    Start Time: 1663580120
    Timeout   : 7200 (sec)
    Verify return code: 21 (unable to verify the first certificate)
    Extended master secret: no
    Max Early Data: 0
---
read R BLOCK
---
Post-Handshake New Session Ticket arrived:
SSL-Session:
    Protocol  : TLSv1.3
    Cipher    : TLS_AES_256_GCM_SHA384
    Session-ID: E3E46FCF4E0C92288EB8B4E018E7E0E3CC535D5C9588F5C0C7806082B259774A
    Session-ID-ctx:
    Resumption PSK: 42AEDC7D3BD9782ABD2BA44766111E912CE57E91A865A070B184C593FF9FF3397A1ED5F3D8759F733874FEF5A5A6F5CE
    PSK identity: None
    PSK identity hint: None
    SRP username: None
    TLS session ticket lifetime hint: 300 (seconds)
    TLS session ticket:
    0000 - 4b 15 19 73 67 7e 86 ca-84 e8 40 87 50 2d 53 00   K..sg~....@.P-S.
    0010 - d4 b9 a2 5c 24 bf ac 7a-2b ad 04 b1 b8 51 80 af   ...\$..z+....Q..
    0020 - cf 7d 7d c3 6e 05 5d bb-68 d7 28 40 ef 81 30 da   .}}.n.].h.(@..0.
    0030 - da e0 fd 75 17 00 5c d2-69 2a 62 0d e9 45 c6 79   ...u..\.i*b..E.y
    0040 - 52 46 8a 1d f5 19 cc c0-e8 bc 9a da e4 b7 f3 05   RF..............
    0050 - be 8c bc 1c ac c0 5b 6b-33 b9 b3 3d b1 15 c4 9f   ......[k3..=....
    0060 - 66 bb d7 c1 5b c3 39 72-c0 5e 22 fb 05 36 28 dc   f...[.9r.^"..6(.
    0070 - 15 9a 32 c5 2a cc 43 e1-0d 19 0c 45 98 d1 eb 80   ..2.*.C....E....
    0080 - b7 7f 12 d2 bc 00 28 7b-79 9c 9c ae 27 d3 b0 0a   ......({y...'...
    0090 - 95 9d 1d d3 cf 5b b0 7a-7e 74 68 43 a4 2d ce bb   .....[.z~thC.-..
    00a0 - 5b 41 74 7c 00 38 58 02-3f 70 24 0c 14 a8 7f 7f   [At|.8X.?p$.....
    00b0 - 85 55 0e 82 56 87 db e1-9e f3 c7 d9 3c db 37 6e   .U..V.......<.7n
    00c0 - d4 5c 0c e8 95 1c 06 f0-87 26 af 6b 43 04 a0 ca   .\.......&.kC...
    00d0 - cb 75 04 c9 88 75 2a eb-b8 dd c7 37 5e d2 e3 d2   .u...u*....7^...
    00e0 - 85 8d 8b 82 33 85 ba f0-04 06 79 03 0c e4 b4 4e   ....3.....y....N

    Start Time: 1663580120
    Timeout   : 7200 (sec)
    Verify return code: 21 (unable to verify the first certificate)
    Extended master secret: no
    Max Early Data: 0
---
read R BLOCK
还可以用
openssl s_client -host 0.0.0.0 -port 12443
3. 使用postman测试
使用postman在win10上进行测试,需要手动配置域名解析:
进入目录 C:\Windows\System32\drivers\etc
使用管理员权限编辑 hosts文件,添加一行:
你的ubuntu系统的ip httpstst.com
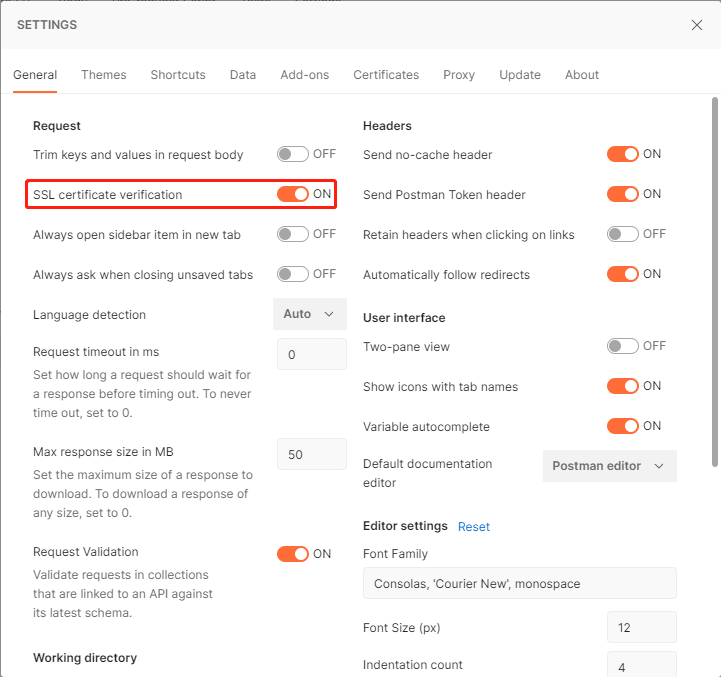
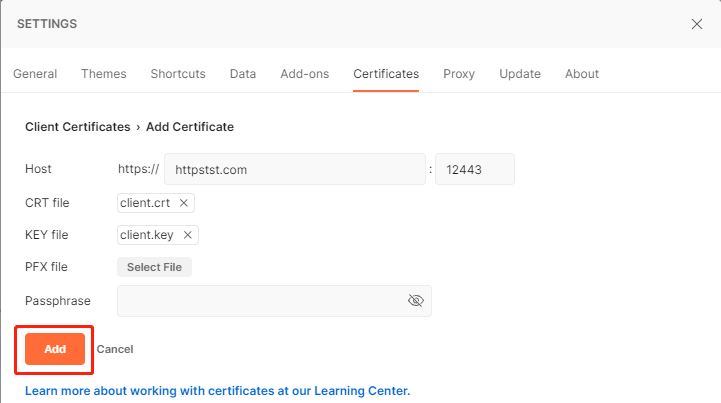
打开postman,点击右上角配置
打开ssl证书验证
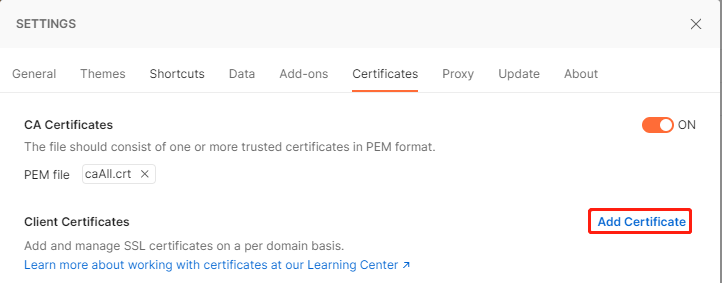
配置ca证书链

配置客户端公私钥
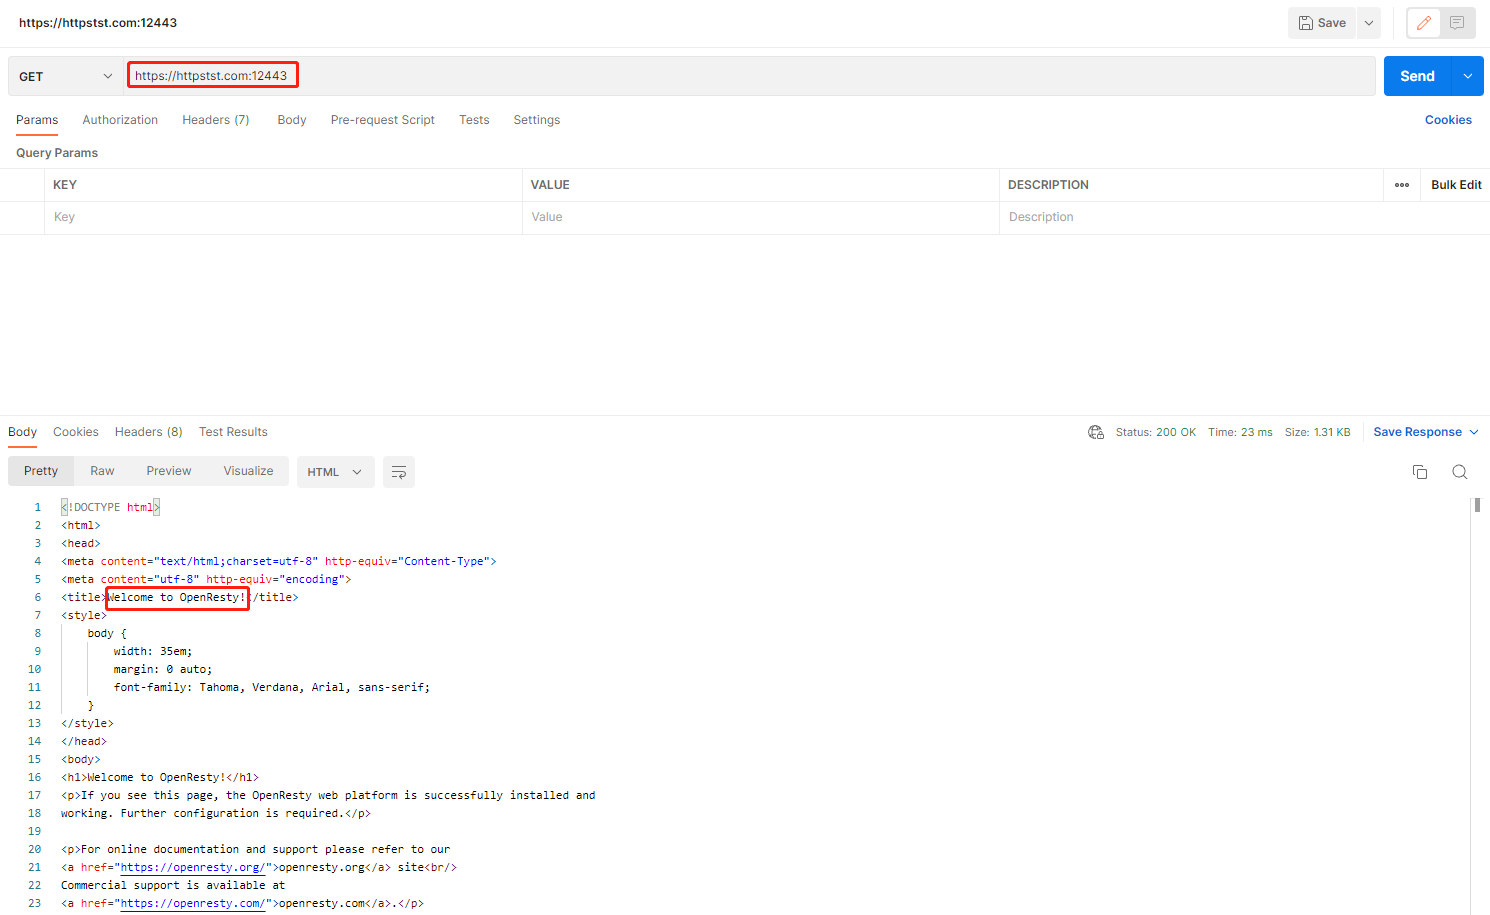
配置号证书后,对地址https://httpstst.com发送get请求:
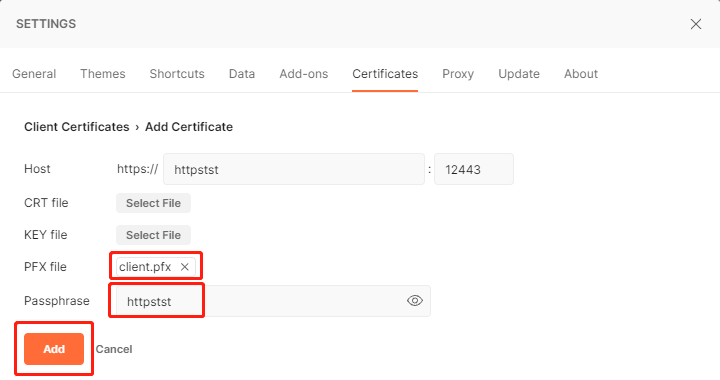
另一种配置,使用 openssl 将 client.crt 和 client.key 打包为 pkcs12 格式的 client.pfx, 导入到postman
(生成.pfx文件或.p12文件需要配置密码,我这里配置的是 httpstst,postman想使用.pfx也要填好密码)
openssl pkcs12 -export -in client.crt -inkey client.key -out client.pfx
4. 使用火狐浏览器验证
rm client.pfx
openssl pkcs12 -export -in client.crt -inkey client.key -out client.pfx
打开火狐浏览器->设置->搜索"证书"
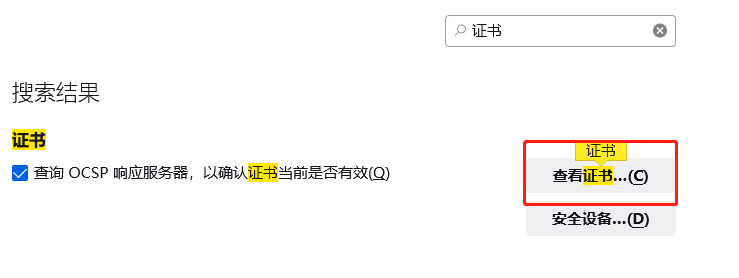
点击查看证书->导入->导入自己的clinet.pfx
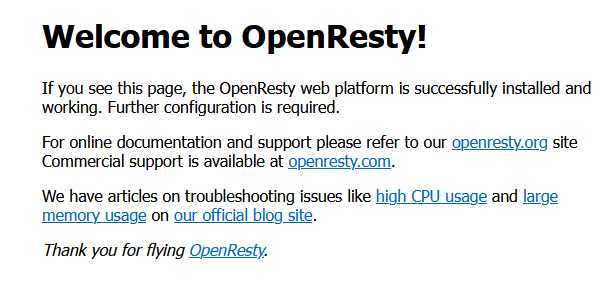
在浏览器网页输入:https://httpstst.com:12443访问,如果显示证书不安全,点击高级选项跳过验证,就可以看到:
5. python程序验证
运行环境:win10
运行程序:python3.8
程序如下:
# -*- coding:utf8 -*-
# python3 https client demo

import urllib.request

import ssl

if __name__ == '__main__':
    CA_FILE = "caAll.crt"
    KEY_FILE = "client.key"
    CERT_FILE = "client.crt"

    context = ssl.SSLContext(ssl.PROTOCOL_TLS)
    context.check_hostname = False
    context.load_cert_chain(certfile=CERT_FILE, keyfile=KEY_FILE)
    context.load_verify_locations(CA_FILE)
    context.verify_mode = ssl.CERT_REQUIRED
    try:
        # 通过request()方法创建一个请求:
        request = urllib.request.Request('https://httpstst.com:12443')
        res = urllib.request.urlopen(request, context=context)
        print(res.code)
        print(res.read().decode("utf-8"))
        print(vars(res))
    except Exception as ex:
        print("Found Error in auth phase:%s" % str(ex))
返回值:
200
<!DOCTYPE html>
<html>
<head>
<meta content="text/html;charset=utf-8" http-equiv="Content-Type">
<meta content="utf-8" http-equiv="encoding">
<title>Welcome to OpenResty!</title>
<style>
    body {
        width: 35em;
        margin: 0 auto;
        font-family: Tahoma, Verdana, Arial, sans-serif;
    }
</style>
</head>
<body>
<h1>Welcome to OpenResty!</h1>
<p>If you see this page, the OpenResty web platform is successfully installed and
working. Further configuration is required.</p>

<p>For online documentation and support please refer to our
<a href="https://openresty.org/">openresty.org</a> site<br/>
Commercial support is available at
<a href="https://openresty.com/">openresty.com</a>.</p>
<p>We have articles on troubleshooting issues like <a href="https://blog.openresty.com/en/lua-cpu-flame-graph/?src=wb">high CPU usage</a> and
<a href="https://blog.openresty.com/en/how-or-alloc-mem/">large memory usage</a> on <a href="https://blog.openresty.com/">our official blog site</a>.
<p><em>Thank you for flying <a href="https://openresty.org/">OpenResty</a>.</em></p>
</body>
</html>

{'fp': None, 'debuglevel': 0, '_method': 'GET', 'headers': <http.client.HTTPMessage object at 0x000002550BE8ECA0>, 'msg': 'OK', 'version': 11, 'status': 200, 'reason': 'OK', 'chunked': False, 'chunk_left': 'UNKNOWN', 'length': 0, 'will_close': True, 'code': 200, 'url': 'https://httpstst.com:12443'}
6. java
java验证不做详述,具体过程是:将客户端的公钥证书和私钥存为keystore,将ca证书循环加载存入另一个trust ksystore,然后通过ssl传给http,一定要把ca证书链全部加载。
参考
[1]. Podman run -v /HOST-DIR:/CONTAINER-DIR:Z详解
[2]. Nginx的双向认证
[3]. 巧用 Nginx 快速实现 HTTPS 双向认证
[4]. 使用OpenSSL创建多级CA证书链签发证书并导出为pkcs12/p12/pfx文件
[5]. OpenSSL自建CA和签发二级CA及颁发SSL证书
[6]. 使用OpenSsl自己CA根证书,二级根证书和颁发证书(亲测步骤)


【推荐】国内首个AI IDE,深度理解中文开发场景,立即下载体验Trae
【推荐】编程新体验,更懂你的AI,立即体验豆包MarsCode编程助手
【推荐】抖音旗下AI助手豆包,你的智能百科全书,全免费不限次数
【推荐】轻量又高性能的 SSH 工具 IShell:AI 加持,快人一步
· TypeScript + Deepseek 打造卜卦网站:技术与玄学的结合
· 阿里巴巴 QwQ-32B真的超越了 DeepSeek R-1吗?
· 如何调用 DeepSeek 的自然语言处理 API 接口并集成到在线客服系统
· 【译】Visual Studio 中新的强大生产力特性
· 2025年我用 Compose 写了一个 Todo App