ubuntu20使用php+apache+adminer搭建mysql网页管理工具
前言
使用 php7+apache2+adminer 搭建网页版mysql管理工具,现将自己的搭建过程记录下来,留作后续参考。可参考其中配置,由于只配置了一次环境,可能有的步骤是多余的,后续可能会修改,全部过程尚未完备,请谨慎参考。
搭建过程
-
安装 mysql 数据库
这一步可参考网上教程,此处不做详解 -
安装 apache
sudo apt-get update
sudo apt-get install apache2
ubuntu桌面版的此步骤安装完毕后,就可以打开网页 http://localhost 访问了。
我是使用的阿里云的服务器,安装时提示 80 端口被占用,于是尝试修改 apache 配置文件:/etc/apache2/port.conf,把端口自定义为:10080
在阿里云上添加可访问端口号:10080
重启 apache 服务:sudo /etc/init.d/apache2 restart
这时候,在浏览器输入:http://服务器IP:10080 ,就可以访问 apache 的页面了
apache2 默认的站点根目录: /var/www/html , /var/www/html默认是只读的,为了能在里面新建文件夹或者文件,修改访问的权限:
cd /var/www
chmod 777 html
apache 服务相关:
重启apache服务:sudo /etc/init.d/apache2 restart
开启apache服务:sudo /etc/init.d/apache2 start
关闭apache服务:sudo /etc/init.d/apache2 stop
- 安装php
(1). 安装libapache2-mod-php7.0 依赖:
sudo apt-get install software-properties-common
sudo add-apt-repository ppa:ondrej/php
sudo apt update
(2). 安装 libapache2-mod-php7.0:
sudo apt-get install libapache2-mod-php7.0
(3). 安装php7:
sudo apt-get install php7.0
(4). 在 /var/www/html里新建文件 index.php:
<?php

phpinfo()

?>
(5). 重启apache服务:
sudo /etc/init.d/apache2 start
在浏览器输入:http://服务器IP:10080/index.php
访问成功,安装成功
-
增加php对mysql的支持:
sudo apt-cache search php7
重启apache服务:sudo /etc/init.d/apache2 restart
打开服务器 http://IP:10080/index.php 可以看见mysql关模块 -
安装扩展:
sudo apt-get -y install php7.0-fpm php7.0-mysql php7.0-curl php7.0-json php7.0-mbstring php7.0-xml php7.0-intl php7.0-odbc php7.0-cgi -
安装 phpmyadmin
ps:这一步应该是安装另一个管理工具phpmyadmin, 我一直没有配置成功,现在记录下来,留作参考:
sudo apt-get install phpmyadmin -
安装 adminer
sudo apt-get install adminer
激活:sudo a2enconf adminer.conf
配置文件目录:/etc/apache2/conf-enabled/adminer.conf
重启使得生效:sudo systemctl reload apache2 -
访问页面
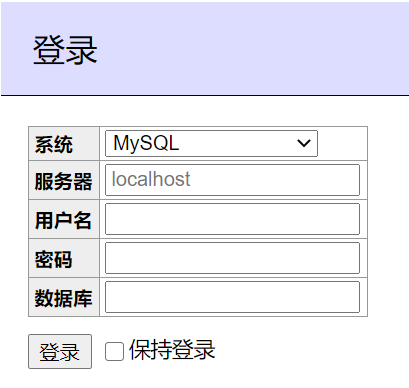
访问页面:https://ip:10080/adminer
此时,可能会出现页面输入数据库密码后登录不上的问题:
"The server requested authentication method unknown to the client"
需要修改数据库:
mysql -uroot -p
use mysql;
select user,host from user
找到root对应的host,我的是 %
ALTER USER 'root'@'root对应的host' IDENTIFIED WITH mysql_native_password BY '你的密码';
更新:FLUSH PRIVILEGES;
退出mysql后,修改mysql配置文件:
我的在 /etc/mysql/mysql.conf.d/mysqld.cnf 添加一行:default_authentication_plugin=mysql_native_password
重启mysql:
sudo /etc/init.d/mysql restart
再次通过页面 https://ip:10080/adminer 登录数据库,就可以了
后记:
再次重复上述过程时,发现了个问题,现在描述如下:
- apt install adminer 方法
我在ubuntu18上尝试使用这个方法安装时,会新建/etc/adminer和/usr/share/adminer文件夹,其中/etc/adminer目录下是空的,/usr/share/adminer目录下没有adminer.php文件,需要自己运行
compile.php构建adminer-4.6.2.php文件
(1).
cd /usr/share/adminer/
./compile.php
mv adminer-4.6.2.php adminer.php
# 编译的时候出现了很多 Missing function,目前不知道原因,但最终还是编出来了
(2).
cd /etc/adminer/
touch conf.php
使用vi编辑conf.php
<?php

define('ADMINER_DIR', '/usr/share/adminer');

function adminer_object() {
    // required to run any plugin
    include_once ADMINER_DIR . "/plugins/plugin.php";

    // autoloader
    foreach (glob(ADMINER_DIR . "/plugins/*.php") as $filename) {
        include_once $filename;
    }

    $plugins = array(
        // specify enabled plugins here
        new AdminerVersionNoverify(), // disable phoning home
        //new AdminerLoginServers([
        //    'my' => ['server' => 'localhost', 'driver' => 'server'], // mysql
        //    'pg' => ['server' => 'localhost', 'driver' => 'pgsql'],
        //]),
    );

    /* It is possible to combine customization and plugins:
    class AdminerCustomization extends AdminerPlugin {
    }
    return new AdminerCustomization($plugins);
    */

    return new AdminerPlugin($plugins);
}

include ADMINER_DIR . "/adminer.php";
?>
(3).
cd /etc/apache2/conf-available/
touch adminer.conf
apache2的配置文件都在conf-available中,运行激活配置文件指令时,会在conf-enabled文件中建立前者的软连接
使用vi编辑adminer.conf
Alias /adminer /etc/adminer

<Directory /etc/adminer>
        Require all granted
        DirectoryIndex conf.php
</Directory>
(4). 激活adminer配置,重启apache
sudo a2enconf adminer.conf
sudo systemctl reload apache2
(停用配置:
sudo a2disconf adminer.conf && systemctl reload apache2)
(5). 访问http://服务器ip地址:端口号/adminer/
出现了久违的adminer页面

- 更简单的方法
不需要apt安装adminer,只需要从adminer官网下载adminer.php文件到/var/www/html/目录下,就可以直接使用。
cd /var/www/html/
wget https://github.com/vrana/adminer/releases/download/v4.8.1/adminer-4.8.1.php
mv adminer-4.8.1.php adminer.php
在浏览器输入:http://服务器ip地址:端口号/adminer.php
就可以直接调用adminer工具
或者不用改名,直接调用http://服务器ip地址:端口号/adminer-4.8.1.php
- 问题
adminer是一个十分强大的工具,可以连接多种数据库,但需要安装相应的php插件
我想连接本地的sqlite3数据库,使用adminer页面会先报错:当前的php不支持sqlite,需要安装插件:
sudo apt install php7.0-sqlite3
# 刷新
sudo apt-cache search php7
# 重启apache
sudo systemctl reload apache2
这时候,再次尝试连接sqlite数据库,4.6.2版本报错:
Implement login() method to use SQLite.
4.8.1版本报错:
Adminer默认不支持访问没有密码的数据库,详情见这里.
根据官网提示:
Adminer 4.6.3 and newer does not support accessing a database without a password.
为了保证安全,adminer从4.6.3以后,不支持登录一个不设密码的数据库,如果想要登录sqlite,需要修改adminer.php或添加插件
当然,连接mysql是没有问题的。至于sqlite3 应该会有解决方案,但留给以后探索吧~
我的解决方案,安装如下版本的adminer.php
cd /var/www/html/
wget https://files.cnblogs.com/files/brian-sun/adminer4.2.2.zip?t=1646390641 -O adminer.zip
unzip adminer.php
数据库位置填写sqlite数据库文件的绝对路径
如果打开sqlite3数据库时提示无效数据库,大概率是数据库所在文件夹没有权限,可以把数据库文件放到 /var/www/html/目录下,或者新建一个文件夹,把数据库文件放到里面,然后给文件夹赋予最高权限。
[参考]
https://blog.csdn.net/lhtzbj12/article/details/75736013
https://blog.csdn.net/zhongbaosheng/article/details/114599093
https://blog.csdn.net/qq_40147863/article/details/83187917
https://blog.csdn.net/weixin_28738165/article/details/116397815
https://www.yundongfang.com/Yun40924.html


【推荐】国内首个AI IDE,深度理解中文开发场景,立即下载体验Trae
【推荐】编程新体验,更懂你的AI,立即体验豆包MarsCode编程助手
【推荐】抖音旗下AI助手豆包,你的智能百科全书,全免费不限次数
【推荐】轻量又高性能的 SSH 工具 IShell:AI 加持,快人一步
· .NET Core 中如何实现缓存的预热?
· 从 HTTP 原因短语缺失研究 HTTP/2 和 HTTP/3 的设计差异
· AI与.NET技术实操系列:向量存储与相似性搜索在 .NET 中的实现
· 基于Microsoft.Extensions.AI核心库实现RAG应用
· Linux系列:如何用heaptrack跟踪.NET程序的非托管内存泄露
· TypeScript + Deepseek 打造卜卦网站:技术与玄学的结合
· 阿里巴巴 QwQ-32B真的超越了 DeepSeek R-1吗?
· 如何调用 DeepSeek 的自然语言处理 API 接口并集成到在线客服系统
· 【译】Visual Studio 中新的强大生产力特性
· 2025年我用 Compose 写了一个 Todo App