Pytest自动化框架
一、Pytest介绍
官网:https://docs.pytest.org/en/7.1.x/
——Pytest是一个测试用例的管理框架,在Unitest基础上做的一个全面的升级.
- 集成度更高,而且更加灵活的一个测试框架(测试用例开头不想使用test打头,可进行自定义)
- 运行的顺序是自上而下,不是像Unitest是根据字母来进行执行
- 全程都是基于指令的形式来运行(通过指令就可以直接生成测试报告)
- 可以直接使用Unitest
- Pytest默认规则是:寻找当前路径下所有的文件与子文件中以test开头或是结尾的文件夹、文件、函数作为识别对象,所以我们在创建Python模块时以及命名函数时,都需要是【test开头或是结尾】,不然则不会被识别到
- Pytest默认不输出任何打印信息,如果要看打印信息,需要在运行时添加 “ -s ” 的指令
- 多条指令一同运行时,需要通过 空格 进行区分,在 main 函数中,是通过 逗号 来分割
- -v 用于详细显示日志信息是否通过
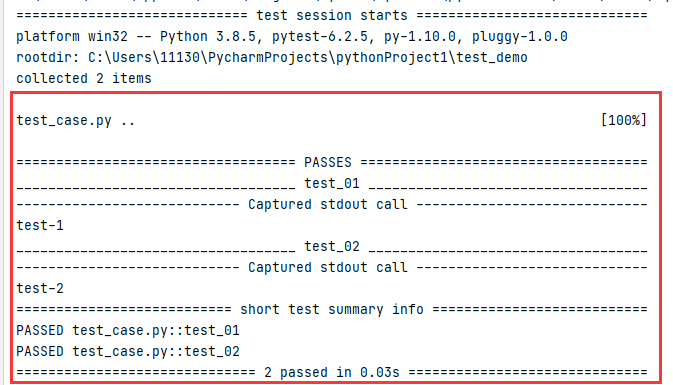
- -rA 测试结果的简单统计
-
-q 只显示运行结果以及时间
- 预置函数: 一般可以通过一个配置文件直接进行管理,配置文件命名一定要是 conftest.py(不能是其他的),用于前期的数据准备,如:可把获取token放入到预置函数中
- fixture是pytest中的一大利器
二、Pytest环境部署
pip install pytest
三、操作使用
import pytest


def test_01():
    print('test-1')

def test_02():
    print('test-2')

if __name__ == "__main__":
    pytest.main()       #不会打印出信息
    pytest.main(['-s']) #可以直接打印出信息
结果:

我们可以从结果中看出,并没有打印出信息,如果相关查看打印信息,可在【输出结果栏】中的“Terminal"中,进入此路径下,输入命令:pytest -s运行

- 多个test文件、函数,指定自定义运行
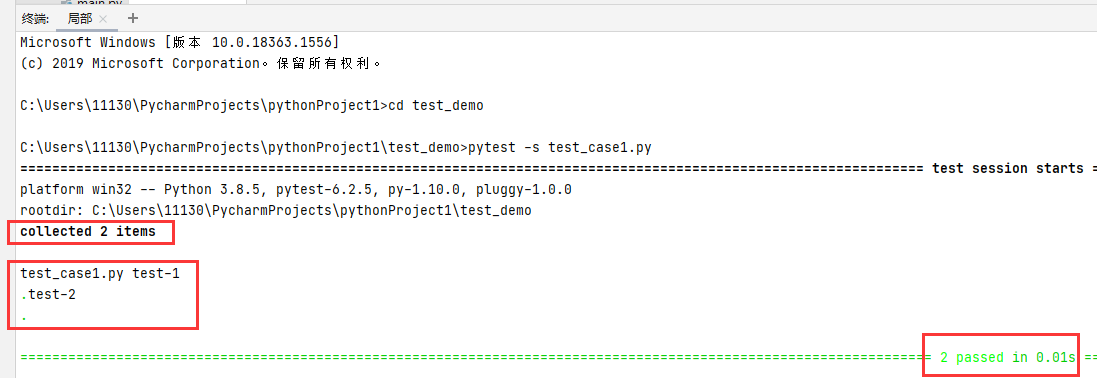
(1)运行指定的 .py模块,可在【输出结果栏】中的“Terminal"中,进入此路径下,输入命令:pytest -s test_case1.py
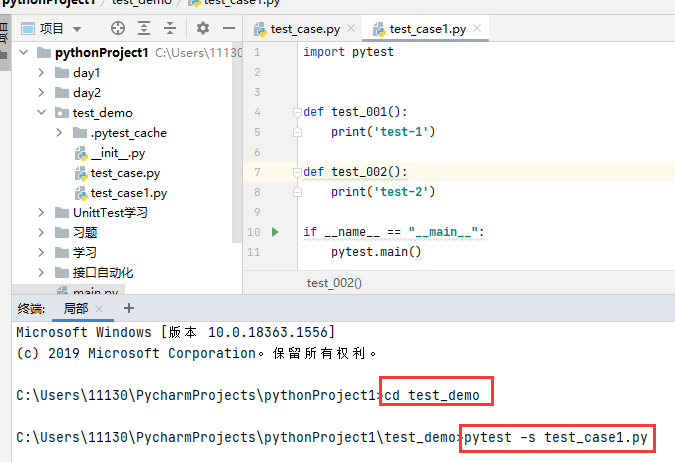
结果:
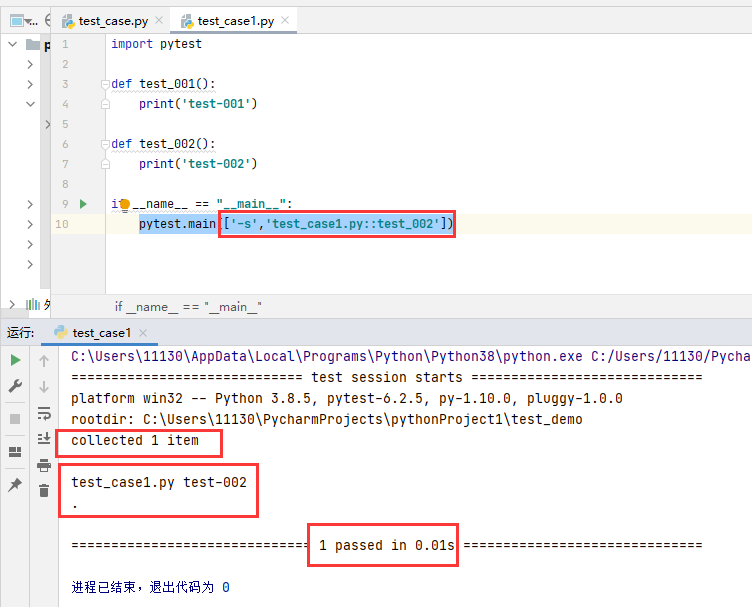
(2)运行 .py模块下某个函数,可在【输出结果栏】中的“Terminal"中,进入此路径下,输入命令:pytest -s test_case1.py::test_002

结果:

方法二:代码中指定:pytest.main(['-s','test_case1.py::test_002'])
(3)指定 .py模块下例运行哪几个,以及指定运行顺序,可在【输出结果栏】中的“Terminal"中,进入此路径下,输入命令:pytest -s test_case1.py::test_002 test_case1.py::test_001

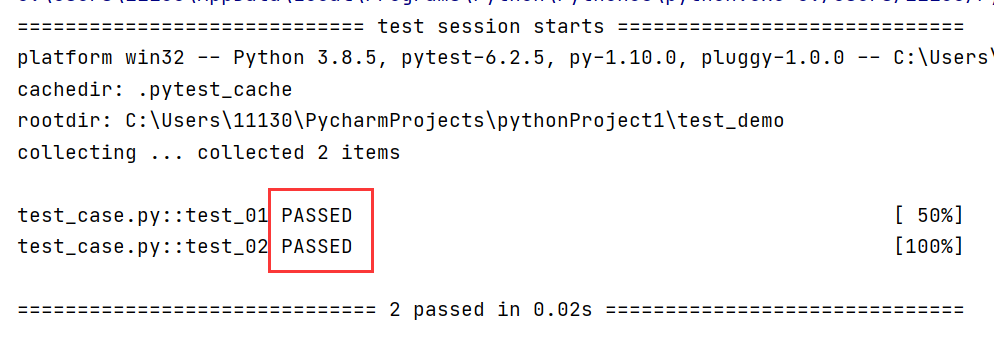
(4)"-V " 打印出用例是否通过结果
import pytest

def test_01():
    print('test-1')

def test_02():
    print('test-2')

if __name__ == "__main__":
    pytest.main(['-v']) # "-V"会打印出用例是否通过结果
结果:
(5)mian中命令,可放在一起写,如:
import pytest

def test_01():
    print('test-1')

def test_02():
    print('test-2')

if __name__ == "__main__":
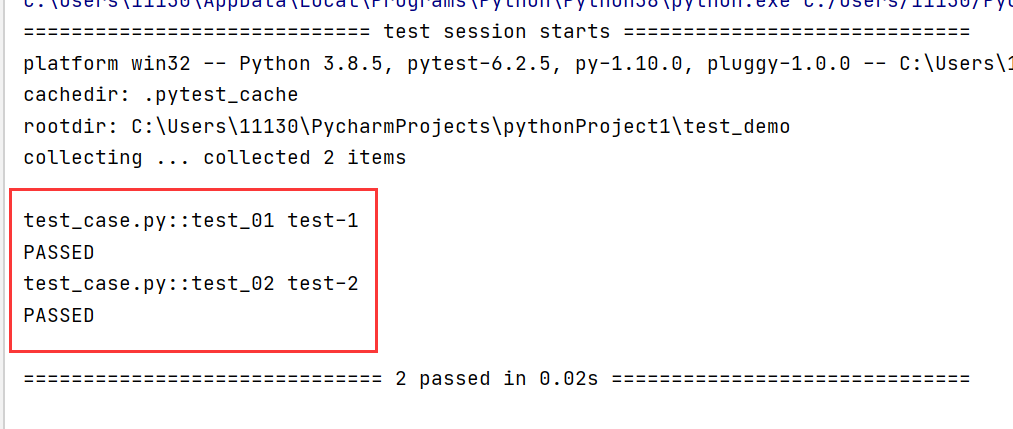
    pytest.main(['-sv'])
结果:
(6) -rA 测试结果的简单统计
import pytest

def test_01():
    print('test-1')

def test_02():
    print('test-2')

if __name__ == "__main__":
    pytest.main(['-rA'])
结果:
(7)-q 只显示运行结果以及时间
import pytest

def test_01():
    print('test-1')

def test_02():
    print('test-2')

if __name__ == "__main__":
    pytest.main(['-q'])
结果:

四、配置文件 conftest.py 中 fixture 的使用:
(1)基本使用
-
conftest.py
import pytest

#预置函数
@pytest.fixture() #装饰器
def keep():
    print('坚持下去!!!')
-
在test_case.py中执行代码
import pytest

def test_01(keep):
    print('test-1')

def test_02():
    print('test-2')

if __name__ == "__main__":
    pytest.main(['-s'])
结果:
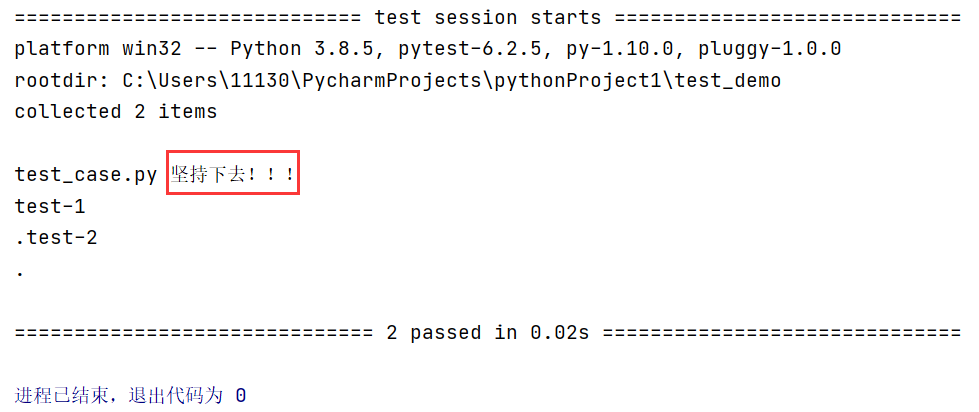
我们可以看出,是相当于把 conftest.py 中的预置函数keep传给了 test_case.py中的 test_01函数,执行代码时,首先运行的conftest.py 中的预置函数keep,然后在依次执行的test_case.py中的2个函数。
(2)断言操作
-
conftest.py
import pytest

@pytest.fixture()
def keep01():
    return 1
-
在test_case.py中执行代码
import pytest

def test_01(keep01):
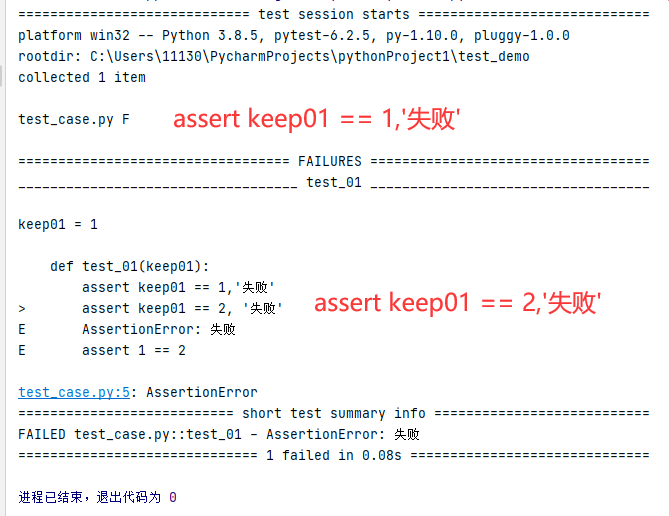
    assert keep01 == 1,'失败'
    assert keep01 == 2, '失败'


if __name__ == "__main__":
    pytest.main(['-s'])
结果:
(3)fixture中scope参数定义的4种等级(默认等级是funtion):
- session:在本次session级别中只执行一次(说的是运行结果中标题显示的:==test session starts==)
- module: 在模块级别中只执行一次,就是说在第一个模块运行一次就可以了,之后的模块在使用,直接取就可以了
- class:在类级别中执行一次
- funtion:在函数级别中执行,每有一个函数就执行一次
-
conftest.py
import pytest

@pytest.fixture(scope='session') #字符串中还可以是:module、class、funtion
def keep01():
    return 1
五、前置、后置条件
-
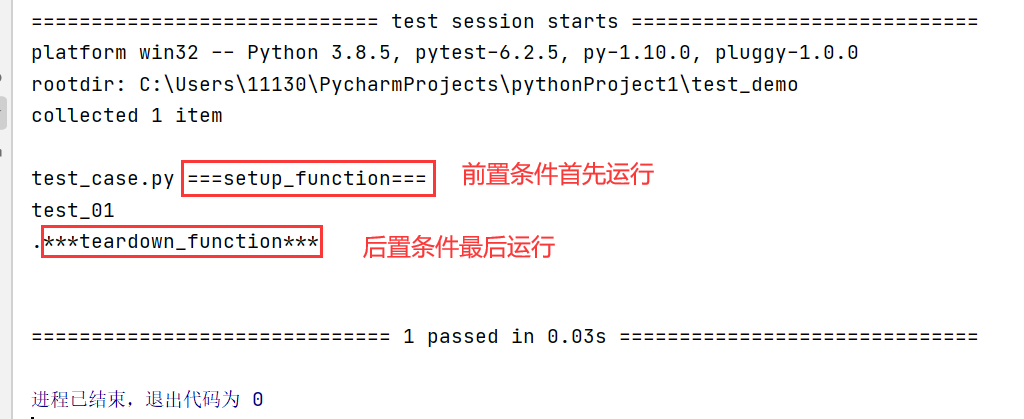
setup_function、teardown_function
import pytest

#前置、后置条件
def setup_function():
    print('===setup_function===')

def teardown_function():
    print('***teardown_function***')

def test_01(keep01):
    print('test_01')

if __name__ == "__main__":
    pytest.main(['-s'])
结果:
-
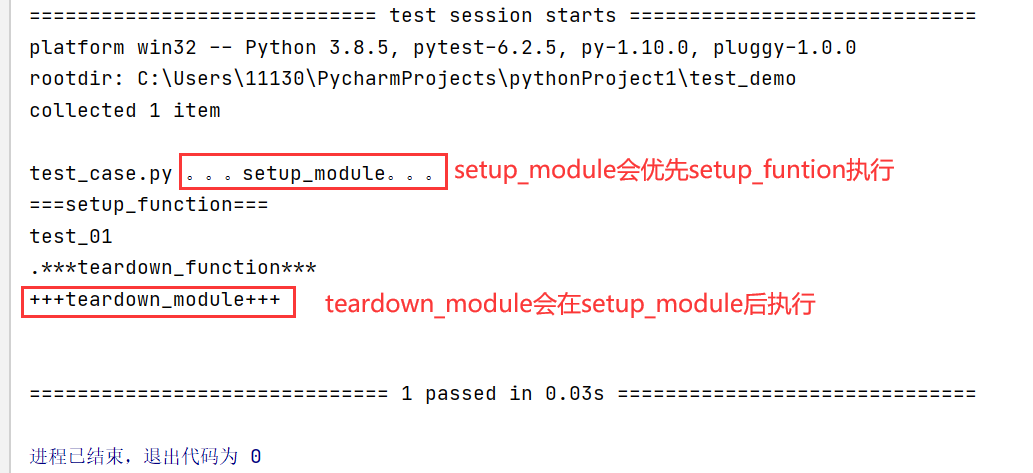
setup_module、teardown_module
import pytest

#前置、后置条件,函数名字是固定写法,不可以自定义
def setup_function():
    print('===setup_function===')

def teardown_function():
    print('***teardown_function***')

def setup_module():
    print('。。。setup_module。。。')

def teardown_module():
    print('+++teardown_module+++')

def test_01(keep01):
    print('test_01')

if __name__ == "__main__":
    pytest.main(['-s'])
结果:
六、类的使用
import pytest

#前置、后置条件
def setup_function():
    print('===setup_function===')

def teardown_function():
    print('***teardown_function***')

def setup_module():
    print('。。。setup_module。。。')

def teardown_module():
    print('+++teardown_module+++')

#pytest中class对象的定义:建议以test开头,不需要继承了
class TestDemo:
    def test_d1(self):
        print('类===test_d1===')

    def test_d2(self):
        print('类***test_d2***')


def test_01(keep01):
    print('普通函数test_01')

if __name__ == "__main__":
    pytest.main(['-s'])
结果:
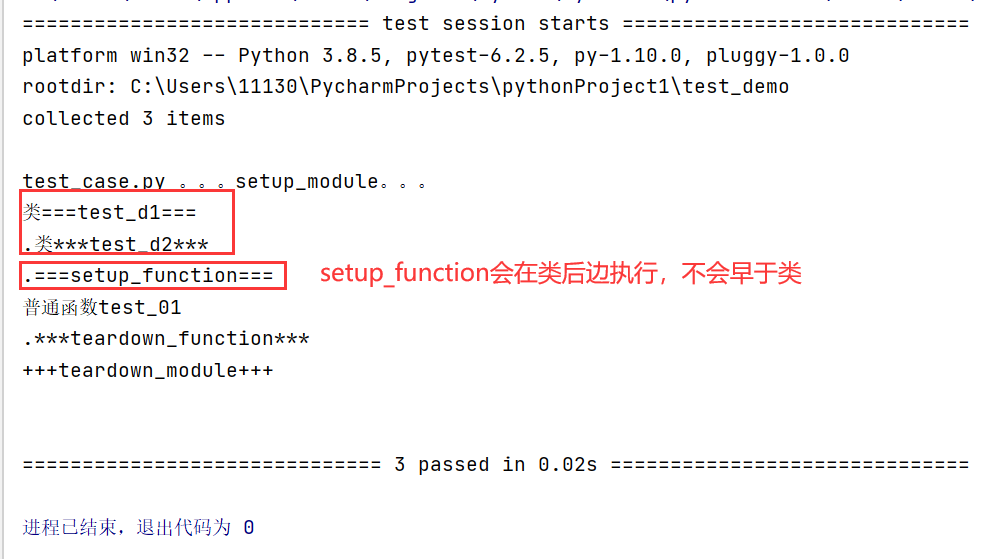
* 我们从结果可以看出setup_function晚于类执行,在类里面是没有执行setup_function的。也就是说在类外边定义的setup_function,只能在类外边起作用,在类里面不起作用。
-
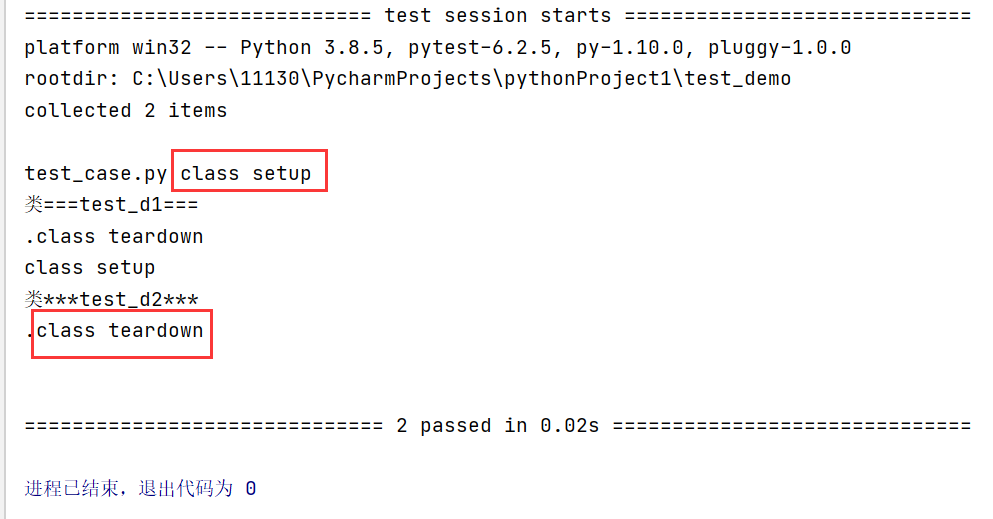
在类里面使用setup、teardown
import pytest

class TestDemo:
    def setup(self):
        print('class setup')

    def teardown(self):
        print('class teardown')

    def test_d1(self):
        print('类===test_d1===')

    def test_d2(self):
        print('类***test_d2***')

if __name__ == "__main__":
    pytest.main(['-s'])
结果:
-
在类里面使用setup、teardown、setup_class、teardown_class、setup_metchod、teardown_metchod
import pytest

#前置、后置条件
class TestDemo:
    def test_001(self):
        print('类:test_001')
    def setup(self):
        print('类:setup')

    def teardown(self):
        print('类:teardown')

    def setup_class(self):
        print('类===setup_class===')

    def teardown_class(self):
        print('类***teardown_class***')

    def setup_method(self):
        print('类===setup_method===')

    def teardown_method(self):
        print('类***teardown_method***')

if __name__ == "__main__":
    pytest.main(['-s'])
结果:
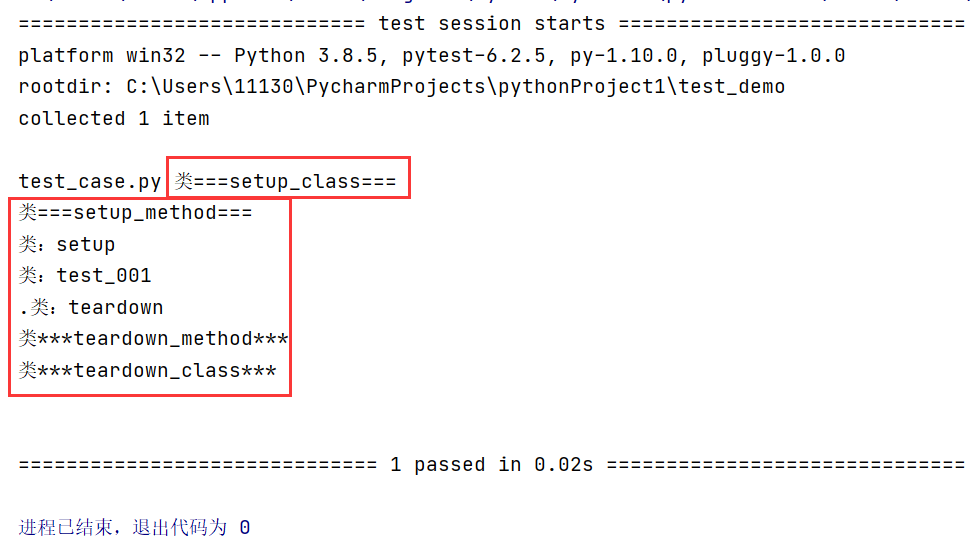
- 在class中 前置、后置 函数的运行顺序:
- setup class
- setup method
- setup
- teardown
- teardown methon
- teardown class
七、pytest中用例的管理手段:mark
——可以通俗的理解为:是一个批量管理工具,标记好了,就可以批量的运行标记为一样的用例了。
- 可以通过mark装饰器对所有的用例进行标记,不同的标记区分进行管理
- 在一个py文件还是多个py文件都会生效
(1)运行一种被标记的用例
import pytest

@pytest.mark.webui
def test_01():
    print('web01')

@pytest.mark.webui
def test_02():
    print('web02')

@pytest.mark.app
def test_03():
    print('app01')

@pytest.mark.app
def test_04():
    print('app02')

if __name__ == "__main__":
    pytest.main(['-s','test_case2.py','-m webui']) # -m webui:指定运行是webui的用例
结果:

(2)用例被@pytest.mark标记多个时,运行其中一种被标记的用例
import pytest

@pytest.mark.webui
def test_01():
    print('web01')

@pytest.mark.webui
def test_02():
    print('web02')

@pytest.mark.app
@pytest.mark.temp
def test_03():
    print('app01')

@pytest.mark.app
@pytest.mark.temp
def test_04():
    print('app02')

if __name__ == "__main__":
    pytest.main(['-s','test_case2.py','-m temp']) # -m webui:指定运行是webui的用例
结果:

(2)同时运行多个不同的被标记种类,-m name1,neme2
pytest.main(['-s','test_case2.py','-m app,webui'])
八、运行方式:
1、命令行模式
通过标记表达式执行
pytest -m demo
这条命令会执行被装饰器@pytest.mark.demo装饰的所有测试用例

生成html报告:
pytest -m demo --html=Report/report.html

生成xml报告:
pytest -m demo --junitxml=Report/report.xml

运行指定模块:
pytest -m demo --html=Report/report.html TestCases/test_pytest.py

运行指定测试目录
pytest -m demo --html=Report/report.html TestCases/

通过节点id来运行:
pytest TestCases/test_pytest.py::TestDemo::test_demo01

通过关键字表达式过滤执行
pytest -k "MyClass and not method"
这条命令会匹配文件名、类名、方法名匹配表达式的用例

获取用例执行性能数据
获取最慢的10个用例的执行耗时
pytest --durations=10
2、新建run.py文件运行,代码如下:
pytest.main(["-m","demo","--html=Report/report.html"])
九、pytest框架下的核心配置文件 pytest.ini
——配置在工程的根目录下,可以全局生效
import pytest

@pytest.mark.webui
def test_01():
    print('web01')

@pytest.mark.webui
def test_02():
    print('web02')

@pytest.mark.interface
def test_03():
    print('interface01')

@pytest.mark.interface
def test_04():
    print('interface02')

if __name__ == "__main__":
    pytest.main(['-s','test_case2.py'])
-
pytest.ini
——ini 文件的名称必须是pytest.ini,代码中所标黄名称必须这样定义,不可为其他的,否则不起作用
[pytest]

#标签
markers =
   webui: automation for web ui   #冒号后边是标签的注释
   interface: automation for interface
   temp: just for fun

#定义到pytest中,读取哪一些py文件,作为pytest的识别对象
python_files = cema*.py  test*.py

#配置后,会根据指定的 cema*,运行代码时,只会执行cema打头的py文件
#添加多个,逗号隔开,可继续添加


#定义到pytest中,读取哪一些类,作为pytest的识别对象
python_classes = Cema*

#配置后,类名为开头Cema的类,就可以正常被识别到执行了


#指定运行的路径,可以为绝对路径和相对路径
testpaths = cema_case2.py ./


#指定运行的函数名
python_functions = vip*  test* #单独配置后,只会运行vip开头的函数;空格间隔,可配置多个


#打印信息显示Passed通过/Failed不通过
log_cli = True
#log_cli 和 -v的区别:
#log_cli会把测试用例的执行显示的更加完善,会显示哪个py文件下哪个类哪个函数,如:test_case.py::TestDemo::test_001 类:test_001
PASSED
# -v 会把【test session starts】打印信息中的信息更加的全面


#配置命令
addopts = -s -v #配置后,工程py文件下都可使用,pytest.main()中可不用在写命令
十、断言机制
- conftest.py
import pytest

@pytest.fixture(scope='session') #字符串中还可以是:module、class、funtion
def keep(): # 预先配置下
    return 1
- pytest.ini
[pytest]

markers =
   webui: automation for web ui
   interface: automation for interface
   temp: just for fun

python_files = cema*.py

#python_classes = Test*

estpaths = cema_case2.py

python_functions = test*

log_cli = True

addopts = -s
- cema_case.py——【返回通过】的用例
import pytest

@pytest.mark.webui
def test_01(keep):
    assert keep == 1,"成功"

if __name__ == "__main__":
    pytest.main()
结果:

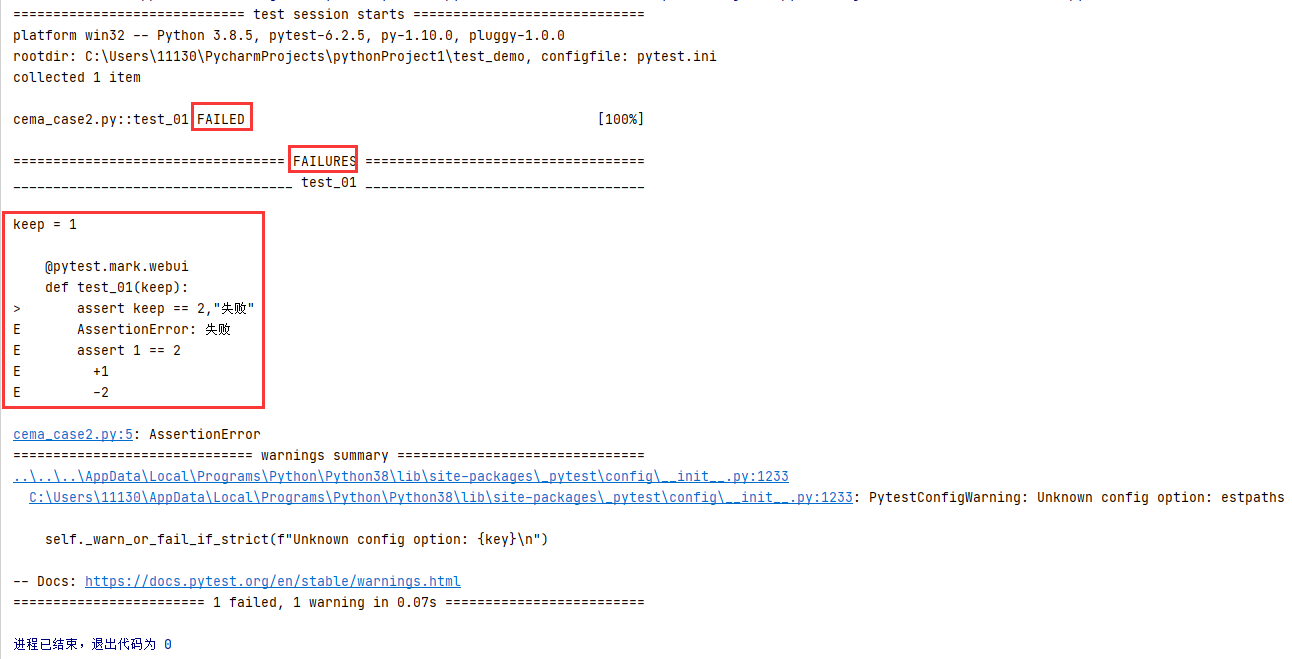
- cema_case.py——【返回不通过】的用例
import pytest

@pytest.mark.webui
def test_01(keep):
    assert keep == 2,"失败"

if __name__ == "__main__":
    pytest.main()
结果:
十一、生成测试报告
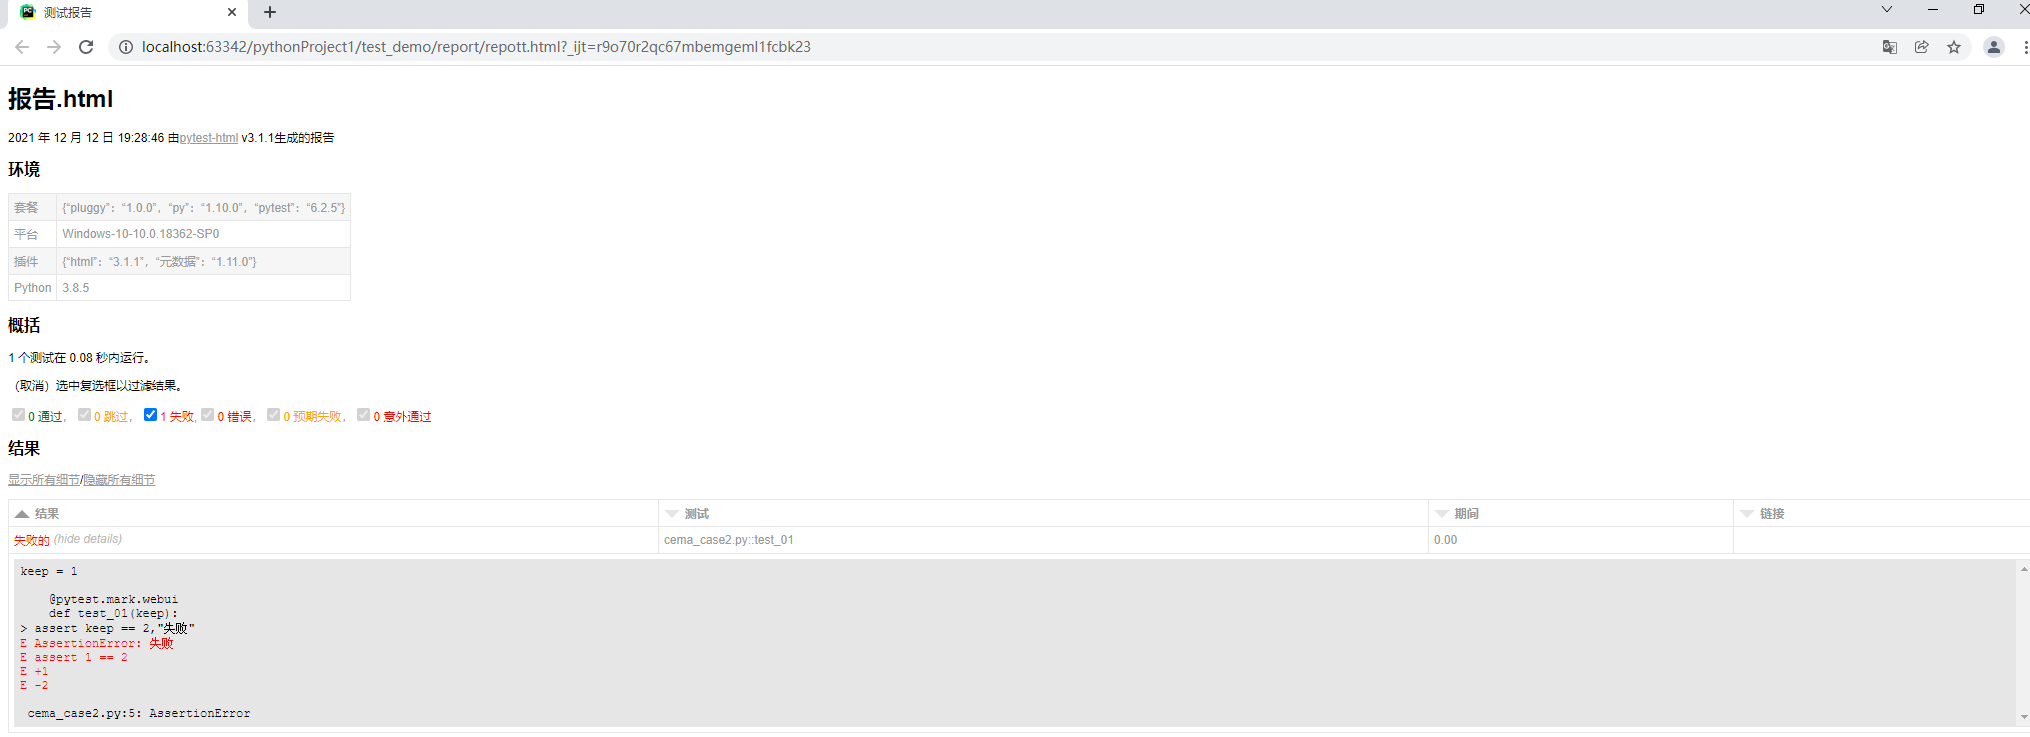
——pytest-html 测试报告模块,cmd中安装
pip install pytest-html
安装后,我们配置完了代码运行结束后,想要生成报告,在Terminal(终端)中输入:
pytest  #输入pytest 后,点击Enter(回车键)

pytest --html=./report/repott.html # =后边是指定路径、文件名称

pytest --html=./report1/repott1.html --self-contained-html #直接生成html文件,不会带有css样式文件,发送给其他人时操作简单
#可放在pytest.ini中的 addopts中
在指定的目录下会生成:repott.html


测试报告:
十二、常用断言
- assert xx :判断 xx 为真
- assert not xx :判断 xx 不为真
- assert a in b :判断 b 包含 a
- assert a == b :判断 a 等于 b
- assert a != b :判断 a 不等于 b
十三、assert小栗子
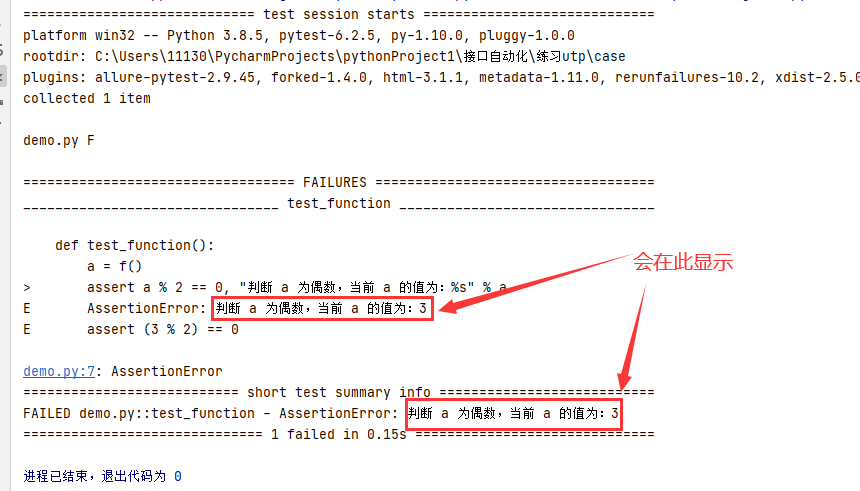
想在抛出异常之后输出一些提示信息,执行之后就方便查看是什么原因了
import pytest
# 异常信息
def f():
    return 3
def test_function():
    a = f()
    assert a % 2 == 0, "判断 a 为偶数,当前 a 的值为:%s" % a

if __name__ == '__main__':
    pytest.main(['-s','demo.py'])
结果:
十四、pytest的mark扩展使用
-
@pytest.mark.xfail(reason="")标记为失败,期望值为失败,在函数之上使用,pytest.xfail()预期结果失败,下面的代码不会执行,在函数里使用
-
@pytest.mark.skip()无条件跳过测试用例,pytest.mark.skipif()有条件跳过测试用力
-
@pytest.mark.parametrize(param1,[1,2,3])多组参数单个用例的执行
-
@pytest.mark.run需要插件pytest-ordering # 控制函数执行顺序,@pytest.mark.run(order=1)
-
@pytest.mark.flaky
最多失败重跑5次,如果失败延迟2秒重跑,可以结合mark标记使用,@pytest.mark.flaky(reruns=5,reruns-delay=2)
如果是批量执行,命令为:pytest --reruns 5 --reruns-delay2
十五、pytest常用插件扩展
-
pytest-cov代码覆盖率的检测 pytest --cov=src --cov-report = html
-
pytest -sugar 改变pytest默认外观,增加进度条功能
-
pytest-xdist 并行运行,pytst -n 2
-
pytest-rerunfailures 失败用例重跑
-
pytest-ordering 执行顺序
-
pytest-picked 仅测试上次提交以来已更改的代码
十六、测试用例的执行
目录:
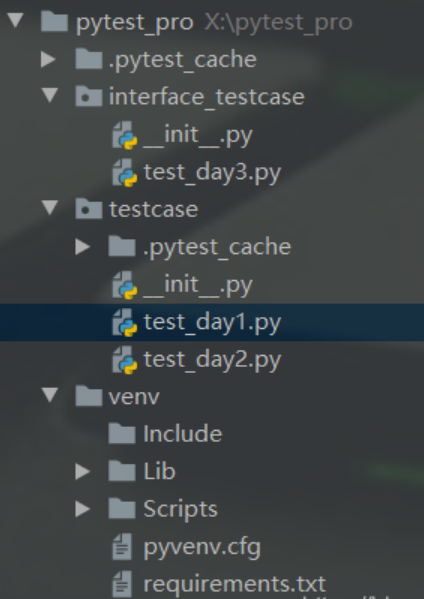
1、主函数模式
(1)运行所有 pytest.main()
(2)指定模块 pytest.main(’[-vs],’,’./testcase/test_day1.py’)
(3)指定目录pytest.main(’[-vs]’),’./testcase’)
(4)通过nodeid指定用例运行:nodeid由模块名,分隔符,类名,方法名,函数名组成
#pytest.main(["-vs"],’./interface_testcase/test_day3.py::test_demo11’)
#pytest.main(["-vs"],’./interface_testcase/test_day3.py::TestLogin::test_01_qianghong1’)
2、命令行模式
(1)运行所有:pytest(2)指定模块 pytest -vs ./testcase/test_day1.py
(3)指定目录 pytest -vs ./testcase
(4)通过nodeid指定用例运行:nodeid由模块名,分隔符,类名,方法名,函数名组成
pytest -vs ./interface_testcase/test_day3.py::test_demo11
pytest -vs ./interface_testcase/test_day3.py::TestLogin::test_01_qianghong1
参数详解:
-s:表示输出调试信息,包括print打印的信息
-v显示更详细的信息
-vs一起使用
-n支持多线程或者分布式运行测试用例
#如 #pytest.main([’-vs’,’./testcase/test_day1.py’,’-n=2’])
# pytest -vs ./testcase/test_day1.py -n 2
#reruns==number 表示失败用例重跑
#pytest -vs ./testcase/test_day2.py --reruns 2
#pytest.main([’–vs’,’./testcase/test_day2.py’,‘reruns=2’]) #失败得的用例重跑两次
#-x表示只要一个用例报错,那么测试停止运行
#–maxfail=2 出现两个失败用例停止
#-k 根据测试用例的部分字符串指定测试用例 pytest -vs test_day2 -k “yang”
pytest--命令行常用参数:http://t.zoukankan.com/zouzou-busy-p-11295444.html
本文来自博客园,作者:他还在坚持嘛,转载请注明原文链接:他还在坚持嘛 https://www.cnblogs.com/brf-test/p/15643563.html


【推荐】国内首个AI IDE,深度理解中文开发场景,立即下载体验Trae
【推荐】编程新体验,更懂你的AI,立即体验豆包MarsCode编程助手
【推荐】抖音旗下AI助手豆包,你的智能百科全书,全免费不限次数
【推荐】轻量又高性能的 SSH 工具 IShell:AI 加持,快人一步
· 10年+ .NET Coder 心语,封装的思维:从隐藏、稳定开始理解其本质意义
· .NET Core 中如何实现缓存的预热?
· 从 HTTP 原因短语缺失研究 HTTP/2 和 HTTP/3 的设计差异
· AI与.NET技术实操系列:向量存储与相似性搜索在 .NET 中的实现
· 基于Microsoft.Extensions.AI核心库实现RAG应用
· 10年+ .NET Coder 心语 ── 封装的思维:从隐藏、稳定开始理解其本质意义
· 地球OL攻略 —— 某应届生求职总结
· 提示词工程——AI应用必不可少的技术
· Open-Sora 2.0 重磅开源!
· 周边上新:园子的第一款马克杯温暖上架
2020-12-05 《软件测试的艺术》 阅读整理(二)