
前端之Css
一、初识Css
概念
- 用于修饰标签。
- 使用css选择器需要关注两点:1、选择哪个选择器 2、如何选择需要使用css样式的标签。
- 在head中添加style标签,在style标签中添加css选择器,就可以将css样式附着到body中的标签上了。
二、选择器
1、选择器种类
(1)id选择器
- head中使用#号定位,在body中的div标签添加id属性,head中写入对应id属性的值,即可将css样式定位到标签上。
<!DOCTYPE html>
<html lang="en">
<head>
    <meta charset="UTF-8">
    <title>Title</title>
    <!--样式标签-->
    <style>
        /*id选择器*/
        #div1{
            background-color: red;
        }
    </style>
</head>
<body>

    <div id="div1">我是个人</div>
</body>
</html>

(2)class选择器
- head中使用英文.号定位,在body中的div标签添加class属性,head中写入对应class属性的值,即可将css样式定位到标签上。
<!DOCTYPE html>
<html lang="en">
<head>
    <meta charset="UTF-8">
    <title>Title</title>
    <style>
        .c1{
            background-color: green;
        }
    </style>
</head>
<body>
    <div class="c1">我是绿色</div>
</body>
</html>

(3)标签选择器
- head中使用标签名div定位,在body中写入标签内容,head中写入对应div标签的值,即可将css样式定位到标签上。
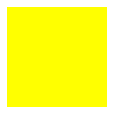
<!DOCTYPE html>
<html lang="en">
<head>
    <meta charset="UTF-8">
    <title>Title</title>
    <style>
        div{
            background-color: yellow;
        }
    </style>
</head>
<body>
    <div>lrx</div>
</body>
</html>

(4)标签层级选择器
- head中使用标签名div里面的span标签定位,在body中写入标签内容,head中写入对应span标签的值,即可将css样式定位到标签上。
<!DOCTYPE html>
<html lang="en">
<head>
    <meta charset="UTF-8">
    <title>Title</title>
    <style>
        div span{
            background-color: yellow;
        }
    </style>
</head>
<body>
    <div>
        <span>123</span>
    </div>
</body>
</html>

(5)属性选择器
- 在body里面的div标签中加入自定义属性,然后head中通过使用标签名div加中括号,中括号中写全自定义属性名和值的方式,将css样式与标签进行关联。
<!DOCTYPE html>
<html lang="en">
<head>
    <meta charset="UTF-8">
    <title>Title</title>
    <style>
        div[abc="哈哈哈"]{
            background-color: burlywood;
        }
    </style>
</head>
<body>
    <div abc="哈哈哈">哦哦哦</div>
</body>
</html>

区别:
- 使用标签选择器时,body中的div标签没有对应的属性,所以body中所有的div标签内容都会被附着这种选择器样式,局限性很高,只有规定了整篇标签都使用同一种样式时才会用到;
- 使用标签层级选择器时,span标签也是没有对应的属性,跟标签选择器的局限性一样,凡是符合div中有span的这个路径的标签,都会被附着相同的样式;
- id选择器和class选择器都会通过标签的属性精确定位。
2、组合选择器种类
(1)id组合选择器
div标签中,在一个HTML标签中不允许出现两个id属性:
那么如何将两个div标签附着相同的id选择器的css样式呢?可以使用id组合选择器。
- head中使用#号定位,将两个id的属性值同时写在一起,使用英文逗号间隔,在body中的div标签添加id属性,head中写入对应id属性的值,即可将css样式定位到标签上。
<!DOCTYPE html>
<html lang="en">
<head>
    <meta charset="UTF-8">
    <title>西山行者</title>
    <link rel="icon" href="https://img1.baidu.com/it/u=567782244,1695500002&fm=253&fmt=auto&app=138&f=JPEG?w=753&h=500">
    <style>

        #id1,#id2{
            background-color: bule;
        }
    </style>

</head>
<body>

<div id="id1"></div>
<div id="id2"></div>

</body>
</html>

(2)class组合选择器
div标签中,在一个HTML标签中可以同时出现两个class属性:
body中可以同时附着多个css样式,只需在body的class属性中写入附着的css样式名,使用一个空格间隔即可:
<!DOCTYPE html>
<html lang="en">
<head>
    <meta charset="UTF-8">
    <title>西山行者</title>
    <link rel="icon" href="https://img1.baidu.com/it/u=567782244,1695500002&fm=253&fmt=auto&app=138&f=JPEG?w=753&h=500">
    <style>

       .c1{
           background-color: yellow;
       }
       .c2{
           width: 100px;
           height: 100px;
       }

    </style>

</head>
<body>

<div class="c1 c2">c1 c2</div>
<div class="c1">c1</div>

</body>
</html>

可以看到,第一个标签同时附着了两个css样式。
3、选择器引入方式
(1)在head中通过style标签包裹
<!DOCTYPE html>
<html lang="en">
<head>
    <meta charset="UTF-8">
    <title>西山行者</title>
    <link rel="icon" href="https://img1.baidu.com/it/u=567782244,1695500002&fm=253&fmt=auto&app=138&f=JPEG?w=753&h=500">
    <style>
        div[abc="哈哈哈"]{
            background-color: blue;
        }

    </style>

</head>
<body>

<div abc="哈哈哈">嗯嗯嗯</div>


</body>
</html>

(2)直接在body里面的标签中加入style属性
<!DOCTYPE html>
<html lang="en">
<head>
    <meta charset="UTF-8">
    <title>西山行者</title>
    <link rel="icon" href="https://img1.baidu.com/it/u=567782244,1695500002&fm=253&fmt=auto&app=138&f=JPEG?w=753&h=500">

</head>
<body>

<div style="background-color: yellow">嗯嗯嗯</div>


</body>
</html>

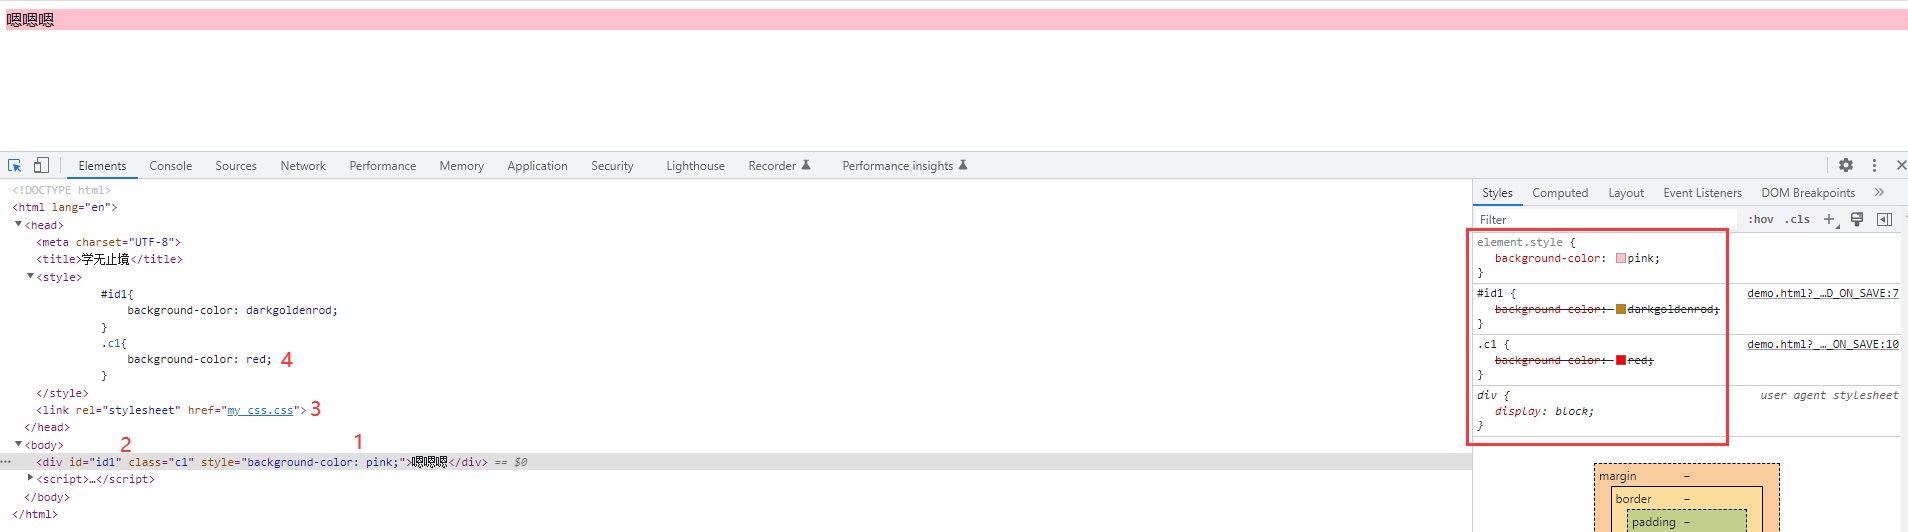
(3)在head中引入css样式表,样式表中的内容与第一种方式在head的style标签中写的内容一样
- 使用link标签,加入属性rel="stylesheet",和属性href,值为引入的css的路径
- 如果css文件所在的目录不止一层,需要将引入的css文件所在的文件夹、引入该css文件的html文件和所在的文件夹sources root,避免找不到
<!DOCTYPE html>
<html lang="en">
<head>
    <meta charset="UTF-8">
    <title>学无止境</title>
    <link rel="stylesheet" href="my_css.css">

</head>
<body>

<div abc="哈哈哈">嗯嗯嗯</div>


</body>
</html>


my_css.css
div[abc="哈哈哈"]{
    background-color: bule;
}
将css所在的文件夹设置成sourceroot路径:
4、选择器选择顺序优先级
- 优先级顺序:由内而外,由近到远
-
由内到外,先id后class最后style
三、CSS属性
1、宽度、高度、背景色
<!DOCTYPE html>
<html lang="en">
<head>
    <meta charset="UTF-8">
    <title>学无止境</title>
    <style>
        .c1{
            width: 100px;   #宽
            height: 100px;  #高
            background-color: yellow;  #背景颜色
        }

    </style>
</head>
<body>

<div  class="c1"></div>

</body>
</html>
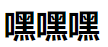
2、字体大小、字体粗细
-
中间使用分号分隔
<body>

<div style="font-size: xx-large;font-weight: bolder">嘿嘿嘿</div>

</body>
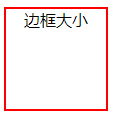
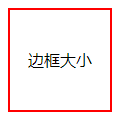
3、边框大小、实线、颜色
<!DOCTYPE html>
<html lang="en">
<head>
    <meta charset="UTF-8">
    <title>学无止境</title>
</head>
<body>

<div style="width: 100px;height: 100px;border:2px solid red">边框大小</div>

</body>
</html>

4、框中内容水平居中
<body>

<div style="width: 100px;height: 100px;border:2px solid red;text-align: center">边框大小</div>

</body>
5、框中内容垂直居中
- 垂直居中的数值与框的高度数值一致
<body>

<div style="width: 100px;height: 100px;border:2px solid red;text-align: center;line-height: 100px">边框大小</div>

</body>
6、浮动(float属性)
(1)未使用float属性
<!DOCTYPE html>
<html lang="en">
<head>
    <meta charset="UTF-8">
    <title>学无止境</title>
    <style>
        .f1 {
            width: 100px;
            height: 50px;
            background-color: palegreen;
        }
    </style>

</head>
<body>
    <div class="f1" ></div>
    <div class="f1" style="background-color: pink"></div>
    <div class="f1" style="background-color: yellow"></div>
</body>
</html>

(2)使用float属性
<!DOCTYPE html>
<html lang="en">
<head>
    <meta charset="UTF-8">
    <title>学无止境</title>
    <style>
        .f1 {
            width: 100px;
            height: 50px;
            background-color: palegreen;
            float:left ;
        }
    </style>

</head>
<body>
    <div class="f1" ></div>
    <div class="f1" style="background-color: pink"></div>
    <div class="f1" style="background-color: yellow"></div>
</body>
</html>

- 由于每个电脑的宽高不一致,所以使用固定高度,宽度采用百分比的方式。(注意:高度不可以使用百分比的方式,因为不显示)
<body>

    <div style="width:30%;height: 100px;background-color: yellow" >keep</div>

</body>

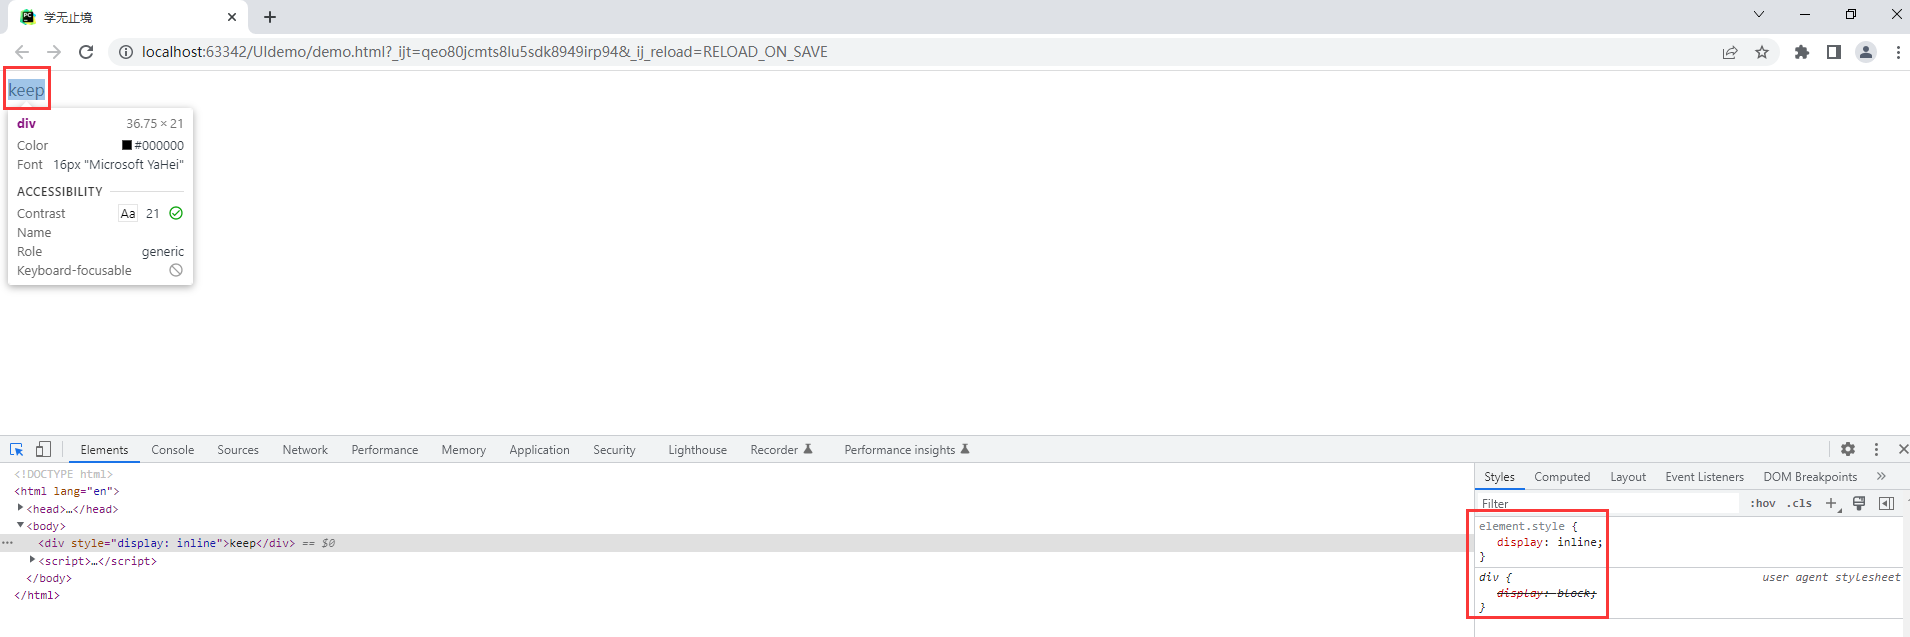
7、行内标签与块级标签相互转换
- 使用属性style="display"即可实现
(1)块级标签转成行内标签
- 使用style="display:inline"属性
<body>

    <div style="display: inline" >keep</div>

</body>
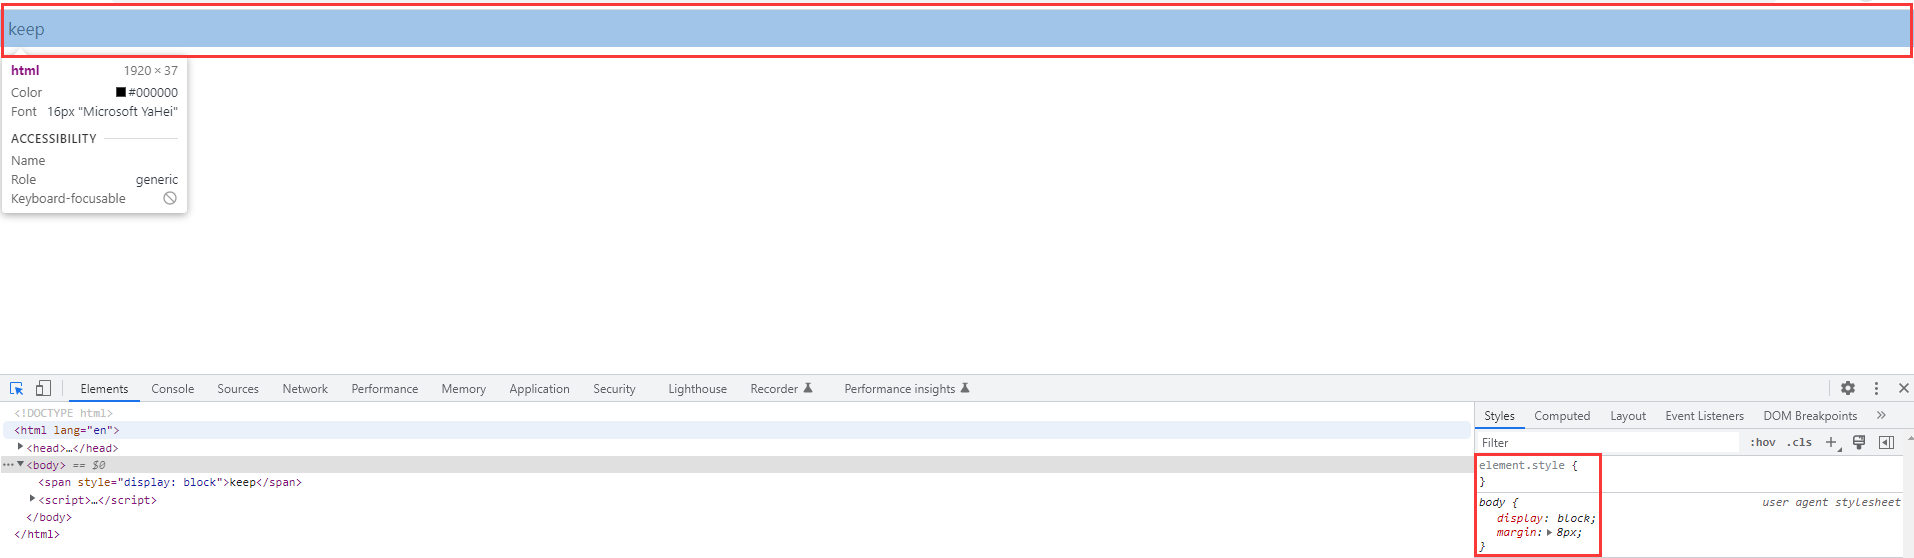
(2)行内标签转成块级标签
- 使用style=display:block属性
<body>

    <span style="display: block">keep</span>

</body>
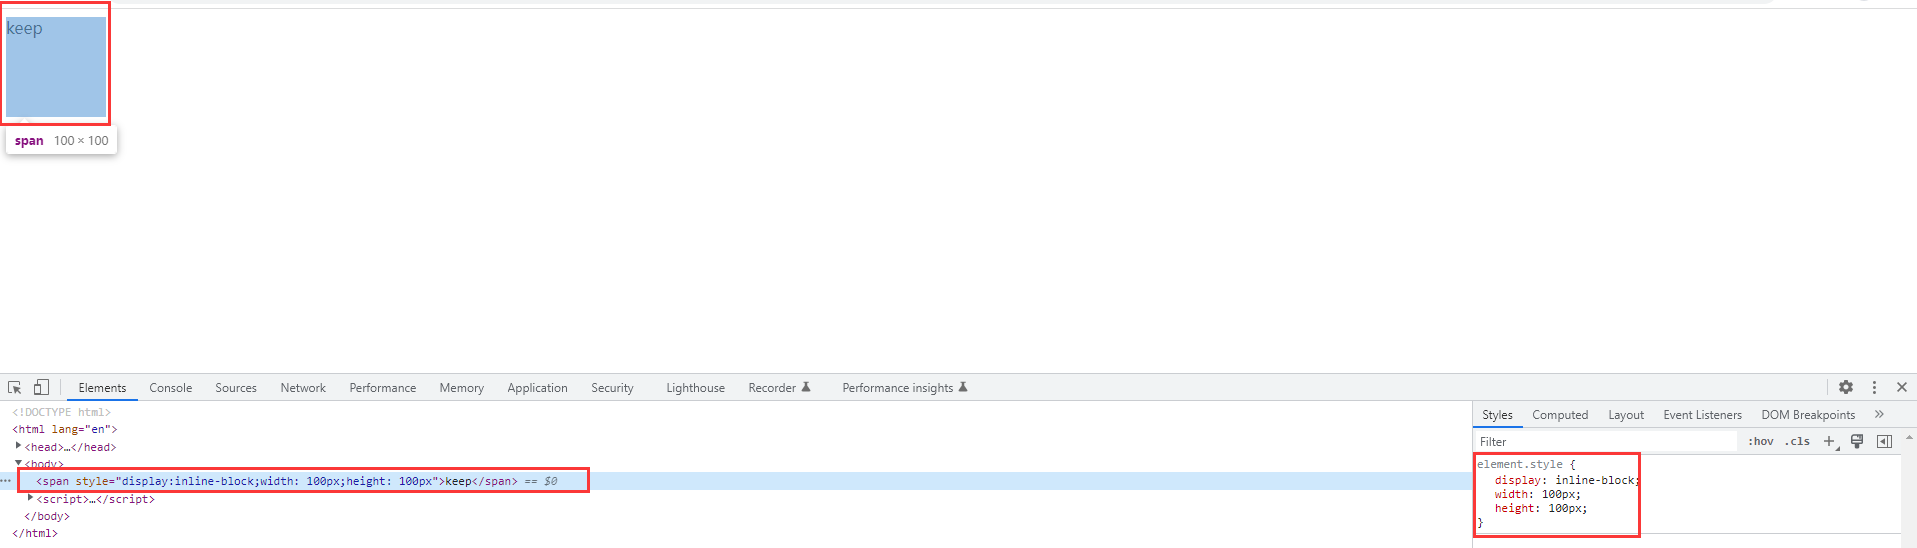
注意:
行内标签是不可以使用宽度、高度、外边距、内边距属性的,即:不识别span标签里面的这些属性,因为span标签本身是有多大占多大
<body>

    <span style="width: 100px;height: 100px">keep</span>

</body>

(3)在块级标签中使宽、高这些属性生效
- 在span标签中使用style=display:inline-block属性即可
<body>

    <span style="display:inline-block;width: 100px;height: 100px">keep</span>

</body>
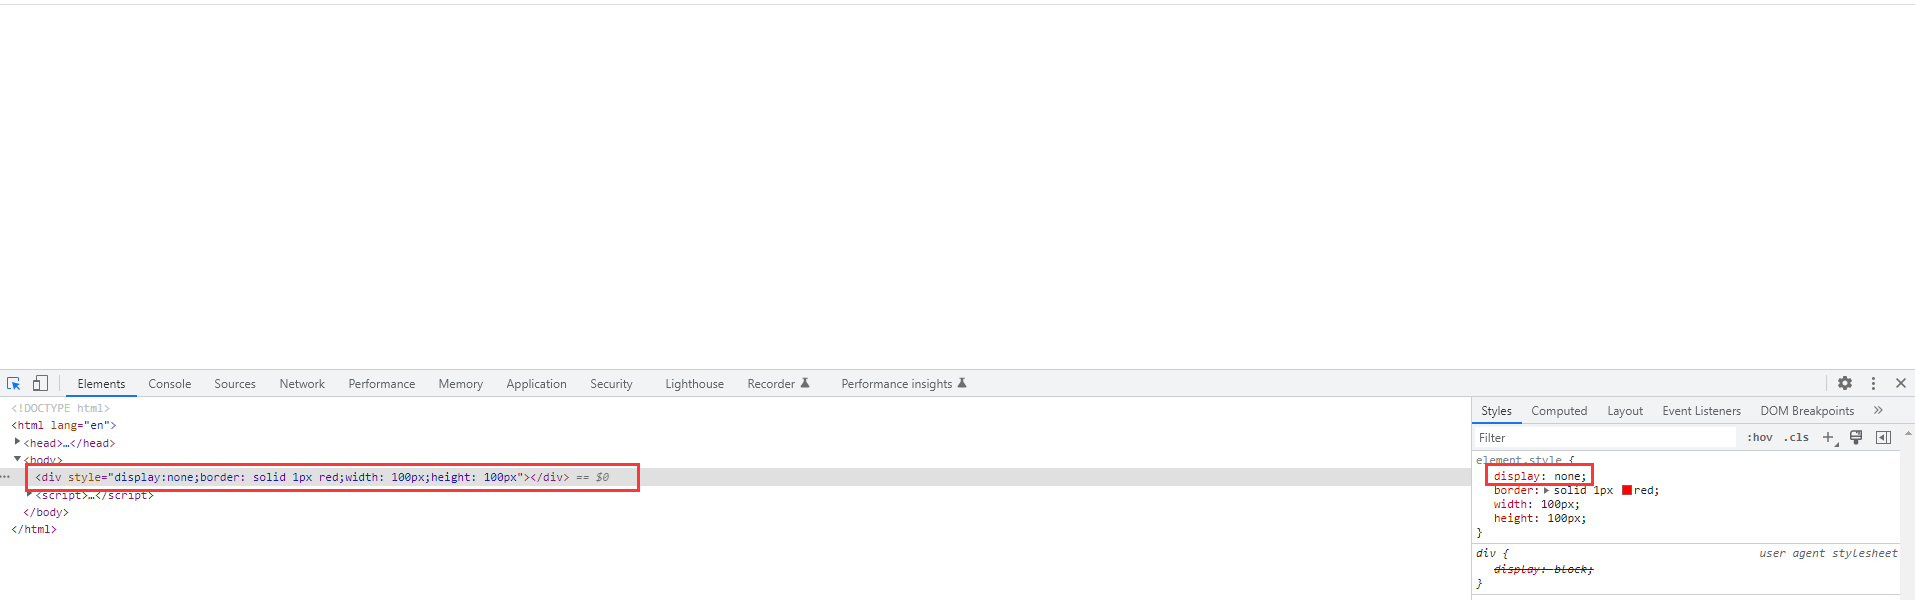
8、隐藏页面信息
- 使用style=display:none属性即可
<body>

<div style="display:none;border: solid 1px red;width: 100px;height: 100px"></div>

</body>

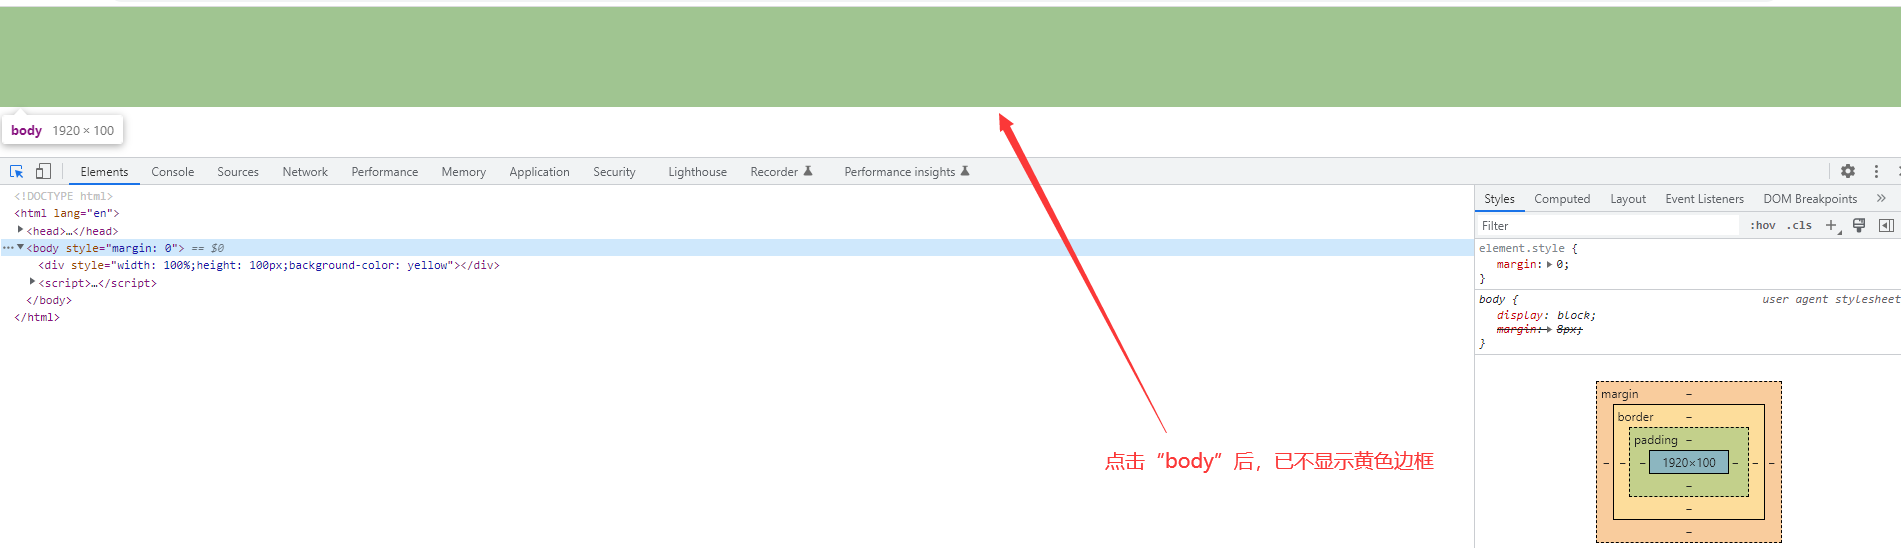
勾选:display: none
——我们可以观察到,勾选display: none后,原来的页面存在的实线红色方框已不显示
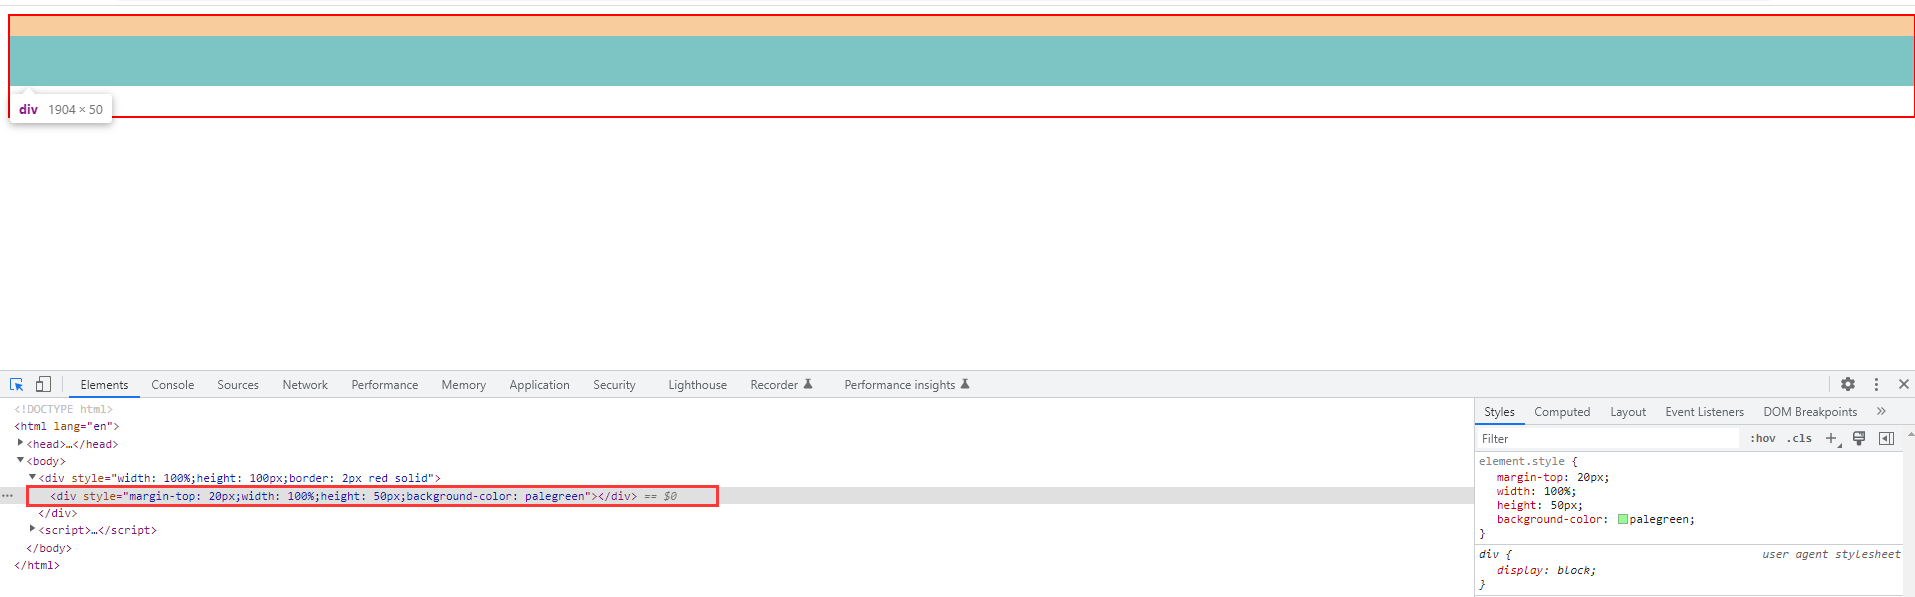
9、边距属性
(1)外边距
-
使用style=margin-top属性
- 不改变自身,针对外层进行像素移动,指的是自身对外层的距离
<div style="width: 100%;height: 100px;border: 2px red solid">
    <div style="margin-top: 1px;width: 100%;height: 50px;background-color: palegreen"></div>
</div>

</body>

鼠标选中蓝色的内标签,然后点击右侧的margin-top数值,使用键盘的上下键,可以移动蓝色内标签:
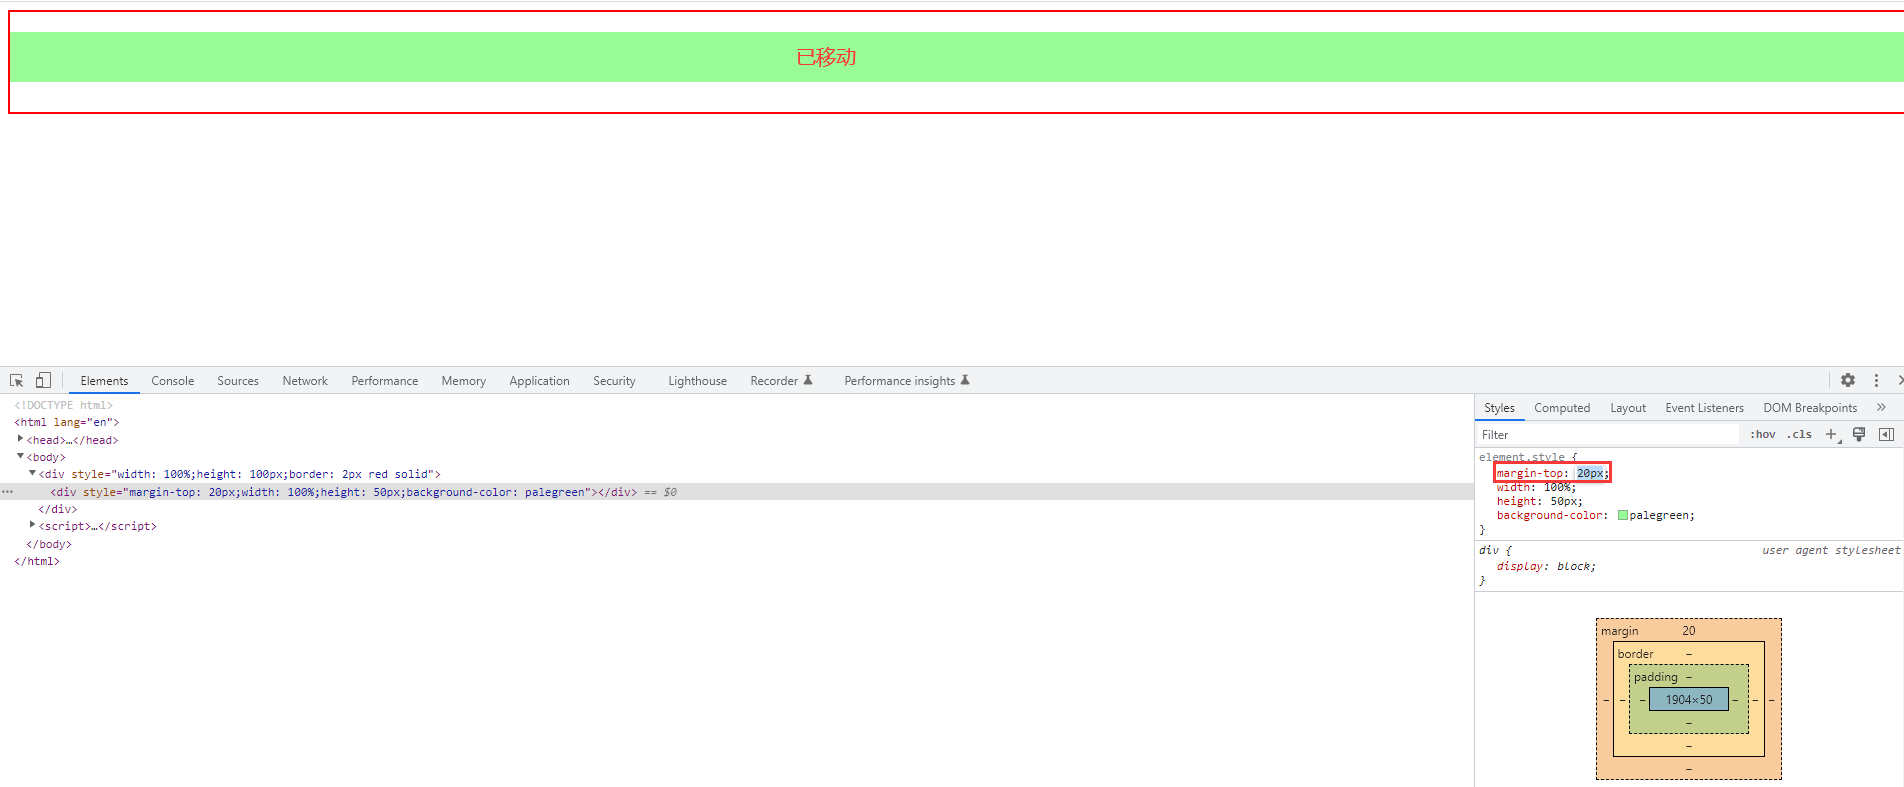
鼠标点击标签代码,可以看到黄色部分就是内标签距离外层的距离:
(2)内边距
-
使用style=padding-top属性
- 改变自身,增加或减少自己的面积
<body>

<div style="width: 100%;height: 100px;border: 2px red solid">
    <div style="padding-top: 1px;width: 100%;height: 50px;background-color: palegreen"></div>
</div>

</body>

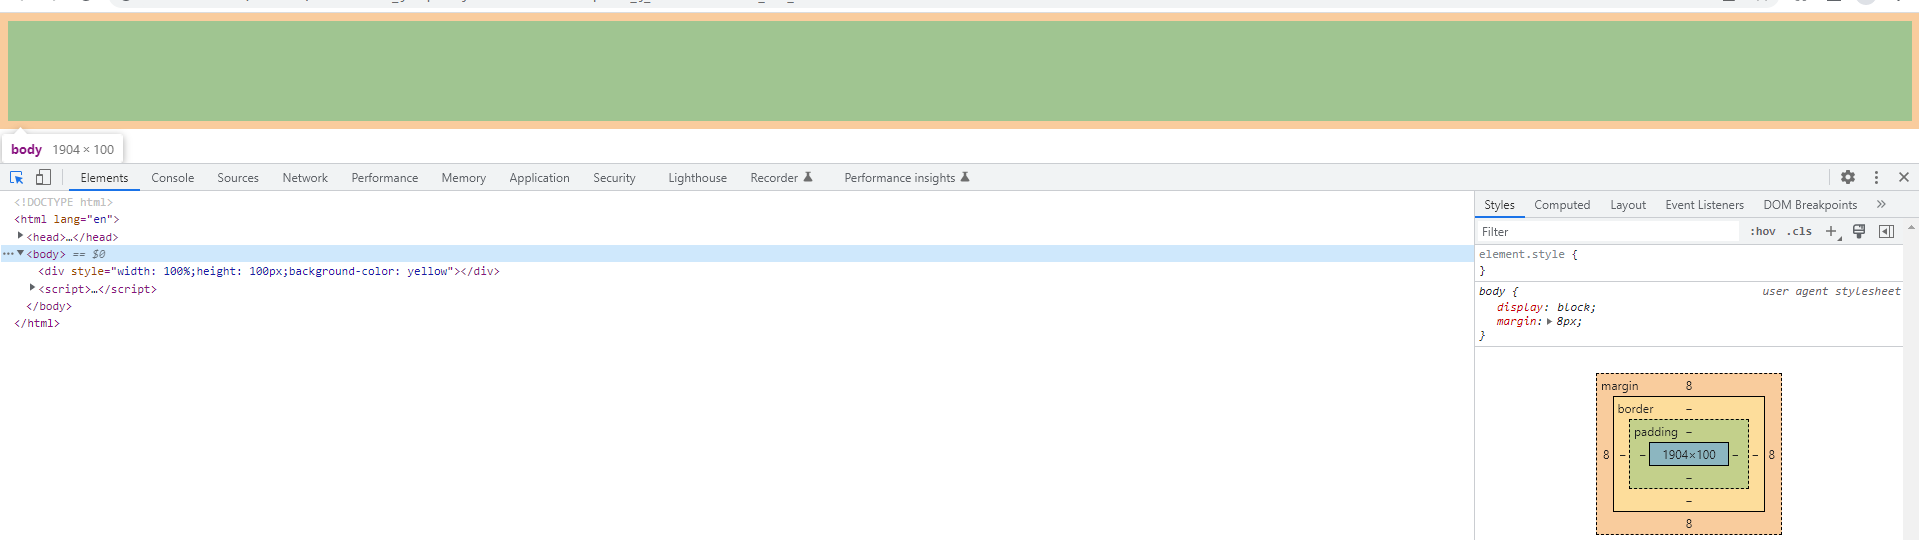
9、分层
在写div标签时,默认有一个8px的margin属性,即与上侧、左侧、右侧都留有间距(鼠标悬浮在body后,截图中黄色的边框):
<body>

<div style="width: 100%;height: 100px;background-color: yellow"></div>

</body>
如果想顶格显示,就在body标签中加入属性:style=margin:0
<body style="margin: 0">

<div style="width: 100%;height: 100px;background-color: yellow"></div>

</body>
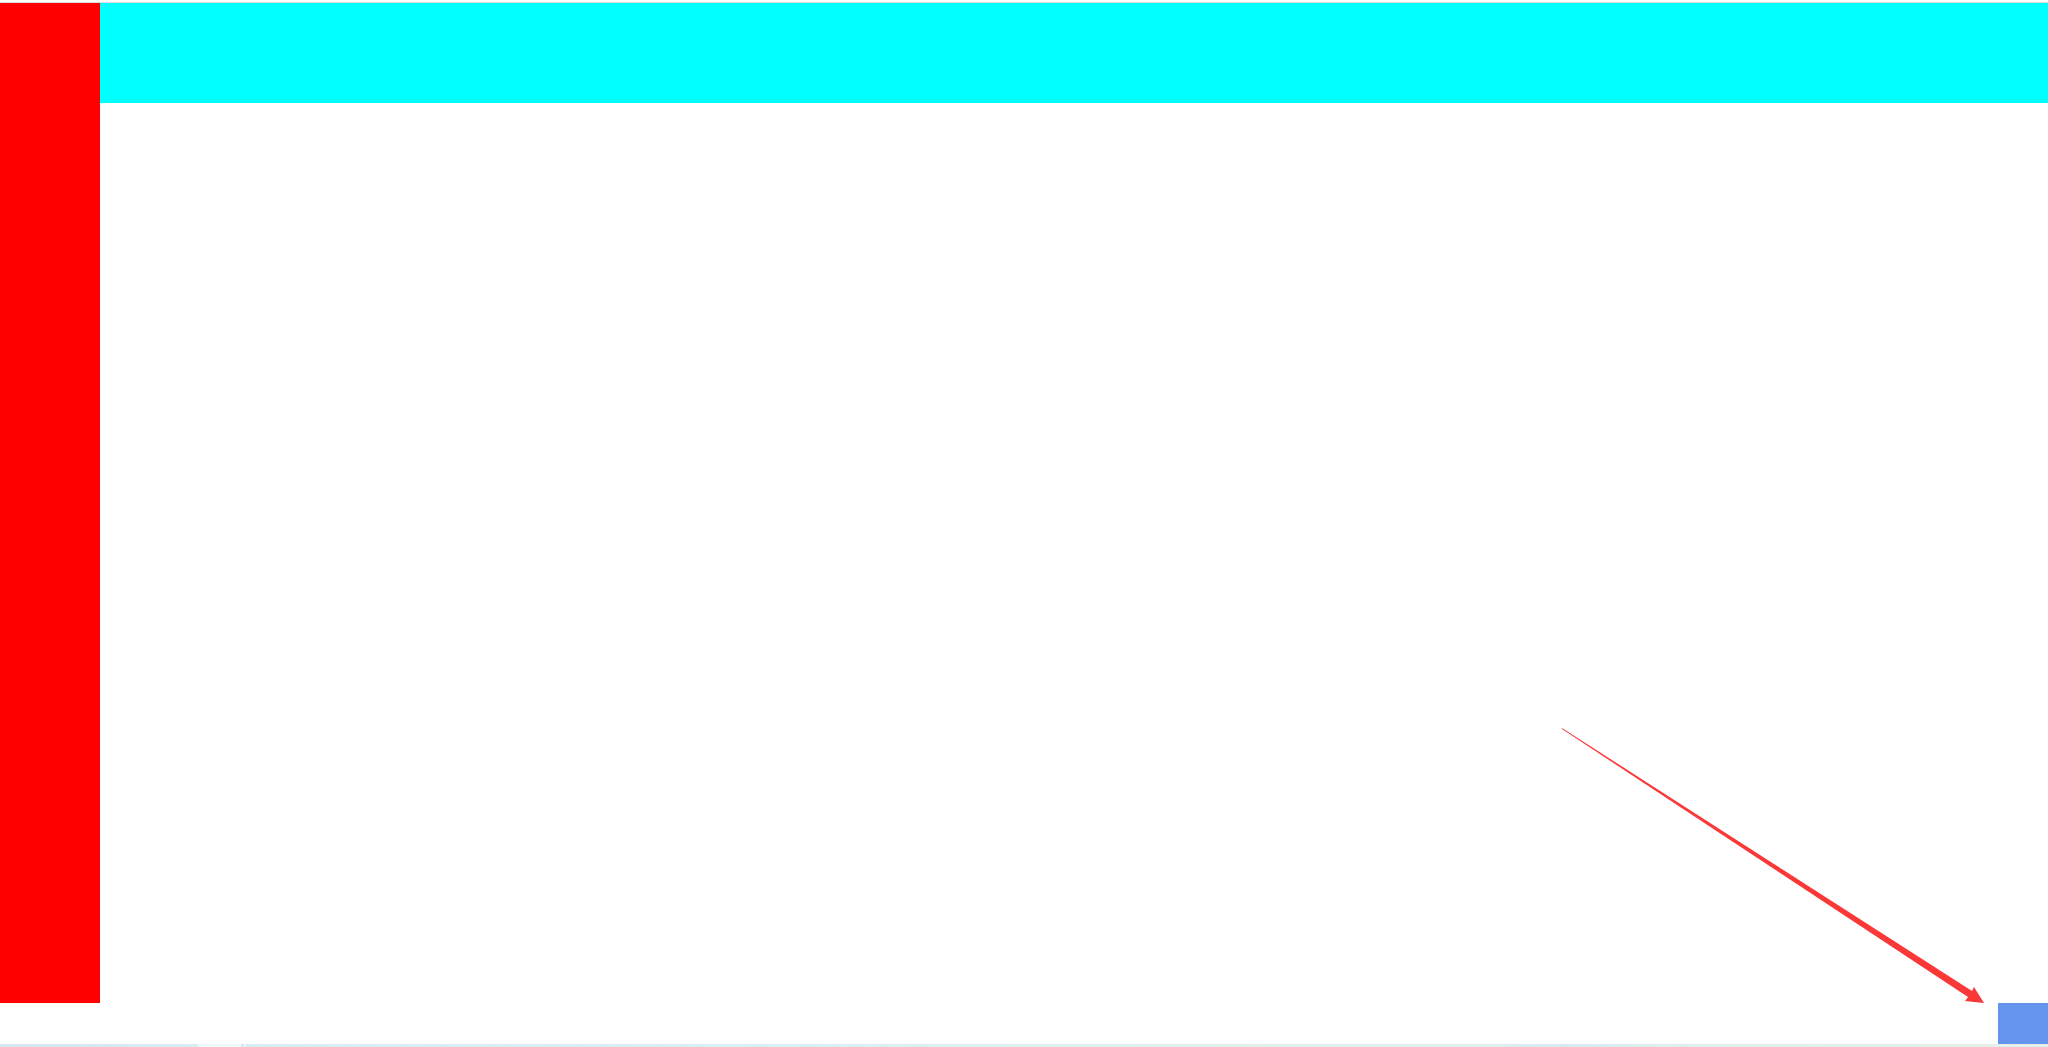
(1)绝对定位
- 在样式中使用position:fixed内容
<head>
    <meta charset="UTF-8">
    <title>学无止境</title>
    <style>
        .c1{
            height: 100px;
            background-color: palegreen;
            position: fixed;
            top: 0;
            left: 0;
            right: 0;
        }
    </style>

</head>
<body style="margin: 0">
<div class="c1">
    <div style="width: 100%;height: 100px;background-color: yellow"></div>

</div>

</body>
这样天蓝色条就不会再随鼠标滚动了:

<body style="margin: 0">
      <div class="ci">
          <div style="width: 100px;height: 1000px;background-color: red"></div>
          <div style="position: fixed;right: 0;width: 50px;height: 50px;background-color: cornflowerblue"></div>

      </div>

</body>
(2)相对定位
- 在样式中使用position:relative和position:absolute内容
- 在想要固定的div标签中加入position:relative属性,同时在针对这个标签做相对位置的div标签中加入position:absolute属性,并在这个div标签中加入相对位置的坐标,比如写入left、right、top、bottom的数值
<body style="margin: 0">
<!--位置相对,宽:500px,高:500px,外框线:2px实线-->
<div style="position: relative;width: 500px;height: 500px;border: solid 2px black">
    <div style="left: 0;top: 0;position: absolute;width: 100px;height: 100px;background-color: red"></div>
    <div style="left:0;bottom:0;position:absolute;width:100px;height:100px;background-color: orchid">
</div>
    <div style="right: 0;top: 0;position: absolute;width: 100px;height: 100px;background-color: yellow"></div>
    <div style="right: 0;bottom: 0;position: absolute;width: 100px;height: 100px;background-color: blueviolet"></div>

</div>

position本身就是分层的概念,如果有两个div标签,没有进行属性设置,内容就会重合
- 直接查看显示:

- 鼠标悬浮在标签时显示:

这时只需使用margin-top属性即可:
<!DOCTYPE html>

<html lang="en">
<head>
    <meta charset="UTF-8">
    <title>学无止境</title>
    <meta name="apple-mobile-web-app-title" content="标题"/>
    <style>
        .c1 {
            height: 100px;
            background-color: green;
            position: fixed;
            top: 0;
            left: 0;
            right: 0;
        }
    </style>

</head>
<body style="margin: 0">
     <div class="c1"></div>
     <div style="margin-top:100px;width: 100px;height: 100%;border: 2px red solid">
         冲鸭!!!
     </div>


</body>

(3)分层优先级
- 使用属性style="z-index",按照z-index的数值大小分层显示,即:数值大的显示在上层,数值小的显示在下层。
- z-index要与position:relative连用才能起作用
<body style="margin: 0">
     <div style="position: relative;width: 200px;height: 200px;border: solid 2px red">
         <div style="z-index: 10;position: absolute;width: 200px;height: 200px;background-color: orange"></div>
         <div style="z-index: 9;position:absolute;width: 200px;height: 200px;background-color: yellow"></div>
     </div>
</body>

10、小手鼠标
- 使用input标签的style="cursor: pointer"属性
<input type="button" value="登录" style="cursor: pointer">
鼠标悬浮到按钮上时,显示的是小手
- 使用input标签的style="cursor: move"属性
<input type="button" value="登录" style="cursor: move">
鼠标悬浮到按钮上时,显示的是移动图标
- 使用input标签的style="cursor: crosshair"属性
<input type="button" value="登录" style="cursor: crosshair">
鼠标悬浮到按钮上时,显示的是十字截图图标
11、overflow滚动条
<body>
   <div style="width: 200px;height: 200px;border: solid black 2px">
       <img src="http://5b0988e595225.cdn.sohucs.com/images/20190917/f299f2a3d5c5469696c641091ae507bf.jpeg">
   </div>
</body>
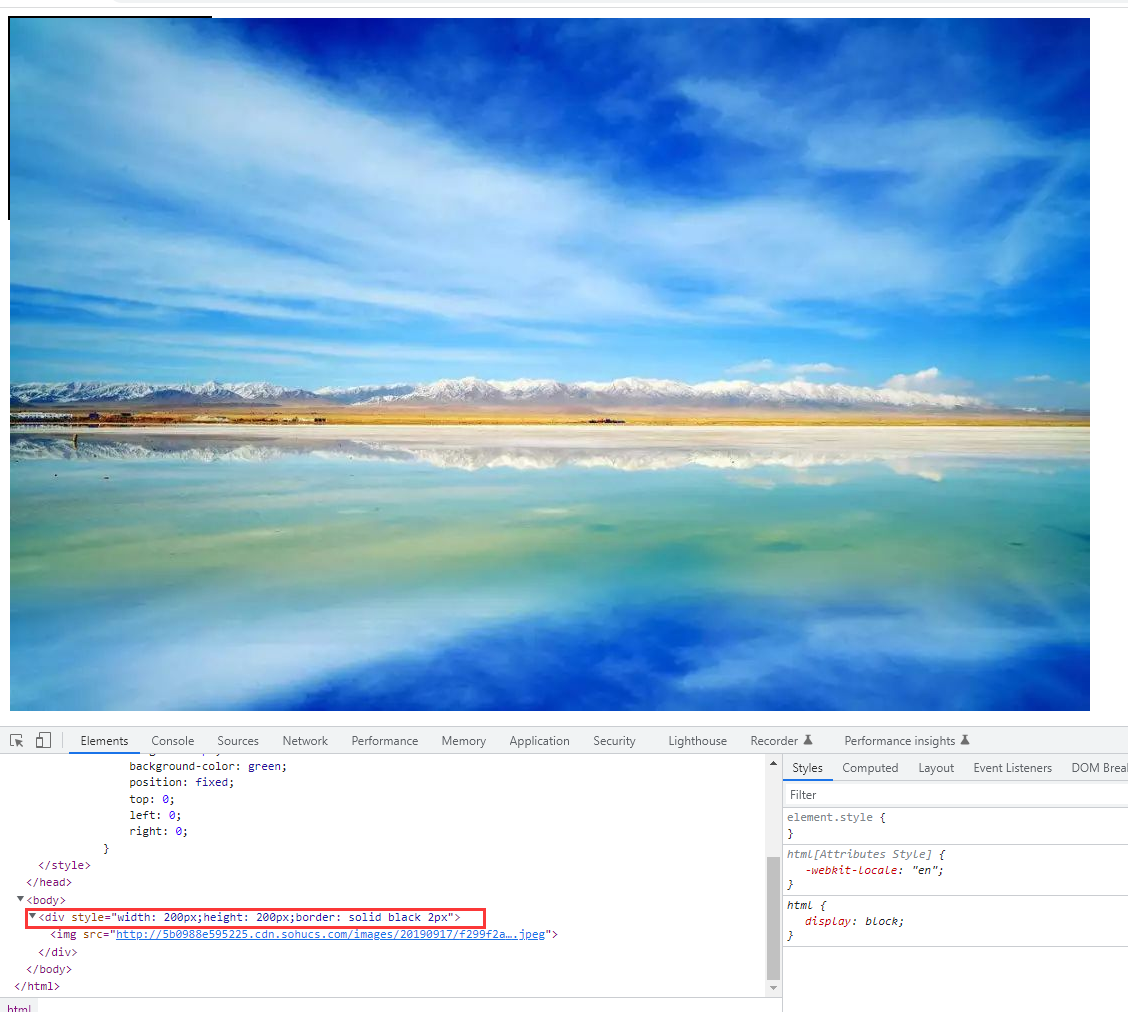
上图中图片将黑色边框挡住了
(1)图片截取
- 在外层div标签中使用style="overflow:hidden"属性(溢出:隐藏)
- 当图片或内容大于外层div时,自动截取图片
<body>
   <div style="overflow:hidden;width: 200px;height: 200px;border: solid black 2px">
       <img src="http://5b0988e595225.cdn.sohucs.com/images/20190917/f299f2a3d5c5469696c641091ae507bf.jpeg">
   </div>

</body>
使用hidden后:

(2)增加滚动条
- 在外层div标签中使用style="overflow:scroll"属性
- 无论图片大小,都增加滚动条
<body>
   <div style="overflow:scroll;width:500px;height:500px;border: solid black 2px">
       <img src="https://i02piccdn.sogoucdn.com/332fe10c7c112798">
   </div>
</body>

(3)自动增加滚动条
- 在外层div标签中使用style="overflow:auto"属性
- 当图片大小超过外层div边框时,增加滚动条
<body>
   <div style="overflow:auto;width:500px;height:500px;border: solid black 2px">
       <img src="https://i02piccdn.sogoucdn.com/332fe10c7c112798">
   </div>
</body>

12、背景图
(1)背景图(默认堆叠)
- 使用style=“background-image:url()”属性
<body>

<div style="background-image:url('https://i01piccdn.sogoucdn.com/a0f7c471cd5601bc');
width: 1000px;height: 800px;border: solid black 1px"></div>

</body>

(2)背景图不堆叠
- 使用style=“background-repeat: no-repeat”属性
<body>

<div style="background-repeat: no-repeat;background-image: url('https://i01piccdn.sogoucdn.com/a0f7c471cd5601bc');
width: 600px;height: 500px;border: solid black 1px"></div>

</body>

(3)背景图横向堆叠
- 使用style=“background-repeat:repeat-x”属性
<body>

<div style="background-repeat: repeat-x;background-image: url('https://i01piccdn.sogoucdn.com/a0f7c471cd5601bc');
width: 600px;height: 500px;border: solid black 1px"></div>

</body>

(4)背景图纵向堆叠
- 使用style=“background-repeat:repeat-y”属性
<body>

<div style="background-repeat: repeat-y;background-image: url('https://i01piccdn.sogoucdn.com/a0f7c471cd5601bc');
width: 600px;height: 500px;border: solid black 1px"></div>

</body>

repeat的作用:
图片越大越占空间,如果背景图是一个渐变色的图,那么可以只使用一张小图,然后以某种方式堆叠即可。
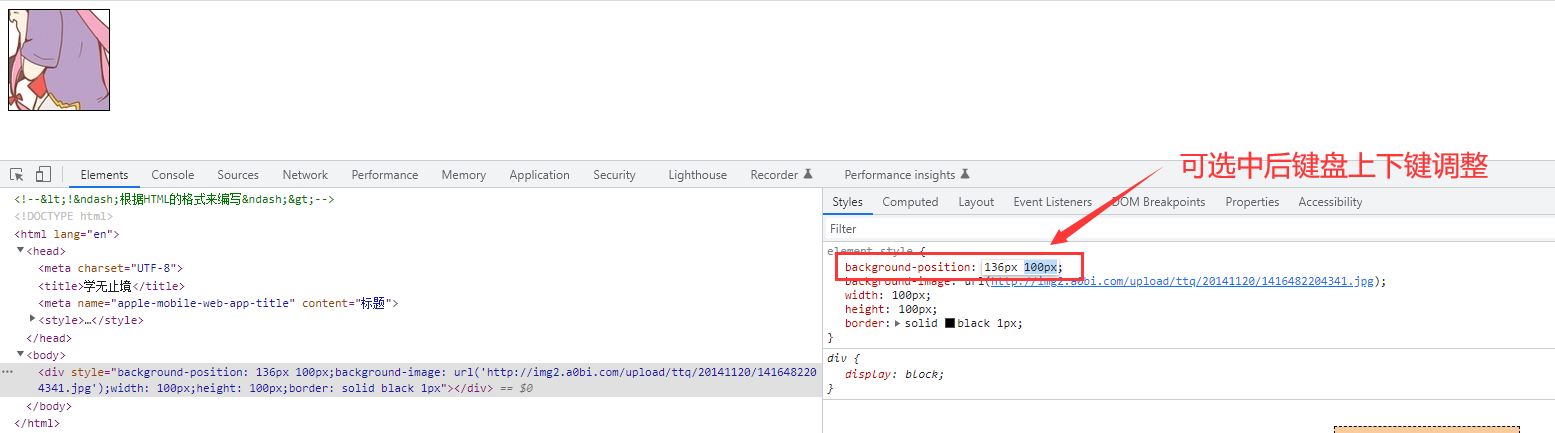
(5)背景图-POSITION
- 使用style="background-position"属性
- 作用:只使用一张大图,通过改变position的x、y坐标来引入图片,实际整个HTML页面是一整张大图,这张大图画了所有的图标
<body>

<div style="background-position: 1px 1px;background-image: url('http://img2.a0bi.com/upload/ttq/20141120/1416482204341.jpg');
width: 100px;height: 100px;border: solid black 1px"></div>

</body>
13、鼠标悬浮时显示
- 使用hover属性
- 该属性必须要在head中使用
<head>
    <meta charset="UTF-8">
    <title>学无止境</title>
    <meta name="apple-mobile-web-app-title" content="标题"/>
    <style>
        .hover:hover{
            background-color: red;
            color: black;
            width: 151px;
        }

        .hover_content{
            height: 50px;
            width: 150px;
            border: 2px solid red;
            text-align: center;
            line-height: 50px;
            color: black;
        }

    </style>

</head>
<body>

<div class="hover hover_content">你有喜欢过我嘛?</div>

</body>


hover属性是当鼠标移动到上边后,显示其设置的样式
本文来自博客园,作者:他还在坚持嘛,转载请注明原文链接:他还在坚持嘛 https://www.cnblogs.com/brf-test/p/12003776.html

 浙公网安备 33010602011771号