Spring学习
Spring1
spring简介
优点
spring是一个免费开源的框架(容器)
spring是一个轻量级的、非入侵式的框架
控制反转、面向切面编程
总结:spring是一个轻量级的控制反转(IOC)面向切面编程(AOP)的框架
组成
有7个定义良好的模块
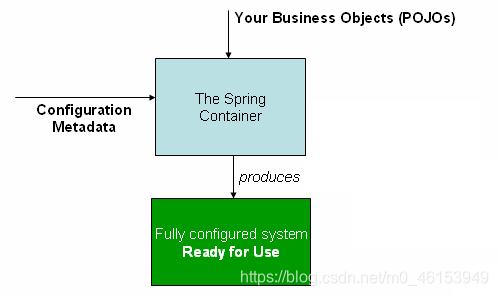
IOC的本质
控制反转,是一种设计思想
DI(依赖注入)是实现ioc的一种方法

IOC的实现方式
-
使用xml配置
-
使用注解
-
新版本的spring也可以零配置实现IOC
3、HelloSpring
- 导入JAR包
    <dependencies>
        <dependency>
            <groupId>org.springframework</groupId>
            <artifactId>spring-webmvc</artifactId>
            <version>5.2.12.RELEASE</version>
        </dependency>
    </dependencies>
- 编写spring文件
<?xml version="1.0" encoding="UTF-8"?>
<beans xmlns="http://www.springframework.org/schema/beans"
       xmlns:xsi="http://www.w3.org/2001/XMLSchema-instance"
       xsi:schemaLocation="http://www.springframework.org/schema/beans
        http://www.springframework.org/schema/beans/spring-beans.xsd">

    <!--使用Spring来创建对象,在spring这些部称Bean-->
    <bean id="hello" class="com.github.subei.pojo.Hello">
        <property name="src" value="Spring"/>
    </bean>

</beans>
- 生成测试文件
     public static void main(String[] args){
      ApplicationContext context = new ClassPathXmlApplication(“beas.xml”);
Hello hello = (Hello)context.getBean(“hello”);
system.out.printlin(hello.toString());
Hello 对象是由Spring创建的
Hello对象的属性是由Spring容器设置的
4、IOC创建对象方式
4.1 方式一:通过无参构造方法来创建
- User.java(pojo包)
package com.github.pojo;

public class User {
    private String name;

    public User() {
        System.out.println("User的无参构造!");
    }

    public String getName() {
        return name;
    }

    public void setName(String name) {
        this.name = name;
    }

    public void show(){
        System.out.println("name="+ name );
    }
}
- beans.xml
<?xml version="1.0" encoding="UTF-8"?>
<beans xmlns="http://www.springframework.org/schema/beans"
       xmlns:xsi="http://www.w3.org/2001/XMLSchema-instance"
       xsi:schemaLocation="http://www.springframework.org/schema/beans
        http://www.springframework.org/schema/beans/spring-beans.xsd">

    <bean id="user" class="com.github.pojo.User">
        <property name="name" value="苏州"/>
    </bean>

</beans>
- Test文件
ApplicationContext context = new ClassPathXmlApplicatiionContext(“beans.xml”);

User user = (user)context.getBean(“user”);
user.show();
result:
User的无参构造!
name=“苏州”
4.2 方式二
通过有参构造方法来创建
- User.Java
package com.github.subei.pojo;

public class UserT {
    private String name;

    public UserT(String name) {
        this.name = name;
    }

    public UserT() {
        System.out.println("UserT被创建了");
    }

    public String getName() {
        return name;
    }

    public void setName(String name) {
        this.name = name;
    }

    public void show() {
        System.out.println("name=" + name);
    }

}
- beans.xml有三种方法
根据index参数下标设置
<bean id=“UserT class=“com.github.polo.UserT>
<constructor-arg index=“0” value=“TestName”/>
</bean>

第二种根据参数类型设置,不建议使用
<bean id=“UserT class=“com.github.polo.UserT>
<constructor-arg type=“java.lang.String” values=“TextName”/>
</bean>

第三种根据参数名字设置
<bean id=“UserT class=“com.github.polo.UserT>
<constructor-arg name=“name” value=“TextName”/>
</bean>
- Test
    @Test
    public void test(){
        ApplicationContext context = new ClassPathXmlApplicationContext("beans.xml");
        // 在执行getBean的时候, user已经创建好, 通过无参构造
        UserT user = (UserT) context.getBean("userT");
        // 调用对象的方法 .
        user.show();
    }
result
User的无参构造
5、Spring配置
5.1 别名
alias 设置别名 , 为bean设置别名 , 可以设置多个别名

<!--设置别名:在获取Bean的时候可以使用别名获取-->
<alias name="userT" alias="userNew"/>
Bean的配置
<!--bean就是java对象,由Spring创建和管理-->

<!--
   id 是bean的标识符,要唯一,如果没有配置id,name就是默认标识符
   如果配置id,又配置了name,那么name是别名
   name可以设置多个别名,可以用逗号,分号,空格隔开
   如果不配置id和name,可以根据applicationContext.getBean(.class)获取对象;

class是bean的全限定名=包名+类名
-->
<bean id="hello" name="hello2 h2,h3;h4" class="com.kuang.pojo.Hello">
   <property name="name" value="Spring"/>
</bean>
import
团队的合作通过import来实现 .

<import resource="{path}/beans.xml"/>
5.2 Bean的配置
5.3 import
Spring3
依赖注入
构造器注入
Set注入(重点)
- pojo下的类
Address.java
package com.github.subei.pojo;

public class Address {
    private String address;

    public String getAddress() {
        return address;
    }

    public void setAddress(String address) {
        this.address = address;
    }

    @Override
    public String toString() {
        return "Address{" +
                "address='" + address + '\'' +
                '}';
    }
}
Student.java
package com.github.subei.pojo;

import java.util.*;

public class Student {
    private String name;
    private Address address;
    private String[] books;
    private List<String> hobby;
    private Map<String,String> card;
    private Set<String> games;
    private String wife;
    private Properties info;

    public String getName() {
        return name;
    }

    public void setName(String name) {
        this.name = name;
    }

    public Address getAddress() {
        return address;
    }

    public void setAddress(Address address) {
        this.address = address;
    }

    public String[] getBooks() {
        return books;
    }

    public void setBooks(String[] books) {
        this.books = books;
    }

    public List<String> getHobby() {
        return hobby;
    }

    public void setHobby(List<String> hobby) {
        this.hobby = hobby;
    }

    public Map<String, String> getCard() {
        return card;
    }

    public void setCard(Map<String, String> card) {
        this.card = card;
    }

    public Set<String> getGames() {
        return games;
    }

    public void setGames(Set<String> games) {
        this.games = games;
    }

    public String getWife() {
        return wife;
    }

    public void setWife(String wife) {
        this.wife = wife;
    }

    public Properties getInfo() {
        return info;
    }

    public void setInfo(Properties info) {
        this.info = info;
    }

    @Override
    public String toString() {
        return "Student{" +
                "name='" + name + '\'' +
                ", address=" + address +
                ", books=" + Arrays.toString(books) +
                ", hobby=" + hobby +
                ", card=" + card +
                ", games=" + games +
                ", wife='" + wife + '\'' +
                ", info=" + info +
                '}';
    }
}
*beans.xml文件注入
<bean id =“student” class=“com.github.polo.Student”>

<property name =“name” value=“苏州”/>

<property name=“address” ref=“address”/>

<property name=“books”>
<array>
<value>Mybatis</value>
</array>
</property>

<property name=“hobby”
<list>
<value>睡觉</value>
</list>
</property>

<property name=“card”>
<map>
<entry key=“IDCard” value=“16116”/>
<entry key=“身份证” value=“282882”/>
</map>
</property>

<property name=“games”>
<set>
<value>蛋仔派对</value>
</set>
</property>

<property name=“wife” >
<null/>
</property>

<property name="info">
            <props>
                <prop key="学号">20210106</prop>
                <prop key="性别">保密</prop>
                <prop key="姓名">subei</prop>
            </props>
        </property>

</bean>
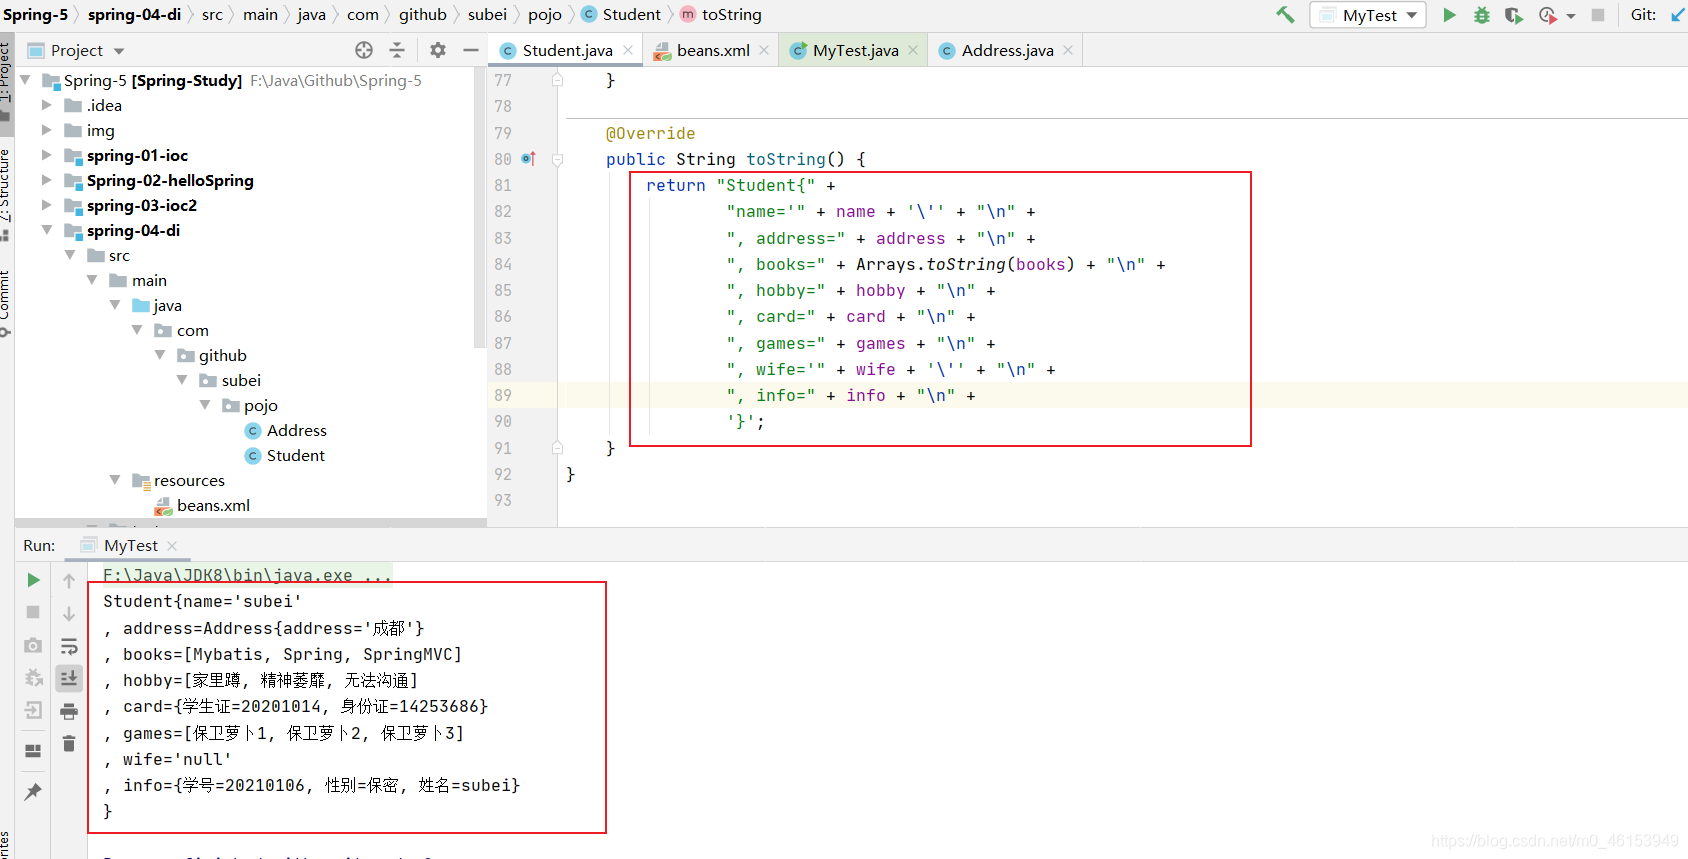
*result
import com.github.subei.pojo.Student;
import org.springframework.context.ApplicationContext;
import org.springframework.context.support.ClassPathXmlApplicationContext;

public class MyTest {
    public static void main(String[] args) {
        ApplicationContext context = new ClassPathXmlApplicationContext("beans.xml");
        Student student = (Student) context.getBean("student");
        System.out.println(student.toString());
    }
}
拓展方式注入
使用p命令和C命令空间进行注入
- p命令
 导入约束 : xmlns:p="http://www.springframework.org/schema/p"

    <!-- p命名空间注入,可以直接注入属性的值: property -->
    <bean id="user" class="com.github.subei.pojo.User"
          p:name="subei"
          p:age="21" />
- c命令(是构造器注入)
 导入约束 : xmlns:c="http://www.springframework.org/schema/c"

    <!-- c命名空间注入,可以通过构造器注入: construct-args -->
    <bean id="user2" class="com.github.subei.pojo.User"
          c:name="subei"
          c:age="22" />
bean的作用域
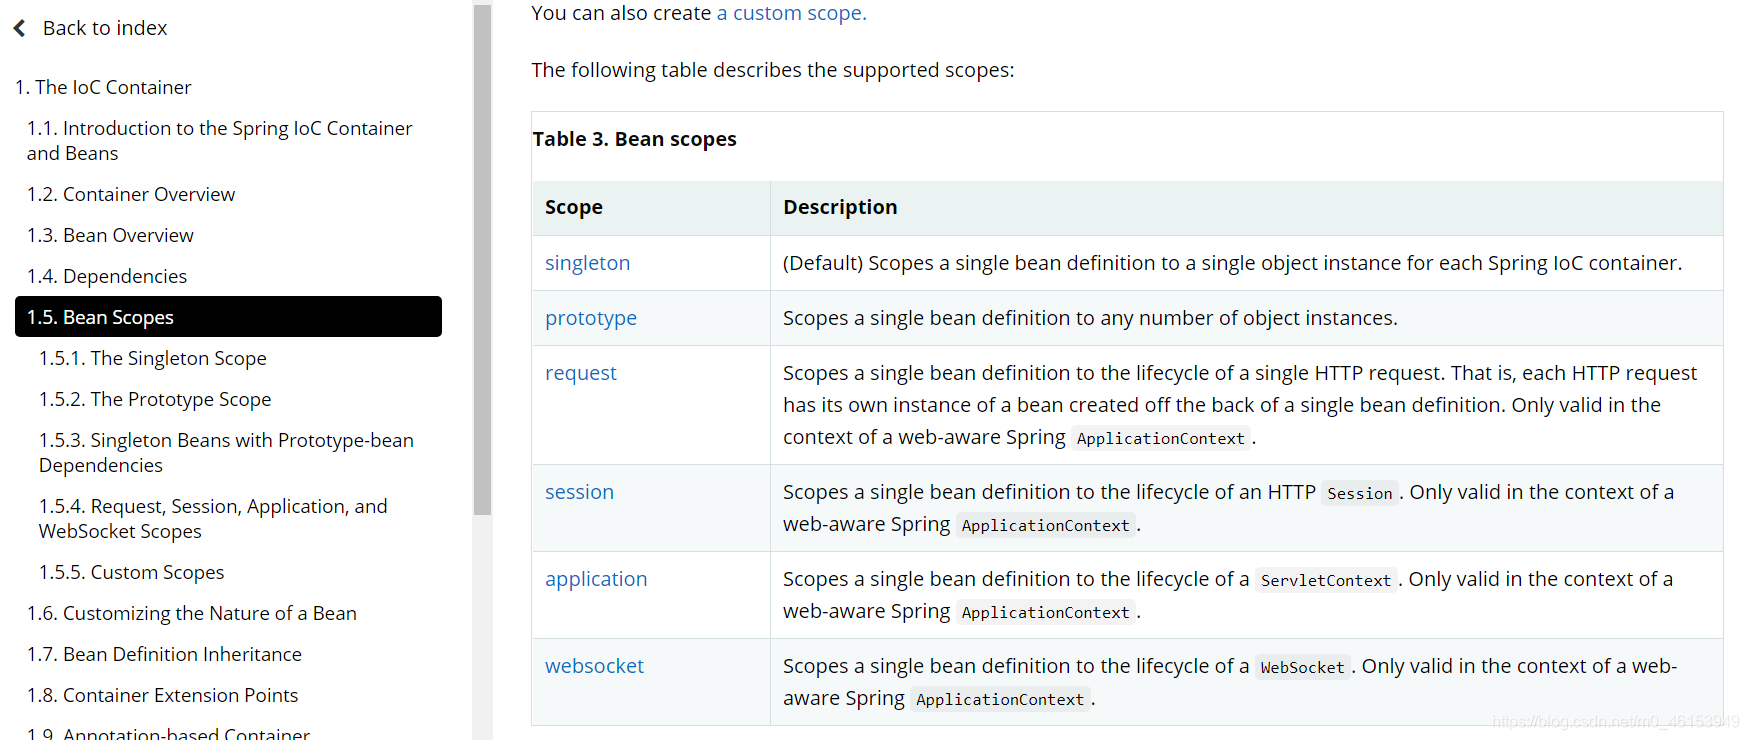
| Scope | Description |
|---|---|
| singleton | (默认)将每个 Spring IoC 容器的单个 bean 定义范围限定为单个对象实例。 |
| prototype | 将单个 bean 定义的作用域限定为任意数量的对象实例。 |
| request | 将单个 bean 定义的范围限定为单个 HTTP 请求的生命周期。也就是说,每个 HTTP 请求都有一个在单个 bean 定义后面创建的 bean 实例。仅在可感知网络的 Spring ApplicationContext中有效。 |
| session | 将单个 bean 定义的范围限定为 HTTP Session的生命周期。仅在可感知网络的 Spring ApplicationContext上下文中有效。 |
| application | 将单个 bean 定义的范围限定为ServletContext的生命周期。仅在可感知网络的 Spring ApplicationContext上下文中有效。 |
| websocket | 将单个 bean 定义的范围限定为WebSocket的生命周期。仅在可感知网络的 Spring ApplicationContext上下文中有效。 |
singleton
当一个bean的作用域为Singleton,那么Spring IoC容器中只会存在一个共享的bean实例,并且所有对bean的请求,只要id与该bean定义相匹配,则只会返回bean的同一实例。Singleton是单例类型,就是在创建起容器时就同时自动创建了一个bean的对象,不管你是否使用,他都存在了,每次获取到的对象都是同一个对象。
实例
    <bean id="user" class="com.github.subei.pojo.User"/>

    <!-- 以下内容是等价的,尽管是多余的(默认为单例作用域) -->
    <bean id="user2" class="com.github.subei.pojo.User"
          scope="singleton"/>
单例模式(面试)
Prototype
- 原型模式:每次从容器中get的时候,都会产生一个新对象
    <bean id="user2" class="com.github.subei.pojo.User"
          scope="prototype"/>
- 其余的request、session、application、这些个只能在web开发中使用到
request
6.4.3 Request
Spring 容器通过为每个 HTTP 请求使用loginAction bean 定义来创建LoginAction bean 的新实例。也就是说,loginAction bean 的作用域是 HTTP 请求级别。您可以根据需要更改创建实例的内部状态,因为从同一loginAction bean 定义创建的其他实例看不到这些状态更改。它们特定于单个请求。当请求完成处理时,将限制作用于该请求的 Bean。
考虑以下 XML 配置来定义 bean :
<bean id="loginAction" class="com.something.LoginAction" scope="request"/>
使用注解驱动的组件或 Java 配置时,可以使用@RequestScope注解 将组件分配给request范围。以下示例显示了如何执行此操作:
@RequestScope
@Component
public class LoginAction {
    // ...
}
session
当一个bean的作用域为Session,表示在一个HTTP Session中,一个bean定义对应一个实例。该作用域仅在基于web的Spring ApplicationContext情形下有效。

考虑下面bean定义:
 <bean id="userPreferences" class="com.foo.UserPreferences" scope="session"/>
在单个 HTTP Session的生存期内,Spring 容器通过使用userPreferences bean 定义来创建UserPreferences bean 的新实例。换句话说,userPreferences bean 的作用域实际上是 HTTP Session级别。与请求范围的 Bean 一样,您可以根据需要任意更改所创建实例的内部状态,因为知道其他 HTTP Session实例(也使用从相同userPreferences Bean 定义创建的实例)不会看到这些状态更改,因为它们特定于单个 HTTP Session。当最终丢弃 HTTP Session时,也将丢弃作用于该特定 HTTP Session的 bean。

使用注解驱动的组件或 Java 配置时,可以使用@SessionScope注解 将组件分配给session范围。
自动装配bean
Byname自动装配
    <!--
    byName:会自动在容器上下文中查找,和自己对象set方法后而的值对应的beanid!
    -->
    <bean id="people" class="com.github.subei.pojo.People" autowire="byName">
        <property name="name" value="哇哈哈"/>

    </bean>
ByType自动装配
    <bean class="com.github.subei.pojo.Cat"/>
    <bean class="com.github.subei.pojo.Dog"/>


    <!--
    byName:会自动在容器上下文中查找,和自己对象set方法后而的值对应的beanid!
    byType:会自动在容器上下文中查找,和自己对象属性类型机同的bean!
    -->
    <bean id="people" class="com.github.subei.pojo.People" autowire="byType">
        <property name="name" value="哇哈哈"/>

    </bean>
- 使用注解实现自动装配
** 导入约束
context:annotation-config/
@Autowired
直接在属性上添加注解
package com.github.subei.pojo;

import org.springframework.beans.factory.annotation.Autowired;

public class People {
    @Autowired
    private Cat cat;
    @Autowired
    private Dog dog;
    private String name;

    public Cat getCat() {
        return cat;
    }

    public Dog getDog() {
        return dog;
    }

    public String getName() {
        return name;
    }

    @Override
    public String toString() {
        return "People{" +
                "cat=" + cat +
                ", dog=" + dog +
                ", name='" + name + '\'' +
                '}';
    }
}
@Nullable 字段标记了这个注解,说明这个字段可以为null
@Resource和@Autowire的区别
- 都是用来自动装配的,都可以放在属性字段上
- 区别
- @AUtowire是通过byTybe来实现,而且必须要求这个对象存在
- @Resource默认通过byname的方式实现,如果找不到名字,则通过byType实现。如果两个都找不到的情况下,就报错(常用)
- 执行顺序不同,@Autowire通过byType的方式来实现,@Resource默认通过byname的方式来实现
4、Spring
使用Java来配置bean
spring官方的文档有这样一段描述,context:component-scan base-package/@ComponentScan will do an auto-scanning. Assuming each class that has to become a bean is annotated with a correct annotation like @Component (for simple bean) or @Controller (for a servlet control) or @Repository (for DAO classes) and these classes are somewhere under the package, Spring will find all of these and create a bean for each one.
这里@componetScan或context:component-scan base-package会扫描将带有注解@Component的类注册为bean。无关@Configuration和@Bean
pojo类包
1、@Component
config包
1、@Configuration
2、@ComponentScan("com.github.pojo")
3、在方法上添加注解@Bean
1+(1+3)@Component+(@Configuration+@Bean)
1+(2+3)@Component+(@ComponentScan+@bean)
1+(3)@Component+(@bean)
(2+3)(@ComponentScan+@bean )
(1+3)(@Configuration+@bean)
Spring5
代理模式
静态代理
动态代理
AOP(面向切面编程)
AOP(Aspect Oriented Programming)意为:面向切面编程,通过预编译方式和运行期动态代理实现程序功能的统一维护的一种技术。

AOP是OOP的延续,是软件开发中的一个热点,也是Spring框架中的一个重要内容,是函数式编程的一种衍生范型。

利用AOP可以对业务逻辑的各个部分进行隔离,从而使得业务逻辑各部分之间的耦合度降低,提高程序的可重用性,同时提高了开发的效率。
原理
-
横切关注点:跨越应用程序多个模块的方法或功能。即是,与我们业务逻辑无关的,但是我们需要关注的部分,就是横切关注点。如日志 , 安全 , 缓存 , 事务等等 …
-
切面(ASPECT):横切关注点 被模块化 的特殊对象。即,它是一个类。
-
通知(Advice):切面必须要完成的工作。即,它是类中的一个方法。
-
目标(Target):被通知对象。
-
代理(Proxy):向目标对象应用通知之后创建的对象。
-
切入点(PointCut):切面通知 执行的 “地点”的定义。
-
连接点(JointPoint):与切入点匹配的执行点。

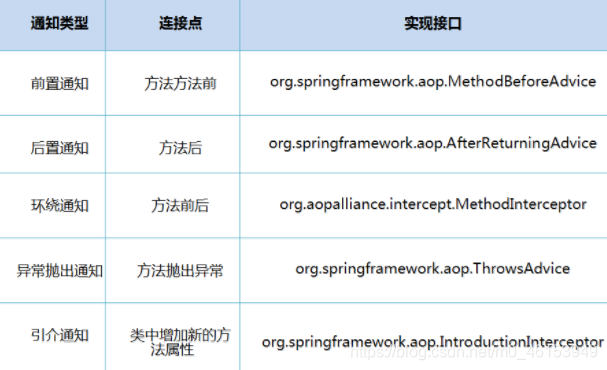
SpringAOP:通过Advice重新定义横向切面逻辑,Spring支持5种类型的advice
实现SpringAOP
一、使用spring接口
1、导包
使用AOP织入
        <dependency>
            <groupId>org.aspectj</groupId>
            <artifactId>aspectjweaver</artifactId>
            <version>1.9.4</version>
        </dependency>
2、编写一个UserService接口和UserServiceImp实现类
3、写一个切面类(通知是切面必须要完成的工作,即它是类中的一个方法)
4、在spring配置文件中注册,并实现AOP切入实现,注意导入约束
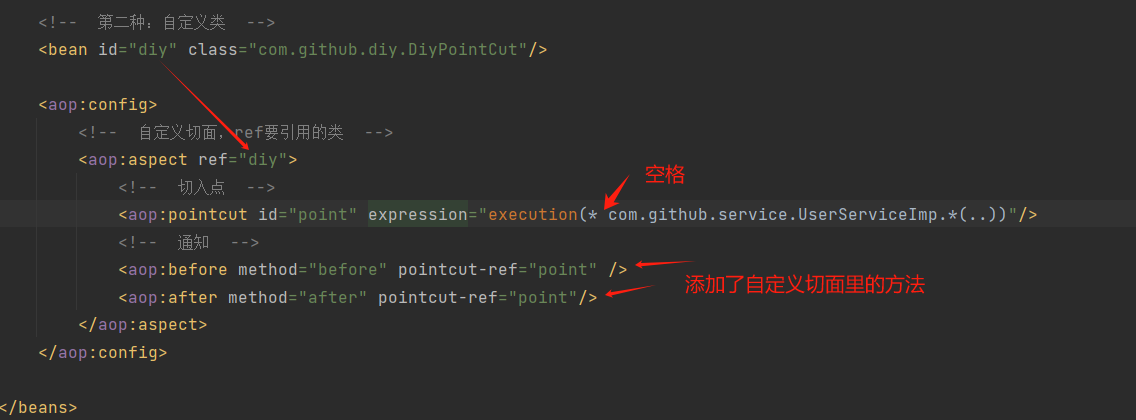
二、自定义实现AOP
三、使用注解来实现
// 使用注解方式实现AOP
@Aspect
public class AnnotationPointCut {
    @Before("execution(* com.github.service.UserServiceImp.*(..))")
    public void before(){
        System.out.println("---------方法执行前---------");
    }

    @After("execution(* com.github.service.UserServiceImp.*(..))")
    public void after(){
        System.out.println("---------方法执行后---------");
    }

    // 在环绕增强中,我们可以给定一个参数,代表我们要获取处理切入的点
    @Around("execution(* com.github.service.UserServiceImp.*(..))")
    public void around(ProceedingJoinPoint jp) throws Throwable {
        System.out.println("环绕前");
        Signature signature = jp.getSignature();
        System.out.println("签名:"+ signature); // 获得签名

        // 执行目标方法:proceed
        Object proceed = jp.proceed();
        System.out.println("环绕后");

        System.out.println(proceed);
    }
}
Spring6
整合Mybatis和Spring
1、UserDao类
UserMapper.xml
配置
-
mybatis- config中配置
别名 -
spring-dao.xml
datasource
    <!-- DataSource:使用Spring的数据源替换Mybatis的配置 c3p0 dbcp druid -->
    <!-- 我们这里使用spring是供JDBC:org.springframework.jdbc.datasource -->
    <bean id="dataSource" class="org.springframework.jdbc.datasource.DriverManagerDataSource">
        <property name="driverClassName" value="com.mysql.jdbc.Driver" />
        <property name="url" value="jdbc:mysql://localhost:3306/mybatis?characterEncoding=UTF-8"/>
        <property name="username" value="root"/>
        <property name="password" value="root"/>
    </bean>
sqlsessionfactory
    <!-- sqlSessionFactory -->
    <bean id="sqlSessionFactory" class="org.mybatis.spring.SqlSessionFactoryBean">
        <property name="dataSource" ref="dataSource" />
        <!-- 绑定mybatis配置文件 -->
        <property name="configLocation" value="classpath:mybatis-config.xml"/>
        <property name="mapperLocations" value="classpath:com/github/mapper/mapper/*.xml"/>
    </bean>
sqlsession template
    <!-- SqlSessionTemplate:就是我们使用的sqLSession -->
    <bean id="SqlSession" class="org.mybatis.spring.SqlSessionTemplate">
        <!-- 只能使用构造器注入sqlSessionFactory,因为它没有set方法 -->
        <constructor-arg index="0" ref="sqlSessionFactory"/>
    </bean>
applicationContext.xml
导入spring-dao
<?xml version="1.0" encoding="UTF-8"?>
<beans xmlns="http://www.springframework.org/schema/beans"
       xmlns:xsi="http://www.w3.org/2001/XMLSchema-instance"
       xmlns:aop="http://www.springframework.org/schema/aop"
       xsi:schemaLocation="http://www.springframework.org/schema/beans
       http://www.springframework.org/schema/beans/spring-beans.xsd
       http://www.springframework.org/schema/aop
       http://www.springframework.org/schema/aop/spring-aop.xsd">

    <import resource="spring-dao.xml"/>

    <!-- -->
    <bean id="userMapper" class="com.github.subei.mapper.mapper.UserMapperImpl">
        <property name="sqlSession" ref="SqlSession"/>
    </bean>

</beans>
UserDaoImpl
配置这个接口
package com.github.subei.mapper.mapper;

import com.github.subei.pojo.User;
import org.mybatis.spring.SqlSessionTemplate;

import java.util.List;

public class UserMapperImpl implements UserMapper{

    // 我们的所有操作,都使用sqlSession来执行,在原来,现在都使用SqlSessionTemplate;
    private SqlSessionTemplate sqlSession;

    public void setSqlSession(SqlSessionTemplate sqlSession) {
        this.sqlSession = sqlSession;
    }

    public List<User> selectUser() {
        UserMapper mapper = sqlSession.getMapper(UserMapper.class);
        return mapper.selectUser();

    }
}
整合实现二
dao继承Support类,直接利用GetsqlSession()获得,然后直接注入SQLSessionFactory。
重新写一个UserDaoImpl类
package com.github.subei.mapper.mapper;

import com.github.subei.pojo.User;
import org.mybatis.spring.support.SqlSessionDaoSupport;

import java.util.List;

public class UserMapperImpl2 extends SqlSessionDaoSupport implements UserMapper{

    public List<User> selectUser() {
        UserMapper mapper = getSqlSession().getMapper(UserMapper.class);
        return mapper.selectUser();
    }
}
事务
1、配置
头文件
       xmlns:tx="http://www.springframework.org/schema/tx"

        http://www.springframework.org/schema/tx
        http://www.springframework.org/schema/tx/spring-tx.xsd

  <!-- 配置声明式事务 -->
    <bean id="transactionManager" class="org.springframework.jdbc.datasource.DataSourceTransactionManager">
        <property name="dataSource" ref="dataSource" />
    </bean>
配置好事务管理器后,去配置事务的通知
    <!-- 结合AOP实现事物的织入 -->
    <!-- 配置事务的通知: -->
    <tx:advice id="txAdvice" transaction-manager="transactionManager">
        <tx:attributes>
            <!-- 配置哪些方法使用什么样的事务,配置事务的传播特性 -->
            <tx:method name="add" propagation="REQUIRED"/>
            <tx:method name="delete" propagation="REQUIRED"/>
            <tx:method name="update" propagation="REQUIRED"/>
            <tx:method name="search*" propagation="REQUIRED"/>
            <tx:method name="get" read-only="true"/>
            <tx:method name="*" propagation="REQUIRED"/>
        </tx:attributes>
    </tx:advice>
配置AOP
搭配aop的头文件中
    <!-- 配置事务的切入 -->
    <aop:config>
        <aop:pointcut id="txPointcut" expression="execution(* com.github.subei.mapper.*.*(..))"/>
        <aop:advisor advice-ref="txAdvice" pointcut-ref="txPointcut"/>
    </aop:config>


