


使用STM32CubeMX移植STM32H743芯片RT-THREAD系统
第一步,在STM32CubeMX上安装RT-THREAD NANO软件包
由于本人已经安装好了,不好重现安装过程。可参考https://blog.csdn.net/qq_36075612/article/details/107309750
第二步,使用STM32CubeMX创建工程
配置调试UART, 配置RCC等
第三步,在STM32CubeMX选择并配置RT-THREAD
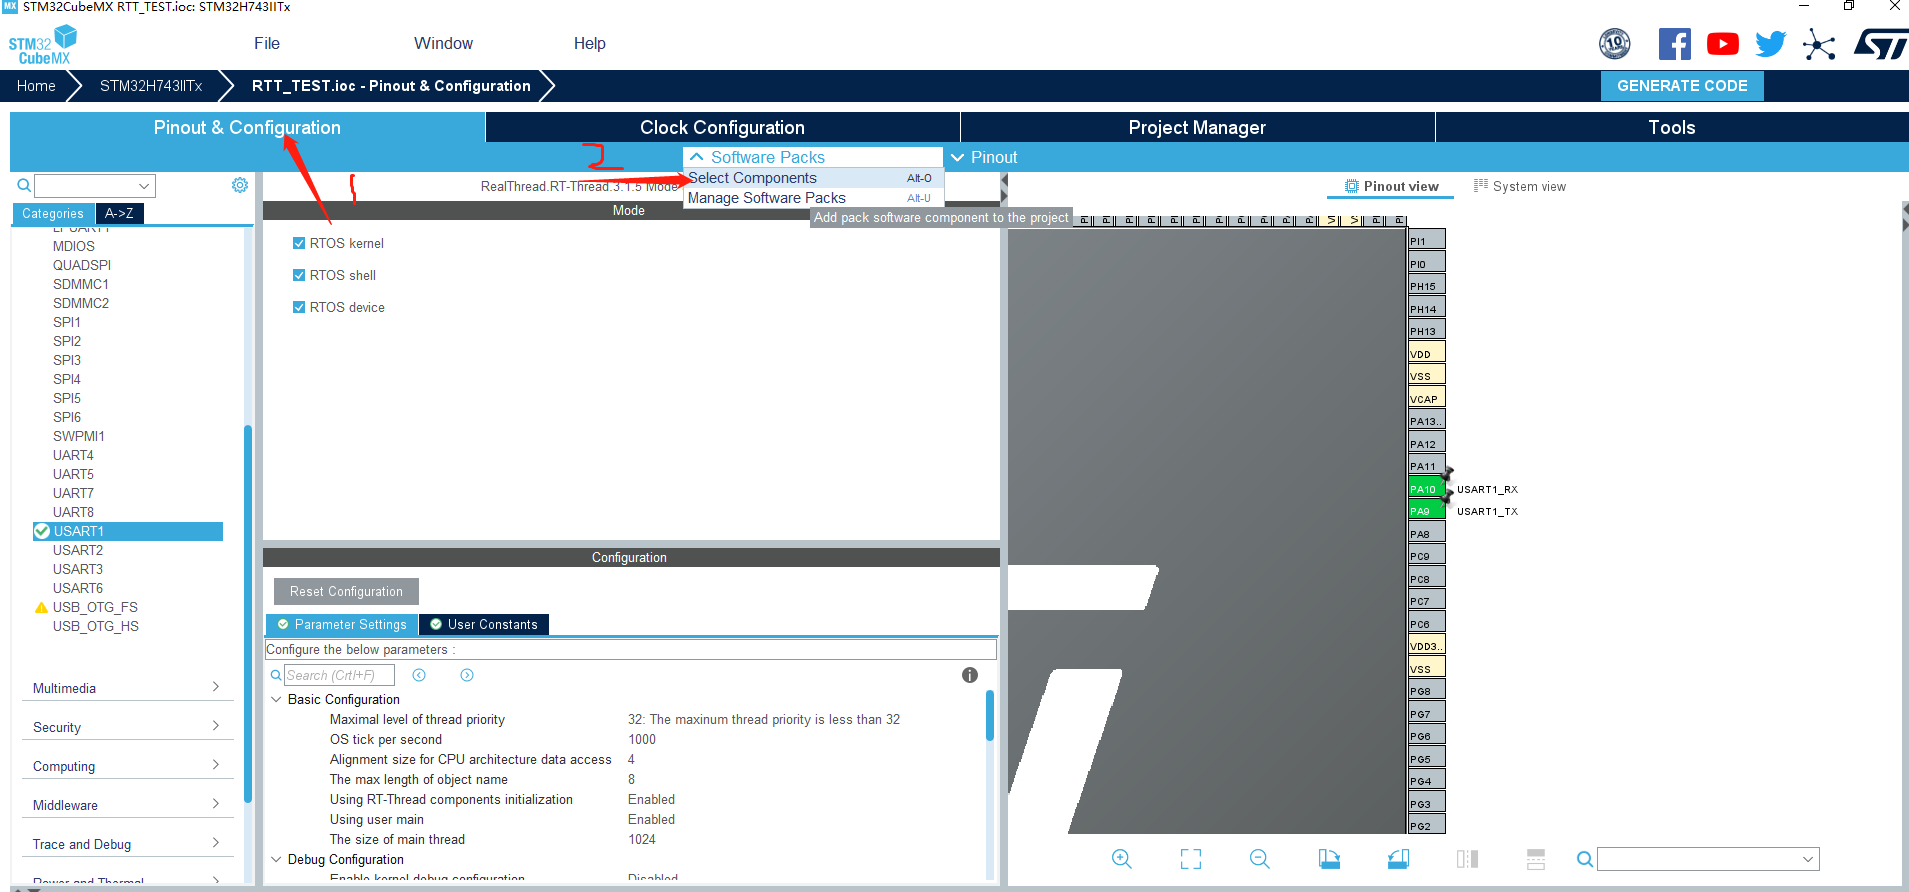
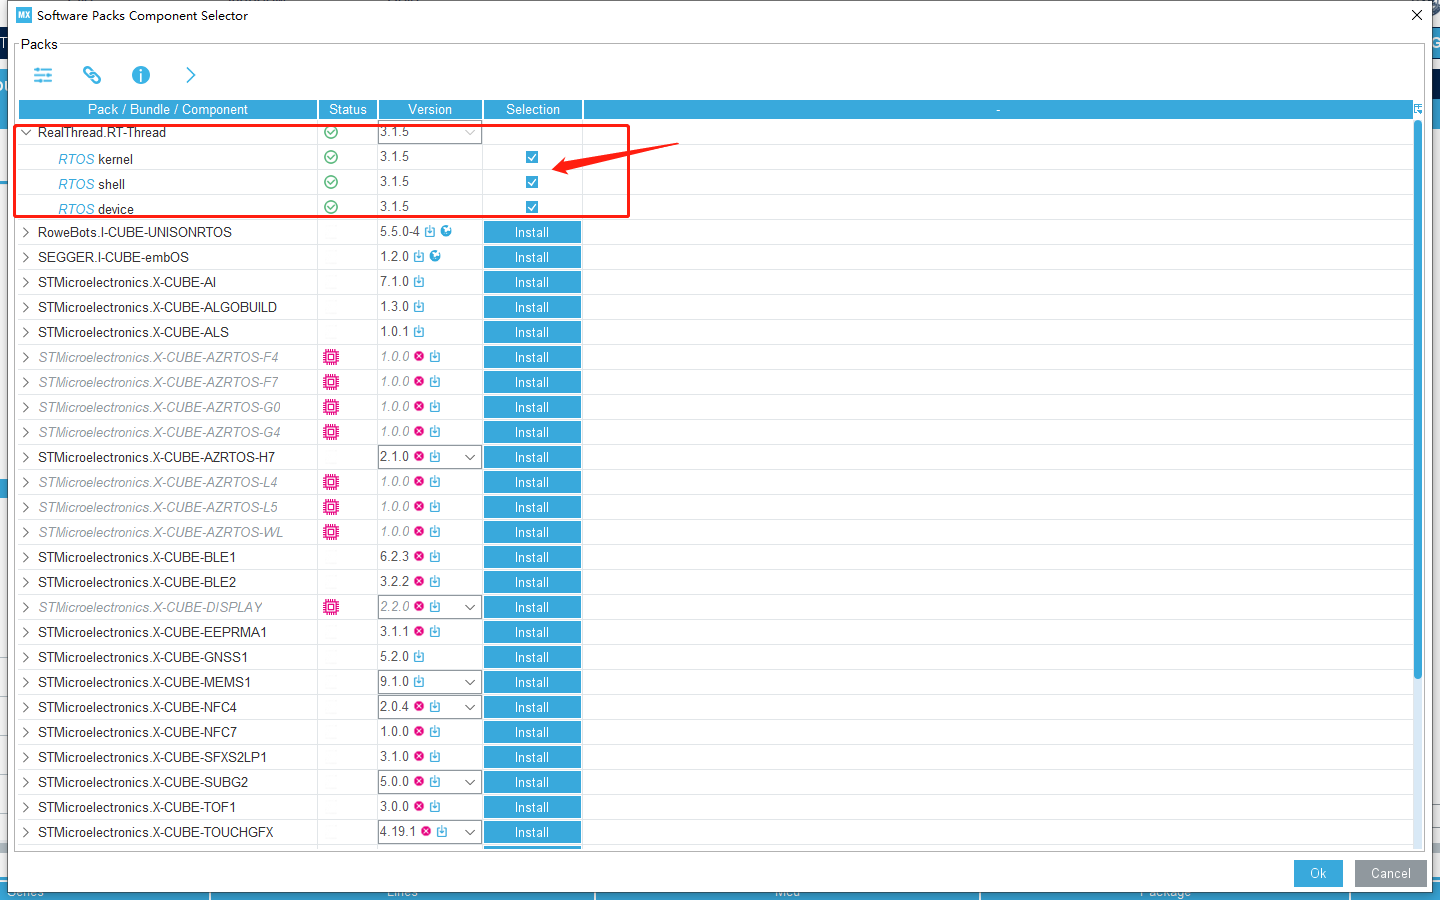
并点击OK
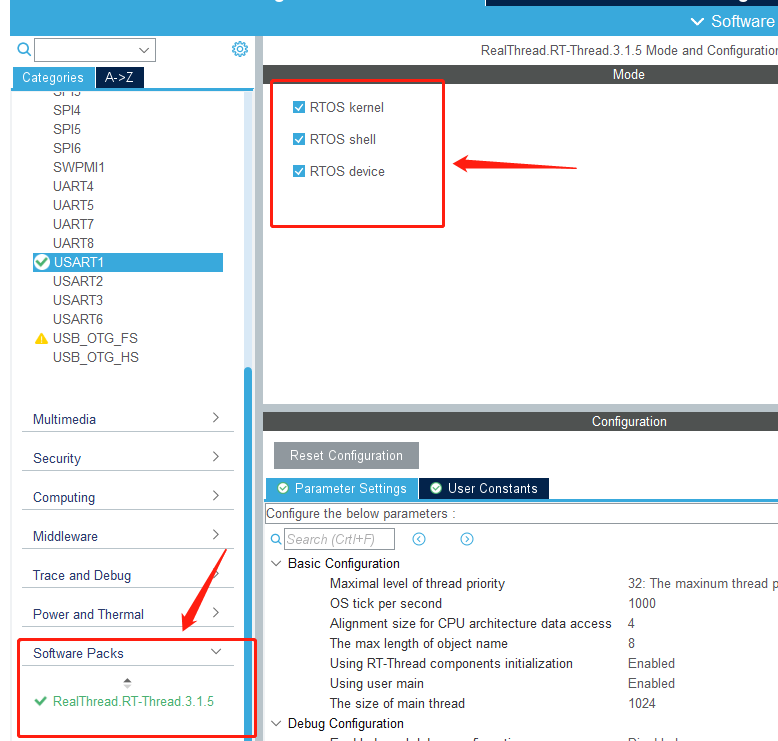

配置好后,直接生成工程,如下图所示

第四步, 编译
1、把以下内容复制粘贴到 <工程根目录>\RT-Thread\rtconfig.h
/* RT-Thread config file */
#ifndef __RTTHREAD_CFG_H__
#define __RTTHREAD_CFG_H__
// <<< Use Configuration Wizard in Context Menu >>>
// <h>Basic Configuration
// <o>Maximal level of thread priority <8-256>
// <i>Default: 32
#define RT_THREAD_PRIORITY_MAX 32
// <o>OS tick per second
// <i>Default: 1000 (1ms)
#define RT_TICK_PER_SECOND 1000
// <o>Alignment size for CPU architecture data access
// <i>Default: 4
#define RT_ALIGN_SIZE 4
// <o>the max length of object name<2-16>
// <i>Default: 8
#define RT_NAME_MAX 8
// <c1>Using RT-Thread components initialization
// <i>Using RT-Thread components initialization
#define RT_USING_COMPONENTS_INIT
// </c>
#define RT_USING_USER_MAIN
// <o>the stack size of main thread<1-4086>
// <i>Default: 512
#define RT_MAIN_THREAD_STACK_SIZE 256
// </h>
// <h>Debug Configuration
// <c1>enable kernel debug configuration
// <i>Default: enable kernel debug configuration
//#define RT_DEBUG
// </c>
// <o>enable components initialization debug configuration<0-1>
// <i>Default: 0
#define RT_DEBUG_INIT 0
// <c1>thread stack over flow detect
// <i> Diable Thread stack over flow detect
//#define RT_USING_OVERFLOW_CHECK
// </c>
// </h>
// <h>Hook Configuration
// <c1>using hook
// <i>using hook
//#define RT_USING_HOOK
// </c>
// <c1>using idle hook
// <i>using idle hook
//#define RT_USING_IDLE_HOOK
// </c>
// </h>
// <e>Software timers Configuration
// <i> Enables user timers
#define RT_USING_TIMER_SOFT 0
#if RT_USING_TIMER_SOFT == 0
#undef RT_USING_TIMER_SOFT
#endif
// <o>The priority level of timer thread <0-31>
// <i>Default: 4
#define RT_TIMER_THREAD_PRIO 4
// <o>The stack size of timer thread <0-8192>
// <i>Default: 512
#define RT_TIMER_THREAD_STACK_SIZE 512
// </e>
// <h>IPC(Inter-process communication) Configuration
// <c1>Using Semaphore
// <i>Using Semaphore
#define RT_USING_SEMAPHORE
// </c>
// <c1>Using Mutex
// <i>Using Mutex
//#define RT_USING_MUTEX
// </c>
// <c1>Using Event
// <i>Using Event
//#define RT_USING_EVENT
// </c>
// <c1>Using MailBox
// <i>Using MailBox
#define RT_USING_MAILBOX
// </c>
// <c1>Using Message Queue
// <i>Using Message Queue
//#define RT_USING_MESSAGEQUEUE
// </c>
// </h>
// <h>Memory Management Configuration
// <c1>Memory Pool Management
// <i>Memory Pool Management
//#define RT_USING_MEMPOOL
// </c>
// <c1>Dynamic Heap Management(Algorithm: small memory )
// <i>Dynamic Heap Management
#define RT_USING_HEAP
#define RT_USING_SMALL_MEM
// </c>
// <c1>using tiny size of memory
// <i>using tiny size of memory
//#define RT_USING_TINY_SIZE
// </c>
// </h>
// <h>Console Configuration
// <c1>Using console
// <i>Using console
#define RT_USING_CONSOLE
// </c>
// <o>the buffer size of console <1-1024>
// <i>the buffer size of console
// <i>Default: 128 (128Byte)
#define RT_CONSOLEBUF_SIZE 256
// </h>
// <h>FinSH Configuration
// <c1>include finsh config
// <i>Select this choice if you using FinSH
#include "finsh_config.h"
// </c>
// </h>
// <h>Device Configuration
// <c1>using device framework
// <i>using device framework
//#define RT_USING_DEVICE
// </c>
// </h>
// <<< end of configuration section >>>
#endif
2、在 <工程根目录>\Middlewares\Third_Party\RealThread_RTOS\bsp\_template\cubemx_config 目录下创建board.h头文件并把以下内容复制粘贴到新创建的board.h里
/*
* Copyright (c) 2006-2018, RT-Thread Development Team
*
* SPDX-License-Identifier: Apache-2.0
*
* Change Logs:
* Date Author Notes
* 2018-11-5 SummerGift first version
*/
#ifndef __BOARD_H__
#define __BOARD_H__
#include <rtthread.h>
#include <stm32h7xx.h>
#ifdef __cplusplus
extern "C" {
#endif
#if !defined (LSI_VALUE)
#define LSI_VALUE ((uint32_t)32000)
#endif
#define STM32_FLASH_START_ADRESS ((uint32_t)0x08000000)
#define STM32_FLASH_SIZE (2048 * 1024)
#define STM32_FLASH_END_ADDRESS ((uint32_t)(STM32_FLASH_START_ADRESS + STM32_FLASH_SIZE))
#define STM32_SRAM_SIZE (512)
#define STM32_SRAM_END (0x24000000 + STM32_SRAM_SIZE * 1024)
#if defined(__CC_ARM) || defined(__CLANG_ARM)
extern int Image$$RW_IRAM1$$ZI$$Limit;
#define HEAP_BEGIN (&Image$$RW_IRAM1$$ZI$$Limit)
#elif __ICCARM__
#pragma section="CSTACK"
#define HEAP_BEGIN (__segment_end("CSTACK"))
#else
extern int __bss_end;
#define HEAP_BEGIN (&__bss_end)
#endif
#define HEAP_END STM32_SRAM_END
/*-------------------------- ETH CONFIG BEGIN --------------------------*/
/** if you want to use eth you can use the following instructions.
*
* STEP 1, define macro related to the eth
* such as BSP_USING_ETH
*
* STEP 2, copy your eth init function from stm32xxxx_hal_msp.c generated by stm32cubemx to the end if board.c file
* such as void HAL_ETH_MspInit(ETH_HandleTypeDef* heth)
*
* STEP 3, modify your stm32xxxx_hal_config.h file to support eth peripherals. define macro related to the peripherals
* such as #define HAL_ETH_MODULE_ENABLED
*
* STEP 4, config your phy type
* such as #define PHY_USING_LAN8720A
* #define PHY_USING_DM9161CEP
* #define PHY_USING_DP83848C
* STEP 5, implement your phy reset function in the end of board.c file
* void phy_reset(void)
*
* STEP 6, config your lwip or other network stack
*
*/
#define BSP_USING_ETH/**/
#ifdef BSP_USING_ETH
#define PHY_USING_LAN8720A/**/
/*#define PHY_USING_DM9161CEP*/
/*#define PHY_USING_DP83848C*/
#endif
void SystemClock_Config(void);
#ifdef __cplusplus
}
#endif
#endif
3、编译工程 如下图所示

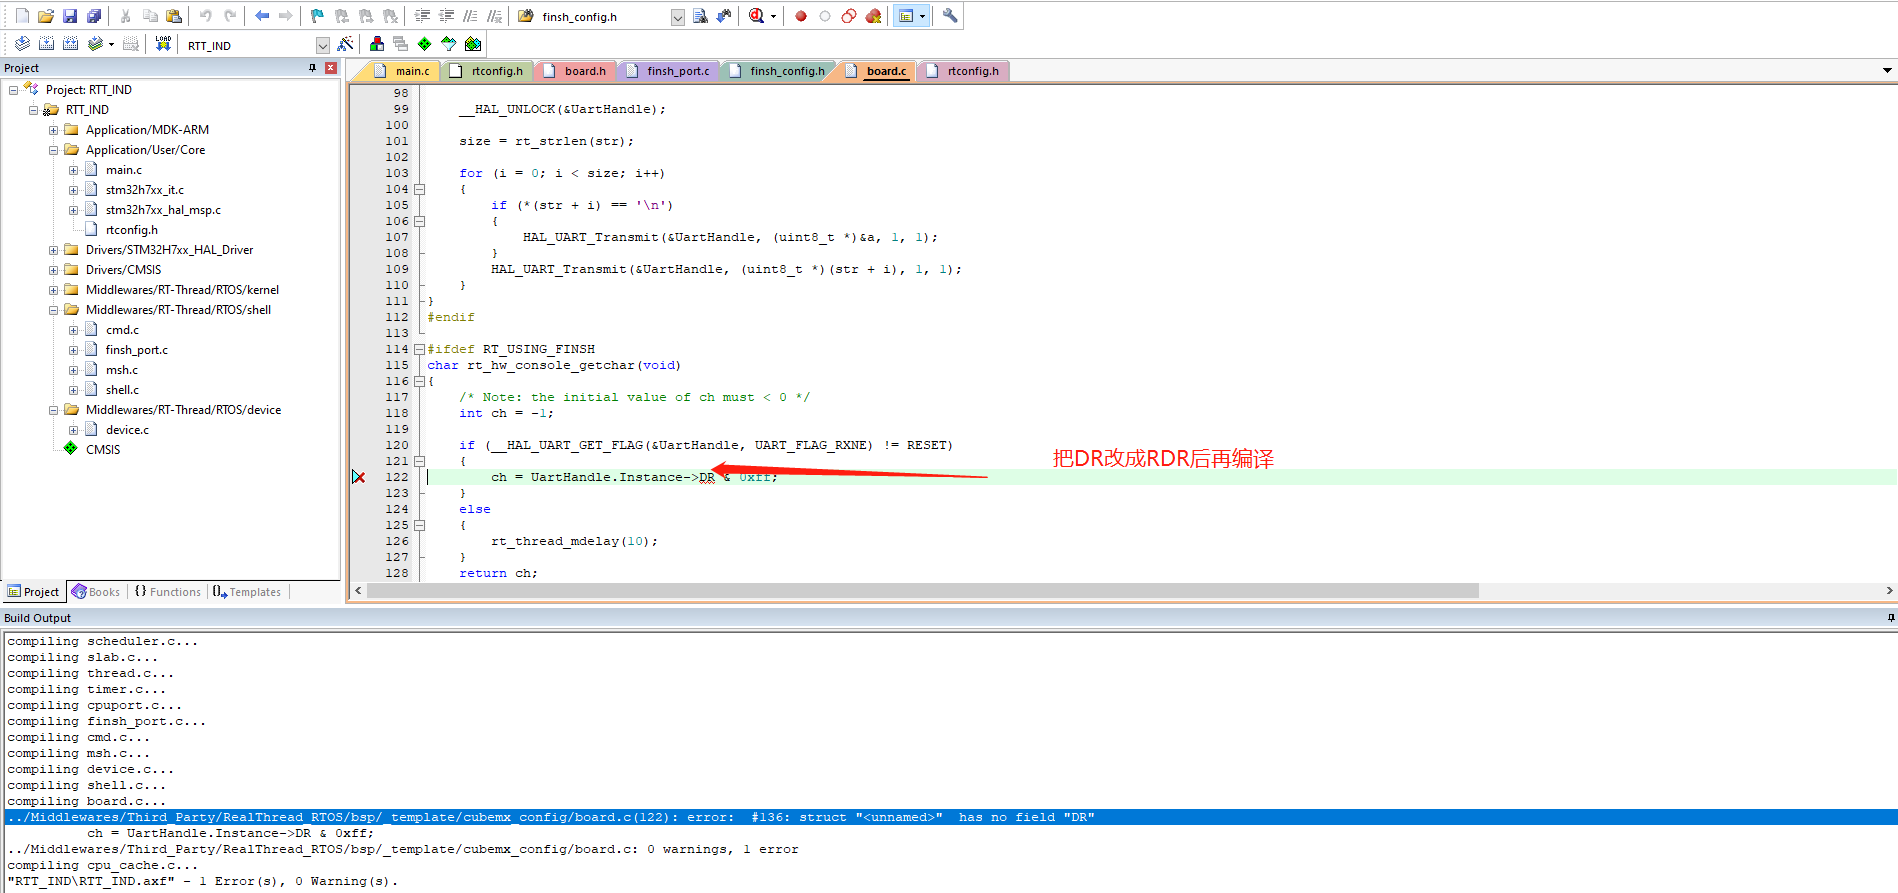
再编译后如下图所示

在stm32h7xx_it.c中把 HardFault_Handler 和 MemManage_Handler函数体删除后再编译
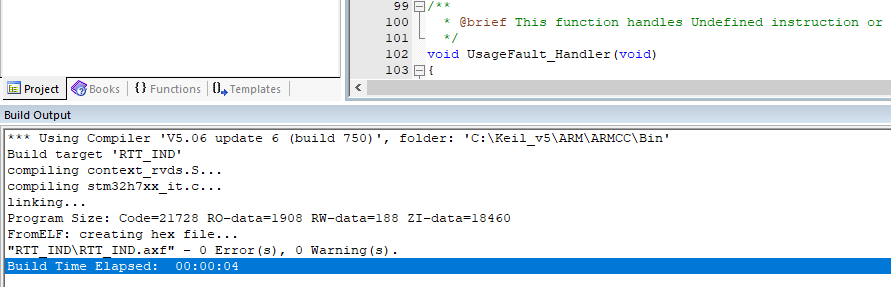
到了这里已经编译成功
但,还有些地方要注意点
注意点一:
在board.c中有个调试串口初始化uart_init函数中要注意板子相对应的串口,比如我的板子就是USART1如下图所示

注意点二:
在main.c中添加包含头文件
#include <rtthread.h>
并在while(1){
//添加如下一行代码,如果没有这行代码,会在MAIN线程中会一直占用CPU,而不会切换到其它线程
rt_thread_mdelay(500);
}
注意点三:
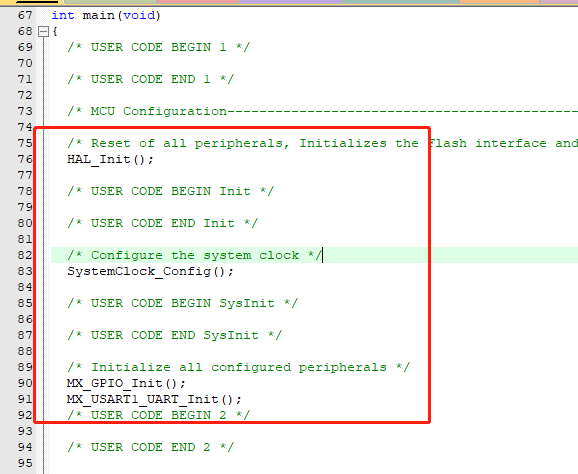
删除以上框住的代码
以上三个注意点修改后再编译
最后下载程序验证,如下图所示
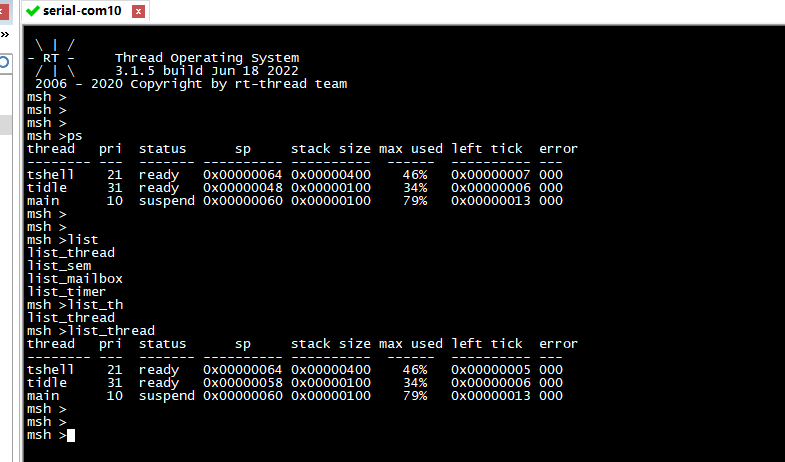
在上图中在STM32H743上面的RT-THREAD系统执行了 ps 和list_thread两条指令,说明此次在STM32CubeMX移植RT-THREAD成功
结束!!!!!!


【推荐】国内首个AI IDE,深度理解中文开发场景,立即下载体验Trae
【推荐】编程新体验,更懂你的AI,立即体验豆包MarsCode编程助手
【推荐】抖音旗下AI助手豆包,你的智能百科全书,全免费不限次数
【推荐】轻量又高性能的 SSH 工具 IShell:AI 加持,快人一步
· TypeScript + Deepseek 打造卜卦网站:技术与玄学的结合
· 阿里巴巴 QwQ-32B真的超越了 DeepSeek R-1吗?
· 【译】Visual Studio 中新的强大生产力特性
· 10年+ .NET Coder 心语 ── 封装的思维:从隐藏、稳定开始理解其本质意义
· 【设计模式】告别冗长if-else语句:使用策略模式优化代码结构