Spring Boot 教程
Spring boot是一个Spring框架模块,它为Spring框架提供RAD(快速应用程序开发)功能。它高度依赖于启动器模板功能,该功能非常强大且完美无缺。

1.什么是Spring boot starter template
Spring Boot Starter包含启动特定功能所需的所有相关依赖关系的集合的模板。比如,我们自己创建一个Spring Web MVC应用程序,则必须自己包含所有的依赖项,这样会导致一些版本的冲突,最终运行异常。
使用Spring boot 创建MVC应用程序,需要导入 spring-boot-starter-web 依赖
<!-- Parent pom is mandatory to control versions of child dependencies -->
<parent>
    <groupId>org.springframework.boot</groupId>
    <artifactId>spring-boot-starter-parent</artifactId>
    <version>2.1.6.RELEASE</version>
    <relativePath />
</parent>

<!-- Spring web brings all required dependencies to build web application. -->
<dependency>
    <groupId>org.springframework.boot</groupId>
    <artifactId>spring-boot-starter-web</artifactId>
</dependency>
上面 spring-boot-starter-web 依赖,导入所有的依赖到你的项目中,将会下载所有的依赖项。
另外注意,不需要向子依赖项指定版本信息,所有版本都根据父级的版本进行解析(我们的示例用的是2.1.6.RELEASE)
<dependencies>
    <dependency>
        <groupId>org.springframework.boot</groupId>
        <artifactId>spring-boot-starter</artifactId>
    </dependency>
    <dependency>
        <groupId>org.springframework.boot</groupId>
        <artifactId>spring-boot-starter-json</artifactId>
    </dependency>
    <dependency>
        <groupId>org.springframework.boot</groupId>
        <artifactId>spring-boot-starter-tomcat</artifactId>
    </dependency>
    <dependency>
        <groupId>org.hibernate.validator</groupId>
        <artifactId>hibernate-validator</artifactId>
    </dependency>
    <dependency>
        <groupId>org.springframework</groupId>
        <artifactId>spring-web</artifactId>
    </dependency>
    <dependency>
        <groupId>org.springframework</groupId>
        <artifactId>spring-webmvc</artifactId>
    </dependency>
</dependencies>
2.Spring boot 自动配置
自动配置启用@EnableAutoConfiguration注解,Spring boot 自动配置扫描classpath,在classpath中找到库,并配置所有的bean。
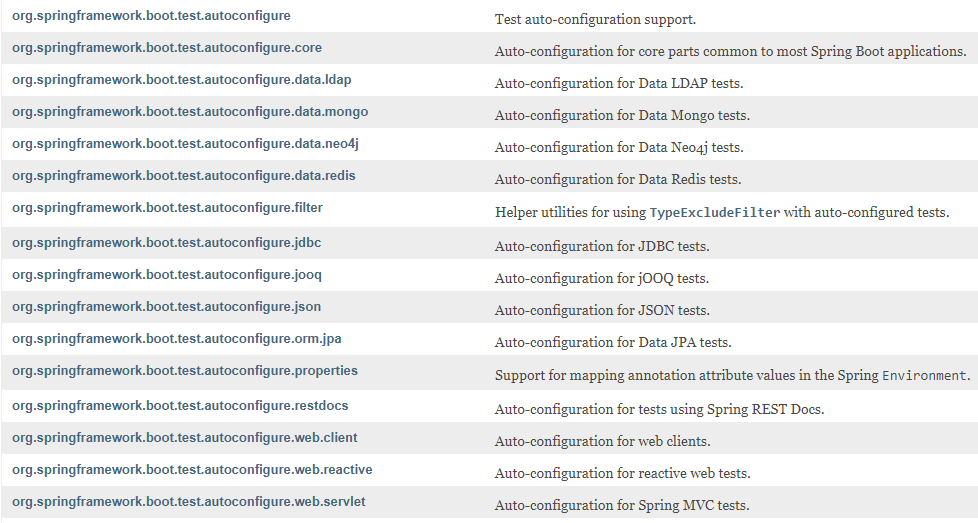
Spring boot 自动配置的逻辑实施是在spring-boot-autoconfigure.jar中,Spring boot autoconfiguration packages:https://docs.spring.io/spring-boot/docs/2.0.4.RELEASE/api/

Spring AOP的自动配置:
1.扫描classpath,存在EnableAspectJAutoProxy, Aspect, Advice 和AnnotatedElement 类。
2.如果没有类,则不会为Spring AOP进行自动配置。
3.如果找到类,则使用Java配置注释配置AOP@EnableAspectJAutoProxy。
4.检查属性的spring.aop值是true或false
5.基于property,设置了proxyTargetClass
AopAutoConfiguration.java
@Configuration
@ConditionalOnClass({ EnableAspectJAutoProxy.class, Aspect.class, Advice.class,
        AnnotatedElement.class })
@ConditionalOnProperty(prefix = "spring.aop", name = "auto", havingValue = "true", matchIfMissing = true)
public class AopAutoConfiguration
{

    @Configuration
    @EnableAspectJAutoProxy(proxyTargetClass = false)
    @ConditionalOnProperty(prefix = "spring.aop", name = "proxy-target-class", havingValue = "false", matchIfMissing = false)
    public static class JdkDynamicAutoProxyConfiguration {

    }

    @Configuration
    @EnableAspectJAutoProxy(proxyTargetClass = true)
    @ConditionalOnProperty(prefix = "spring.aop", name = "proxy-target-class", havingValue = "true", matchIfMissing = true)
    public static class CglibAutoProxyConfiguration {

    }

}
3.嵌入式Web Server
Spring boot 应用包含tomcat 作为web server,可以用命令直接去运行Spring boot应用程序。
如果不想用tomcat,也可以排除它,用其它的web server,都是基于可配置的。
例如:下面的配置是排除tomcat,用jetty
<dependency>
    <groupId>org.springframework.boot</groupId>
    <artifactId>spring-boot-starter-web</artifactId>
    <exclusions>
        <exclusion>
            <groupId>org.springframework.boot</groupId>
            <artifactId>spring-boot-starter-tomcat</artifactId>
        </exclusion>
    </exclusions>
</dependency>


<dependency>
    <groupId>org.springframework.boot</groupId>
    <artifactId>spring-boot-starter-jetty</artifactId>
</dependency>
4.启动应用程序
要运行应用程序,我们需要使用@SpringBootApplication注解,这相当于@Configuration,@EnableAutoConfiguration和@ComponentScan在一起使用
这样可以扫描配置类,文件并将它们加载到spring上下文中。在下面的示例中,执行以main()方法启动。加载所有配置文件,配置它们并根据application.properties文件夹中的应用程序属性来启动应用程序/resources
MyApplication.java
@SpringBootApplication
public class MyApplication
{
   public static void main(String[] args)
   {
       SpringApplication.run(Application.class, args);
   }
}
### Server port #########
server.port=8080

### Context root ########
server.contextPath=/home
可以直接用IDE运行main()方法,或者可以构建成jar文件然后运行以下命令:
java -jar spring-boot-demo.jar
关注公众号githubcn,免费获取更多学习视频教程


 浙公网安备 33010602011771号