

springboot读取properties和yml配置文件
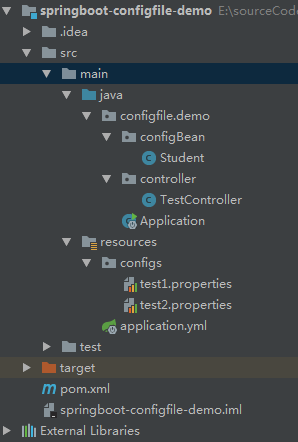
一、新建maven工程:springboot-configfile-demo,完整工程如下:
pom.xml
<?xml version="1.0" encoding="UTF-8"?>
<project xmlns="http://maven.apache.org/POM/4.0.0"
         xmlns:xsi="http://www.w3.org/2001/XMLSchema-instance"
         xsi:schemaLocation="http://maven.apache.org/POM/4.0.0 http://maven.apache.org/xsd/maven-4.0.0.xsd">
    <modelVersion>4.0.0</modelVersion>

    <groupId>springboot.configfile.demo</groupId>
    <artifactId>springboot-configfile-demo</artifactId>
    <version>1.0-SNAPSHOT</version>
    <parent>
        <groupId>org.springframework.boot</groupId>
        <artifactId>spring-boot-starter-parent</artifactId>
        <version>1.4.1.RELEASE</version>
    </parent>
    <dependencies>
        <dependency>
            <groupId>org.springframework.boot</groupId>
            <artifactId>spring-boot-starter-web</artifactId>
        </dependency>
    </dependencies>
</project>
二、新建三个配置文件
1、主配置文件application.yml(程序默认从该文件读取配置信息,放在该配置文件的配置,可以直接在代码通过@Value读取)
server:
  port: 8083
  context-path: /

teacher:
  name: boshen
  password: 123456
2、自定义配置文件1,configs/test1.properties(没有前缀)
doctor_name=zhangsan
doctor_age=35
3、自定义配置文件2,configs/test2.properties(有前缀,后面通过一个Student类来接收信息)
student.name=lishi
student.sex=man

student.bookList[0]=english
student.bookList[1]=history

student.scoreMap[english]=95
student.scoreMap[history]=98
三、新建类Student
package configfile.demo.configBean;

import org.springframework.boot.context.properties.ConfigurationProperties;
import org.springframework.context.annotation.Configuration;
import org.springframework.context.annotation.PropertySource;
import org.springframework.stereotype.Component;

import java.io.Serializable;
import java.util.List;
import java.util.Map;

/**
 * @author Administrator
 * @date 2019/02/15
 */
@Configuration
@ConfigurationProperties(prefix = "student")
@PropertySource("classpath:configs/test2.properties")
@Component
public class Student implements Serializable{
    private String name;
    private String sex;

    private List<String> bookList;

    private Map<String,String> scoreMap;

    public String getName() {
        return name;
    }

    public void setName(String name) {
        this.name = name;
    }

    public String getSex() {
        return sex;
    }

    public void setSex(String sex) {
        this.sex = sex;
    }

    public List<String> getBookList() {
        return bookList;
    }

    public void setBookList(List<String> bookList) {
        this.bookList = bookList;
    }

    public Map<String, String> getScoreMap() {
        return scoreMap;
    }

    public void setScoreMap(Map<String, String> scoreMap) {
        this.scoreMap = scoreMap;
    }

    @Override
    public String toString() {
        return "Student{" +
                "name='" + name + '\'' +
                ", sex='" + sex + '\'' +
                ", bookList=" + bookList +
                ", scoreMap=" + scoreMap +
                '}';
    }
}
四、新建controller类,进行测试
package configfile.demo.controller;

import configfile.demo.configBean.Student;
import org.springframework.beans.factory.annotation.Autowired;
import org.springframework.beans.factory.annotation.Value;
import org.springframework.web.bind.annotation.RequestMapping;
import org.springframework.web.bind.annotation.RequestMethod;
import org.springframework.web.bind.annotation.RestController;

/**
 * @author Administrator
 * @date 2019/02/15
 */
@RestController
@RequestMapping("/config-test")
public class TestController {

    @Value("${teacher.name}")
    private String teacherName;
    @Value("${teacher.password}")
    private String teacherPassword;

    @Value("${doctor_name}")
    private String doctorName;
    @Value("${doctor_age}")
    private Integer doctorAge;

    @Autowired
    private Student student;

    @RequestMapping(value = "/read",method = RequestMethod.GET)
    public void postTest(){
        System.out.println("以下是默认的application.yml的配置:==========");
        System.out.println("teacher.name:"+teacherName);
        System.out.println("teacher.password:"+teacherPassword);

        System.out.println("以下是configs/test1.properties的配置:==========");
        System.out.println("doctor_namee:"+doctorName);
        System.out.println("doctor_age:"+doctorAge);

        System.out.println("以下是configs/test2.properties的配置:==========");
        System.out.println(student.toString());
    }
}
五、新建springboot启动类
package configfile.demo;

import org.springframework.boot.SpringApplication;
import org.springframework.boot.autoconfigure.EnableAutoConfiguration;
import org.springframework.boot.autoconfigure.SpringBootApplication;
import org.springframework.context.annotation.ComponentScan;
import org.springframework.context.annotation.Configuration;
import org.springframework.context.annotation.PropertySource;

/**
 * @author Administrator
 * @date 2019/02/15
 */
@SpringBootApplication
@Configuration
@ComponentScan
@EnableAutoConfiguration
@PropertySource(value = "classpath:/configs/test1.properties", ignoreResourceNotFound = true)
public class Application {
    public static void main(String[] args){
        SpringApplication.run(Application.class, args);
    }
}
六,启动程序,在postman测试,并查看控制台输出


