
Nginx在centos6.5下的安装和反向代理简单配置
From:http://blog.csdn.net/luckykapok918/article/details/44258901
查看linux的版本信息:
lsb_release -a

1.首先卸载原有的nginx:
yum remove nginx
2.安装nginx在内网的centos6.5服务器192.168.200.123上:
yum install nginx
3.运行nginx
cd /usr/sbin
./nginx

或者执行 service nginx start
4.,停止、重启nginx
/usr/sbin/nginx -s stop 或者执行 service nginx stop
/usr/sbin/nginx -s reload
5.检查nginx运行情况
5.1 ps -ef | grep nginx

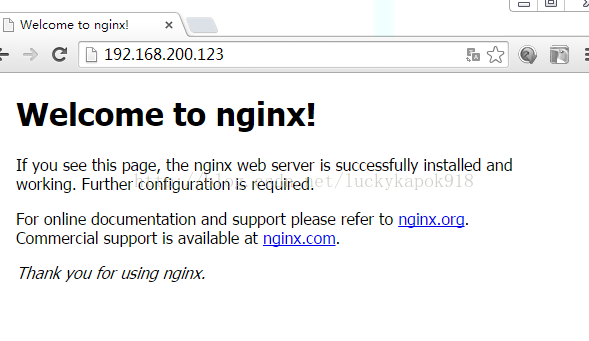
5.2 浏览器中测试
6.查看80端口是否启用

7.配置反向代理,:
反向代理说明:nginx服务器地址192.168.200.123,端口80 ;tomcat服务器地址192.168.200.121端口8080;apache服务器地址192.168.200.121,端口80.
现在需要访问nginx的80端口来访问tomcat中的web服务。
7.1 配置前访问:

7.2配置nginx并重启服务:
cd 到 /etc/nginx/conf.d文件夹
修改default.conf文件
增加如下内容:
- server{
- listen 80;
- server_name 192.168.200.123;
- location / {
- root /usr/share/nginx/html;
- index index.html index.htm;
- }
- location /wmsnew {
- proxy_set_header Host $host;
- proxy_set_header X-Real-IP $remote_addr;
- proxy_set_header Destination $http_destination;
- proxy_pass http://192.168.200.121:8080/wmsnew/;
- }
- location /wmsnew/static {
- proxy_set_header Host $host;
- proxy_set_header X-Real-IP $remote_addr;
- proxy_set_header Destination $http_destination;
- proxy_pass http://192.168.200.121/static;
- }
- }
server{
listen          80;
server_name 192.168.200.123;

   location / {
        root   /usr/share/nginx/html;
        index  index.html index.htm;
    }

location /wmsnew {
proxy_set_header Host $host;
proxy_set_header X-Real-IP $remote_addr;
proxy_set_header Destination $http_destination;
proxy_pass http://192.168.200.121:8080/wmsnew/;
}
location /wmsnew/static {
proxy_set_header Host $host;
proxy_set_header X-Real-IP $remote_addr;
proxy_set_header Destination $http_destination;
proxy_pass http://192.168.200.121/static;
}

}
如果123服务器启动了防火墙,则需要单独为80端口开发
- <span style="font-size:18px;color:#3366ff;">#修改防火墙配置:
- [root@admin nginx-1.2.6]# vi + /etc/sysconfig/iptables
- #添加配置项
- -A INPUT -m state --state NEW -m tcp -p tcp --dport 80 -j ACCEPT
- #重启防火墙
- [root@admin nginx-1.2.6]# service iptables restart</span>
<span style="font-size:18px;color:#3366ff;">#修改防火墙配置:
[root@admin nginx-1.2.6]# vi + /etc/sysconfig/iptables
#添加配置项
-A INPUT -m state --state NEW -m tcp -p tcp --dport 80 -j ACCEPT
#重启防火墙
[root@admin nginx-1.2.6]# service iptables restart</span>
7.3 配置后访问:
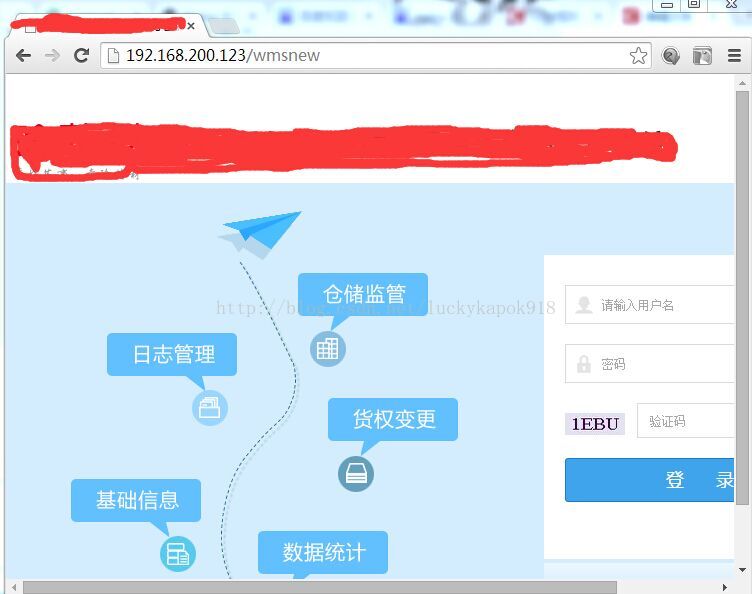
配置成功!!
--------------------------------------------------------------补充源码编码安装nginx方式------------------------------------------------
安装说明
操作系统:centos6.3
软件:nginx-1.2.6.tar.gz
安装方式:源码编码安装
安装位置:/usr/local/nginx
nginx下载地址:http://nginx.org/en/download.html
准备工具
在安装nginx衫,需要确保系统已经安装了g++、gcc、openssl-devel、pcre-devel和zlib-devel软件。
- yum install gcc-c++
- yum -y install zlib zlib-devel openssl openssl--devel pcre pcre-devel
检查系统安装的ningx
- find -name nginx
- ./nginx
- ./nginx/sbin/nginx
- ./nginx-1.2.6/objs/nginx
卸载系统原有的nginx
- yum remove nginx
centos安装nginx
将安装包文件上传到目录中,本文是上传到/usr/local中,按以下命令进行操作。
- [root@admin local]# cd /usr/local
- [root@admin local]# tar -zxv -f nginx-1.2.6.tar.gz
- [root@admin local]# rm -rf nginx-1.2.6.tar.gz
- [root@admin local]# mv nginx-1.2.6 nginx
- [root@admin local]# cd /usr/local/nginx
- [root@admin nginx]# ./configure --prefix=/usr/local/nginx
- [root@admin nginx]# make
- [root@admin nginx]# make install

 浙公网安备 33010602011771号