Maven
Maven 的一个哲学是习惯优于配置 (Convention Over Configuration)。
maven 配置文件
配置文件的加载顺序 ~/.m2/setting.xml --> conf/settings.xml
../conf/settings.xml 中配置本地仓库地址 <localRepository>../local/repo</localRepository>
pom 文件
dependencyManagement 标签
在 Maven 中 dependencyManagement 的作用其实相当于一个对所依赖 jar 包进行版本管理的管理器。
pom.xml 文件中,jar 的版本判断的两种途径:
1.如果 dependencies 里的 dependency 自己没有声明 version 元素,那么 maven 就会到 dependencyManagement 里面去找有没有对该 artifactId 和 groupId 进行过版本声明,如果有,就继承它,如果没有就会报错,告诉你必须为 dependency 声明一个 version。
2.如果 dependencies 中的 dependency 声明了 version,那么无论 dependencyManagement 中有无对该 jar 的 version 声明,都以 dependency 里的 version 为准。
1. 为方便管理,建议只出现在父 pom 。子 pom 一般是 dependencies 。
2. 统一版本号 <version> 标签。
3. 声明作用 (子 pom 里用到再引),不会被实际引用,子 pom 的引用必须在父 pom 存在。
Dependency 的子标签
Type 标签
依赖的类型,默认方式 jar 。
scope 标签
在POM 4 中,<dependency>中还引入了<scope>,它主要管理依赖的部署,可以优化 pom,什么时候用和需不需要打到包中。依赖范围也控制哪些依赖在哪些 classpath 中可用,哪些依赖包含在一个应用中。目前<scope>可以使用5个值:
compile (编译范围)
compile 是 <scope> 的缺省值,适用于所有阶段(编译、测试、运行),会打到 jar 或 war 包中。 compile 的依赖在所有的 classpath 中可用。
provided (已提供范围)
provided 适用于编译和测试阶段,不会打到 jar 包或 war 包。只有在当 JDK 或者容器已提供该依赖之后才可使用。例如, 开发一个 web 应用,可能在编译 classpath 中需要可用的 Servlet API 来编译一个 servlet,但是你不会想要在打包好的 WAR 中包含这个 Servlet API;这个 Servlet API JAR 由你的应用服务器或者 servlet 容器提供。provided 的依赖在编译 classpath (不是运行时)可用。它们不是传递性的,也不会被打包。
runtime (运行时范围)
runtime 依赖在运行和测试阶段需要,但在编译的时候不需要。会打到 jar 或 war 包中。比如,你可能在编译的时候只需要 JDBC API JAR,而只有在运行的时候才需要 JDBC 驱动实现。
test (测试范围)
test 的依赖只有在测试编译和测试运行阶段使用。不会打到 jar 包或 war 包。
system (系统范围)
system 范围依赖与 provided 类似,但必须显式的提供一个本地系统中 JAR 文件的路径。这么做是为了允许基于本地对象编译,而这些对象是系统类库的一部分。这样的构件应该是一直可用的,Maven 也不会在仓库中去寻找它。如果你将一个依赖范围设置成系统范围,你必须同时提供一个 systemPath 元素。注意该范围是不推荐使用的(你应该一直尽量去从公共或定制的 Maven 仓库中引用依赖)。
依赖的传递性
第一列表示直接依赖(A->B)的 scope,第一行表示间接依赖(B->C)的 scope,中间值表示 A 项目对 C jar 的依赖关系(A->C)。例如,作用域是 test 的包不会传递到引用这个项目的其它项目。- 表示不传递依赖。
| compile | test | provided | runtime | |
| compile | compile | - | - | runtime |
| test | test | - | - | test |
| provided | provided | - | provided | provided |
| runtime | runtime | - | - | runtime |
依赖调节
最短路径原则
加载先后原则
exclusions 标签
exclusions 排除包,spring 的框架中自带的 log 依赖一般不用,予以排除。


<dependency>
    <groupId>org.springframework</groupId>
    <artifactId>spring-context</artifactId>
    <verison>${org.springframework-version}</verison>
    <exclusions>
        <exclusion>
            <groupId>commons-logging</groupId>
            <artifactId>commons-logging</artifactId>
        </exclusion>
    </exclusions>
</dependency>
mvn 依赖查找技巧
把 mvn 依赖树输出到文本文件中。命令窗口中 进入到该 model 的 pom 所在的文件夹路径,再执行命令 mvn dependency:tree > d.txt
版本管理
a) 1.0-SNAPSHOT 更新时,可以原号推到私服上去。
i. 删除本地的 repository 库。
ii. mvn clean package -U (不管本地有没有 jar 包,强制到远程拉一次)
b) 主版本号.次版本号.增量版本号-<里程碑版本>
1.0.0-RELAESE/Final
多模块打包
多模块项目打包后,其他 module 作为一个 jar 放在 web 的 war 的 lib 中。他们的 spring 配置文件,需要在 web.xml 中进行如下配置,才能找到。
<context-param>
<param-name>contextConfiglocation</param-name>
<param-value>classpath*:applicationContext*.xml</param-value>
</context-param>
就能找到以 applicationContext 开头的 xml。
classpath 和 classpath* 区别:
classpath:只会到你指定的 class 路径中查找找文件;
classpath*:不仅包含 class 路径,还包括 jar 文件中(class路径)进行查找。
项目生命周期
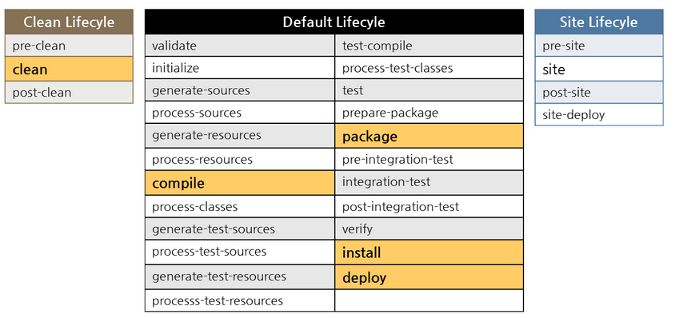
Maven 有三套相互独立的生命周期(lifecycle):clean、default、site。
clean 主要是清理项目、default 是 Maven 最核心的构建部署项目、site 是生成项目站点文档。
一个构建生命周期由多个 phase 组成
A Build Lifecycle is Made Up of Phases.
每个生命周期又由一些不同的构建阶段(phase)组成。在一个生命周期内,后面的阶段依赖于前面的阶段。
每个内置的构建周期相互独立,用户可以仅仅调用生命周期的某一个阶段。三大生命周期及其阶段,如下图:
clean 周期
pre-clean:准备清理
clean:真正的清理工作(删除 target 目录文件)
post-clean:执行清理后的一些后续工作
default 周期
validate:验证
initialize:初始化配置
generate-sources:生成源代码编译目录
process-sources:处理项目主资源文件,复制资源文件到outputclasspath
generate-resources:生成资源目录
process-resources:处理资源文件
complie:编译源代码
process-classes:处理编译后文件
generate-test-sources:生成测试目录
process-test-sources:处理项目测试资源文件,复制测试资源文件到outputclasspath
generate-test-resources:生成测试资源文件
process-test-resources:处理测试资源文件
test-compile:编译测试代码
process-test-classes:处理测试代码
test:单元测试运行测试代码( 运行 test case,包括 junit 和 testNG)
prepare-package:打包前的准备
package:将编译好的代码打包成为jar或者war或者ear等
pre-integration-test:准备整体测试
integration-test:整体测试
post-integration-test:为整体测试收尾
verify:验证
install:安装到本地 Maven 库(将 java 工程打成 jar / war)
deploy:将最终包发布到远程 Maven 仓库
site 周期
pre-site:准备生成站点
site:生成站点及文档
post-site:站点收尾
site-deploy:将生成的站点发布到服务器上
几个常用的周期已标出,在开发环境直接使用命令行调用,例如:
mvn clean install
Phase 由插件的 goal 组成
A Build Phase is Made Up of Plugin Goals.
虽然构建生命周期由不同的 phase 负责,但 phase 可以有多种实现方式。这些实现方式就是绑定到该 phase 的不同插件的 goal。
通俗理解:phase 可以认为是一个虚拟的名字(类似于接口),实际上的 phase 是由许多插件的 goal 实现(类似于实现类)。
一个插件 goal 代表一个用于构建和管理项目的任务(任务的概念比 phase 更为具体)。goal 可以被绑定在零个或者多个构建 phase 上。没有被绑定在任何 phase 的 goal 也可以被直接调用。执行的顺序由 goal 和 phase 的调用顺序来定。例如,下面的命令。clean 和 package 是构建过程,dependency:copy-dependencies 是一个插件的目标。
mvn clean dependency:copy-dependencies package
这个命令表示,clean phase 以及它之前的 phase 会被执行,然后 dependency:copy-dependencies 目标会被执行,最后,执行 package phase 及它之前的所有 phase。
如果一个 goal 绑定了多个 phase,那这个 goal 会被所有绑定的 phase 调用。此外,phase 还可以有零个或多个 goal 绑定到它。如果 phase 没有目标绑定到它,则该 phase 将不会执行。但如果它有一个或多个 goal,它将执行所有这些 goal。
另外,部分 phase 都有 默认的 goal 绑定于它。根据打包类型的不同,phase 的默认 goal 也不同。
| Phase | plugin:goal |
|---|---|
process-resources |
resources:resources |
compile |
compiler:compile |
process-test-resources |
resources:testResources |
test-compile |
compiler:testCompile |
test |
surefire:test |
package |
ejb:ejb or ejb3:ejb3 or jar:jar or par:par or rar:rar or war:war |
install |
install:install |
deploy |
deploy:deploy |
一般不会通过命令行进行调用的 phase
一些由复合词(pre-*, post-*, process-*)组成的构建阶段通常不会由命令行直接调用。这些构建过程连接整个构建流程,产生不被外部使用的中间结果。例如调用 integration-test 阶段,整个环境会停留在悬挂状态。
代码覆盖工具,例如 Jacoco,执行容器插件,例如 Tomcat,Cargo 和 Docker 把目标绑定在 pre-integration-test 阶段,用于准备测试的容器环境。这些插件也绑定在 post-integration-test 阶段,用于收集覆盖率的统计,或者回收测试容器。
故障保护和代码覆盖插件绑定目标在 integration-test 和 verify 阶段。最终的结果就是在 verify 阶段之后生成可用的测试和代码覆盖率报告。如果 integration-test 由命令行调用,就不会生成任何的报告。更糟糕的是,迁移测试的容器环境就会停留在悬挂状态。Tomcat 服务和 Docker 实例就会一直运行,maven 不会自己终止。
插件
查询网站
jar 包坐标查询 https://mvnrepository.com/
maven 插件查询 tomcat7-maven-plugin:https://maven.apache.org/plugins/ tomcat-maven-plugin:http://www.mojohaus.org/plugins.html
常用插件
<build>
    <finalName>${project.artifactId}</finalName>
    <plugins>
        <!-- 资源文件拷贝插件 -->
        <plugin>
            <groupId>org.apache.maven.plugins</groupId>
            <artifactId>maven-resources-plugin</artifactId>
            <version>2.7</version>
            <configuration>
                <encoding>UTF-8</encoding>
            </configuration>
        </plugin>
        <!-- java编译插件 -->
        <plugin>
            <groupId>org.apache.maven.plugins</groupId>
            <artifactId>maven-compiler-plugin</artifactId>
            <version>3.2</version>
            <configuration>
                <source>1.7</source>
                <target>1.7</target>
                <encoding>UTF-8</encoding>
            </configuration>
        </plugin>
    </plugins>
    <pluginManagement>
        <plugins>
            <!-- 配置Tomcat插件 -->
            <plugin>
                <groupId>org.apache.tomcat.maven</groupId>
                <artifactId>tomcat7-maven-plugin</artifactId>
                <version>2.2</version>
                <configuration>
                    <port>80</port>
                    <path>/SSM</path>
                    <uriEncoding>UTF-8</uriEncoding>
                    <server>tomcat7</server> <!-- 指定tomcat名称 -->
                </configuration>
            </plugin>
        </plugins>
    </pluginManagement>
</build>
=========Maven Report Plugin=========
1. 源码分析
<artifactId>maven-pmd-plugin</artifactId>

2. 代码格式检查
<artifactId>maven-checkstyle-plugin</artifactId>

3. 代码相似度检查
<groupId>org.codehaus.mojo</groupId>
<artifactId>simian-maven-plugin</artifactId>

4. 格式化统计报告
<groupId>org.codehaus.mojo</groupId>
<artifactId>jdepend-maven-plugin</artifactId>

5.findbugs 静态代码检查
<groupId>org.codehaus.mojo</groupId>
<artifactId>findbugs-maven-plugin</artifactId>

6.JavaDoc
<artifactId>maven-javadoc-plugin</artifactId>

7. 生成 java 代码交叉引用和源代码的 html 格式
<artifactId>maven-jxr-plugin</artifactId>

8. 代码覆盖率
<groupId>org.codehaus.mojo</groupId>
<artifactId>cobertura-maven-plugin</artifactId>

<groupId>org.codehaus.mojo</groupId>
<artifactId>emma-maven-plugin</artifactId>

9.java 代码的度量工具
<groupId>org.codehaus.mojo</groupId>
<artifactId>javancss-maven-plugin</artifactId>

10. 单元测试报告
<artifactId>maven-surefire-report-plugin</artifactId>

11.TODO 检查报告
    <groupId>org.codehaus.mojo</groupId>
    <artifactId>taglist-maven-plugin</artifactId>

12. 项目总报告
<artifactId>maven-project-info-reports-plugin</artifactId>


=========Maven Common Plugin=========
1.SCP 文件传输
<groupId>com.github.goldin</groupId>
<artifactId>copy-maven-plugin</artifactId>

2.SSH 命令
<groupId>com.github.goldin</groupId>
<artifactId>sshexec-maven-plugin</artifactId>

3.Maven Job
<groupId>com.github.goldin</groupId>
<artifactId>jenkins-maven-plugin</artifactId>

4. 生成 about 信息
<groupId>com.github.goldin</groupId>
<artifactId>about-maven-plugin</artifactId>

5. 查找重复依赖
<groupId>com.github.goldin</groupId>
<artifactId>duplicates-finder-plugin</artifactId>

6.Maven 邮件发送
<groupId>com.github.goldin</groupId>
<artifactId>mail-maven-plugin</artifactId>

7. 项目目录查找
<groupId>com.github.goldin</groupId>
<artifactId>find-maven-plugin</artifactId>

8. 获取 SVN 版本
<groupId>com.google.code.maven-svn-revision-number-plugin</groupId>
<artifactId>maven-svn-revision-number-plugin</artifactId>

9. 编译 C++
<groupId>org.codehaus.mojo</groupId>
<artifactId>native-maven-plugin</artifactId>

10.DDL 生成
<groupId>org.codehaus.mojo</groupId>
<artifactId>hibernate3-maven-plugin</artifactId>

11.Eclipse RCP
<groupid>org.sonatype.tycho</groupid>
<artifactid>target-platform-configuration</artifactid>


=========Maven Official Plugin=========
1. 自动定义打包
<artifactId>maven-assembly-plugin</artifactId>

2.ANT
<artifactId>maven-antrun-plugin</artifactId>
findbugs 静态代码检查
<plugin>
    <groupId>org.codehaus.mojo</groupId>
    <artifactId>findbugs-maven-plugin</artifactId>
    <version>3.0.0</version>
    <configuration>
        <!-- 分析工作的等级,可以为Min、Default和Max -->
        <effort>Default</effort>
        <!-- Low、Medium和High (Low最严格) -->
        <threshold>Low</threshold>
        <findbugsXmlOutput>true</findbugsXmlOutput>
        <!-- findbugs xml 输出路径 -->
        <findbugsXmlOutputDirectory>target/site</findbugsXmlOutputDirectory>
    </configuration>
</plugin>
运行 mvn clean compile findbugs:findbugs
运行成功后在 target 的 site 文件夹下有一个 findbugsXml 的 xml 文件,里面记载着静态错误信息
如果 xml 文件不好查看,可以使用 findbugs:gui 的命令进行查看。需要在子 bundle 查看,在 parent 看不到信息。
注意:由于 findbugs 命令是通过检查字节码文件,所以要先进行编译
sonar 工具基于此插件。
source 打包源代码
maven-source-plugin 提供自动将源码打包并发布的功能。phase 标签设置为 install。不使用在对外的工作中。
<project>
  ...
  <build>
    <plugins>
      <plugin>
        <groupId>org.apache.maven.plugins</groupId>
        <artifactId>maven-source-plugin</artifactId>
        <version>3.2.0</version>
        <executions>
          <execution>
            <id>attach-sources</id>
            <phase>verify</phase>
            <goals>
              <goal>jar-no-fork</goal>
            </goals>
          </execution>
        </executions>
      </plugin>
    </plugins>
  </build>
  ...
</project>
执行 mvn install,maven 会自动将 source install 到 repository 。
执行 mvn deploy,maven 会自动将 source deploy 到 remote-repository 。
执行 mvn source:jar,单独打包源码。
注意:在多项目构建中,将 source-plugin 置于顶层或 parent 的 pom 中并不会发挥作用,必须置于具体项目的 pom 中。
assembly 打可执行 jar
 <plugin>
    <artifactId>maven-assembly-plugin</artifactId>
    <version>2.4</version>
    <configuration>
        <descriptorRefs>
            <descriptorRef>jar-with-dependencies</descriptorRef>  <!-- 把依赖也打到jar中 -->
        </descriptorRefs>
        <archive>
            <manifest>
                <mainClass>com.test.Test</mainClass> <!-- 主方法类 -->
            </manifest>
        </archive>
    </configuration>
    <executions>
        <execution>
            <id>make-assembly</id>
            <phase>package</phase>
            <goals>
                <goal>single</goal>
            </goals>
        </execution>
    </executions>
</plugin>
配置了一个 manifest 标签来配置 Main 函数的入口。执行命令 mvn assembly:assembly 即能生成可执行jar。 生成可执行 jar 的3种方式。
versions 版本修改同步
maven 修改 主 pom 中项目的版本号,要想子 module 中 parent 标签下的 version 标签的值同步改变,可使用 version 插件,不然得手动修改;
<build>
    <plugins>
        <plugin>
            <groupId>org.codehaus.mojo</groupId>
            <artifactId>version-maven-plugin</artifactId>
            <version>2.3</version>
        <plugin>
    <plugins>
<build>
在引用里插件的情况下,于命令窗口的项目路径下运行 mvn 命令 mvn versions:set -DnewVersion=1.1.20180101-SNAPSHOT 即可。
tomcat7
model 单独使用的插件在子 pom 单独定义。
如果对 web 的 model 单独使用的插件,就单独定义在 web 的 pom 中。
<plugin>
    <groupId>org.apache.tomcat.maven</groupId>
    <artifactId>tomcat7-maven-plugin</artifactId>
    <version>2.2</version>
    <configuration>
        <port>8080</port>
        <path>/<path>
    </configuration>
<plugin>
如果在 pom.xml 中配置了 Tomcat 插件,在 idea 右边的 Maven Project 中会出现对应的插件。此时只需要右击,就可以以 run 模式或者 debug 模式启动项目。或者:点击 Run-->Edit Configurations 后搜索 maven
自定义插件
guide:https://maven.apache.org/guides/plugin/guide-java-plugin-development.html
步骤:
1、创建项目 修改项目的 pom,添加一个 <packaging>maven-plugin</packaging> 标签项。
<project
    xmlns="http://maven.apache.org/POM/4.0.0"
    xmlns:xsi="http://www.w3.org/2001/XMLSchema-instance"
  xsi:schemaLocation="http://maven.apache.org/POM/4.0.0 http://maven.apache.org/maven-v4_0_0.xsd">
    <modelVersion>4.0.0</modelVersion>
    <groupId>com.boom</groupId>
    <artifactId>boom-plugin</artifactId>
    <packaging>maven-plugin</packaging>
    <version>1.0.0-SNAPSHOT</version>
    <name>my-maven-plugin Maven Mojo</name>
    <url>http://maven.apache.org</url>
    <dependencies>
        <dependency>
            <groupId>org.apache.maven</groupId>
            <artifactId>maven-plugin-api</artifactId>
            <version>2.0</version>
        </dependency>
        <dependency>
            <groupId>org.apache.maven.plugin-tools</groupId>
            <artifactId>maven-plugin-annotations</artifactId>
            <version>3.1</version>
        </dependency>
    </dependencies>
</project>
2、创建一个继承 AbstractMojo 的类。
3、编码。@Mojo(name = "sayHello") 中的 name 定义的就是插件的 goal 的名称。
import org.apache.maven.plugin.AbstractMojo;
import org.apache.maven.plugin.MojoExecutionException;
import org.apache.maven.plugin.MojoFailureException;
import org.apache.maven.plugin.annotations.LifecyclePhase;
import org.apache.maven.plugin.annotations.Mojo;
import org.apache.maven.plugin.annotations.Parameter;

@Mojo(name = "sayHello", defaultPhase = LifecyclePhase.PACKGE)
public class BoomMojo extends AbstractMojo {

    @Parameter
    private String msg;

    @Parameter
    private List<String> options;

    public void execute() throws MojoException, MojoFailureException {
        System.out.println(boom's sayHello ! + msg);
        System.out.println(boom's sayHello ! + options);
    }
}
4、执行 mvn clean install 生成 jar 包。
5、在其他项目的 pom 中,进行引用参数传递。
若要在 mvn 执行命令中添加 -Dgxx=sd 参数,需要定义 @Parameter(property = "gxx")。
也可用这个 -D 配置 maven 自带的属性值project.xxx和setting.xxx。maven 的自带属性在 pom 中的引用格式为 ${project.artifactId}。
maven 中的 project.xxx 参数定义在 super pom 里,即 MAVEN_HOME/lib/maven-model-builder-3.3.9.jar/org/apache/maven/model/pom-4.0.0.xml。
<plugin>
    <groupId>com.boom</groupId>
    <artifactId>boom-plugin</artifactId>
    <version>1.0.0-SNAPSHOT</version>
    <configuration>
        <msg>booooom</msg>
        <options>
           <option>11</option>
        </options>
    </configuration>
    <executions>
        <execution>
            <phase>package</phase>
            <goals>
                <goal>sayHello</goal>
            <goals>
        </execution>
    </executions>
</plugin>
静态资源链接添加版本号
场景:防止用户端浏览器缓存旧版的静态资源文件。可以通过 maven plugin 插件,实现对 js、css 等文件的缓存问题处理。
页面 js 操作的添加方式:https://blog.csdn.net/qq_36171431/article/details/77840268
插件实现的方式:
https://github.com/StruggleBird/asset-cache-control
https://github.com/byzy/jcv-maven-plugin
https://blog.csdn.net/qq_35192681/article/details/86315924
Profile
1、使用场景:分环境打包配置文件。
在 项目的 project.src.main.resources.conf 路径下,有 dev、prod、test 目录及目录中的 dev.properties 等。
 <profiles>
    <profile>
        <id>dev</id>
        <properties>
            <!--profiles.active是自定义的字段(名字随便起),自定义字段可以有多个-->
            <profiles.active>dev</profiles.active>
        </properties>
    </profile>
    <profile>
        <id>prod</id>
        <properties>
            <profiles.active>prod</profiles.active>
        </properties>
        <activation>
            <activeByDefault>true</activeByDefault>
        </activation>
    </profile>
    <profile>
        <id>test</id>
        <properties>
            <profiles.active>test</profiles.active>
        </properties>
    </profile>
</profiles>
然后在同个 pom 中,在 <build> 标签里引用。
<build>
    <resources>
        <resource>
            <directory>${basedir}/src/main/resources</directory>
            <excludes>
                <exclude>conf/**</exclude>
            <excludes>
        </resource>
        <resource>
            <directory>${basedir}/src/main/resources/${profile.active}</directory>
        </resource>
    </resources>
</build>
输入命令 mvn install -P test 打完的包里 conf 目录下就只有 test 文件及其里面的 test.properties 文件。
Maven 命令参数 -D 设置 <Properties> 标签下的同名标签的值,-P 表示选择 <profiles> 下的 <profile> 的哪个 <id> 值。
2、在 maven 的 setting.xml 中按环境 dev/test/prod 定义两个 profile 来切换仓库地址,下载依赖。用 <activeProfile> 标签值指定的 profile 的 id,完成切换。
<profiles>
    <profile>
        <id>dev</id>
        <activation>
            <activeByDefault>true</activeByDefault>
        </activation>
        <repositories>
            <repository>
                <id>central</id>
                <url>https://repo.maven.apache.org/maven2</url>
                <snapshots>
                    <enabled>true</enabled>
                </snapshots>
            </repository>
        </repositories>
        <pluginRepositories>
            <pluginRepository>
                <id>maven-net-cn</id>
                <url>http://maven.net.cn/content/groups/public/</url>
                <snapshots>
                    <enabled>false</enabled>
                </snapshots>
            </pluginRepository>
        </pluginRepositories>
    </profile>
    ... id 为 tset 或 prod 的其他 profile
</profiles>
<activeProfiles>
    <activeProfile>dev</activeProfile>
</activeProfiles>
archetype 模板化
生成一个 archetype
命令 mvn archetype:create-from-project
进入目标文件夹 cd /target/generated-sources/archetype
执行 mvn install 或 mvn deploy 生成模板。
可以把模板添加到 idea 的 maven 骨架列表。Add Archetype... 不推荐,会下载远端的 xml 配置,易失败。
从 archetype 创建项目 mvn archetype:generate -DarchetypeCatalog=local 。
常用镜像
<mirror>
  <id>alimaven</id>
  <name>aliyun maven</name>
  <url>http://maven.aliyun.com/nexus/content/groups/public/</url>
  <mirrorOf>central</mirrorOf>
</mirror>
<mirror>
    <id>ui</id>
    <mirrorOf>central</mirrorOf>
    <name>Human Readable Name for this Mirror.</name>
    <url>http://uk.maven.org/maven2/</url>
</mirror>
<mirror>
    <id>osc</id>
    <mirrorOf>central</mirrorOf>
    <url>http://maven.oschina.net/content/groups/public/</url>
</mirror>
<mirror>
    <id>osc_thirdparty</id>
    <mirrorOf>thirdparty</mirrorOf>
    <url>http://maven.oschina.net/content/repositories/thirdparty/</url>
</mirror>
参考:
[1] Maven – Introduction to the Build Lifecycle

 浙公网安备 33010602011771号