python--pearl
python珠玑
&用法
&符号延续了C/C++的含义,指的是位运算。
实例1:
print(2&5)
结果:
0
分析:位运算是指二进制的位运算,
2的二进制是1 0,5的二进制是1 0 1,那么二者的位运算是0。
and用法
and用法代替了C/C++中的&&,指的是逻辑运算。
实例1:
print(0 and 2)
结果:
0
实例2:
print(8 and 5)
结果:
5
分析:
python和C/C++一样,存在短路效应,a and b,a为False,b不会被判断,直解返回a,a为True,表达式取决于b,返回b。
延伸:计算1+2+3+...+n,要求不使用乘除法,不使用for、while、if、else、switch、case等关键词及条件判断语句。
def sum_comp(n):
    ans = n
    tmp = ans and sum_comp(n - 1)
    ans += tmp
    return ans

print(sum_comp(100))
结果:5050
//取整除,向下取证
实例1:
print(7//3.2)
结果:2.0
实例2:
print(7//-3.2)
结果:
-3.0
实例3:
print(7//3)
结果:
2
/除法运算,输出小数
实例1:
print(6/3)
结果:2.0
实例2:
print(7/3)
结果:
2.3333333333333335
列表赋值,整体替换
实例1:
result = [1, 2, 3, 4, 5]
result[1:5] = 'abc'
print(result)
结果:[1, 'a', 'b', 'c']
实例2:
result = [1, 2, 3, 4, 5]
result[1:2] = 'abc'
结果:[1, 'a', 'b', 'c', 3, 4, 5]
实例3:
result = [1, 2, 3, 4, 5]
result[1:3] = 'abc'
结果:[1, 'a', 'b', 'c', 4, 5]
参数为可变对象
class Test:
    def func(self,numbers=[]):
        numbers.sort()
        numbers.append("END")
        return numbers

t1 = Test()
print(t1.func())

t2 = Test()
print(t2.func())

t3 = Test()
print(t3.func(["abc","efg"])) # 此时的numbers = ["END","END"],但是重新给与参数["abc","efg"],结果为["abc","efg","END"]

t4 = Test()
print(t4.func())
结果:
['END']
['END', 'END']
['abc', 'efg', 'END']
['END', 'END', 'END']
列表遍历时删除元素
- 方法1:使用filter过滤返回新的列表
lst = [1,1,0,2,0,0,8,3,0,2,2,0,9,3,2]
new_lst = filter(lambda x: x!=0, lst)
print(list(new_lst))
结果:[1, 1, 2, 8, 3, 2, 2, 9, 3, 2]
- 方法2:列表解析
lst = [1,1,0,2,0,0,8,3,0,2,2,0,9,3,2]
new_lst = [x for x in lst if x != 0]
print(new_lst)
结果:[1, 1, 2, 8, 3, 2, 2, 9, 3, 2]
- 方法3:遍历拷贝的列表,操作原始列表
lst = [1,1,0,2,0,0,8,3,0,2,2,0,9,3,2]
for item in lst[:]:
    if item == 0:
        lst.remove(item)
print(lst)
结果:[1, 1, 2, 8, 3, 2, 2, 9, 3, 2]
- 方法4:while循环,判断元素是否在列表中
lst = [1,1,0,2,0,0,8,3,0,2,2,0,9,3,2]
while 0 in lst:
    lst.remove(0)
print(lst)
结果:[1, 1, 2, 8, 3, 2, 2, 9, 3, 2]
- 方法5:倒序循环遍历
lst = [1,1,0,2,0,0,8,3,0,2,2,0,9,3,2]
for item in range(len(lst)-1,-1,-1):
    if lst[item] == 0:
        del lst[item]
print(lst)
结果:[1, 1, 2, 8, 3, 2, 2, 9, 3, 2]
列表和整数相乘
item = ["hello"]
items = [item]*3
items[0][0] = "world"
print(items)
结果:
[['world'], ['world'], ['world']]
闭包
a = 0
def func1():
    a = 1
    def func2():
        global a
        a = 2
        print('closure a: ', a)
    print(f'func1_a:{a}')
    func2()
    print(f'after func2, func1_a:{a}')
func1()
print(f'gobal a:{a}')
结果:
func1_a:1
closure a:  2
after func2, func1_a:1
gobal a:2
装饰器
def outer(f):
    def inner(*args,**kargs):
        inner.co+=1
        return f(*args, *kargs)
    inner.co = 0
    return inner

@outer
def f():
    pass

f()
f()
f()
print(f.co)
结果:3
文档注释
正确的文档注释方式:
"""Return a foobang
Optional plotz says to frobnicate the bizbaz first.
"""
或者
"""API for interacting with the volume manager"""
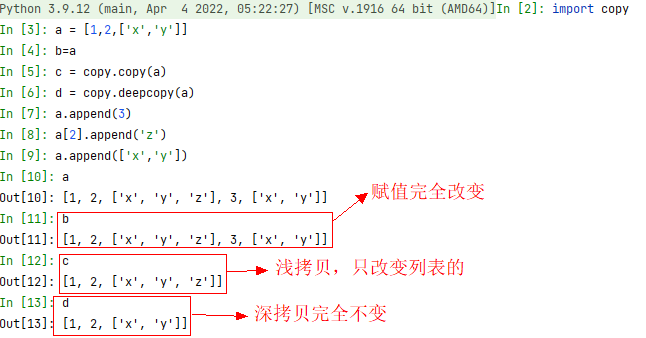
深浅拷贝

整除
print(7//2)#整除下取整,向小数靠拢3
print(7//-2)#整除向小数取整-4
结果:
3
-4
all函数
all()函数用于判断给定的可迭代参数iterable中的所有元素是否都为TRUE,如果是返回True,否则返回False。
元素除了是0、空、None、False外都算True。
实例:
print(all({0:'True',1:'True'}))
print(all({1:'False',2:'True'}))
print(all({1:'True',False:2}))
print(all({'0':'True'}))
结果:
False
True
False
True
变量
a = 123
b = a
a = 456
print(a)
print(b)
结果:
456
123
分析:
a和b是两块内存地址,a和b的变量相互独立.
元组元素
有无逗号是关键,一个元素在元组里面,必须要有逗号,否则不是元组。
实例:
a = 1,2,3
b = (1)
c = (1,)
d = {"HELLO"}
e = {"Hello",}
f = ("Hello")
g = ("Hello",)
print(type(a))
print(type(b))
print(type(c))
print(type(d))
print(type(e))
print(type(f))
print(type(g))
结果:
<class 'tuple'>
<class 'int'>
<class 'tuple'>
<class 'set'>
<class 'set'>
<class 'str'>
<class 'tuple'>
元组性能-相乘和相加
实例:
a = (1, 2)
b = a * 2
c = a + b
print(b)
print(c)
结果:
(1, 2, 1, 2)
(1, 2, 1, 2, 1, 2)
元组性能-解包
实例1:
my_tuple = 10,20,30,40
a, b, *c = my_tuple
print(a)
print(b)
print(c)
结果:
10
20
[30, 40]
实例2:
a, b, *c = "helloworld"
print(a)
print(b)
print(c)
结果:
h
e
['l', 'l', 'o', 'w', 'o', 'r', 'l', 'd']
可变对象
可变对象:list, dict, set
不可变对象:tuple, string, int float, bool, bytes
print(''.join([1,2])) # 报错
print(''.join((1,2))) # 报错
print(''.join(['1', '2'])) # 12 字符串类型
列表
多个字符串的列表,拼接为字符串
追求时间:优先选择list.append 和 str.join(str_list)
追求内存:优先使用+,+=
列表可变对象
l1 = ["Hello"]
l22 = l1*3
l2 = [l1]*3
print(l2)
print(l22)
l2[0][0] = "World" # l2[0]是个可变的对象
print(l2)
print(id(l2[0]), id(l2[1]))
结果:
[['Hello'], ['Hello'], ['Hello']]
['Hello', 'Hello', 'Hello']
[['World'], ['World'], ['World']]
2669068705920 2669068705920
列表操作-删除元素
方式1:
x = [4, 1, 0, 3, 5]
del x[2]
print(x)
结果:
[4, 1, 3, 5]
方式2:
x = [4, 1, 0, 3, 5]
x.remove(0)
print(x)
结果:
[4, 1, 3, 5]
方式3:
x = [4, 1, 0, 3, 5]
x[2:3] = []
print(x)
结果:
[4, 1, 3, 5]
列表赋值
a = [0,1,2,3]
for a[-1] in a:
   print(a[-1])
结果:
0
1
2
2
列表比较
x = [1,2,3]
print(x == x[:])    # 比较值
print(x == [1,2,3]) # 比较值

print(x is x[:])    # 比较ID
print(x == x[0:-1]) # [1,2]
结果:
True
True
False
False
参数传递
在定义函数时,可以在形参前边加一个*,这样这个形参将会获取到所有实参,并将所有实参保存到一个元组里
实例:
def sum(*a):
    result = 0
    for n in a:
        result += n
    print(result)

sum(1,2,3)
结果:
6
如果在形参的开头直接写一个*,则要求所有的参数以关键字参数的形式传递
实例:
def sum(*, a, b, c):
    print(a, b, c)

sum(a=1,b=2,c=3)
结果:
1 2 3
如果在形参前加**,则可以接收其他关键字形参,会将这些参数保存在一个字典里
实例:
def sum(**a):
    print(a, type(a))

sum(a=1,b=2,c=3)
结果:
{'a': 1, 'b': 2, 'c': 3} <class 'dict'>
sort和sorted
sorted函数对所有可迭代对象进行排序操作,sort是应用在list上的方法,list的sort方法返回的是对已经存在的列表进行操作,无返回值,而内建函数sorted返回的是一个新的list
实例1:
s = ['bb', 'aaa', 'c', 'ffff']
s.sort(key=len)
print(s)

s_new = sorted(s, key=len)
print(s_new)
结果:
['c', 'bb', 'aaa', 'ffff']
['c', 'bb', 'aaa', 'ffff']
实例2:
s = [2, '1', '4', 3]
s.sort(key=int)
print(s)

print(sorted(s, key=int))
结果:
['1', 2, 3, '4']
['1', 2, 3, '4']
装饰器
简单说,@a就是将b传递给a(),并返回新的b = a(b)
实例:
def a(h):
    return h()
@a
def b():
    print("hello world")
使用@a来表示装饰器,等同于b = a(b)
实例:
def begin_end(old):
    def new_func(*args, **kwargs):
        print('begint_end装饰开始执行') #执行顺序2
        result = old(*args, **kwargs)
        print('begint_end装饰执行结束') #执行顺序6
        return result
    return new_func

def fn(old):
    def new_func(*args, **kwargs):
        print('fn装饰开始执行。。') #执行顺序3
        result = old(*args, **kwargs)
        print('fn装饰执行结束。。') #执行顺序5
        return result
    return new_func

@begin_end
@fn

def say_hello():
    print('大家好~~') #执行顺序4

say_hello() #执行顺序1
结果:
begint_end装饰开始执行
fn装饰开始执行。。
大家好~~
fn装饰执行结束。。
begint_end装饰执行结束
Python的多装饰器是从外到内执行的,再执行被装饰的函数。当然这只是在装饰器中的闭包函数的运行顺序,如果在装饰器函数和闭包函数之前有代码,那运行起来又不一样
情况1:
# -*- coding:utf-8 -*-

def decorator_a(func):
    def inner_a(*args, **kwargs):
        print 'Get in inner_a'
        return func(*args, **kwargs)
    return inner_a

def decorator_b(func):
    def inner_b(*args, **kwargs):
        print 'Get in inner_b'
        return func(*args, **kwargs)
    return inner_b

@decorator_b
@decorator_a
def f(x):
    print 'Get in f'
    return x * 2

f(1)
结果:
Get in inner_b
Get in inner_a
Get in f
由此可见,是先运行的decorator_b,再运行的decorator_a,最后运行的被装饰函数f(x)
这是因为decorator_a装饰器先return 了inner_a, 而decorator_b后面又把inner_a装饰了,
最终整个暴露在外面的是inner_b,所以显示inner_b先运行,最终的效果看起来就是装饰器decorator_b先运行。实际上代码在机器上跑的时候是先跑的decorator_a函数,再跑的decorator_b函数
情况2:
# -*- coding:utf-8 -*-

def decorator_a(func):
    print 'Get in decorator_a'
    def inner_a(*args, **kwargs):
        print 'Get in inner_a'
        return func(*args, **kwargs)
    return inner_a

def decorator_b(func):
    print 'Get in decorator_b'
    def inner_b(*args, **kwargs):
        print 'Get in inner_b'
        return func(*args, **kwargs)
    return inner_b

@decorator_b
@decorator_a
def f(x):
    print 'Get in f'
    return x * 2

f(1)
结果:
Get in decorator_a
Get in decorator_b
Get in inner_b
Get in inner_a
Get in f
现在的结果和情况1得出的运行顺序结论不一致了,在每个装饰器中,
装饰器函数和内层的闭包函数之间的代码是先运行的decorator_a 再运行的decorator_b。这和情况1的结论恰好相反。代码位置不同,运行的顺序也不。
情况3:
# -*- coding:utf-8 -*-

def decorator_a(func):
    print 'Get in decorator_a'
    def inner_a(*args, **kwargs):
        print 'Get in inner_a'
        return func(*args, **kwargs)
    return inner_a

def decorator_b(func):
    print 'Get in decorator_b'
    def inner_b(*args, **kwargs):
        print 'Get in inner_b'
        return func(*args, **kwargs)
    return inner_b

@decorator_b
@decorator_a
def f(x):
    print 'Get in f'
    return x * 2
结果:
Get in decorator_a
Get in decorator_b
函数闭包
实例
foo = 1
def sample(bar):
    global foo
    def inner_function(baz):
        foo = baz
        return foo
    inner_function(bar)
    return foo

print(sample(100))
结果:1
变量重新声明
实例
i = 1
def fun(x):
    return x + i
i = 2
x = 3
print(fun(x))
结果:5
类
使用class关键字定义类,类可以理解为一张图纸,根据类来创建对象,即类就是对象的图纸,对象就是类的实例,如果多个对象是通过一个类创建的,这些对象即是一类对象
实例:
class MyClass():
    pass

mc = MyClass()
mc_2 = MyClass()
result = isinstance(mc, MyClass) # isinstance()用来检查一个对象是否是一个类的实例
result2 = isinstance(mc_2,MyClass)
print(result)
print(result2)
结果:
True
True
类属性和方法
class Person:
    """
    在类的代码中,可定义变量和函数,在类中我们所定义的变量,将会成为所有实例的公开属性,
    所有实例都可以访问这些属性
    """
    name = 'swl' #公共属性,所有实例都可以访问
    def say_hello(self): #方法,通过该类的所有实例都可以访问
        print("形参self:", self)
        print("重写name后:",self.name)
    """
    方法调用和函数调用的区别:
    如果是函数调用,则调用时传递几个参数就会有几个参数
    如果是方法调用,默认传递一个参数,所有方法至少要定义一个形参self
    """
p1 = Person() # 创建Person的实例,不要忘记后面括号,类的实例化一定要加括号
p2 = Person()
print('p1.name:',p1.name) # p1实例访问类的属性
print('p2.name:',p2.name)

print('p1:',p1)
p1.name = 'zbj' #重写p1和p2的name属性
p2.name = 'shs'
p1.say_hello() # 用p1调用方法,self就是p1,self.name即p1的属性值zbj
p2.say_hello()
结果:
p1.name: swl
p2.name: swl
p1: <__main__.Person object at 0x000001D67416FFD0>
形参self: <__main__.Person object at 0x000001D67416FFD0>
重写name后: zbj
形参self: <__main__.Person object at 0x000001D67416FFA0>
重写name后: shs
类实例化
class Person:
    print("Person代码块") # 不管Person被实例几次,类中代码块中的代码只在类定义的时候执行1次

    def __init__(self, name):
        # init会在对象创建以后立刻执行,init可以用来向新创建的对象中初始化属性,
        # 调用类创建对象时,类后面的所有参数都会依次传递到init中
        print('init方法执行了~~')
        print(self)
        self.name = name

    def say_hello(self):
        print('say', self.name)

p1 = Person('swl')
p1.say_hello()
p2 = Person('shs')
p2.say_hello()

"""
p = Person()的运行流程:
1.创建一个变量
2.在内存中创建一个新对象
3.__init__(self)方法执行
4.将对象id赋值给变量
"""
结果:
Person代码块
init方法执行了~~
<__main__.Person object at 0x000001B3CD4DFFD0>
say swl
init方法执行了~~
<__main__.Person object at 0x000001B3CD4DFEE0>
say shs
类属性和方法
class A(object):
    count = 0
    def __init__(self):
        self.name = "sunwukong"

    def test(self):
        print("这是test实例方法~",self)
    @classmethod
    def test2(cls):
        print("这是类方法test2~",cls, cls.count)

    @staticmethod
    def test3():
        print("这是静态方法test3~")

a = A()
a.count = 10
print("类属性通过类访问", A.count)
print("类属性通过实例对象访问",a.count)
print("实例属性通过实例对象访问",a.name)
a.name = "zhubajie"
print("实例属性通过实例对象修改后",a.name)

a.test()
A.test(a)
a.test2()
a.test3()
A.test3()
结果:
类属性通过类访问 0
类属性通过实例对象访问 10
实例属性通过实例对象访问 sunwukong
实例属性通过实例对象修改后 zhubajie
这是test实例方法~ <__main__.A object at 0x0000023872390F70>
这是test实例方法~ <__main__.A object at 0x0000023872390F70>
这是类方法test2~ <class '__main__.A'> 0
这是静态方法test3~
这是静态方法test3~
类继承
实例:
class Father(object):
    def __init__(self, name):
        self.name=name
        print ( "name: %s" %( self.name) )
    def getName(self):
        return 'Father ' + self.name

class Son(Father):
    def getName(self):
        return 'Son '+self.name

if __name__=='__main__':
    son=Son('runoob')
    print ( son.getName() )
结果:
name: runoob # 子类不重写 `__init__`,实例化子类时,会自动调用父类定义的 `__init__`
Son runoob
如果重写了__init__ 时,实例化子类,就不会调用父类已经定义的 __init__,语法格式如下:
class Father(object):
    def __init__(self, name):
        self.name=name
        print ( "name: %s" %( self.name) )
    def getName(self):
        return 'Father ' + self.name

class Son(Father):
    def __init__(self, name):
        print ( "hi" )
        self.name =  name
    def getName(self):
        return 'Son '+self.name

if __name__=='__main__':
    son=Son('runoob')
    print ( son.getName() )
结果:
hi
Son runoob
长度
a = ("1",
     "2",
     "3")

b = ("1"
     "22"
     "333")
c = '''1
22'''

print(len(a), len(b), len(c))
print(a)
print(b)
print(c)
print(type(c))
结果:
3 6 4
('1', '2', '3')
122333
1
22
<class 'str'>
注意
c其实是一个字符串,1\n22
布尔值与逻辑运算符
print(1 + False)
print(1 + True)
print(0 or None)
print(1<2<3) # 逻辑运算符都是与中间的数进行比较, 相当于1<2 and 2<3
print(10<20>15)
print(10<20>15<20>25)
结果:
1
2
None
True
True
False
字典popitem()方法
返回并删除字典中的最后一对键和值,如果字典已经为空则报出KeyError异常
实例:
a = [{1: 2}, {4: 3}]
for i in a:
    print(i.popitem())

b = {1:2, 4:3}
print(b.popitem())
结果:
(1, 2)
(4, 3)
(4, 3)
集合之间的<
print({3, 4, 5} < {5, 6, 7})
print({3, 4} < {3, 4, 5})
结果:
False
True
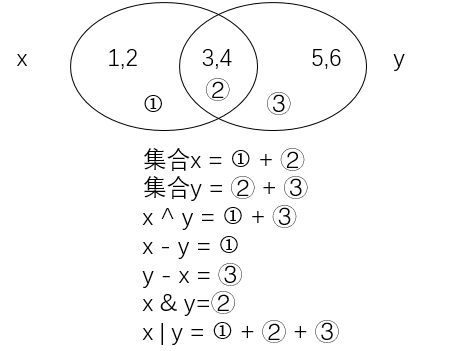
集合间运算
print({1, 2, 3, 4, 5} ^ {5, 6})  # 对称差集
print({1, 2, 3, 4, 5} - {5, 6})  # 差集
print({1, 2, 3, 4, 5}.difference({5, 6}))  # 差集
print({1, 2, 3, 4, 5} | {5, 6})  # 并集
print({1, 2, 3, 4, 5} & {5, 6})  # 交集
结果:
{1, 2, 3, 4, 6}
{1, 2, 3, 4}
{1, 2, 3, 4}
{1, 2, 3, 4, 5, 6}
{5}
or的用法
实例:
x = 100 or 200
print(x)
结果:100 # or找到真为止,and找到假为止
读写文件的几种模式
| 模式 | 描述 |
|---|---|
| r | 以只读方式打开文件,文件的指针将会放在文件的开头。这是默认模式 |
| rb | 以二进制格式打开一个文件用于只读。文件指针将会放在文件的开头。这是默认模式 |
| r+ | 打开一个文件用于读写。文件指针将会放在文件的开头 |
| rb+ | 以二进制格式打开一个文件用于读写。文件指针将会放在文件的开头 |
| w | 打开一个文件用于写入。如果该文件存在则将其覆盖,如果该文件不存在,创建新文件 |
| wb | 以二进制格式打开一个文件只用于写入,如果该文件已存在则将其覆盖,如果该文件不存在则创建新文件 |
| w+ | 打开一个文件用于读写,如果该文件存在则将其覆盖,如果该文件不存在,创建新文件 |
| wb+ | 以二进制格式打开一个文件用于读写。如果该文件已存在则将其覆盖,如果该文件不存在,创建新文件 |
| a | 打开一个文件用于追加。如果该文件已存在,文件指针将会放在文件的结尾,新的内容会被写入到已有内容之后。如果文件不存在,创建新文件进行写入 |
| ab | 以二进制格式打开一个文件用于追加,如果该文件已存在,文件指针将会放在文件的结尾。新的内容将会被写入到已有内容之后。如果该文件不存在,创建新文件进行写入 |
| a+ | 打开一个文件用于读写。如果该文件已存在,文件指针将会放在文件的结尾。文件打开时会以追加模式。如果该文件不存在,创建新文件用于读写 |
| ab+ | 以二进制格式打开一个文件用于追加。如果该文件已存在,文件指针将会放在文件的结尾。如果该文件不存在,创建新文件用于读写 |
实例1:
2.txt内有内容
Hello world!haha
Hello World!xixi
r方式读取
with open("2.txt","r") as f:#以只读格式打开文件
    print(f.read()) # 一次性读取整个文件,当然也可以设置读取大小,如`f.read(5)`
结果:
Hello world!haha
Hello World!xixi
r方式读取
with open("2.txt","r") as f:#以只读格式打开文件
    print(f.readline()) # 一次读一行
结果:
Hello world!haha
r方式读取
with open("2.txt","r") as f:
    print(f.readlines())#一次读取整个文件,得到列表
结果:
['Hello world!haha\n', 'Hello World!xixi']
rb方式读取
with open("2.txt","rb") as f: # 以二进制格式读取
    print(f.read())
结果:
b'Hello world!haha\r\nHello World!xixi'
r+方式读取
with open("2.txt","r+") as f:
    print(f.read())
结果:
Hello world!haha
Hello World!xixi
rb+方式读取
with open("2.txt","rb+") as f:
    print(f.read())
结果:
b'Hello world!haha\r\nHello World!xixi'
w方式写入
msg = "hello world!"
with open("2.txt", "w") as f: # 文件如果存在则覆盖,不存在则创建
    f.write(msg)
2.txt内的内容是:
hello world!
- 'wb'方式写入
msg = "hello world!"
data = msg.encode()
with open("2.txt", "wb") as f:#以二进制格式写入
    f.write(data)
2.txt内的内容是:
hello world!
wb+方式写入
msg = "hello world!"
data = msg.encode()
with open("2.txt", "wb+") as f:#以二进制格式写入
    f.write(data)
wt方式写入,原file.txt为“123”
with open("file.txt", "wt") as file: # Python写文件时会用\r\n来表示换行
    file.write("hello")
    file.write("world")
file.txt内容为:helloworld
2.txt内的内容是:
hello world!
a方式写入
msg = "hello world!"
data = msg.encode()
with open("2.txt", "a") as f:#追加
    f.write(msg)
2.txt内的内容是:
hello world!hello world!
a+方式写入
msg = "hello world!"
data = msg.encode()
with open("2.txt", "a+") as f: #在结尾追加
    f.write(msg)
2.txt内的内容是:
hello world!hello world!hello world!
ab方式写入
msg = "hello world!"
data = msg.encode()
with open("2.txt", "ab") as f:#以二进制方式追加
    f.write(data)
2.txt内的内容是:
hello world!hello world!hello world!hello world!
ab+方式写入
msg = "hello world!"
data = msg.encode()
with open("2.txt", "ab+") as f:#以二进制方式追加, `+`强调可读写
    f.write(data)
2.txt内的内容是:
hello world!hello world!hello world!hello world!hello world!
元素变列表跟着变元素
numbers = [1, 2]
values = numbers
values[0] = 3
print(numbers, values)
结果:[3, 2] [3, 2]
类方法
class Foo:
    name = 'hello'
    def say_hello(self):
        print(self.name)

    @classmethod
    def bar(cls):
        cls.name = 'Bye'

foo_one = Foo()
foo_two = Foo()
foo_one.bar()
foo_one.say_hello()
foo_two.say_hello()
结果:
Bye
Bye
继承
class Spam(object):
    num_instances = 0

    def __init__(self):
        Spam.num_instances += 1

class Sub(Spam):
    num_instances = 0


sub = Sub()
print(sub.num_instances, Spam.num_instances)
结果:
0 1
迭代器
s = [(lambda x: i*x)(2) for i in range(5)]
print(s)
结果:
[0, 2, 4, 6, 8]
range是可迭代的不是迭代器
import collections

a = range(10)
print(isinstance(a, collections.Iterable))
print(isinstance(a, collections.Iterator))
结果:
True
False
__sub__
class Num:
    def __init__(self, x):
        self.x = x

    def __sub__(self, other):
        if self.x >= other.x:
            return Num(self.x - other.x)
        return Num(other.x - self.x)


a = Num(1)
b = Num(3)
c = a - b
print(c.x)
结果:2
deque
from collections import deque

dq = deque([1])
dq.extend([2,3])
dq.extendleft([4,5])
print(list(dq))
结果:[5, 4, 1, 2, 3]
列表内元素累加
import functools

result = functools.reduce(lambda x, y: × + y, [1, 2, 3, 4, 5])
print(result)
结果:15
类私有
class Foo:
    @property
    def x(self):
        return 10

    def get_y(self):
        return self.__y

    def set_y(self, value):
        self.__y = min(value, 20)

    y = property(get_y, set_y)


my_foo_object = Foo()

my_foo_object.y = 30
b = my_foo_object.y - my_foo_object.x
print(my_foo_object.y)
print(my_foo_object.x)
print(b)
结果:
20
10
10
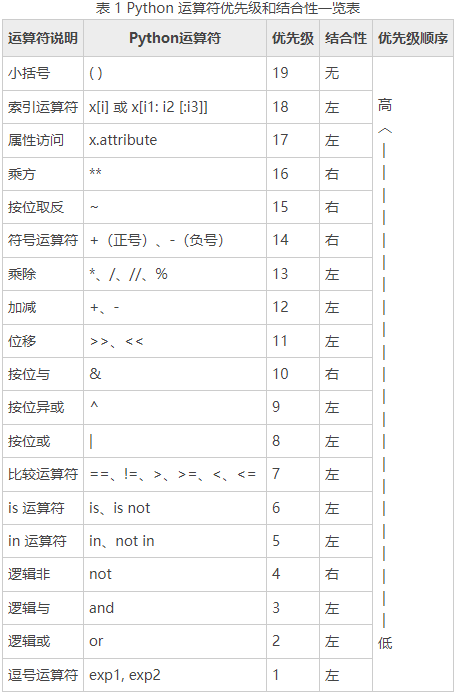
python运算符优先级
print(4 > 3==3)
结果:True

元组相加
tup1 = (12, 34.56)
tup2 = ('abc', 'xyz')
tup3 = tup1 + tup2
print(tup3)
结果:(12, 34.56, 'abc', 'xyz')
正则匹配
import re

m = re.match('(\w\w\w)-(\d?)', 'abc-123') # ?匹配前面0个或1个, + 匹配前面1个或多个

print (m.group(0)) # 匹配所有值,返回字符串
print (m.group(1)) # 匹配第一个匹配值,返回字符串
print (m.group(2)) # 匹配第二个匹配值,返回字符串
print (m.groups()) # 匹配所有值,返回元组
print (m.group())  # 匹配所有值,返回字符串
print("#####")
m = re.match('(\w\w\w)-(\d*)', 'abc-123') # *匹配前面0个或多个
print (m.group(0))
print (m.group(1))
print (m.group(2))
print (m.groups())
print (m.group())
结果:
abc-1
abc
1
('abc', '1')
abc-1
#####
abc-123
abc
123
('abc', '123')
abc-123
正则匹配
import re
p = re.compile(r'\d+')
print(p.findall('one1two2three3four4'))
结果:['1', '2', '3', '4']
正则匹配
import re

p = re.compile(r'\d+')
print (p.split('one1two2three3four4'))
结果:['one', 'two', 'three', 'four', '']
str.replace
s = "this is a test"
print(s.replace('s', 'a')) # replace全部替换
结果:thia ia a teat
列表相加
s = [1,2,3]+[4,5,6]
print(s)
结果:[1, 2, 3, 4, 5, 6]
format
print("{0:30d}.png".format(1)) #1.png
print("{0:03}.png".format(1)) # 001.png
print("{0:3}.png".format(1)) # 1.png
print("{0:03d}.png".format(1)) # 001.png
结果:
                             1.png  # 30d表示30个长度
001.png
  1.png
001.png
集合运算

集合pop()
x = {1,2,3}
x.pop()
print(x)
结果:{2, 3}


