反恶意软件扫描接口(AMSI)基础知识——amsi是专门针对混淆绕过的无文件攻击脚本,在Windows 10 和Windows Server 2016 之后才有的,然后并不是所有的杀毒软件都可以调用amsi接口。国内的基本不可以!我晕!
Amsi(Antimalware Scan Interface)基础知识
The Windows Antimalware Scan Interface (AMSI) is a versatile interface
standard that allows your applications and services to integrate with
any antimalware product that's present on a machine. AMSI provides
enhanced malware protection for your end-users and their data,
applications, and workloads.AMSI is agnostic of antimalware vendor; it's designed to allow for the
most common malware scanning and protection techniques provided by
today's antimalware products that can be integrated into applications.
It supports a calling structure allowing for file and memory or stream
scanning, content source URL/IP reputation checks, and other
techniques.
AMSI also supports the notion of a session so that antimalware vendors
can correlate different scan requests. For instance, the different
fragments of a malicious payload can be associated to reach a more
informed decision, which would be much harder to reach just by looking
at those fragments in isolation.
从前面微软的文档中我们可以知道Windows防病毒扫描界面(AMSI)是一个通用的接口标准,是开放给防病毒产品调用的一个接口。
这个接口支持允许不单单可以用来扫描脚本、代码、命令或者cmdlet,也可以用来扫描任何文件、内存或者数据流,如字符串、即时消息、图像或者视频等等
我认为这个Amsi(Antimalware Scan Interface)主要是针对脚本来说的,目前来说脚本逐渐成为针对性攻击的武器,诸如JavaScript,VBScript和PowerShell之类的脚本为我们攻击提供了巨大的好处。它们是系统合法的软件,并且执行文件不落地在内存中加载。
脚本语言比exe等等Pe文件要好混淆,可以从远端或注册表加载执行,并且脚本的动态特性允许攻我们容易地逃避反恶意软件和类似的端点防护产品的检测与分析。并且执行文件可以不落地直接在内存中加载。
那么 Windows 10可以通过反恶意软件扫描接口(AMSI)提供查杀脚本的功能,还可以以脚本解释程序的相同方式查看脚本内容 ,这样的话就可以未加密和未混淆的形式来查看我们的攻击脚本。
目前在微软的文档中我们可以知道
AMSI功能已集成到Windows 10的这些组件中。
用户帐户控制或UAC(EXE,COM,MSI或ActiveX)
PowerShell(脚本,交互使用和动态代码评估)
Windows脚本主机(wscript.exe和cscript.exe)
JavaScript和VBScript
Office VBA宏

看到网上有python amsi的gist:https://gist.github.com/masthoon/8ada1d19e6e217481aa881fab16b5970
AMSI Interface in Python
amsi.py
import sys
import windows
import windows.winproxy
import windows.generated_def as gdef

class AMSIProxy(windows.winproxy.ApiProxy):
    APIDLL = "Amsi"
    default_error_check = staticmethod(windows.winproxy.no_error_check)

"""
HRESULT WINAPI AmsiInitialize(
  _In_  LPCWSTR      appName,
/*_In_  DWORD        coInit, REMOVED */
  _Out_ HAMSICONTEXT *amsiContext
);
"""
AmsiInitializePrototype = gdef.WINFUNCTYPE(gdef.BOOL, gdef.LPCWSTR, gdef.POINTER(gdef.PVOID))
AmsiInitializeParams = ((1, 'appName'),(1, 'amsiContext'))

@AMSIProxy('AmsiInitialize', deffunc_module=sys.modules[__name__])
def AmsiInitialize(appName, amsiContext):
    return AmsiInitialize.ctypes_function(appName, amsiContext)


"""
HRESULT WINAPI AmsiOpenSession(
  _In_  HAMSICONTEXT amsiContext,
  _Out_ HAMSISESSION *session
);
"""
AmsiOpenSessionPrototype = gdef.WINFUNCTYPE(gdef.BOOL, gdef.PVOID, gdef.POINTER(gdef.PVOID))
AmsiOpenSessionParams = ((1, 'amsiContext'),(1, 'session'))

@AMSIProxy('AmsiOpenSession', deffunc_module=sys.modules[__name__])
def AmsiOpenSession(amsiContext, session):
    return AmsiOpenSession.ctypes_function(amsiContext, session)


"""
HRESULT WINAPI AmsiScanBuffer(
  _In_     HAMSICONTEXT amsiContext,
  _In_     PVOID        buffer,
  _In_     ULONG        length,
  _In_     LPCWSTR      contentName,
  _In_opt_ HAMSISESSION session,
  _Out_    AMSI_RESULT  *result
);
"""
AmsiScanBufferPrototype = gdef.WINFUNCTYPE(gdef.BOOL, gdef.PVOID, gdef.PVOID, gdef.ULONG, gdef.LPCWSTR, gdef.PVOID, gdef.POINTER(gdef.ULONG))
AmsiScanBufferParams = ((1, 'amsiContext'),(1, 'buffer'),(1, 'length'),(1, 'contentName'),(1, 'session'),(1, 'result'))

@AMSIProxy('AmsiScanBuffer', deffunc_module=sys.modules[__name__])
def AmsiScanBuffer(amsiContext, buffer, length, contentName, session, result):
    return AmsiScanBuffer.ctypes_function(amsiContext, buffer, length, contentName, session, result)

"""
typedef enum AMSI_RESULT {
  AMSI_RESULT_CLEAN                   = 0,
  AMSI_RESULT_NOT_DETECTED            = 1,
  AMSI_RESULT_BLOCKED_BY_ADMIN_START  = 16384,
  AMSI_RESULT_BLOCKED_BY_ADMIN_END    = 20479,
  AMSI_RESULT_DETECTED                = 32768
} AMSI_RESULT;
BOOL AmsiResultIsMalware(
  _In_ AMSI_RESULT r
);
"""

AMSI_RESULT_CLEAN = gdef.EnumValue("_AMSI_RESULT", "AMSI_RESULT_CLEAN", 0x0)
AMSI_RESULT_NOT_DETECTED = gdef.EnumValue("_AMSI_RESULT", "AMSI_RESULT_NOT_DETECTED", 0x1)
AMSI_RESULT_BLOCKED_BY_ADMIN_START = gdef.EnumValue("_AMSI_RESULT", "AMSI_RESULT_BLOCKED_BY_ADMIN_START", 16384)
AMSI_RESULT_BLOCKED_BY_ADMIN_END = gdef.EnumValue("_AMSI_RESULT", "AMSI_RESULT_BLOCKED_BY_ADMIN_END", 20479)
AMSI_RESULT_DETECTED = gdef.EnumValue("_AMSI_RESULT", "AMSI_RESULT_DETECTED", 32768)
class _AMSI_RESULT(gdef.EnumType):
    values = [AMSI_RESULT_CLEAN, AMSI_RESULT_NOT_DETECTED, AMSI_RESULT_BLOCKED_BY_ADMIN_START, AMSI_RESULT_BLOCKED_BY_ADMIN_END, AMSI_RESULT_DETECTED]
    mapper = {x:x for x in values}
AMSI_RESULT = _AMSI_RESULT


class AMSIScanner(object):
    def __enter__(self):
        self.context = gdef.PVOID()
        self.session = gdef.PVOID()

        if AmsiInitialize("TestEngine", self.context) != 0:
            print("AmsiInitialize failed!")

        if AmsiOpenSession(self.context, self.session) != 0:
            print("AmsiOpenSession failed!")
        return self

    def __exit__(self, exc_type, exc_val, exc_tb):
        pass # TODO release the AMSI engine

    def scan(self, buffer):
        result = AMSI_RESULT()
        AmsiScanBuffer(self.context, buffer, len(buffer), "fakefile.bin", self.session, result)
        return result


if __name__ == '__main__':
    with AMSIScanner() as scanner:
        print("Scanning ABC:")
        res = scanner.scan('ABC')
        print("\t{}".format(res))
        print("Scanning EICAR:")
        res = scanner.scan('X5O!P%@AP[4\PZX54(P^)7CC)7}$EICAR-STANDARD-ANTIVIRUS-TEST-FILE!$H+H*')
        print("\t{}".format(res))
也有人实现了python的amsi接口调用:
amsi.py
#!/usr/bin/env python3

#> ------------------------------------

#       Antimalware Scan Interface

#> ------------------------------------

import sys
from enum import IntEnum
from ctypes import HRESULT, POINTER, windll, byref
from ctypes.wintypes import HANDLE, LPCWSTR, UINT, LPCSTR
from comtypes.hresult import S_OK


#> ------------------------------------------------------------------------------
#   The AMSI_RESULT enumeration specifies the types of results returned by scans
#> ------------------------------------------------------------------------------
"""
    typedef enum AMSI_RESULT {
        AMSI_RESULT_CLEAN,
        AMSI_RESULT_NOT_DETECTED,
        AMSI_RESULT_BLOCKED_BY_ADMIN_START,
        AMSI_RESULT_BLOCKED_BY_ADMIN_END,
        AMSI_RESULT_DETECTED
    } ;
"""
class AMSI_RESULT(IntEnum):
    """ AMSI Results Class """
    AMSI_RESULT_CLEAN                   = 0
    AMSI_RESULT_NOT_DETECTED            = 1
    AMSI_RESULT_BLOCKED_BY_ADMIN_START  = 16384
    AMSI_RESULT_BLOCKED_BY_ADMIN_END    = 20479
    AMSI_RESULT_DETECTED                = 32768


class Amsi(object):
    """ AMSI API Class """

    def __init__(self):
        # Inialize the context and session to utilize
        self.amsi_ctx     = self.amsi_initialize()
        self.amsi_session = self.amsi_open_session()


    #> -------------------------
    #   Initialize the AMSI API
    #> -------------------------
    """
        HRESULT AmsiInitialize(
            LPCWSTR      appName,
            HAMSICONTEXT *amsiContext
        );
    """
    def amsi_initialize(self):
        AmsiInitialize          = windll.amsi.AmsiInitialize
        AmsiInitialize.argtypes = [LPCWSTR, POINTER(HANDLE)]  # Specify the argument data types
        AmsiInitialize.restype  = HRESULT

        amsi_ctx  = HANDLE(0)  # Return this context
        amsi_hres = AmsiInitialize("amsi-test", byref(amsi_ctx))

        # If this function succeeds, it returns S_OK. Otherwise, it returns an HRESULT error code
        if amsi_hres != S_OK:
            print(f"[!]\tAmsiInitialize Error: {amsi_hres}")
            sys.exit()  # Exit if initialization fails

        return amsi_ctx


    #> ----------------------------------------------------------------------------------
    #   Remove the instance of the AMSI API that was originally opened by AmsiInitialize
    #> ----------------------------------------------------------------------------------
    """
        void AmsiUninitialize(
            HAMSICONTEXT amsiContext
        );
    """
    def amsi_uninitialize(self):
        AmsiUninitialize          = windll.amsi.AmsiUninitialize
        AmsiUninitialize.argtypes = [HANDLE]
        AmsiUninitialize(self.amsi_ctx)

        return None


    #> -----------------------------------------------------------------------
    #   Opens a session within which multiple scan requests can be correlated
    #> -----------------------------------------------------------------------
    """
        HRESULT AmsiOpenSession(
            HAMSICONTEXT amsiContext,
            HAMSISESSION *amsiSession
        );
    """
    def amsi_open_session(self):
        AmsiOpenSession          = windll.amsi.AmsiOpenSession
        AmsiOpenSession.argtypes = [HANDLE, POINTER(UINT)]  # Specify attribute data types
        AmsiOpenSession.restype  = HRESULT

        amsi_session = UINT(0)  # Return this session
        amsi_hres    = AmsiOpenSession(self.amsi_ctx, amsi_session)

        # If this function succeeds, it returns S_OK. Otherwise, it returns an HRESULT error code
        if amsi_hres != S_OK:
            print(f"[!]\tAmsiOpenSession Error: {amsi_hres}")
            sys.exit()  # Exit if session creation fails

        return amsi_session


    #> ----------------------------------------------------
    #   Close a session that was opened by AmsiOpenSession
    #> ----------------------------------------------------
    """
        void AmsiCloseSession(
            HAMSICONTEXT amsiContext,
            HAMSISESSION amsiSession
        );
    """
    def amsi_close_session(self):
        AmsiCloseSession          = windll.amsi.AmsiCloseSession
        AmsiCloseSession.argtypes = [HANDLE, UINT]  # Specify attribute data types
        AmsiCloseSession.restype  = HRESULT

        amsi_hres = AmsiCloseSession(self.amsi_ctx, self.amsi_session)

        return None


    #> ----------------------------
    #   Scans a string for malware
    #> ----------------------------
    """
        HRESULT AmsiScanString(
            HAMSICONTEXT amsiContext,
            LPCWSTR      string,
            LPCWSTR      contentName,
            HAMSISESSION amsiSession,
            AMSI_RESULT  *result
        );
    """
    def amsi_scan_string(self, data):
        AmsiScanString          = windll.amsi.AmsiScanString
        AmsiScanString.argtypes = [HANDLE, LPCWSTR, LPCWSTR, UINT, POINTER(UINT)]  # Specify attribute data types
        AmsiScanString.restype  = HRESULT

        amsi_res  = UINT(0)  # Return this scan result
        amsi_hres = AmsiScanString(self.amsi_ctx, data, "string-data", self.amsi_session, byref(amsi_res))

        # If this function succeeds, it returns S_OK. Otherwise, it returns an HRESULT error code
        if amsi_hres != S_OK:
            print(f"[!]\tAmsiScanString Error: {amsi_hres}")
            sys.exit()  # Exit if scan fails

        return amsi_res


    #> --------------------------------------------
    #   Scans a buffer-full of content for malware
    #> --------------------------------------------
    """
        HRESULT AmsiScanBuffer(
            HAMSICONTEXT amsiContext,
            PVOID        buffer,
            ULONG        length,
            LPCWSTR      contentName,
            HAMSISESSION amsiSession,
            AMSI_RESULT  *result
        );
    """
    def amsi_scan_buffer(self, data):
        AmsiScanBuffer          = windll.amsi.AmsiScanBuffer
        AmsiScanBuffer.argtypes = [HANDLE, LPCSTR, UINT, LPCWSTR, UINT, POINTER(UINT)]  # Specify attribute data types
        AmsiScanBuffer.restype  = HRESULT

        amsi_res  = UINT(0)  # Return this scan result
        amsi_hres = AmsiScanBuffer(self.amsi_ctx, data, len(data), "buffer-data", self.amsi_session, byref(amsi_res))

        # If this function succeeds, it returns S_OK. Otherwise, it returns an HRESULT error code
        if amsi_hres != S_OK:
            print(f"[!]\tAmsiScanBuffer Error: {amsi_hres}")
            sys.exit()  # Exit if scan fails

        return amsi_res


    #> ---------------------------------------------------------------------------------
    #   Determines if the result of a scan indicates that the content should be blocked
    #> ---------------------------------------------------------------------------------
    """
        void AmsiResultIsMalware(
            r
        );
    """
    def amsi_result_is_malware(self, amsi_res):
        # List of potential detection result codes
        AMSI_RESULTS = {
            AMSI_RESULT.AMSI_RESULT_BLOCKED_BY_ADMIN_END:   'BLOCKED_BY_ADMIN_END',
            AMSI_RESULT.AMSI_RESULT_BLOCKED_BY_ADMIN_START: 'BLOCKED_BY_ADMIN_START',
            AMSI_RESULT.AMSI_RESULT_DETECTED:               'DETECTED'
        }

        if amsi_res.value in AMSI_RESULTS.keys():
            return True

        else:
            return False
Amsi(Antimalware Scan Interface)的工作流程。
As an application developer, you can actively participate in malware
Specifically, you can help protect your customers from
script-based malware, and from non-traditional avenues of
cyberattack.
By way of an example, let's say that your application is scriptable:
it accepts arbitrary script, and executes it via a scripting engine.
At the point when a script is ready to be supplied to the scripting
engine, your application can call the Windows AMSI APIs to request a
scan of the content. That way, you can safely determine whether or not
the script is malicious before you decide to go ahead and execute it.This is true even if the script was generated at runtime. Script
(malicious or otherwise), might go through several passes of
de-obfuscation. But you ultimately need to supply the scripting engine
with plain, un-obfuscated code. And that's the point at which you
invoke the AMSI APIs.
从微软的文档中我们可以看到Amsi中的工作流程。
如果有一个应用程序接受任意脚本,并通过脚本引擎执行该脚本。
那么杀毒软件可以调用amsi来查杀脚本。
可能有同学有疑问:杀毒软件不是也能不靠amsi查杀脚本吗?不不不 amsi的意义在于:无论我们的恶意脚本是经过多次模糊处理还是远程执行amsi都可以在脚本注入内存前检测到。而普通的静态杀毒软件是没办法的。
我们可以看微软文档给出的工作流程图来理解:
其实不难理解,首先我们要知道我们的恶意脚本是如何注入内存执行的
bypass 杀毒软件时我们的脚本一定是模糊处理的,但是无论我们什么样模糊处理到注入内存执行的时候一定是纯净,清晰的代码,不然脚本引擎无法理解和执行我们的恶意脚本。
那么问题就是在这里,amsi在脚本解密到注入内存之前去扫描查杀。这才是调用amsi的意义。
我们可以调用powershell来执行我们的恶意代码来更好理解Amsi
AMSI的一个简单测试是在PowerShell提示符–中键入AMSI旁路中常用的字符串amsiutils。如果端点安全产品支持AMSI,并且检测到该字符串,那么PowerShell提示符将显示错误,表明输入的命令是恶意的。
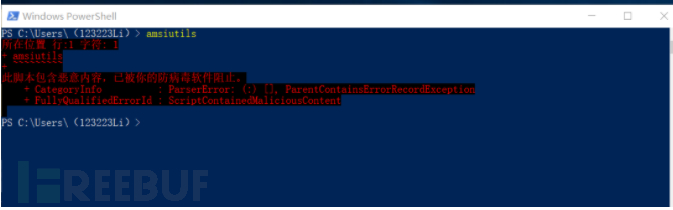
PS C:\Users\(123223Li)> amsiutils
所在位置 行:1 字符: 1
+ amsiutils
+ ~~~~~~~~~
此脚本包含恶意内容,已被你的防病毒软件阻止。
    + CategoryInfo          : ParserError: (:) [], ParentContainsErrorRecordException
    + FullyQualifiedErrorId : ScriptContainedMaliciousContent
很好Amsi查杀并阻止了power shell执行命令。
我们来处理一下amsiutils,比如我们常用的base64加密和XOR编码技术。
$bytes = [convert]::FromBase64String('YW1zaXV0aWxz') # YW1zaXV0aWxz为amsiutils的base64编码
$string = -join ($bytes | % {[char] ($_ -bxor 0x33)}) #进行XOR编码
iex $string #执行命令
然后我们使用powershell ISE 执行来模拟我们在实战中的无文件落地直接内存加载执行的手法
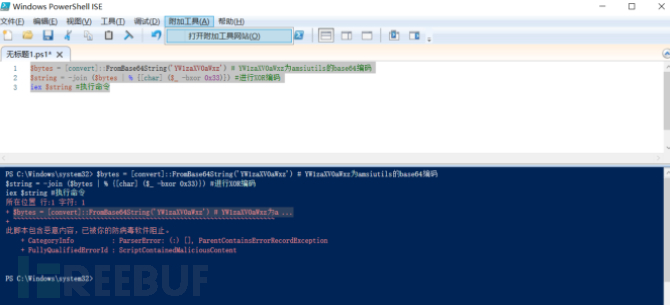
毫不意外,amsi检测到并拦截了powershell去执行我们的脚本。
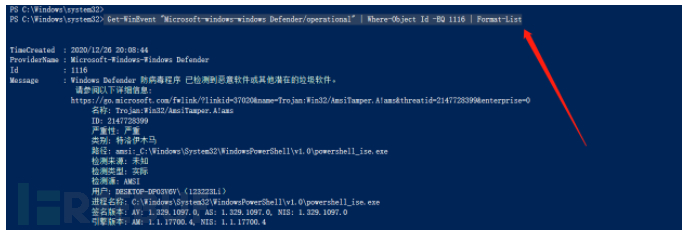
我们可以使用下面命令来查看amsi中的查杀结果
Get-WinEvent 'microssoft-windows-windows defender/operational' | Where-Object id -EQ 1116 | format-list
当然amsi也可以检测vba和Java script
在实战中,使用宏攻击(钓鱼)也是我们常用的手法,所以我们要知道amsi对宏文件的检测流程
在微软文档中我们可以看到
The user receives a document containing a (malicious) macro, which
evades static antivirus software scans by employing techniques such as
obfuscation, password-protected files, or other. The user then opens
the document containing the (malicious) macro. If the document opens
in Protected View, then the user clicks Enable Editing to exit
Protected View. The user clicks Enable Macros to allow macros to run.
As the macro runs, the VBA runtime uses a circular buffer to log [1]
data and parameters related to calls to Win32, COM, and VBA APIs. When
specific Win32 or COM APIs that are considered high risk (also known
as triggers) [2] are observed, macro execution is halted, and the
contents of the circular buffer are passed to AMSI. The registered
AMSI anti-malware service provider responds with a verdict to indicate
whether or not the macro behavior is malicious. If the behavior is
non-malicious, then macro execution proceeds. Otherwise, if the
behavior is malicious, then Microsoft Office closes the session in
response to the alert [3], and the AV can quarantine the file.
微软文档中也给出了一个流程图
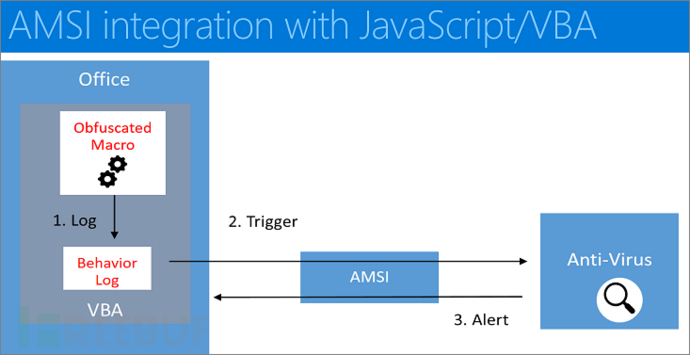
通过阅读理解微软文档我们可以知道amsi对宏的检测查杀流程:
1.word等等钓鱼文件加载宏
2.VBA宏运行时,运行时会有一个循环的缓冲区中记录数据和参数调用Win32,COM, VBA等等api的情况。
3.amsi监控着缓冲区中的情况,一旦我们的宏调用了一些敏感的API或一些敏感的数据交互,就会触发amsi的触发器。
4.amsi停止宏执行并从循环缓冲区取出内容传递。
5.amsi从循环缓冲区取出内容传递给杀毒软件。
6.杀毒软件拿到数据后判断宏是否为恶意的。
6.如果行为是无恶意的,那么宏可以执行。否则,关闭宏会话并发出响应警报和处理恶意文件。
我们可以看一个例子来理解amsi检测查杀vba的流程:
跟powershell一样我们也使用远程加载powershell恶意代码。这样更贴近实战。
1.使用cobat Strike生成我们的恶意代码
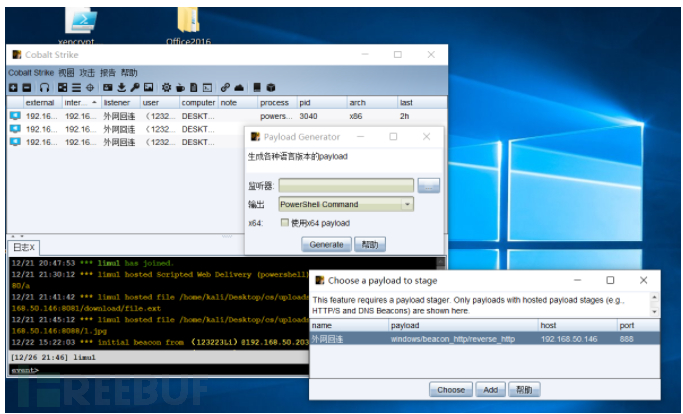
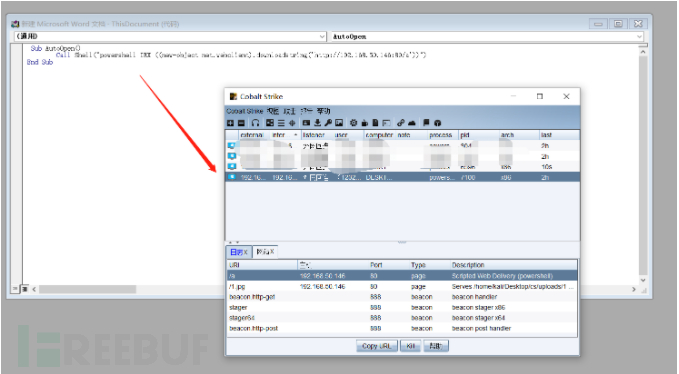
2.使用宏远程加载我们的恶意代码
#使用宏调用powershell远程加载ps1
 Sub AutoOpen()
        Call Shell("powershell -Sta -Nop -Window Hidden -EncodedCommand shell")
End Sub
在没有开amsi的情况下可以执行上线!
在开了amsi的情况下无法执行了
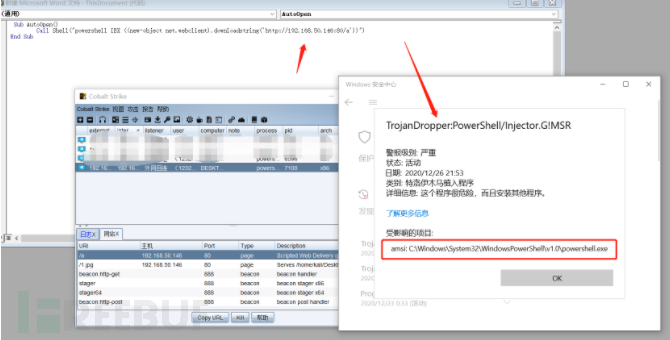
amsi是所有杀毒软件都可以调用吗?并不是!
amsi是在Windows 10 和Windows Server 2016 之后才有的,然后并不是所有的杀毒软件都可以调用amsi接口。国内的基本不可以哈哈哈。
在github上有一个项目记录了可以调用amsi的杀毒软件
https://github.com/subat0mik/whoamsi/wiki/Which-Endpoint-Protection-is-Using-AMSI%3F
杀软对抗是一个动态对抗的过程,杀毒有新技术,免杀就有新手法。只有熟透杀软才能更好免杀。
amsi解决的是远程加载执行恶意脚本无文件落地的攻击手法,过两天看看跟大家学习一下bypass AMsi的手法。
我们学习了Antimalware Scan Interface(AMSI)的一些知识。作为渗透测试的我们了解杀软是为了更好地进行免杀。
在对抗杀毒软件的手法中,在大层面来说:
一就是破坏杀毒软件,使其无法正常运行;
二是绕过杀毒软件,使其无法检测到。
从小的层面来说:
静态免杀
动态免杀
沙盒对抗
等等
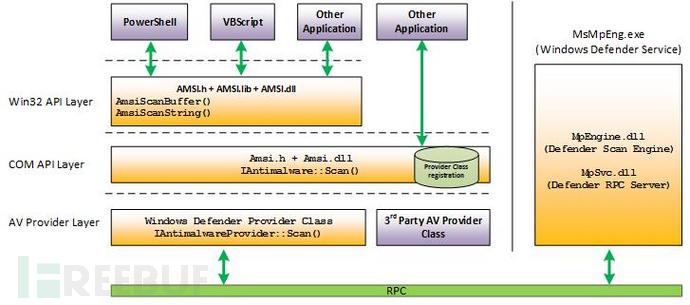
前面我们说到AMSI是windows开放的一个接口,注册的杀毒软件可以通过调用amsi接口来完成监控查杀。
既然是接口,那么我们是不是可以使杀毒软件无法调用这个amsi接口来bypass?
首先我们得知道杀毒软件是如何调用amsi的:
在微软文档中给出了2种调用amsi接口的方法
There are two ways in which you can interface with AMSI in your application.
By using the AMSI Win32 APIs. By using the AMSI COM interfaces.
分别是:
1.通过使用AMSI Win32 API
Functions that your application can call to request a scan. AMSI provides the following functions.
#函数,应用程序可以通过调用amsi,amsi提供以下函数

Function #函数    Description #功能
AmsiCloseSession    Close a session that was opened by AmsiOpenSession.#关闭打开的会话
AmsiInitialize    Initialize the AMSI API.#初始化AMSI API。
AmsiOpenSession    Opens a session within which multiple scan requests can be correlated.#打开一个会话中关联多个扫描请求。
AmsiResultIsMalware    Determines if the result of a scan indicates that the content should be blocked.#    确定扫描的结果表明,内容应该是屏蔽
AmsiScanBuffer    Scans a buffer-full of content for malware. #    扫描恶意软件的缓冲区已满的内容。
AmsiScanString    Scans a string for malware.#恶意软件扫描一个字符串。
AmsiUninitialize    Remove the instance of the AMSI API that was originally opened by AmsiInitialize.#删除的实例AMSI API,
其中每个函数的调用方法有兴趣可以去微软种查看。
https://docs.microsoft.com/en-us/windows/win32/amsi/antimalware-scan-interface-functions
2.通过使用AMSI COM接口
这个中调用的是IAmsiStream接口(amsi.h)代表一个流被扫描,微软文档中给出了示例,
https://docs.microsoft.com/en-us/windows/win32/api/amsi/nf-amsi-iamsistream-getattribute

Inheritance The IAmsiStream interface inherits from the IUnknown
interface. IAmsiStream also has these types of members:

Methods Methods The IAmsiStream interface has these methods.

METHODS Method    Description IAmsiStream::GetAttribute    Returns a
requested attribute from the stream. IAmsiStream::Read    Requests a
buffer-full of content to be read. Requirements REQUIREMENTS
            Minimum supported client    Windows 10 [desktop apps only]
          Minimum supported server    Windows Server 2016 [desktop apps only] Target
Platform    Windows Header    amsi.h
然后上面我们知道了如何调用amsi,但是调用amsi还要注册才能调用,所以我们也得看看amsi是如何注册的:
As a creator of antimalware products, you can choose to author and
register your own in-process COM server (a DLL) to function as an AMSI
That AMSI provider must implement the IAntimalwareProvider
interface, and it must run in-process.Note that, after Windows 10, version 1709 (the Fall 2017 Creators'
Update), your AMSI provider DLL may not work if it depends upon other
DLLs in its path to be loaded at the same time. To prevent DLL
hijacking, we recommend that your provider DLL load its dependencies
explicitly (with a full path) using secure LoadLibrary calls, or equivalent.
We recommend this instead of relying on the LoadLibrary search behavior.The section below shows how to register your AMSI provider. For full
sample code showing how to author your own AMSI provider DLL, see the
IAntimalwareProvider interface sample application.Register your provider DLL with AMSI To begin with, you need to ensure
that these Windows Registry keys exist.HKLMSOFTWAREMicrosoftAMSIProviders HKLMSOFTWAREClassesCLSID An
AMSI provider is an in-process COM server. Consequently, it needs to
register itself with COM. COM classes are registered in
HKLMSOFTWAREClassesCLSID.
当然在微软文档中也给出了示例,但是我们是要做免杀,理解一些必要的东西就行。
在微软的文档中我们可以知道
Note that, after Windows 10, version 1709 (the Fall 2017 Creators'
Update), your AMSI provider DLL may not work if it depends upon other
DLLs in its path to be loaded at the same time. To prevent DLL
hijacking, we recommend that your provider DLL load its dependencies
explicitly (with a full path) using secure LoadLibrary calls, orequivalent.
We recommend this instead of relying on the LoadLibrarysearch behavior.search behavior.
微软中说:
也就是说存在dll劫持的例子。

 浙公网安备 33010602011771号