quarkus依赖注入之三:用注解选择注入bean
欢迎访问我的GitHub
这里分类和汇总了欣宸的全部原创(含配套源码):https://github.com/zq2599/blog_demos
本篇概览
- 本文是《quarkus依赖注入》系列的第三篇,前文咱们掌握了创建bean的几种方式,本篇趁热打铁,学习一个与创建bean有关的重要知识点:一个接口如果有多个实现类时,bean实例应该如何选择其中的一个呢?可以用注解来设定bean的选择逻辑
- 如果您熟悉spring,此刻应该会想到ConditionalXXX注解,下面的代码来自spring官方,注解ConditionalOnProperty的作用是根据配置信息来控制bean是否实例化,本篇咱们要掌握的是quarkus框架下的类似控制逻辑
@Service
@ConditionalOnProperty(
  value="logging.enabled",
  havingValue = "true",
  matchIfMissing = true)
class LoggingService {
    // ...
}
- 本篇主要是通过实例学习以下五个注解的用法
- LookupIfProperty,配置项的值符合要求才能使用bean
- LookupUnlessProperty,配置项的值不符合要求才能使用bean
- IfBuildProfile,如果是指定的profile才能使用bean
- UnlessBuildProfile,如果不是指定的profile才能使用bean
- IfBuildProperty,如果构建属性匹配才能使用bean
源码下载
- 本篇实战的完整源码可在GitHub下载到,地址和链接信息如下表所示(https://github.com/zq2599/blog_demos)
| 名称 | 链接 | 备注 |
|---|---|---|
| 项目主页 | https://github.com/zq2599/blog_demos | 该项目在GitHub上的主页 |
| git仓库地址(https) | https://github.com/zq2599/blog_demos.git | 该项目源码的仓库地址,https协议 |
| git仓库地址(ssh) | git@github.com:zq2599/blog_demos.git | 该项目源码的仓库地址,ssh协议 |
- 这个git项目中有多个文件夹,本次实战的源码在quarkus-tutorials文件夹下,如下图红框

- quarkus-tutorials是个父工程,里面有多个module,本篇实战的module是basic-di,如下图红框

LookupIfProperty,配置项的值符合要求才能使用bean
- 注解LookupIfProperty的作用是检查指定配置项,如果存在且符合要求,才能通过代码获取到此bean,
- 有个关键点请注意:下图是官方定义,可见LookupIfProperty并没有决定是否实例化beam,它决定的是能否通过代码取到bean,这个代码就是Instance<T>来注入,并且用Instance.get方法来获取

- 定义一个接口TryLookupIfProperty.java
public interface TryLookupIfProperty {
    String hello();
}
- 以及两个实现类,第一个是TryLookupIfPropertyAlpha.java
public class TryLookupIfPropertyAlpha implements TryLookupIfProperty {
    @Override
    public String hello() {
        return "from " + this.getClass().getSimpleName();
    }
}
- 第二个TryLookupIfPropertyBeta.java
public class TryLookupIfPropertyBeta implements TryLookupIfProperty {
    @Override
    public String hello() {
        return "from " + this.getClass().getSimpleName();
    }
}
- 然后就是注解LookupIfProperty的用法了,如下所示,SelectBeanConfiguration是个配置类,里面有两个方法用来生产bean,都用注解LookupIfProperty修饰,如果配置项service.alpha.enabled的值等于true,就会执行tryLookupIfPropertyAlpah方法,如果配置项service.beta.enabled的值等于true,就会执行tryLookupIfPropertyBeta方法
package com.bolingcavalry.config;

import com.bolingcavalry.service.TryLookupIfProperty;
import com.bolingcavalry.service.impl.TryLookupIfPropertyAlpha;
import com.bolingcavalry.service.impl.TryLookupIfPropertyBeta;
import io.quarkus.arc.lookup.LookupIfProperty;
import javax.enterprise.context.ApplicationScoped;

public class SelectBeanConfiguration {

    @LookupIfProperty(name = "service.alpha.enabled", stringValue = "true")
    @ApplicationScoped
    public TryLookupIfProperty tryLookupIfPropertyAlpha() {
        return new TryLookupIfPropertyAlpha();
    }

    @LookupIfProperty(name = "service.beta.enabled", stringValue = "true")
    @ApplicationScoped
    public TryLookupIfProperty tryLookupIfPropertyBeta() {
        return new TryLookupIfPropertyBeta();
    }
}
- 然后来验证注解LookupIfProperty是否生效,下面是单元测试代码,有两处需要注意的地方,稍后会提到
package com.bolingcavalry;

import com.bolingcavalry.service.TryLookupIfProperty;
import com.bolingcavalry.service.impl.TryLookupIfPropertyAlpha;
import io.quarkus.test.junit.QuarkusTest;
import org.junit.jupiter.api.Assertions;
import org.junit.jupiter.api.BeforeAll;
import org.junit.jupiter.api.Test;
import javax.enterprise.inject.Instance;
import javax.inject.Inject;

@QuarkusTest
public class BeanInstanceSwitchTest {

    @BeforeAll
    public static void setUp() {
        System.setProperty("service.alpha.enabled", "true");
    }

    // 注意,前面的LookupIfProperty不能决定注入bean是否实力话,只能决定Instance.get是否能取到,
    //所以此处要注入的是Instance,而不是TryLookupIfProperty本身
    @Inject
    Instance<TryLookupIfProperty> service;

    @Test
    public void testTryLookupIfProperty() {
        Assertions.assertEquals("from " + tryLookupIfPropertyAlpha.class.getSimpleName(),
                                service.get().hello());
    }
}
- 上述代码有以下两点要注意
- 注意TryLookupIfProperty的注入方式,对这种运行时才能确定具体实现类的bean,要用Instance的方式注入,使用时要用Instance.get方法取得bean
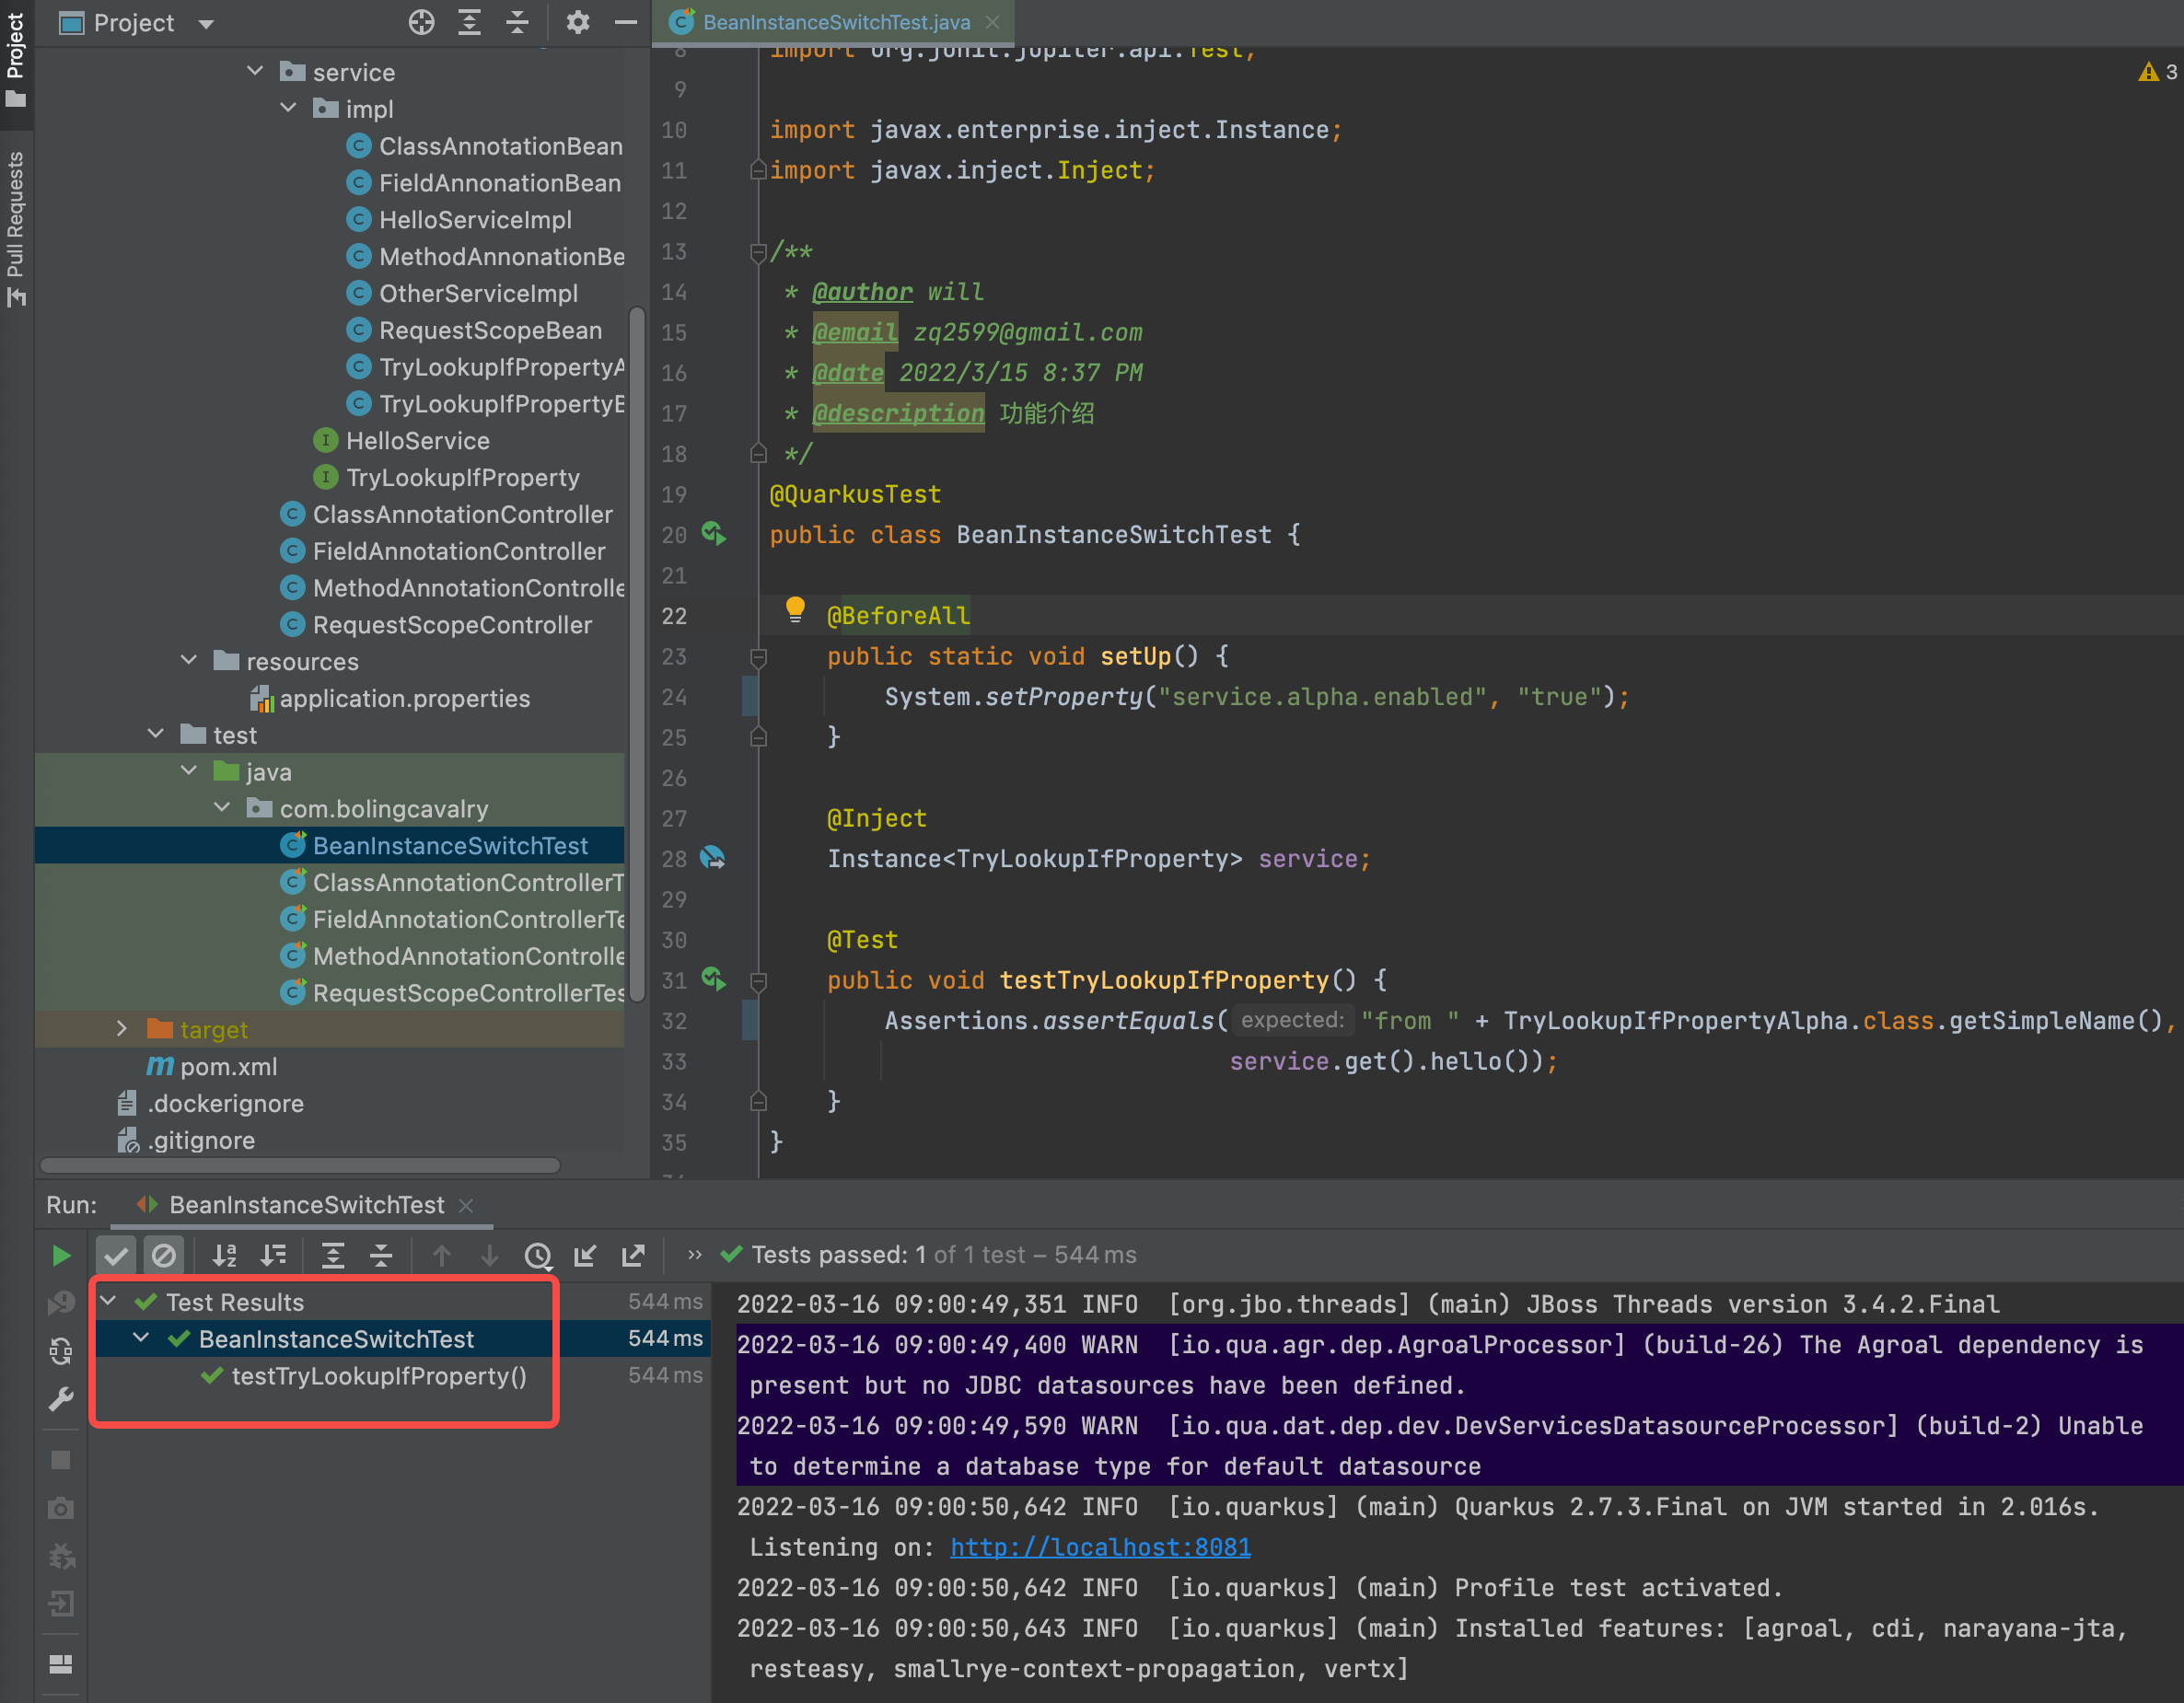
- 单元测试的BeforeAll注解用于指定测试前要做的事情,这里用System.setProperty设置配置项service.alpha.enabled,所以,理论上SelectBeanConfiguration.tryLookupIfPropertyAlpha方法应该会执行,也就是说注入的TryLookupIfProperty应该是TryLookupIfPropertyAlpha实例,所以testTryLookupIfProperty中用assertEquals断言预测:TryLookupIfProperty.hello的值来自TryLookupIfPropertyAlpha
- 执行单元测试,如下图,符合预期
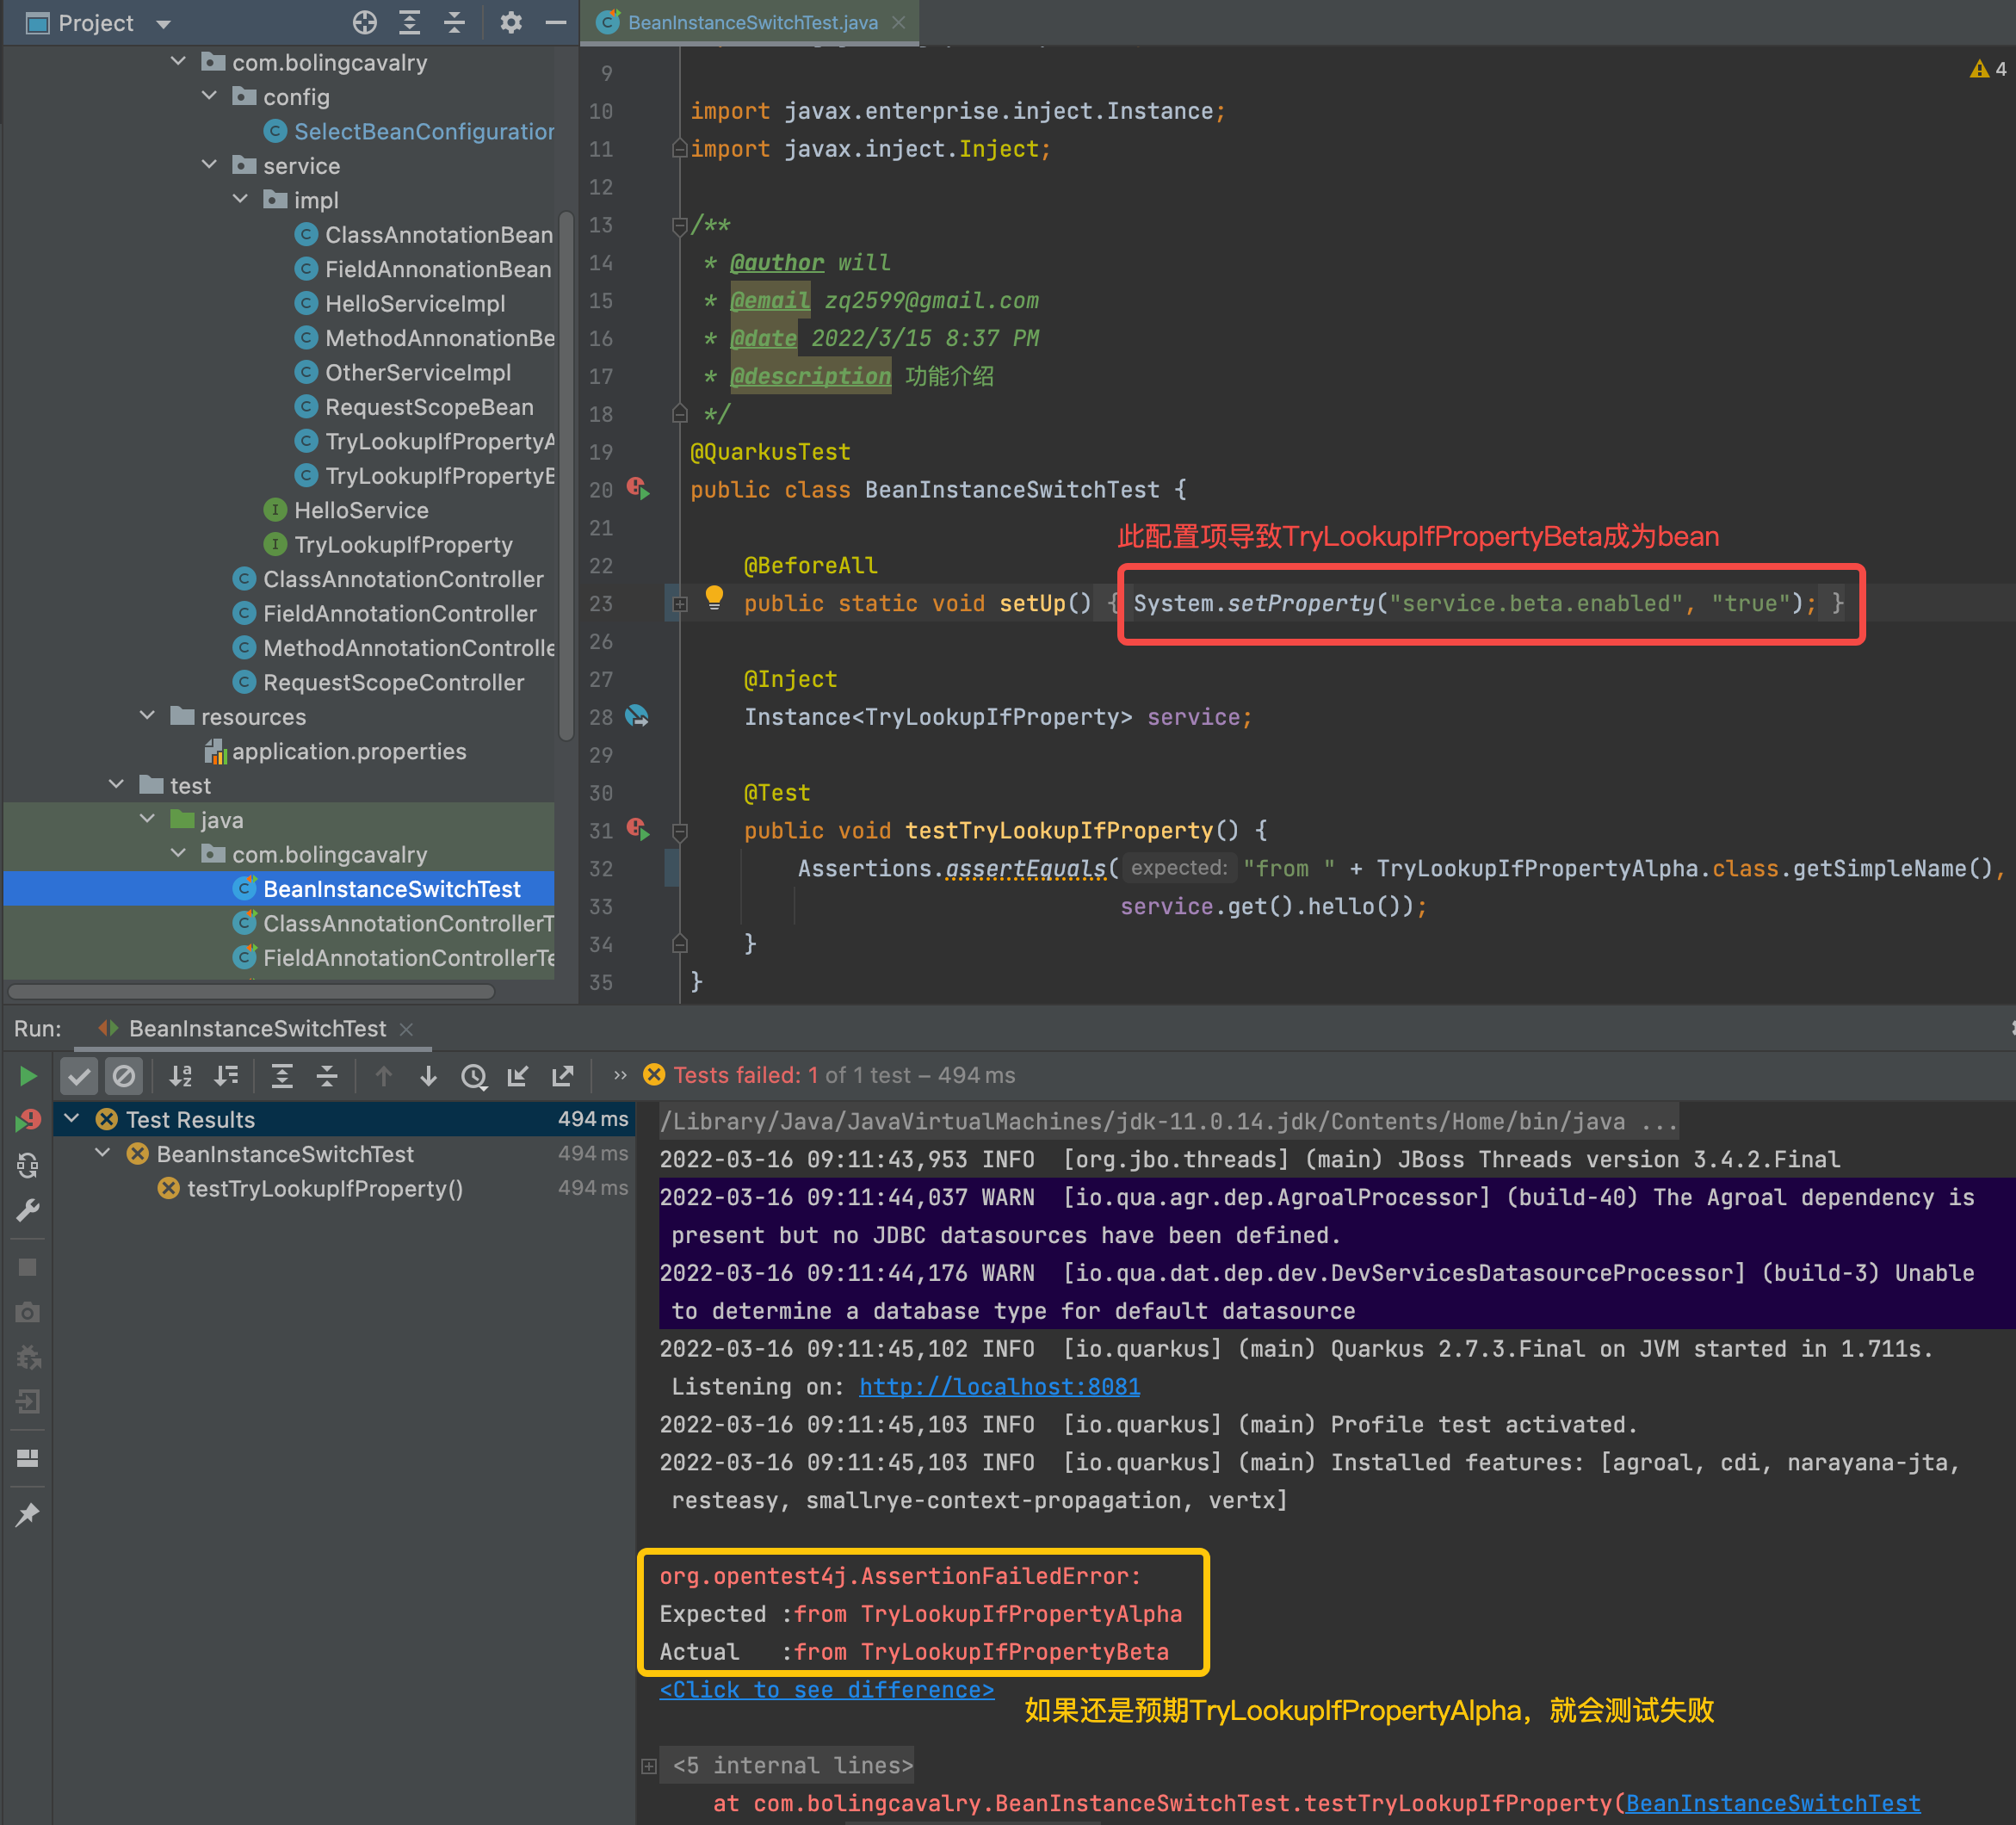
- 修改BeanInstanceSwitchTest.setUp,将service.alpha.enabled改成service.alpha.enabled,如此理论上SelectBeanConfiguration.tryLookupIfPropertyBeta方法应该会执行,实例化的应该就是TryLookupIfPropertyBeta,那么本次单元测试就不能通过了
- 如下图,果然,注入的实例变成了TryLookupIfPropertyBeta,但是预期的还是之前的TryLookupIfPropertyAlpha,于是测试失败
LookupUnlessProperty,配置项的值不符合要求才能使用bean
-
LookupIfProperty的意思是配置项的值符合要求才会创建bean,而LookupUnlessProperty恰好相反,意思是配置项的值不符合要求才能使用bean
-
为了验证LookupUnlessProperty的效果,修改SelectBeanConfiguration.java,只修改tryLookupIfPropertyBeta方法的注解,由从之前的LookupIfProperty改为LookupUnlessProperty,属性也改为service.alpha.enabled,现在的逻辑是:如果属性service.alpha.enabled的值是true,就执行tryLookupIfPropertyAlpha,如果属性service.alpha.enabled的值不是true,就执行tryLookupIfPropertyBeta
public class SelectBeanConfiguration {

    @LookupIfProperty(name = "service.alpha.enabled", stringValue = "true")
    @ApplicationScoped
    public TryLookupIfProperty tryLookupIfPropertyAlpha() {
        return new TryLookupIfPropertyAlpha();
    }

    @LookupUnlessProperty(name = "service.alpha.enabled", stringValue = "true")
    @ApplicationScoped
    public TryLookupIfProperty tryLookupIfPropertyBeta() {
        return new TryLookupIfPropertyBeta();
    }
}
- 打开刚才的BeanInstanceSwitchTest.java,setUp方法中将service.alpha.enabled的值设为true
@BeforeAll
public static void setUp() {
	System.setProperty("service.alpha.enabled", "true");
}
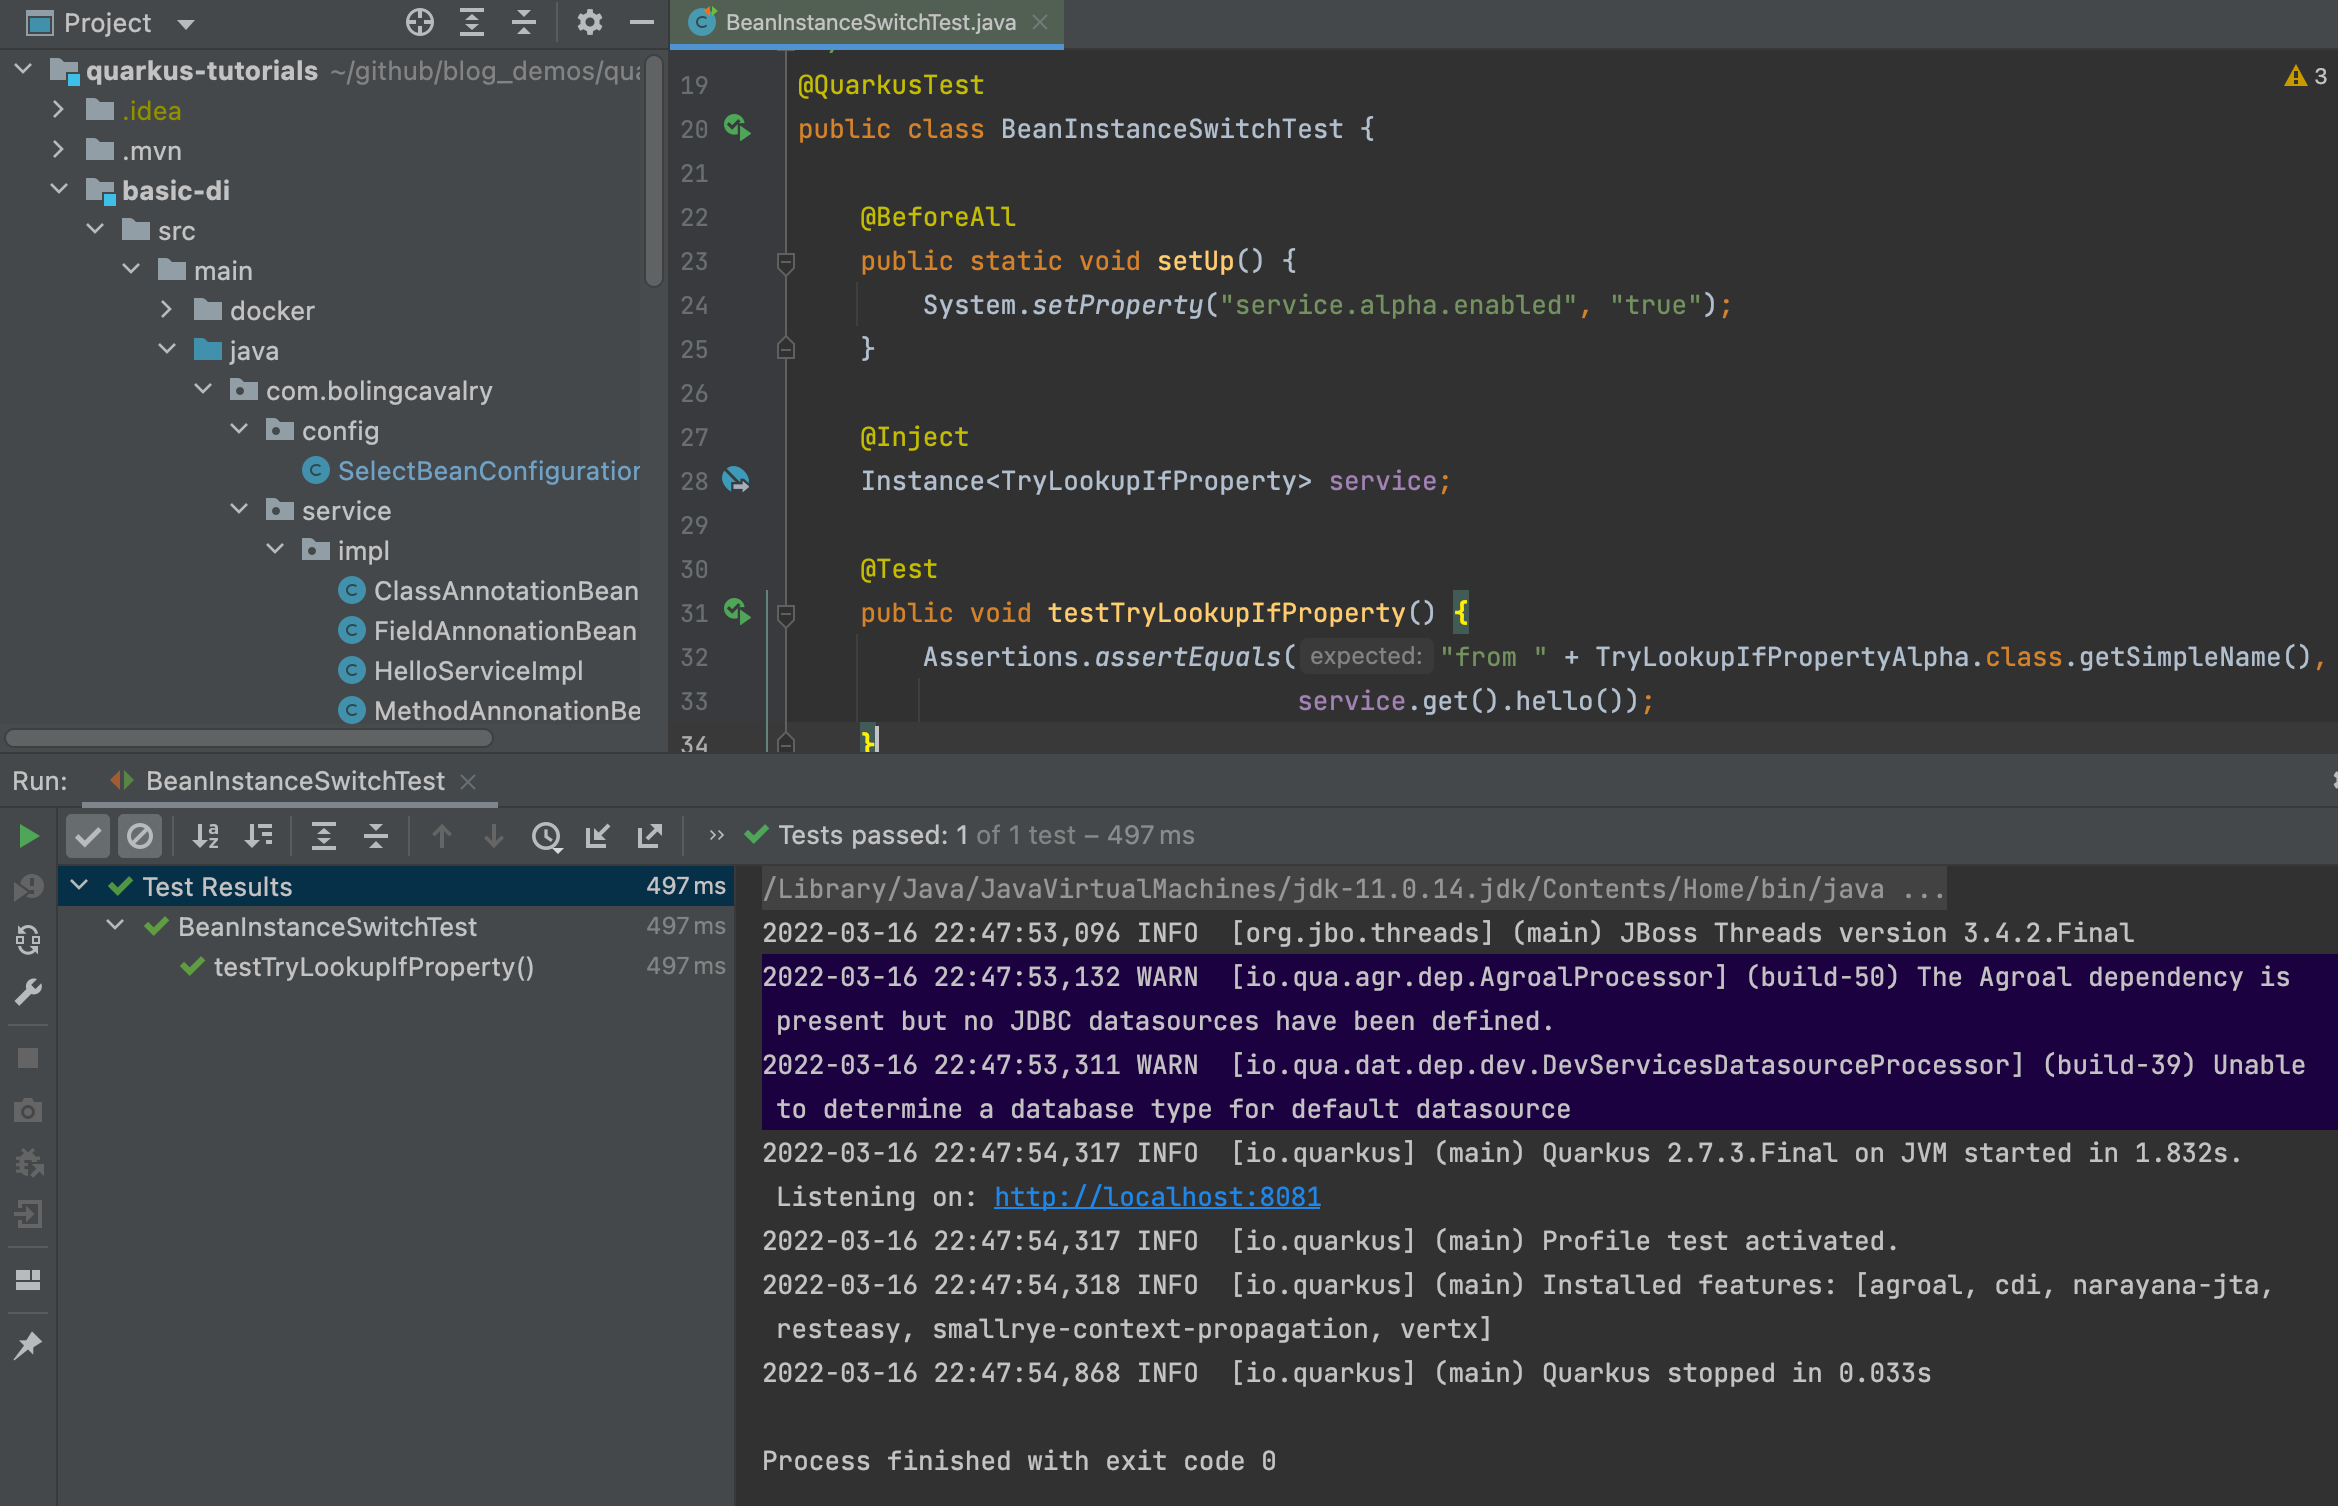
- 运行单元测试,如下图,符合预期
-
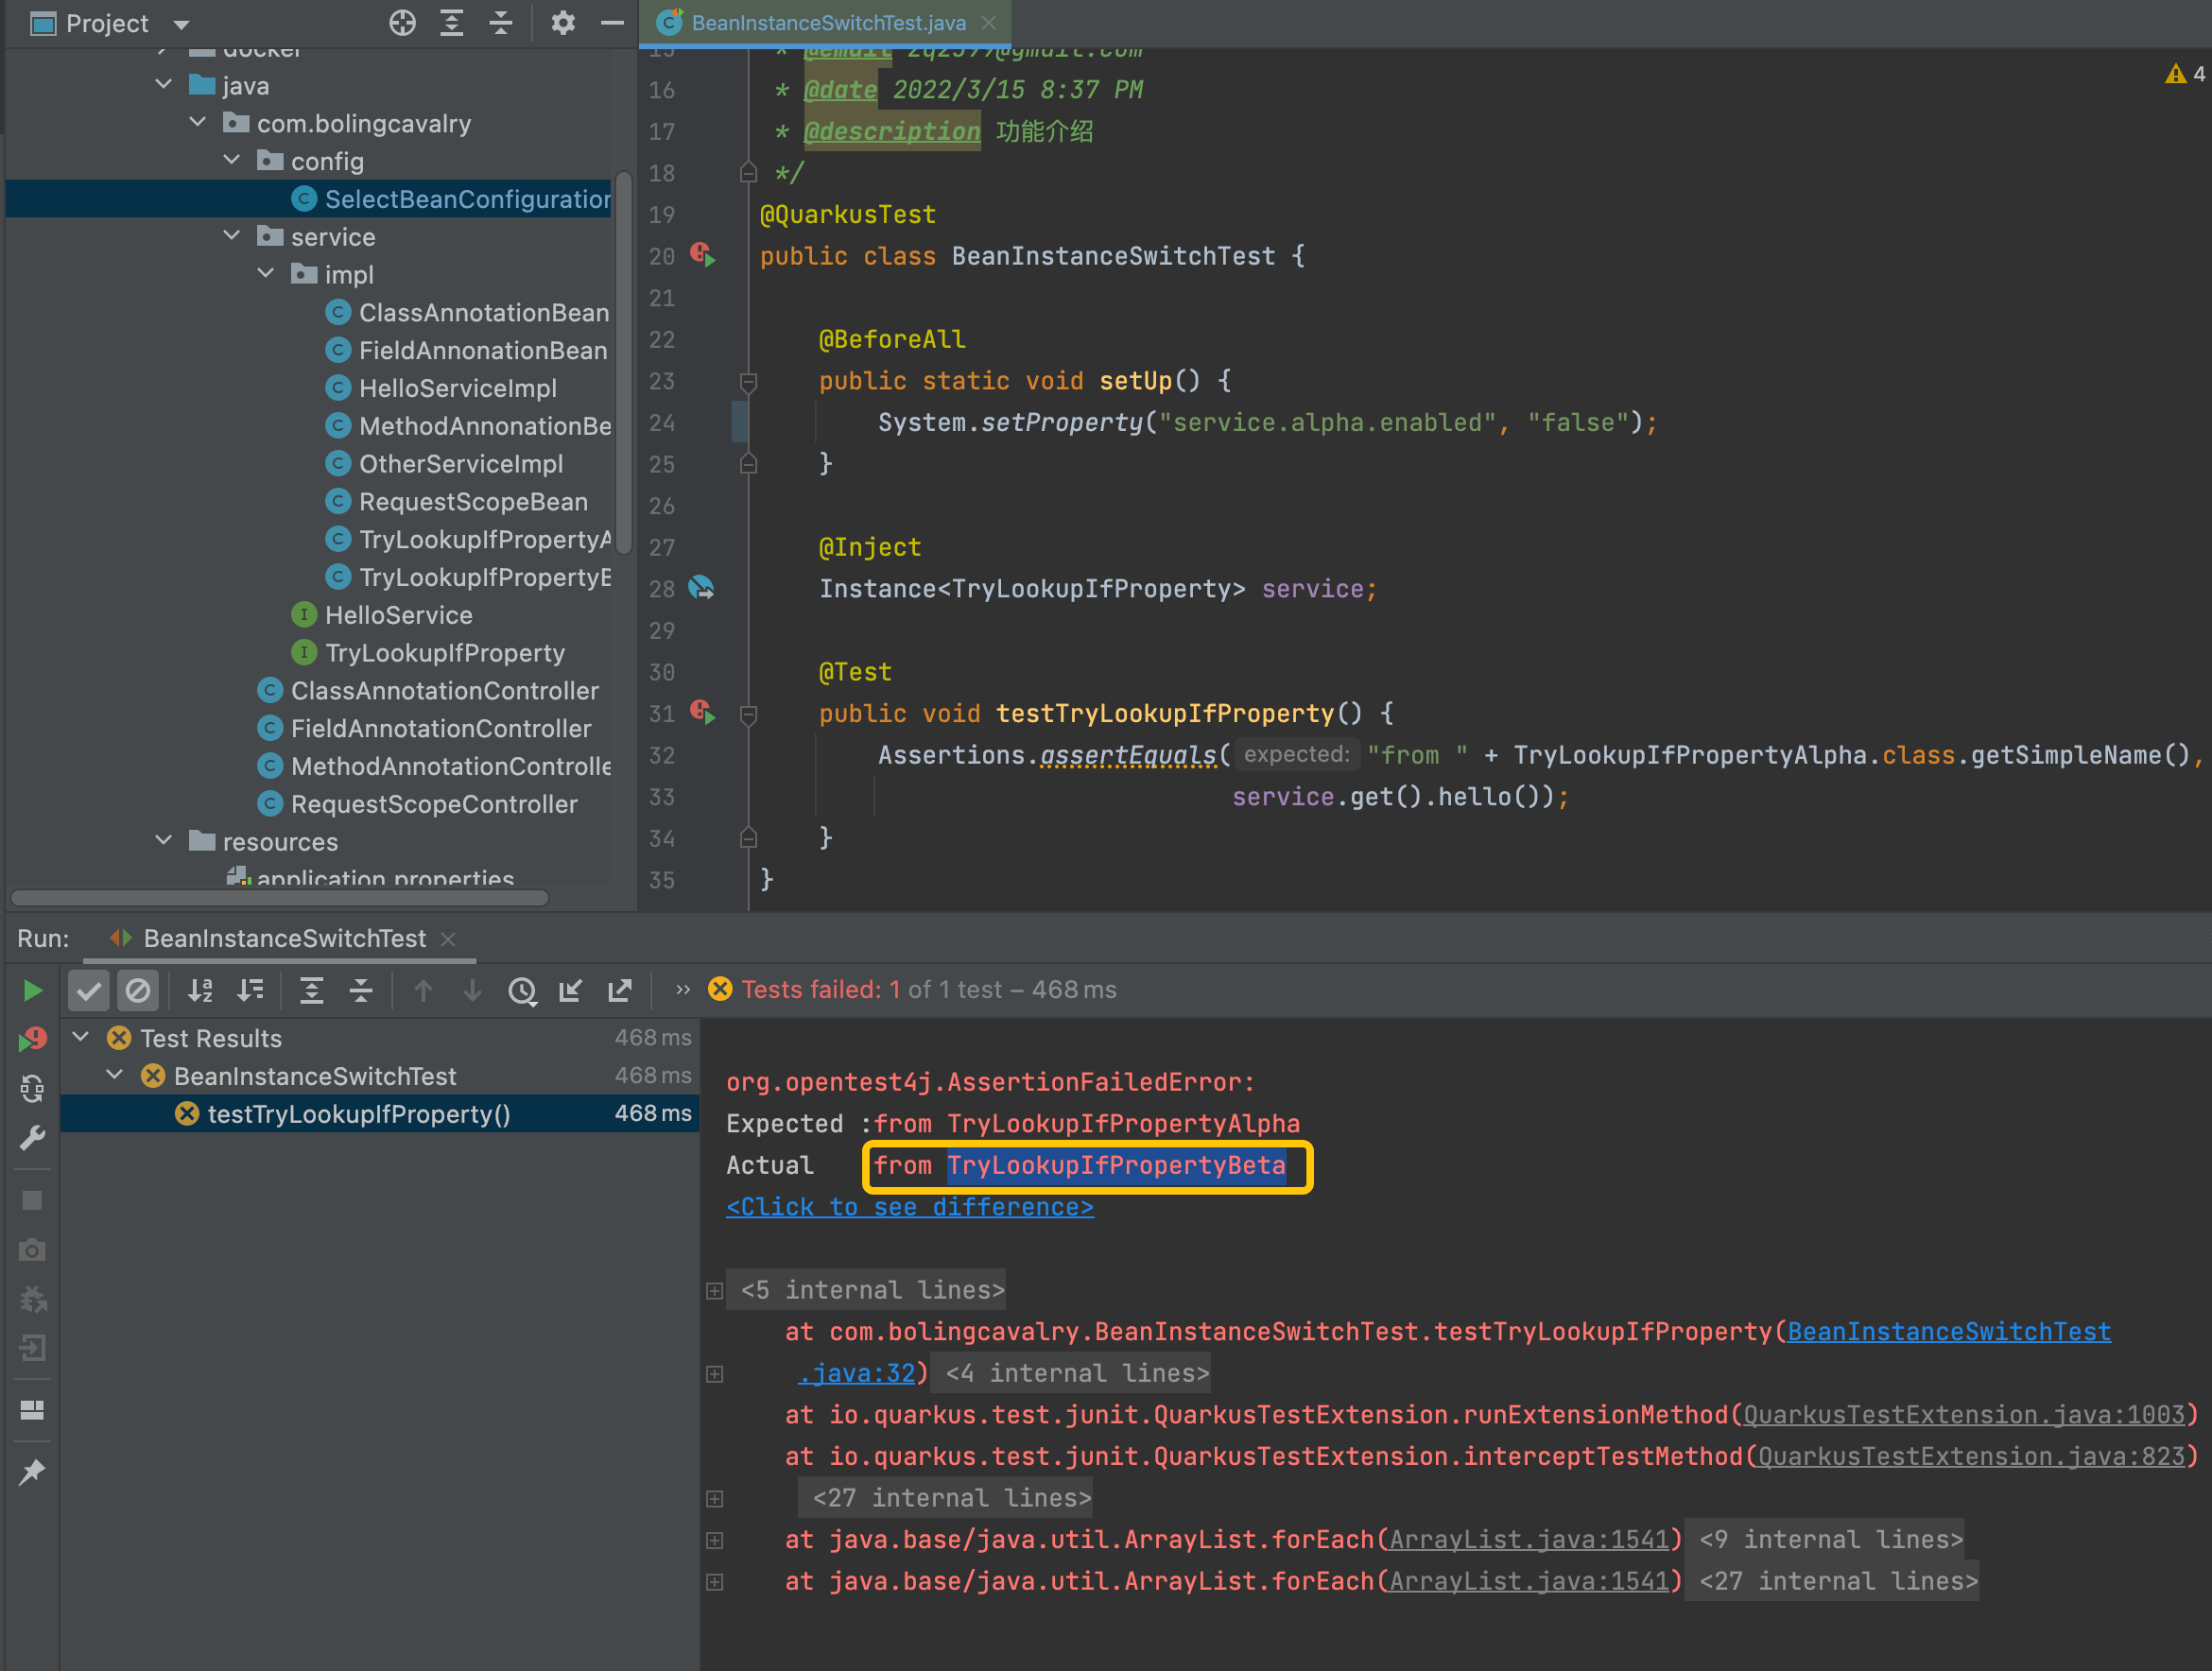
现在把service.alpha.enabled的值设为false,单元测试不通过,提示返回值是TryLookupIfPropertyBeta,这也是符合预期的,证明LookupUnlessProperty已经生效了
-
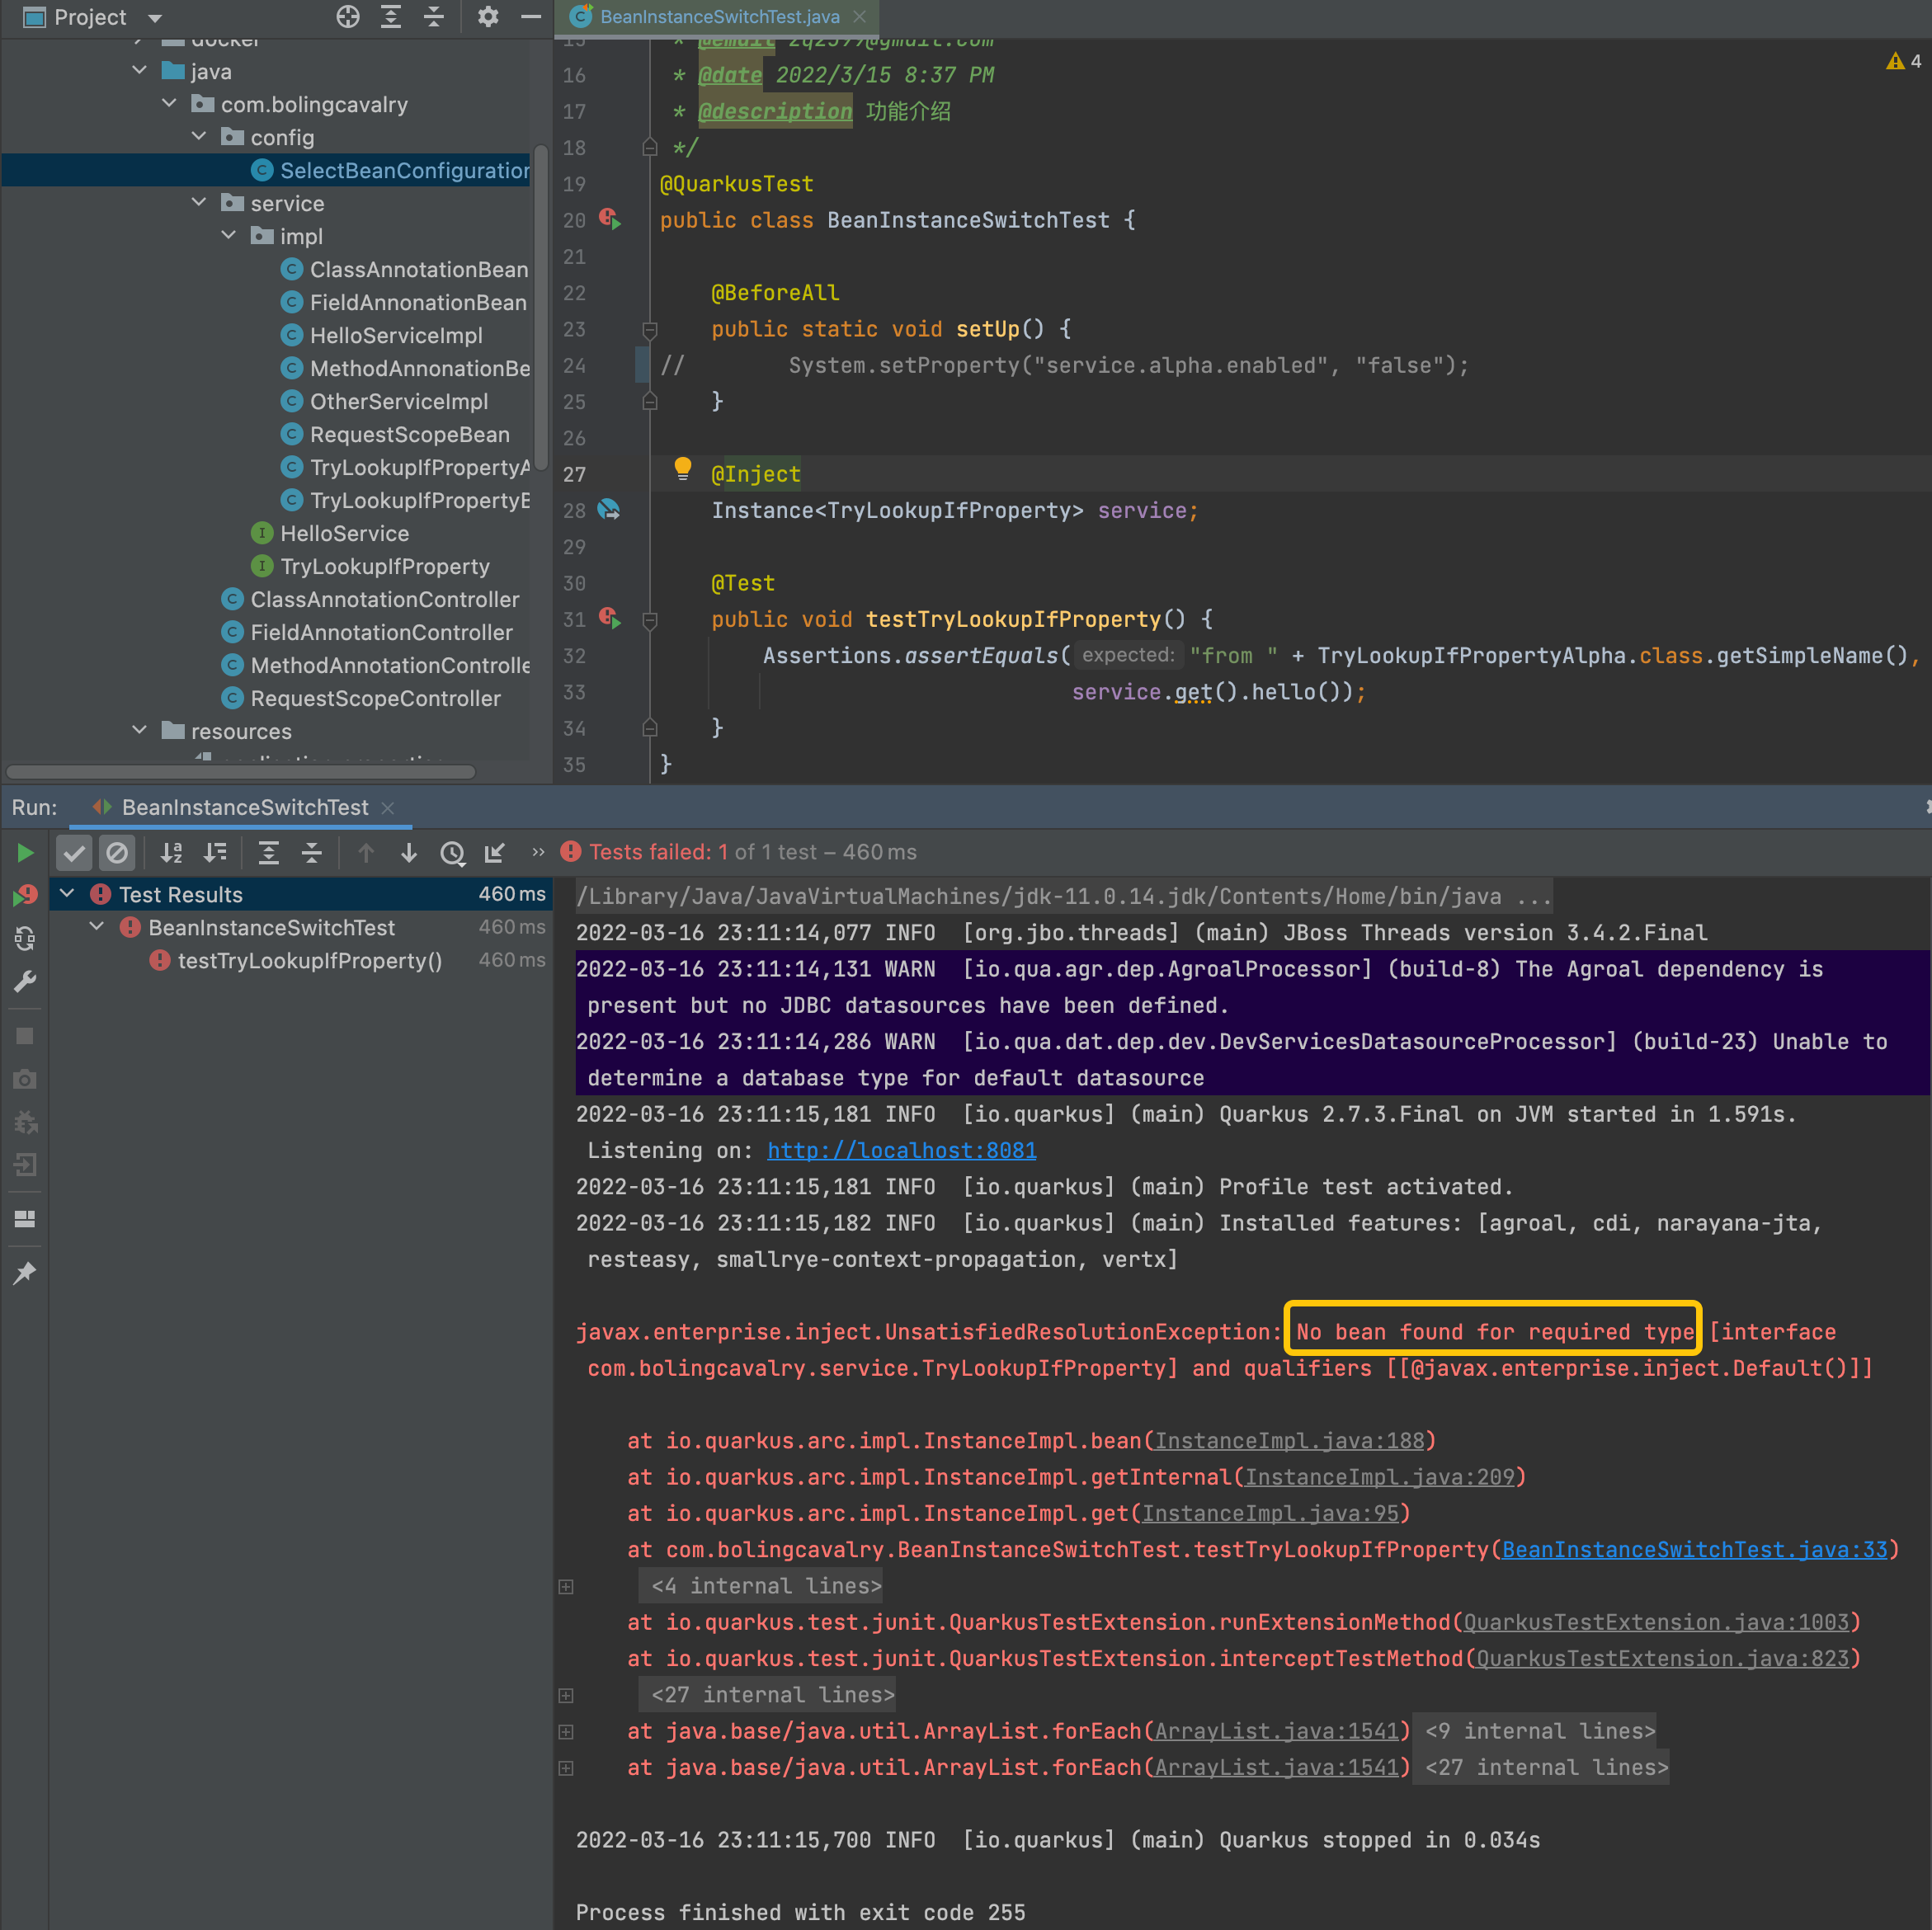
此刻您可能会好奇,如果配置项service.alpha.enabled不存在会如何,咱们将setUp方法中的System.setProperty这段代码删除,这样配置项service.alpha.enabled就不存在了,再次执行单元测试,发现SelectBeanConfiguration类的tryLookupIfPropertyAlpha和tryLookupIfPropertyBeta两个方法都没有执行,导致没有TryLookupIfProperty类型的bean
-
这时候您应该发现了一个问题:如果配置项service.alpha.enabled不存在的时候如何返回一个默认bean,以避免找不到bean呢?
-
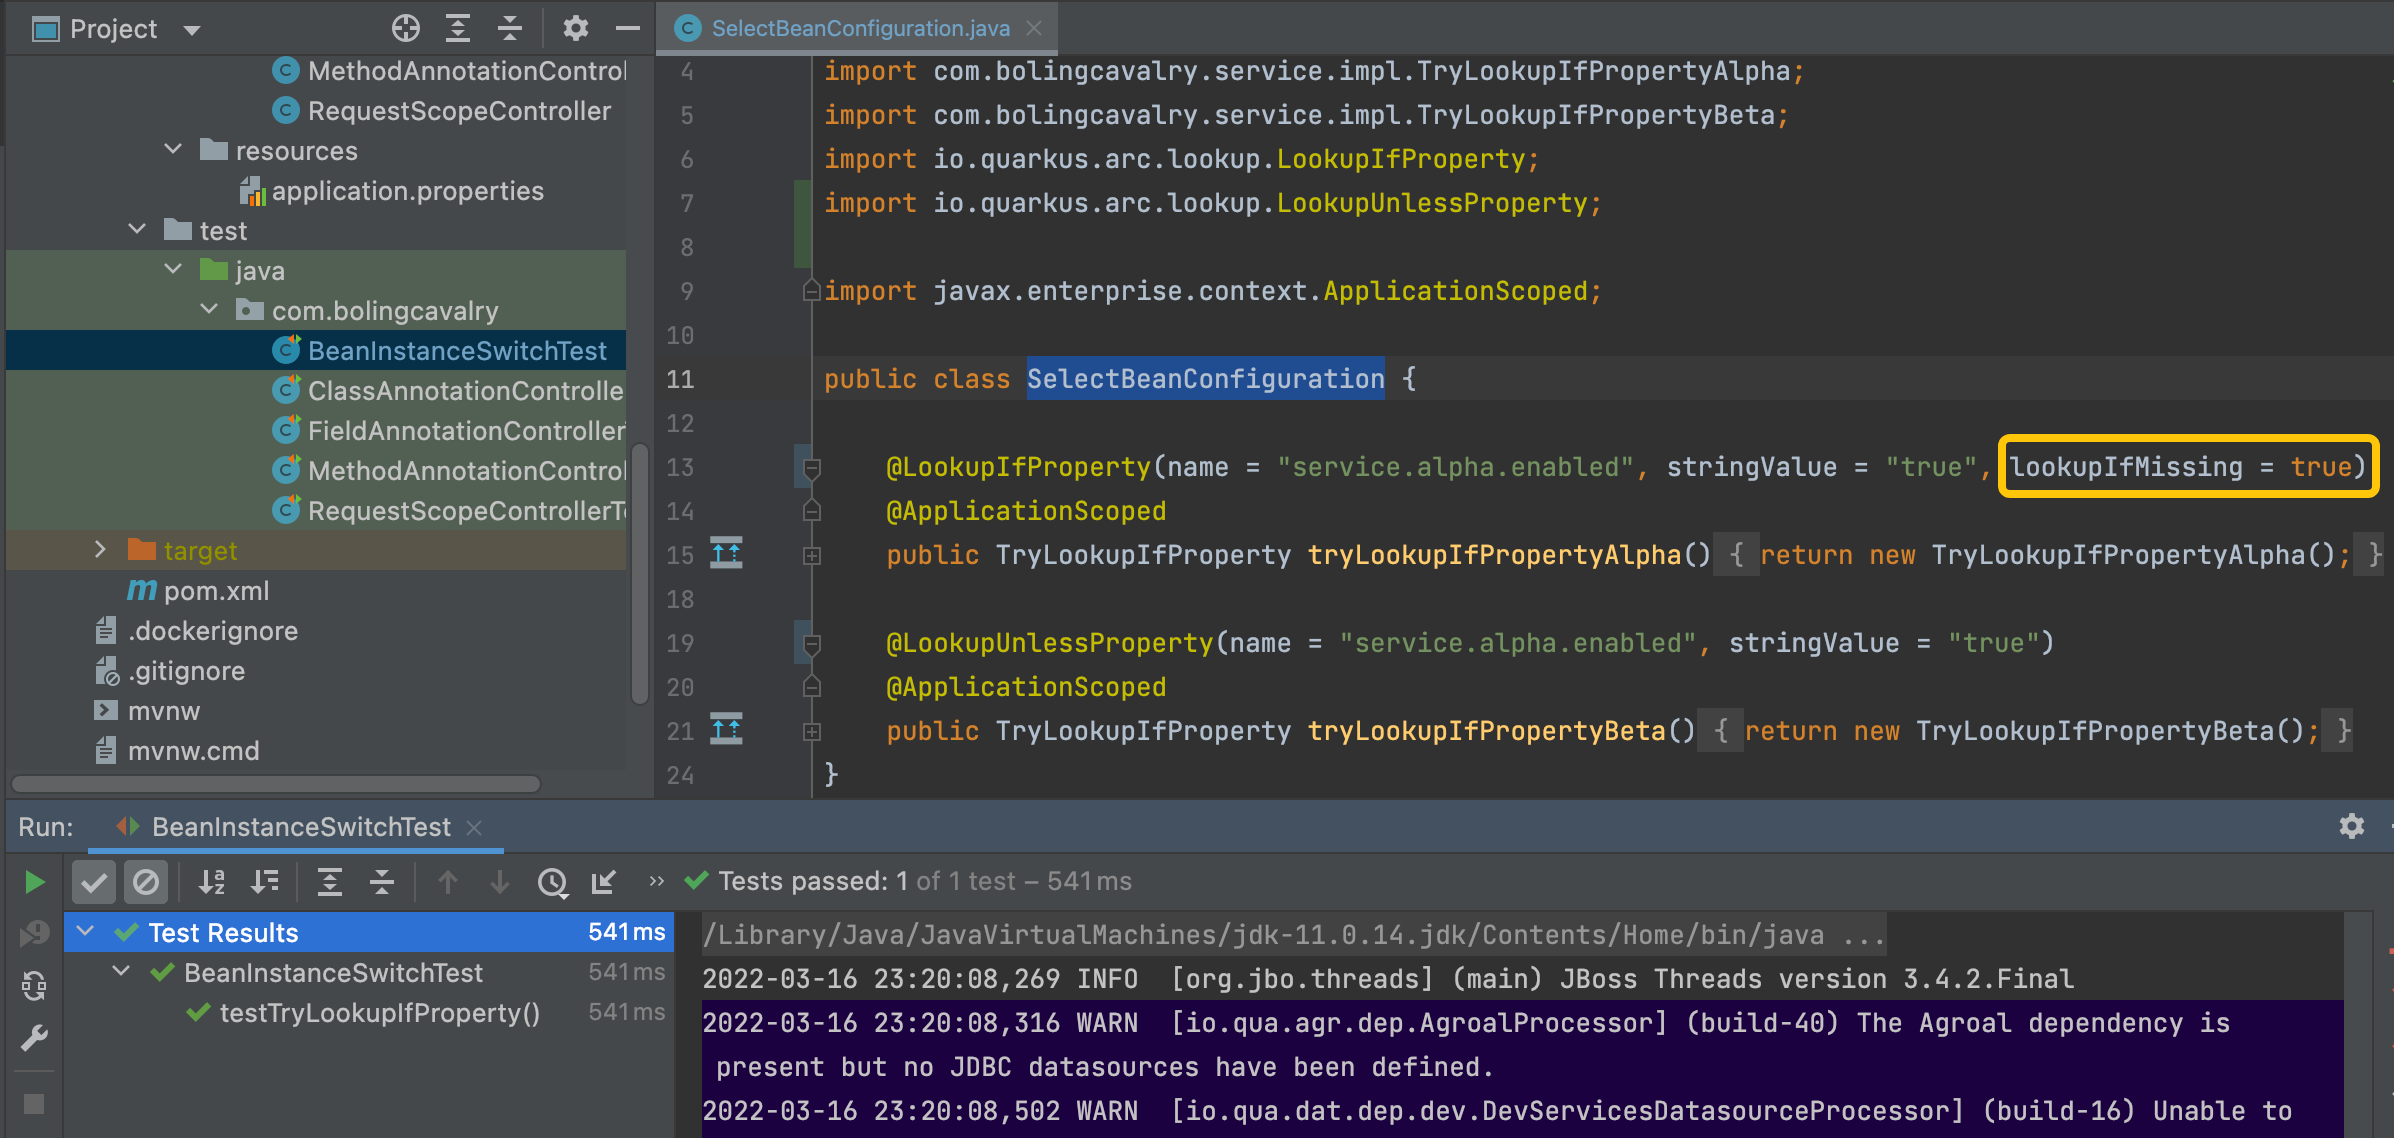
LookupIfProperty和LookupUnlessProperty都有名为lookupIfMissing的属性,意思都一样:指定配置项不存在的时候,就执行注解所修饰的方法,修改SelectBeanConfiguration.java,如下图黄框所示,增加lookupIfMissing属性,指定值为true(没有指定的时候,默认值是false)

- 再次运行单元测试,如下图,尽管service.alpha.enabled不存在,但lookupIfMissing属性起了作用,SelectBeanConfiguration.tryLookupIfPropertyAlpha方法还是执行了,于是测试通过
IfBuildProfile,如果是指定的profile才能使用bean
- 应用在运行时,其profile是固定的,IfBuildProfile检查当前profile是否是指定值,如果是,其修饰的bean就能被业务代码使用
- 对比官方对LookupIfProperty和IfBuildProfile描述的差别,LookupIfProperty决定了是否能被选择,IfBuildProfile决定了是否在容器中
# LookupIfProperty,说的是be obtained by programmatic
Indicates that a bean should only be obtained by programmatic lookup if the property matches the provided value.
# IfBuildProfile,说的是be enabled
the bean will only be enabled if the Quarkus build time profile matches the specified annotation value.
- 接下来写代码验证,先写个接口
public interface TryIfBuildProfile {
    String hello();
}
- 再写两个实现类,第一个是TryIfBuildProfileProd.java
public class TryIfBuildProfileProd implements TryIfBuildProfile {
    @Override
    public String hello() {
        return "from " + this.getClass().getSimpleName();
    }
}
- 第二个TryIfBuildProfileDefault.java
public class TryIfBuildProfileDefault implements TryIfBuildProfile {
    @Override
    public String hello() {
        return "from " + this.getClass().getSimpleName();
    }
}
- 再来看IfBuildProfile的用法,在刚才的SelectBeanConfiguration.java中新增两个方法,如下所示,应用运行时,如果profile是test,那么tryIfBuildProfileProd方法会被执行,还要注意的是注解DefaultBean的用法,如果profile不是test,那么quarkus的bean容器中就没有TryIfBuildProfile类型的bean了,此时DefaultBean修饰的tryIfBuildProfileDefault方法就会被执行,导致TryIfBuildProfileDefault的实例注册在quarkus容器中
@Produces
@IfBuildProfile("test")
public TryIfBuildProfile tryIfBuildProfileProd() {
	return new TryIfBuildProfileProd();
}

@Produces
@DefaultBean
public TryIfBuildProfile tryIfBuildProfileDefault() {
	return new TryIfBuildProfileDefault();
}
-
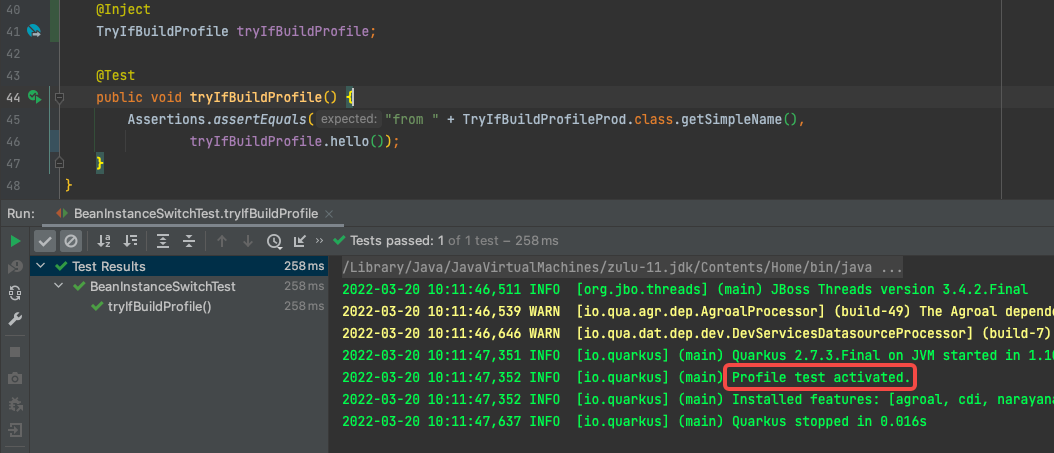
单元测试代码写在刚才的BeanInstanceSwitchTest.java中,运行单元测试是profile被设置为test,所以tryIfBuildProfile的预期是TryIfBuildProfileProd实例,注意,这里和前面LookupIfProperty不一样的是:这里的TryIfBuildProfile直接注入就好,不需要Instance<T>来注入
@Inject TryIfBuildProfile tryIfBuildProfile; @Test public void testTryLookupIfProperty() { Assertions.assertEquals("from " + TryLookupIfPropertyAlpha.class.getSimpleName(), service.get().hello()); } @Test public void tryIfBuildProfile() { Assertions.assertEquals("from " + TryIfBuildProfileProd.class.getSimpleName(), tryIfBuildProfile.hello()); } -
执行单元测试,如下图,测试通过,红框显示当前profile确实是test
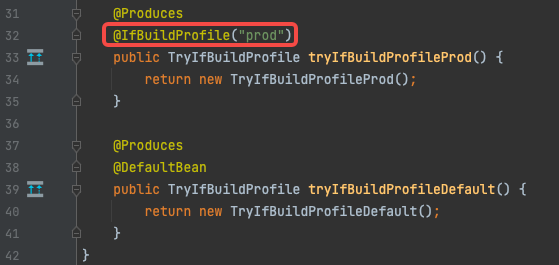
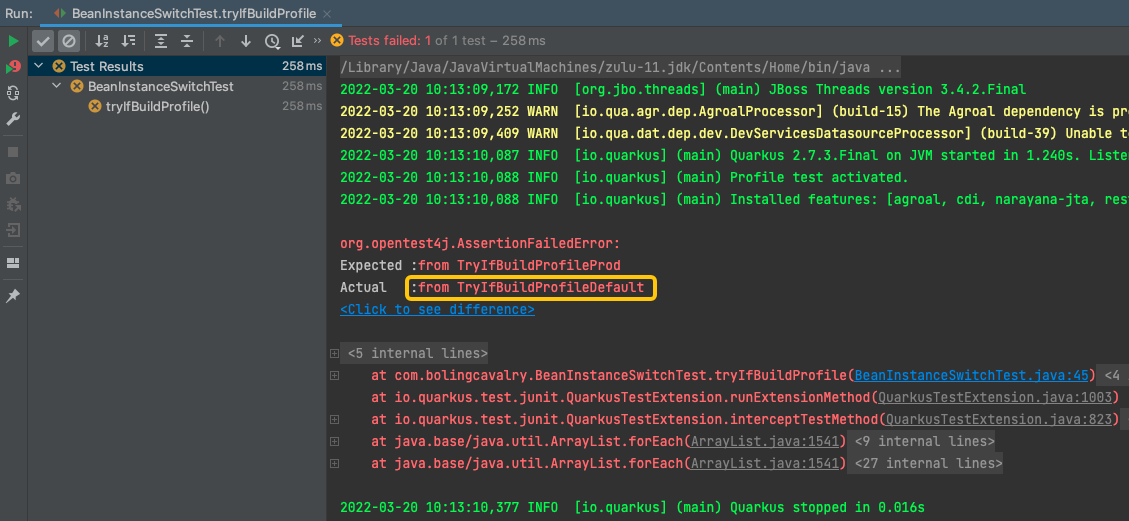
- 再来试试DefaultBean的是否正常,修改SelectBeanConfiguration.java的代码,如下图红框,将IfBuildProfile注解的值从刚才的test改为prod,如此一来,再执行单元测试时tryIfBuildProfileProd方法就不会被执行了,此时看tryIfBuildProfileDefault方法能否执行
- 执行单元测试,结果如下图,黄框中的内容证明是tryIfBuildProfileDefault方法被执行,也就是说DefaultBean正常工作
UnlessBuildProfile,如果不是指定的profile才能使用bean
- UnlessBuildProfile的逻辑与IfBuildProfile相反:如果不是指定的profile才能使用bean
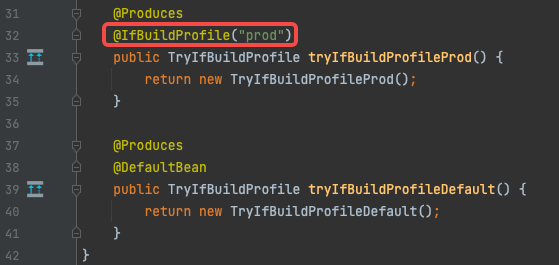
- 回顾刚才测试失败的代码,如下图红框,单元测试的profile是test,下面要求profile必须等于prod,因此测试失败,现在咱们将红框中的IfBuildProfile改为UnlessBuildProfile,意思是profile不等于prod的时候bean可以使用
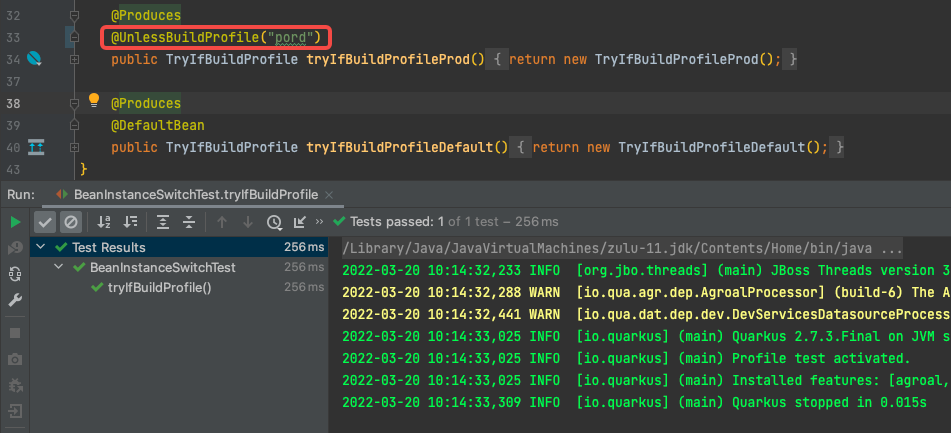
- 执行单元测试,如下图,这一次顺利通过,证明UnlessBuildProfile的作用符合预期
IfBuildProperty,如果构建属性匹配才能使用bean
- 最后要提到注解是IfBuildProperty是,此注解与LookupIfProperty类似,下面是两个注解的官方描述对比,可见IfBuildProperty作用的熟悉主要是构建属性(前面的文章中提到过构建属性,它们的特点是运行期间只读,值固定不变)
# LookupIfProperty的描述,如果属性匹配,则此bean可以被获取使用
Indicates that a bean should only be obtained by programmatic lookup if the property matches the provided value.
# IfBuildProperty的描述,如果构建属性匹配,则此bean是enabled
the bean will only be enabled if the Quarkus build time property matches the provided value
- 限于篇幅,就不写代码验证了,来看看官方demo,用法上与LookupIfProperty类似,可以用DefaultBean来兜底,适配匹配失败的场景
@Dependent
public class TracerConfiguration {

    @Produces
    @IfBuildProperty(name = "some.tracer.enabled", stringValue = "true")
    public Tracer realTracer(Reporter reporter, Configuration configuration) {
        return new RealTracer(reporter, configuration);
    }

    @Produces
    @DefaultBean
    public Tracer noopTracer() {
        return new NoopTracer();
    }
}
- 至此,基于多种注解来选择bean实现的学习已经完成,依靠配置项和profile,已经可以覆盖多数场景下bean的确认,如果这些不能满足您的业务需求,接下来的文章咱们继续了解更多灵活的选择bean的方式


 注入点的类型,如果有多个bean都是该类型的实现,应该如何选择呢?本篇尝试通过多种注解来选择


【推荐】国内首个AI IDE,深度理解中文开发场景,立即下载体验Trae
【推荐】编程新体验,更懂你的AI,立即体验豆包MarsCode编程助手
【推荐】抖音旗下AI助手豆包,你的智能百科全书,全免费不限次数
【推荐】轻量又高性能的 SSH 工具 IShell:AI 加持,快人一步
· 震惊!C++程序真的从main开始吗?99%的程序员都答错了
· winform 绘制太阳,地球,月球 运作规律
· 【硬核科普】Trae如何「偷看」你的代码?零基础破解AI编程运行原理
· 上周热点回顾(3.3-3.9)
· 超详细:普通电脑也行Windows部署deepseek R1训练数据并当服务器共享给他人