
PRESTO安装部署和参数说明(一)
PRESTO部署和参数说明(一)
一,概要
在部署和使用presto的过程中,在此记录一下部署记录和使用记录以及需要注意的事项。本人使用的presto版本是0.214,3台redhat虚拟机。使用背景:客户需要定期查询大批量的数据,最后选择了sqoop工具定期导入hive,并且定期删除定期更新,因为没有找到是个实时增量导入的工具,批量执行mapreduce任务,然后使用分布式查询引擎presto查询数据。
二,安装部署
在官网下载最新的安装包和客户端包:
server安装包:https://prestodb.io/docs/current/installation/deployment.html
client连接包:https://prestodb.io/docs/current/installation/cli.html
我们有三台测试机器,测试机器的版本类型为:
LSB Version: :base-4.0-amd64:base-4.0-noarch:core-4.0-amd64:core-4.0-noarch:graphics-4.0-amd64:graphics-4.0-noarch:printing-4.0-amd64:printing-4.0-noarch
Distributor ID: RedHatEnterpriseServer
Description: Red Hat Enterprise Linux Server release 6.7 (Santiago)
Release: 6.7
Codename: Santiago
我们要部署3个worker和一个Coordinator(附带一个Discovery Server节点)节点,并且这个master节点和一个worker节点部署同一台机器上。
第一步:下载完成之后,解压压缩包
tar -zxvf presto-server-0.214.tar.gz
第二步:解压之后,在目录presto-server-0.214中创建etc文件夹。进去etc文件夹,建立配置文件,我这里建立配置文件如下
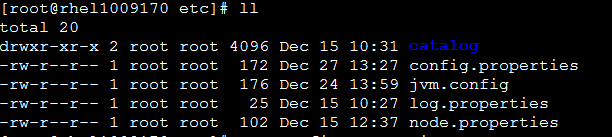
config.properties: presto服务配置
node.properties:每个节点特定配置
jvm.properties:java虚拟机的命令行选项
log.properties:输出的日志级别
catalog目录:每个连着者配置
咱们一个一个的讲解:
config.properties
如果是Coordinator节点:注意 EXAMPLE.COM是指Coordinator节点的域名或者IP
1 2 3 4 5 6 7 8 | coordinator=truenode-scheduler.include-coordinator=truehttp-server.http.port=8080query.max-memory=10GBquery.max-memory-per-node=3GBquery.max-total-memory-per-node=3GBdiscovery-server.enabled=truediscovery.uri=http://EXAMPLE.COM:8080 |
如果是worker节点:
1 2 3 4 5 6 | coordinator=falsehttp-server.http.port=8080query.max-memory=10GBquery.max-memory-per-node=3GBquery.max-total-memory-per-node=3GBdiscovery.uri=http://EXAMPLE.COM:8080 |
参数解释:
coordinator: 是否运行该实例为coordinator(接受client的查询和管理查询执行)。
node-scheduler.include-coordinator:coordinator是否也作为work。对于大型集群来说,在coordinator里做worker的工作会影响查询性能。
http-server.http.port:指定HTTP端口。Presto使用HTTP来与外部和内部进行交流。
query.max-memory: 查询能用到的最大总内存
query.max-memory-per-node: 查询能用到的最大单结点内存
discovery-server.enabled:
Presto使用Discovery服务去找到集群中的所有结点。每个Presto实例在启动时都会在Discovery服务里注册。这样可以简化部署,
不需要额外的服务,Presto的coordinator内置一个Discovery服务。也是使用HTTP端口。
discovery.uri: Discovery服务的URI。将example.net:8080替换为coordinator的host和端口。这个URI不能以斜杠结尾,这个错误需特别注意,不然会报404错误。
另外还有以下属性:
jmx.rmiregistry.port: 指定JMX RMI的注册。JMX client可以连接此端口
jmx.rmiserver.port: 指定JXM RMI的服务器。可通过JMX监听。
node.properties
1 2 3 | node.environment=productionnode.id=node01node.data-dir=/var/presto/data |
解释:
node.environment: 环境名字,Presto集群中的结点的环境名字都必须是一样的。
node.id: 唯一标识,每个结点的标识都必须是为一的。就算重启或升级Presto都必须还保持原来的标识。
node.data-dir: 数据目录,Presto用它来保存log和其他数据
jvm.properties
1 2 3 4 5 6 7 8 | -server-Xmx5G-XX:+UseG1GC-XX:G1HeapRegionSize=32M-XX:+UseGCOverheadLimit-XX:+ExplicitGCInvokesConcurrent-XX:+HeapDumpOnOutOfMemoryError-XX:OnOutOfMemoryError=kill -9 %p |
JVM配置文件etc/jvm.config,包含启动Java虚拟机时的命令行选项。格式是每一行是一个命令行选项。此文件数据是由shell解析,所以选项中包含空格或特殊字符会被忽略。
log.properties
1 | com.facebook.presto=INFO |
备注:日志级别有四种,DEBUG, INFO, WARN and ERROR
catalog目录
在这里以hive为例子,我在客户端的配置如下:
1 2 3 | connector.name=hive-hadoop2hive.metastore.uri=thrift://10.18.14.170:9083hive.config.resources=/etc/alternatives/hadoop-conf/core-site.xml,/etc/alternatives/hadoop-conf/hdfs-site.xml |
第三步:启动presto服务和客户端命令
启动presto-server,进入目录bin目录执行。
./launcher start
其余选项可供参考:
1 2 3 4 5 6 7 8 9 10 11 12 13 14 15 16 17 18 19 20 21 22 23 24 | Usage: launcher [options] commandCommands: run, start, stop, restart, kill, statusOptions: -h, --help show this help message and exit -v, --verbose Run verbosely --etc-dir=DIR Defaults to INSTALL_PATH/etc --launcher-config=FILE Defaults to INSTALL_PATH/bin/launcher.properties --node-config=FILE Defaults to ETC_DIR/node.properties --jvm-config=FILE Defaults to ETC_DIR/jvm.config --config=FILE Defaults to ETC_DIR/config.properties --log-levels-file=FILE Defaults to ETC_DIR/log.properties --data-dir=DIR Defaults to INSTALL_PATH --pid-file=FILE Defaults to DATA_DIR/var/run/launcher.pid --launcher-log-file=FILE Defaults to DATA_DIR/var/log/launcher.log (only in daemon mode) --server-log-file=FILE Defaults to DATA_DIR/var/log/server.log (only in daemon mode) -D NAME=VALUE Set a Java system property |
启动presto-cli客户端:
把下载的jar包:presto-cli-0.214-executable.jar 重命名为:presto 并且赋予权限
chmod +x presto
执行进去命令以hive为例子:
/presto --server localhost:8080 --catalog hive --schema default
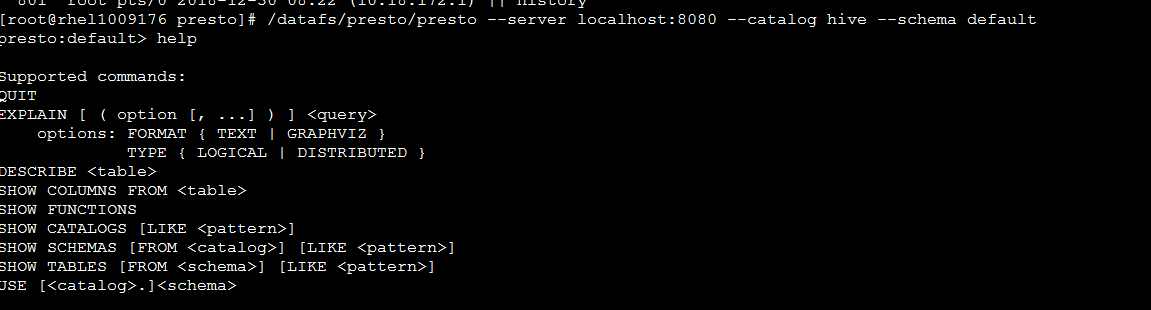
客户端其他命令供参考:
1 2 3 4 5 6 7 8 9 10 11 12 13 14 15 16 17 18 19 20 21 22 23 24 25 26 27 28 29 30 31 32 33 34 35 36 37 38 39 40 41 42 43 44 45 46 47 48 49 50 51 52 53 54 55 56 57 58 59 60 61 62 63 64 65 66 67 68 69 70 71 72 73 74 75 76 77 78 79 80 81 82 83 84 85 86 87 88 89 90 91 92 93 94 95 96 97 98 99 100 101 102 103 104 105 106 107 108 109 110 111 112 113 114 115 116 117 118 119 120 121 122 123 124 125 126 | NAME presto - Presto interactive consoleSYNOPSIS presto [--access-token <access token>] [--catalog <catalog>] [--client-info <client-info>] [--client-request-timeout <client request timeout>] [--client-tags <client tags>] [--debug] [--execute <execute>] [(-f <file> | --file <file>)] [(-h | --help)] [--http-proxy <http-proxy>] [--ignore-errors] [--keystore-password <keystore password>] [--keystore-path <keystore path>] [--krb5-config-path <krb5 config path>] [--krb5-credential-cache-path <krb5 credential cache path>] [--krb5-disable-remote-service-hostname-canonicalization] [--krb5-keytab-path <krb5 keytab path>] [--krb5-principal <krb5 principal>] [--krb5-remote-service-name <krb5 remote service name>] [--log-levels-file <log levels file>] [--output-format <output-format>] [--password] [--resource-estimate <resource-estimate>...] [--schema <schema>] [--server <server>] [--session <session>...] [--socks-proxy <socks-proxy>] [--source <source>] [--truststore-password <truststore password>] [--truststore-path <truststore path>] [--user <user>] [--version]OPTIONS --access-token <access token> Access token --catalog <catalog> Default catalog --client-info <client-info> Extra information about client making query --client-request-timeout <client request timeout> Client request timeout (default: 2m) --client-tags <client tags> Client tags --debug Enable debug information --execute <execute> Execute specified statements and exit -f <file>, --file <file> Execute statements from file and exit -h, --help Display help information --http-proxy <http-proxy> HTTP proxy to use for server connections --ignore-errors Continue processing in batch mode when an error occurs (default is to exit immediately) --keystore-password <keystore password> Keystore password --keystore-path <keystore path> Keystore path --krb5-config-path <krb5 config path> Kerberos config file path (default: /etc/krb5.conf) --krb5-credential-cache-path <krb5 credential cache path> Kerberos credential cache path --krb5-disable-remote-service-hostname-canonicalization Disable service hostname canonicalization using the DNS reverse lookup --krb5-keytab-path <krb5 keytab path> Kerberos key table path (default: /etc/krb5.keytab) --krb5-principal <krb5 principal> Kerberos principal to be used --krb5-remote-service-name <krb5 remote service name> Remote peer's kerberos service name --log-levels-file <log levels file> Configure log levels for debugging using this file --output-format <output-format> Output format for batch mode [ALIGNED, VERTICAL, CSV, TSV, CSV_HEADER, TSV_HEADER, NULL] (default: CSV) --password Prompt for password --resource-estimate <resource-estimate> Resource estimate (property can be used multiple times; format is key=value) --schema <schema> Default schema --server <server> Presto server location (default: localhost:8080) --session <session> Session property (property can be used multiple times; format is key=value; use 'SHOW SESSION' to see available properties) --socks-proxy <socks-proxy> SOCKS proxy to use for server connections --source <source> Name of source making query --truststore-password <truststore password> Truststore password --truststore-path <truststore path> Truststore path --user <user> Username --version Display version information and exit |
查看web界面 http://EXAMPLE.COM:8080/ui/,举例说明:至此部署成功


【推荐】国内首个AI IDE,深度理解中文开发场景,立即下载体验Trae
【推荐】编程新体验,更懂你的AI,立即体验豆包MarsCode编程助手
【推荐】抖音旗下AI助手豆包,你的智能百科全书,全免费不限次数
【推荐】轻量又高性能的 SSH 工具 IShell:AI 加持,快人一步
· go语言实现终端里的倒计时
· 如何编写易于单元测试的代码
· 10年+ .NET Coder 心语,封装的思维:从隐藏、稳定开始理解其本质意义
· .NET Core 中如何实现缓存的预热?
· 从 HTTP 原因短语缺失研究 HTTP/2 和 HTTP/3 的设计差异
· 周边上新:园子的第一款马克杯温暖上架
· 分享 3 个 .NET 开源的文件压缩处理库,助力快速实现文件压缩解压功能!
· Ollama——大语言模型本地部署的极速利器
· DeepSeek如何颠覆传统软件测试?测试工程师会被淘汰吗?
· 使用C#创建一个MCP客户端