

centos7安装Tarsphp+TarsGateWay
两台主机分别为:
192.168.1.131 (tars-framework)
192.168.1.132 (tarscpp+tars-gateway)
192.168.1.131 通过docker-compose安装tars-framework,
docker-compose.yml:
注意这里的版本为v2.4.13,尝试了一下安装3.0以上版本时安装网关会异常
version: "3"
services:
  framework:
    image: tarscloud/framework:v2.4.13
    container_name: tars-framework
    restart: always
    environment:
      MYSQL_HOST: "192.168.1.189"
      MYSQL_ROOT_PASSWORD: "123456"
      MYSQL_USER: "root"
      MYSQL_PORT: 12306
      REBUILD: "false"
      INET: ens33
      SLAVE: "false"
    volumes:
      - /alidata/tars/framework/data:/data/tars:rw
      # - ./source/Shanghai:/etc/localtime
    network_mode: "host"
192.168.1.132 安装tarscpp
Linux中加速访问github:
1. 登录http://tool.chinaz.com/dns/
2. 查询以下域名映射,并分别取访问速度较快的一个ip
github.global.ssl.fastly.net
assets-cdn.github.com
TTL值越大证明响应速度越快(“TTL”的值越大越好才对,因为“TTL”的值越大,说明发送数据包经过路由器越少,而经过路由器越少,说明越快到达目的地,速度当然也就越快。)
3. 将查询到的ip和域名设置到host中
sudo vi /etc/hosts
在hosts中加入查询结果
162.125.80.3   github.global.ssl.fastly.net
185.199.110.153 assets-cdn.github.com
保存,退出,并重启网络
systemctl start network.service

或者
service network restart
安装tarscpp依赖
yum install glibc-devel gcc gcc-c++ bison flex cmake
如果cmake版本过低,测参考该博客升级cmake:https://blog.csdn.net/chenshun87/article/details/98765708
下载源码:
git clone https://github.com/TarsCloud/TarsCpp.git --recursive
cd TarsCpp
mkdir build
cd build
cmake ..
make
make install
至此, Tars Cpp的编译环境已经完成, 下一步可以实现Cpp的Tars服务了,
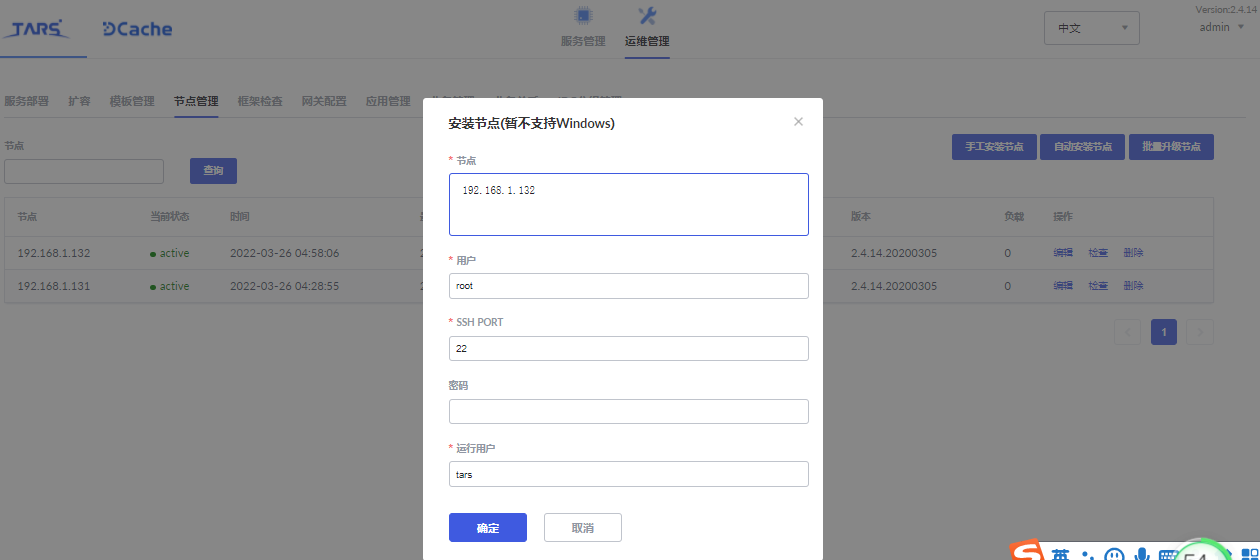
在131的tarsweb添加132节点,因为tarsgateway就是一个节点应用所以必须先添加节点否则会失败:
安装tarsgateway:
git clone https://github.com/TarsCloud/TarsGateway.git
cd TarsGateway/install;
./install.sh webhost token server_ip tars_db_ip tars_db_port tars_db_user tars_db_pwdb
例:
./install.sh 192.168.1.131:3000 eyJhbGciOiJIUzI1NiIsInR5cCI6IkpXVCJ9.eyJ1aWQiOiJhZG1pbiIsImlhdCI6MTY0ODUzMzI3NiwiZXhwIjoxNzQwODA4NDc2fQ.6XeI8VBVzrKq72leo7M1UIejwB2atHSHPEpA_VVeRCo 192.168.1.132 192.168.1.189 12306 root 123456
安装参数如下:
- webhost TarsWeb管理端的host或ip:port
- token TarsWeb管理端的token,可以通过管理端获取http://webhost:3001/auth.html#/token
- server_ip GatewayServer部署的ip,目前这里只支持一个,如果需要更多,后面直接在平台上面扩容即可。
- tars_db_ip tarsdb 所在的数据库服务器ip。
- tars_db_port tarsdb 端口。
- tars_db_user tarsdb 用户名(需要有建库建表权限)。
- tars_db_pwd tarsdb 密码。
验证安装结果:
在浏览器打开 http://${server_ip}:8200/monitor/monitor.html , 如果能正常显示 hello TupMonitorxxx 就表示安装成功。
修改默认安装端口
将server.json中的8200端口值修改为你需要的端口,然后重新执行./install.sh步骤,最后在TarsWeb中将GatewayServer重启即可。
192.168.1.132 安装tarsnode
docker-compose.yml:
version: "3"
services:
  node:
    image: tarscloud/tars-node:latest
    container_name: tars-node
    restart: always
    volumes:
      - /alidata/tars/node/data:/data/tars:rw
      # - ./source/Shanghai:/etc/localtime
    environment:
      INET: ens33
      WEB_HOST: http://192.168.1.131:3000
    network_mode: "host"
合并安装docker-compose
version: "3"

services:
  framework:
    image: tarscloud/framework:v3.0.4
    container_name: tars-framework
    ports:
      - "3000:3000"
    restart: always
    networks:
      internal:
        ipv4_address: 182.25.1.3
    environment:
      MYSQL_HOST: "192.168.1.189"
      MYSQL_ROOT_PASSWORD: "123456"
      MYSQL_USER: "root"
      MYSQL_PORT: 12306
      REBUILD: "false"
      INET: eth0
      SLAVE: "false"
    volumes:
      - /mnt/hgfs/www/tars/framework/data:/data/tars:rw
      # - ./source/Shanghai:/etc/localtime
  node:
    image: tarscloud/tars-node:latest
    container_name: tars-node
    restart: always
    networks:
      internal:
        ipv4_address: 182.25.1.5
    volumes:
      - /mnt/hgfs/www/tars/tarsnode/data:/data/tars:rw
      # - ./source/Shanghai:/etc/localtime
    environment:
      INET: eth0
      WEB_HOST: http://182.25.1.3:3000
    ports:
      - "9000-9020:9000-9020"
    depends_on:
      - framework
networks:
  internal:
    driver: bridge
    ipam:
      config:
        - subnet: 182.25.1.0/16
或者使用dockerfile:
docker-compose.yml:
version: "3"

services:
  framework:
    image: tarscloud/framework:latest
    container_name: tars-framework
    ports:
      - "3000:3000"
    restart: always
    networks:
      internal:
        ipv4_address: 182.25.1.3
    environment:
      MYSQL_HOST: "192.168.1.189"
      MYSQL_ROOT_PASSWORD: "123456"
      MYSQL_USER: "root"
      MYSQL_PORT: 12306
      REBUILD: "false"
      INET: eth0
      SLAVE: "false"
    volumes:
      - /mnt/hgfs/cwww/tars/framework/data:/data/tars:rw
      - /etc/localtime:/etc/localtime
      # - ./source/Shanghai:/etc/localtime
  node:
    build:
      context: ./tarsnode #Dockerfile目录
      dockerfile: Dockerfile #Dockerfile文件
    # image: tarscloud/tars-node:latest
    container_name: tars-node
    restart: always
    networks:
      internal:
        ipv4_address: 182.25.1.5
    volumes:
      - /mnt/hgfs/cwww/tars/tarsnode/data:/data/tars:rw
      - /mnt/hgfs/cwww/:/data/www:rw
      - /etc/localtime:/etc/localtime
      # - ./source/Shanghai:/etc/localtime
    environment:
      INET: eth0
      WEB_HOST: http://182.25.1.3:3000
    ports:
      - "9000-9020:9000-9020"
    depends_on:
      - framework
networks:
  internal:
    driver: bridge
    ipam:
      config:
        - subnet: 182.25.1.0/20
dockerfile,安装PHP扩展:
FROM tarscloud/tars-node:latest
# - config timezone
RUN ln -sf /usr/share/zoneinfo/Asia/Shanghai /etc/localtime \
    # ----------php gmp.so ----------
    && apt-get update \
    && apt-get -y --force-yes install libgmp-dev \
    && wget https://www.php.net/distributions/php-7.4.30.tar.gz \
    && tar -zxvf php-7.4.30.tar.gz \
    && cd php-7.4.30/ext/gmp \
    && phpize \
    && ./configure --with-php-config=/usr/bin/php-config \
    && make && make install \
    && echo 'extension=gmp.so' >> /etc/php/7.4/cli/php.ini \
    # ----------php amqp.so ----------
    && apt-get install librabbitmq-dev \
    && pecl install amqp \
    && wget https://pecl.php.net/get/amqp-1.10.0.tgz \
    && tar -xvf amqp-1.10.0.tgz \
    && cd amqp-1.10.0 \
    && phpize \
    && ./configure --with-php-config=/usr/bin/php-config \
    && make && make install \
    && echo 'extension=amqp.so' >> /etc/php/7.4/cli/php.ini \
    # ----------php bcmath.so ----------
    && cd /root/php-7.4.30/ext/bcmath \
    && phpize \
    && ./configure --with-php-config=/usr/bin/php-config \
    && make && make install \
    && echo 'extension=bcmath.so' >> /etc/php/7.4/cli/php.ini


WORKDIR /data
tarsweb 添加网关配置

<main>
    #传到后面taf服务的http头, 多个头以,分隔
    filterheaders = X-GUID|X-XUA|Host
    # 是否打开通过主控发现代理,1打开, 0 关闭
    auto_proxy=1
    flow_report_obj=Base.GatewayServer.FlowControlObj
    <base>
        # tup 回包大小限制
        rspsize=5242880
    </base>
    <http_retcode>
        # 定义哪些返回码做超时容错处理,哪些返回码做出错容灾处理
        inactive=2|6
        timeout=1|3
    </http_retcode>

    <db>
        charset=utf8
        dbhost =192.168.1.189
        dbname =db_base
        dbpass =123456
        dbport =12306
        dbuser =root
    </db>
</main>
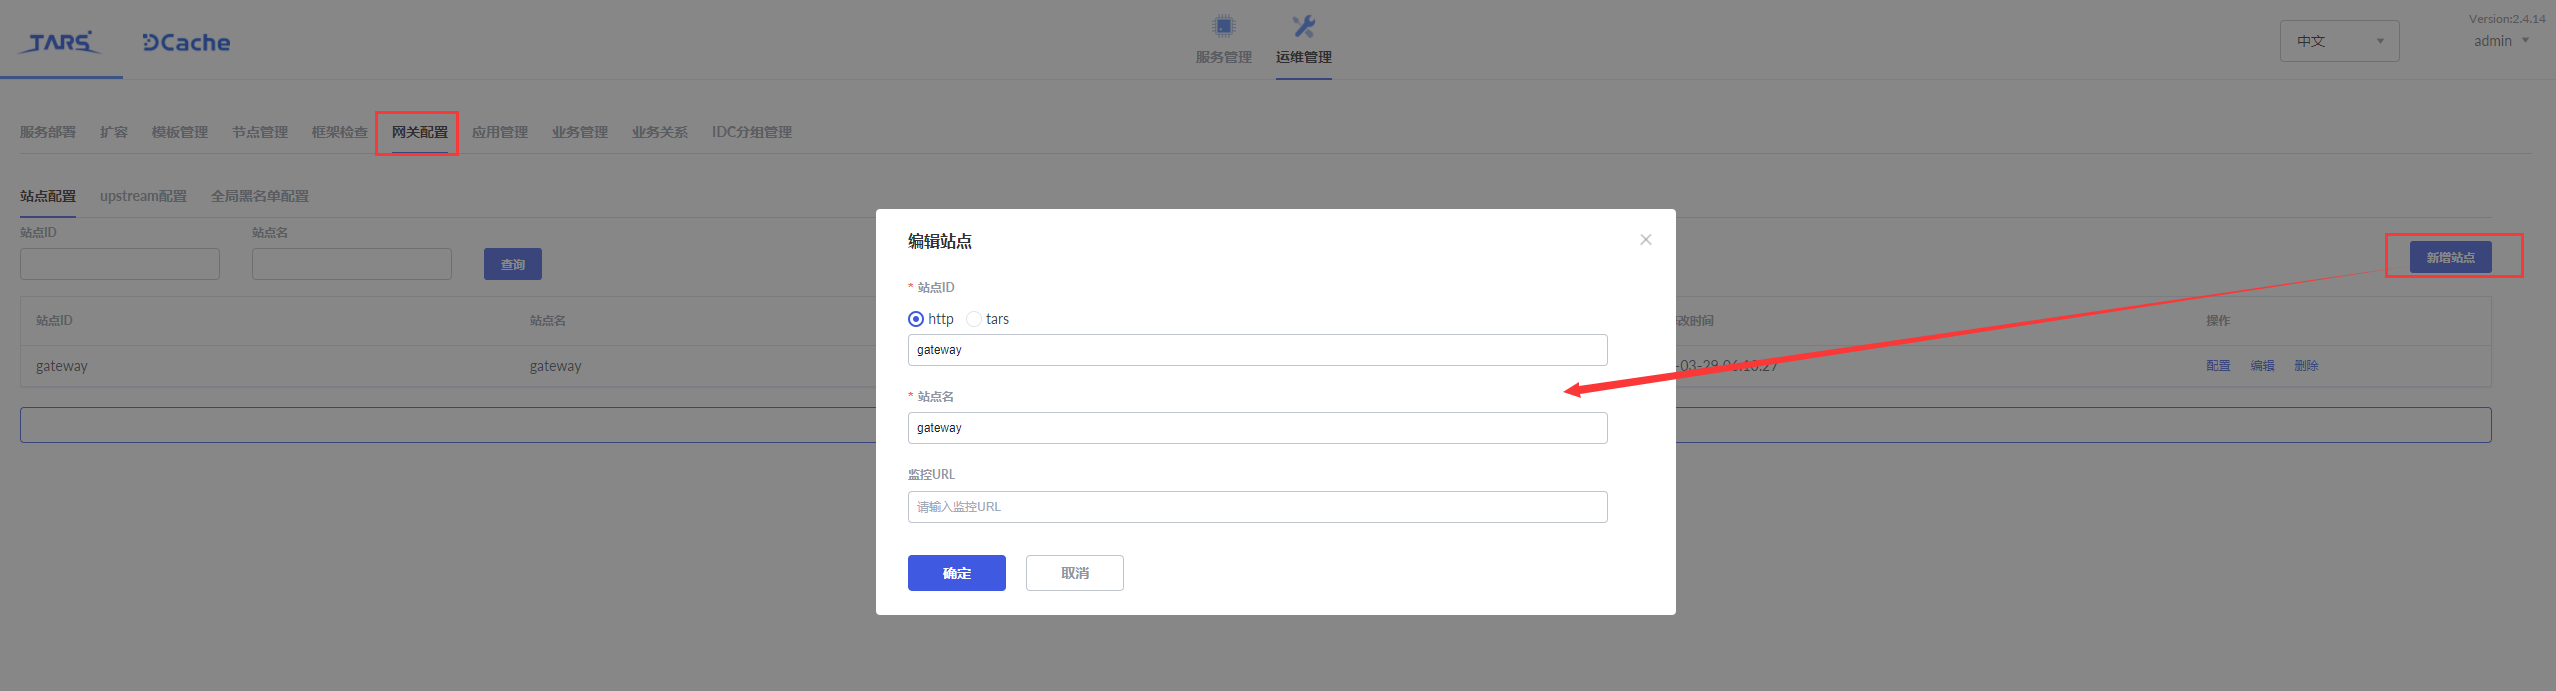
添加网关站点
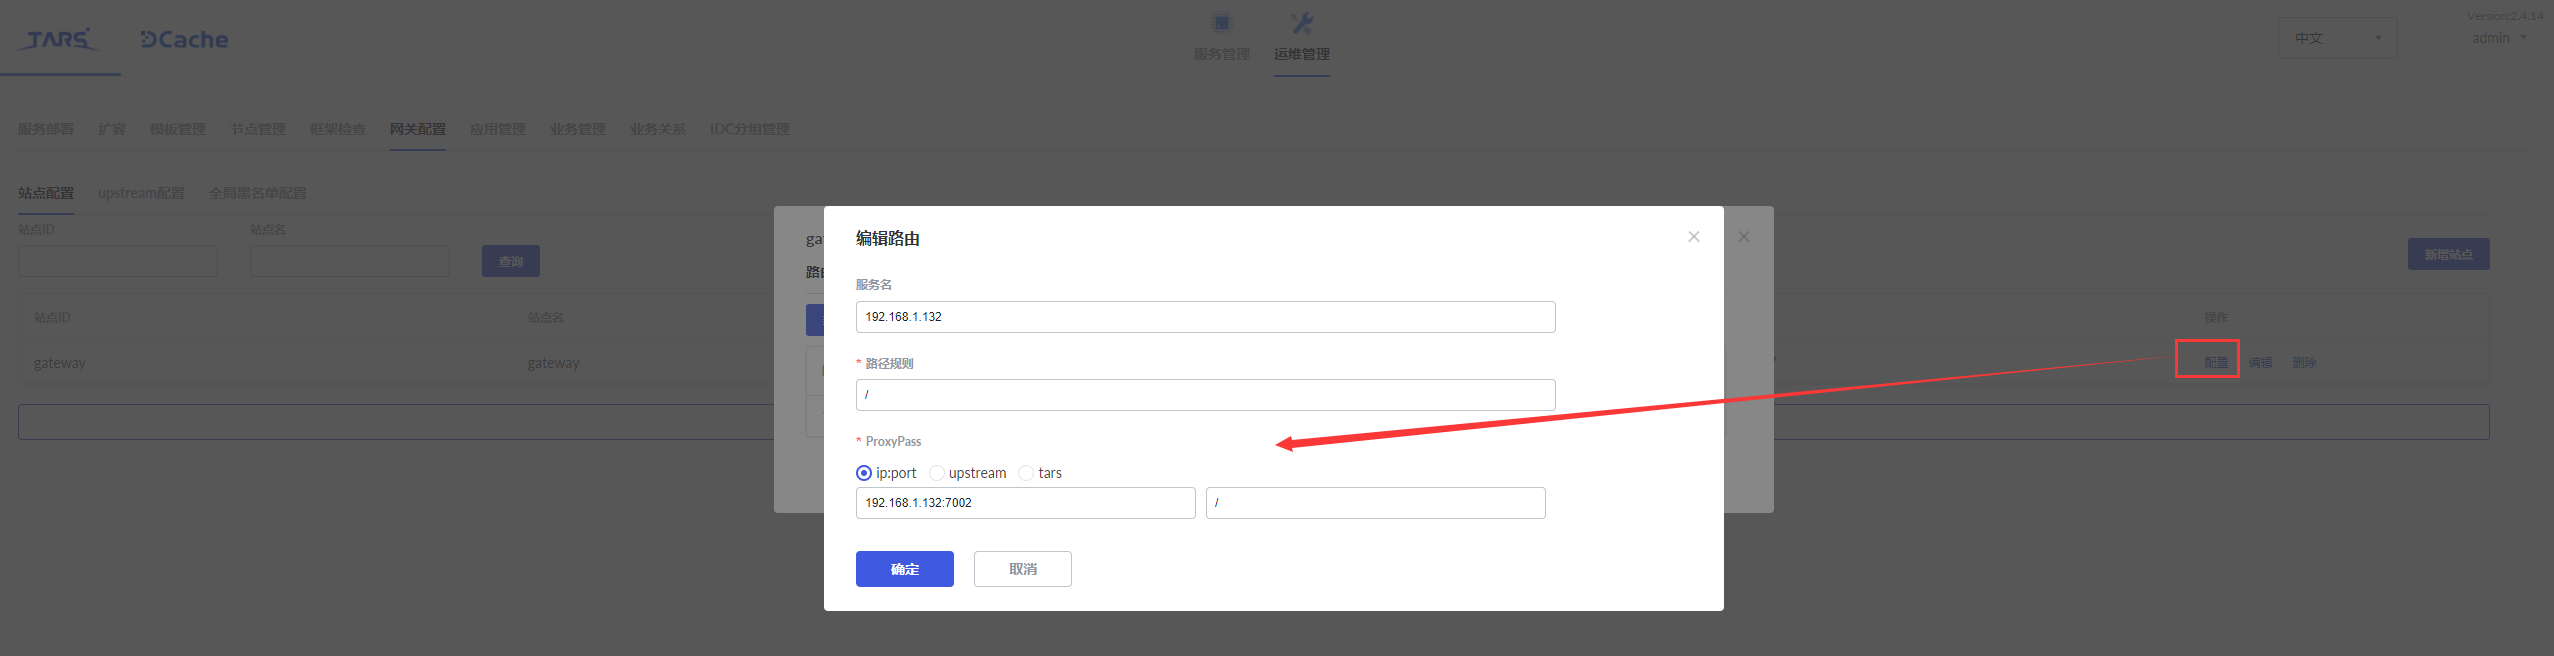
配置网关站点
tars-node容器安装PHP gmp扩展
进入容器
docker exec -it tars-node /bin/sh
检查安装vim
apt-get update
apt-get install vim
安装php-gmp
apt install php-gmp
修改php.ini,找到gmp扩展配置去掉前面的‘;’
vim /etc/php/7.4/cli/php.ini
上传gmp扩展包,没有的话下载,并进入gmp目录内
phpize
编译
./configure --with-php-config=/usr/bin/php-config
为虚拟机docker与本地机器代码目录创建软连接:
打开cmd执行,创建命令
  指令     软连接地址           实际地址
mklink /J D:\bwopt\booway\bwss D:\Java\Project\main_insenattendance\bwopt\booway\bwss\
