TypeScript装饰器Decorators学习
- TypeScript装饰器Decorators学习
- 装饰器与继承的区别
- 配置TS装饰器环境
- 类装饰器decorator的基本使用
- 装饰器decorator语法糖
- ts装饰器叠加
- 通过TS装饰器实现统一消息回应
- 装饰器工厂在TS中的使用
- 方法装饰器
- 静态方法装饰器与writable
- 使用装饰器实现文本高亮
- 延迟执行在装饰器中的实现
- 使用装饰器工厂控制延迟时间
- 装饰器全局异常管理
- 装饰器工厂自定义
console.log - 用户登录验证在TS装饰器中的实现
- 数据权限控制访问方法
- 使用装饰器模拟超快速的网络请求
- 属性修饰器和参数修饰器
- 属性访问器动态转换对象属性
- 使用ts的属性装饰器创建随机色块
- 元数据
reflect-metadata的使用 - 使用Reflect-metadata的defineMetadata和getMetadata配置验证数据
TypeScript装饰器Decorators学习
装饰器与继承的区别
装饰器可以给代码提供功能。
现实生活当中张三想有一辆车,他可以通过继承的方式让父亲给他一辆车。
装饰器是现在比如说张三有一辆车,他想换个内饰,方向盘,或者轮骨这样的。
继承是在父子类之间进行的,父类有的功能子类可以拿来用,当然有的情况下父类设置为private子类就无法使用了,装饰器可以对功能进行装饰,装饰类的方法、属性甚至整个类等等。
装饰器更加的灵活,继承的话就是拿来就用。
配置TS装饰器环境
需要我们有tsconfig.json的配置文件。
终端命令:tsc --init
然后我们需要将装饰器所需要的配置项打开:
{
  "compilerOptions": {
  	"target": "es2016",
    "experimentalDecorators": true,
  	"emitDecoratorMetadata": true,
    ......
  }
}
然后是两个比较常用的终端命令:
tsc 1.ts -w // 监视某一个ts文件
tsc -w // 根据配置文件监视整个项目的文件
当然也可以在菜单栏使用终端-运行任务-typescript-监视来实现对整个项目文件的监视。
类装饰器decorator的基本使用
可以在原型链上无限增加内容,让其拥有新的属性啊,方法呀什么的。像vue中的混入(mixin),装饰器就是这样的特性,开放封闭原则。
const moveDecorator: ClassDecorator = (target: Function) => {
    target.prototype.name = 'bleak'
    target.prototype.getPosition = () : {x: number, y: number} => {
        return {x: 100, y: 200}
    }
}

@moveDecorator
class Tank {
    // public getPosition() {}
}

const t = new Tank()
console.log((t as any).getPosition()) // { x: 100, y: 200 }
console.log((<any>t).getPosition()) // { x: 100, y: 200 }
console.log((t as any).name) // bleak

@moveDecorator
class Player {
    public getPosition() {}
}

const p = new Player()
console.log(p.getPosition()) // { x: 100, y: 200 }
装饰器decorator语法糖
@符号的方式就是语法糖的表现形式, 我们在实例化对象new Function来创建对象, 为了与其他语言相似, ES6推出了class类的概念, 其实class内部还是通过构造函数的方式来进行操作, 归根到底还是原型的概念.
const moveDecorator: ClassDecorator = (target: Function) => {
    target.prototype.name = 'bleak'
    target.prototype.getPosition = () : {x: number, y: number} => {
        return {x: 100, y: 200}
    }
}

// @moveDecorator
class Tank {}
moveDecorator(Tank)
const t = new Tank()
console.log((<any>t).getPosition()) // { x: 100, y: 200 }
我们会发现我们不使用装饰器@语法的情况下, 直接使用该函数传入类与使用装饰器的效果相同, 只是装饰器是自动的帮我们执行了一下, 不用我们再去写一行代码去执行.
ts装饰器叠加
在ts中装饰器是可以叠加的,比如我们可以像如下代码一样叠加多个类装饰器:
const moveDecorator: ClassDecorator = (target: Function) => {
    target.prototype.name = 'bleak'
    target.prototype.getPosition = () : {x: number, y: number} => {
        return {x: 100, y: 200}
    }
}

const MusicDecorator: ClassDecorator = (target: Function) => {
    target.prototype.playMusic = (): void => {
        console.log('播放音乐')
    }
}


@moveDecorator
@MusicDecorator
class Tank {}

const t = new Tank()
console.log((t as any).getPosition()); // { x: 100, y: 200 }
(<any>t).playMusic() // 播放音乐
我们可以通过使用多个装饰器来给类添加多个不同的功能,比如上面添加的一个是获取位置和名字的功能,一个是播放音乐的功能。
通过TS装饰器实现统一消息回应
我们可以通过装饰器给多个类添加统一的功能,当然我们也可以通过继承来实现。
const MessageDecorator:ClassDecorator = (target:Function) => {
    target.prototype.message = (content: string) => {
        console.log(content)
    }
}

@MessageDecorator
class LoginController {
    public login() {
        console.log("登录业务处理")
        ;(this as any).message("恭喜你,登录成功了")
    }
}

new LoginController().login() // 登录业务处理 恭喜你,登录成功了

@MessageDecorator
class ArticleController {
    public store() {
        (this as any).message("文章添加成功")
    }
}
new ArticleController().store() // 文章添加成功
装饰器工厂在TS中的使用
我们可以根据需要使用装饰器工厂返回不同的装饰器, 根据传入参数的不同,我们可以返回不同的装饰器,虽然我们下面只是根据一个参数,但是我们也用多个参数来区分要返回的装饰器。
const MusicDecoratorFactory = (type: string): ClassDecorator => {
    switch(type) {
        case 'Tank':
            return (target:Function) => {
                target.prototype.playMusic = (): void => {
                    console.log('播放战争音乐')
                }
            }
        default:
            return (target:Function) => {
                target.prototype.playMusic = (): void => {
                    console.log('播放电音')
                }
            }
    }

}

@MusicDecoratorFactory('Tank')
class Tank {}

const t = new Tank()
;(<any>t).playMusic() // 播放战争音乐


@MusicDecoratorFactory('Player')
class Player {}

(new Player() as any).playMusic() // 播放电音
当然,方法装饰器呀,属性装饰器呀等装饰器同样可以使用装饰器工厂。
方法装饰器
const showDecorator:MethodDecorator = (target: any, propertyKey: string | symbol, descriptor: PropertyDescriptor): PropertyDescriptor | void => {
    console.log(target)
    console.log(propertyKey)
    console.log(descriptor)
    target.name = 'bleak'
}

class User {
    @showDecorator
    public show() {
        console.log("It's my show time")
    }
}

console.log((new User() as any).name)
/* 结果
{}
show
{
  value: [Function: show],
  writable: true,
  enumerable: false,
  configurable: true
}
bleak
*/
- 方法装饰器的第一个参数target,如果我们是给静态方法添加的方法装饰器,那么target就是构造函数,如果是普通方法,那么target就是原型对象。
- 方法装饰器的第二个参数propertyKey,是我们方法的名称
- 方法装饰器的第三个参数descriptor,是对方法属性的描述,包括其函数体的具体内容value,其可写性writable,可枚举性(迭代性)enumerable和可配置性configurable.
我们可以像如下方式一样修改方法体:
const showDecorator:MethodDecorator = (target: any, propertyKey: string | symbol, descriptor: PropertyDescriptor): PropertyDescriptor | void => {
    console.log(target)
    console.log(propertyKey)
    console.log(descriptor);
    descriptor.value = () => {
        console.log("Now it's bleak's show time")
    }
}

class User {
    @showDecorator
    public show() {
        console.log("It's my show time")
    }
}

new User().show() // Now it's bleak's show time
静态方法装饰器与writable
const showDecorator:MethodDecorator = (target: any, propertyKey: string | symbol, descriptor: PropertyDescriptor): PropertyDescriptor | void => {
    descriptor.value = () => {
        console.log("Now it's bleak's show time")
    }
}

class User {
    @showDecorator
    public static show() {
        console.log("It's my show time")
    }
}

User.show() // Now it's bleak's show time
无论是静态方法还是普通方法,调用装饰器的时候第三个参数都是对方法属性的描述。
如果我们把writable设置为false,那么我们就无法再对方法进行重写。
const showDecorator:MethodDecorator = (target: any, propertyKey: string | symbol, descriptor: PropertyDescriptor): PropertyDescriptor | void => {

    descriptor.writable = false
}

class User {
    @showDecorator
    public static show() {
        console.log("It's my show time")
    }
}

User.show() // Now it's bleak's show time
// × Error
User.show = () => {
    console.log('show method changed.')
}
使用装饰器实现文本高亮
const highlightDecorator:MethodDecorator = (target: any, propertyKey: string | symbol, descriptor: PropertyDescriptor): PropertyDescriptor | void => {
    const method = descriptor.value
    descriptor.value = () => {
        return `<div style='color:red;'>${method()}</div>`
    }
}

class User {
    @highlightDecorator
    public static show() {
        return "It's my show time"
    }
}


console.log(User.show()) // <div style='color:red;'>It's my show time</div>
- 首先把原来的方法保存
- 重新写一个新的方法
- 在新的方法中使用原来的方法,即可实现文字的高亮效果。
延迟执行在装饰器中的实现
const SleepDecorator:MethodDecorator = (target: any, propertyKey: string | symbol, descriptor: PropertyDescriptor): PropertyDescriptor | void => {
    const method = descriptor.value
    descriptor.value = () => {
        setTimeout(() => {
            method()
        }, 2000)
    }
}

class User {
    @SleepDecorator
    public show() {
        console.log("It's my show time")
    }
}
new User().show()
使用装饰器工厂控制延迟时间
const SleepDecoratorFactory =
    (times: number):MethodDecorator =>
    (...args: any[]) => {
        const [ , ,descriptor] = args
        const method = descriptor.value
        descriptor.value = () => {
            setTimeout(() => {
                method()
            }, times)
        }
    }

class User {
    @SleepDecoratorFactory(500)
    public show() {
        console.log("It's my show time")
    }
}
new User().show()
装饰器全局异常管理
const ErrorDecorator:MethodDecorator = (target: Object, propertyKey: string | symbol, descriptor: PropertyDescriptor) => {
const method = descriptor.value
descriptor.value = () => {
try {
method()
} catch(error: any) {
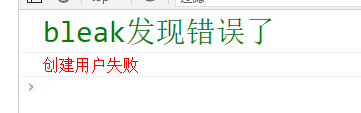
console.log(`%cbleak发现错误了`, 'color:green;font-size:30px;')
console.log(`%c${error.message}`, 'color:red; font-size:16px')
}
}
}
class User {
@ErrorDecorator
find() {
throw new Error("您查找的用户不存在")
}
@ErrorDecorator
create() {
throw new Error("创建用户失败")
}
}
new User().create()
装饰器工厂自定义 console.log
我们可以通过装饰器工厂来实现打印错误时自定义消息内容:
const ErrorDecoratorFactory = (title: string='bleak发现错误了', titleFontSize: number = 20):MethodDecorator => {
return (target: Object, propertyKey: string | symbol, descriptor: PropertyDescriptor) => {
const method = descriptor.value
descriptor.value = () => {
try {
method()
} catch(error: any) {
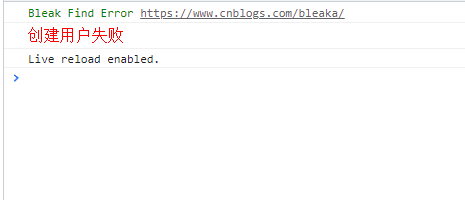
console.log(`%c${title}`, `color:green;font-size:${titleFontSize}px;`)
console.log(`%c${error.message}`, 'color:red; font-size:16px;')
}
}
}
}
class User {
@ErrorDecoratorFactory()
find() {
throw new Error("您查找的用户不存在")
}
@ErrorDecoratorFactory('Bleak Find Error https://www.cnblogs.com/bleaka/', 12)
create() {
throw new Error("创建用户失败")
}
}
new User().create()
用户登录验证在TS装饰器中的实现
const user = {
    name: 'Bleak',
    isLogin: false
}

const AccessDecorator: MethodDecorator =  (target: Object, propertyKey: string | symbol, descriptor: PropertyDescriptor) => {
    const method = descriptor.value
    descriptor.value = () => {
        if(user.isLogin === true) {
            return method()
        } else {
            alert('请登陆后操作')
            location.href = 'login.html'
        }

    }
}

class Article {
    show() {
        console.log('显示文章')
    }
    @AccessDecorator
    store() {
        console.log('保存文章')
    }
}

new Article().store() // 跳转到登录页面
数据权限控制访问方法
type userType = {
    name: string,
    isLogin: boolean,
    permissions: string[]
}
const user:userType = {
    name: 'Bleak',
    isLogin: true,
    permissions: ["store"]
}

const AccessDecoratorFactory = (keys: string[]): MethodDecorator => {
    return (target: Object, propertyKey: string | symbol, descriptor: PropertyDescriptor) => {
        const method = descriptor.value

        // 定义一个方法来检测有效性
        const validate = () =>
            keys.every (k => {
                return user.permissions.includes(k)
            })

        descriptor.value = () => {
            if(user.isLogin === true && validate()) {
                alert('验证通过')
                method()
            } else {
                alert('验证失败')
            }

        }
    }
}

class Article {
    show() {
        console.log('显示文章')
    }
    @AccessDecoratorFactory(['store'])
    store() {
        console.log('保存文章')
    }
}

new Article().store()
使用装饰器模拟超快速的网络请求
const RequestDecorator = (url: string): MethodDecorator => {
    return (target: Object, propertyKey: string | symbol, descriptor: PropertyDescriptor) => {
        const method = descriptor.value
        // axios.get(url).then()
        new Promise<any[]>(resolve => {
            setTimeout(() => {
                resolve([{name:'Bleak'}, {name: 'Chris'}])
            }, 2000)
        }).then(users => {
            method(users)
        })
    }
}


class Uesr {
    @RequestDecorator('https://www.baidu.com')
    public all(users: any[]) {
        console.log(users)
    }
}
我们可以通过方法装饰器工厂来实现异步网络请求,这样的好处是我们以后想要请求得时候就会变得非常简单,我们使用装饰器就自动请求了,自动注入到我们的参数里面,我们直接用就可以了。
属性修饰器和参数修饰器
const PropDecorator: PropertyDecorator = (target: Object, propertyKey: string | symbol): void => {
    console.log(target)
    console.log(propertyKey)
}

class Hd {
    @PropDecorator
    public name: string | undefined
}
- 属性装饰器的第一个参数target,如果我们是给静态属性添加的属性装饰器,那么target就是构造函数,如果是普通属性,那么target就是原型对象。
- 属性装饰器的第二个参数propertyKey是属性名称。
const PropDecorator: PropertyDecorator = (target: Object, propertyKey: string | symbol): void => {
    // console.log(target)
    // console.log(propertyKey)
}

const ParamsDecorator: ParameterDecorator = (target: Object, propertyKey: string | symbol, parameterIndex: number): void => {
    console.log(target)
    console.log(propertyKey)
    console.log(parameterIndex)
}


class Hd {
    @PropDecorator
    public title: string | undefined

    public show(id: number = 1, compouted: boolean ,@ParamsDecorator content:string) {

    }
}
- 参数装饰器的第一个参数target就是原型对象。
- 参数装饰器的第二个参数propertyKey是参数名称。
- 参数装饰器的第三个参数parameterIndex是参数所在的位置。
属性访问器动态转换对象属性
// Object.defineProperty() 方法会直接在一个对象上定义一个新属性,或者修改一个对象的现有属性,并返回此对象。
// Object.defineProperty(obj, prop, descriptor)
// obj 要定义属性的对象。
// prop 要定义或修改的属性的名称或 Symbol。
// descriptor 要定义或修改的属性描述符。
const LowerDecorator: PropertyDecorator = (target: Object, propertyKey: string | symbol): void => {
    let value: string
    Object.defineProperty(target, propertyKey, {
        get: () => {
            return value.toLowerCase()
        },
        set: v => {
            value = v
        }
    })
}


class Hd {
    @LowerDecorator
    public title : string | undefined

}

const obj = new Hd()
obj.title = 'Bleak'
console.log(obj.title) // bleak
使用ts的属性装饰器创建随机色块
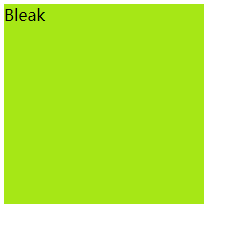
const RandomColorDecorator: PropertyDecorator = (target: Object, propertyKey: string | symbol): void => {
    const color:string[] = '0123456789abcdef'.split('')
    Object.defineProperty(target, propertyKey, {
        get: ()=> {
            let res = '#'
            for(let i = 0; i < 6; i++) {
                res += color[Math.floor(Math.random() * color.length)]
            }
            return res
        }
    })
}

class Hd {
    @RandomColorDecorator
    public color: string | undefined

    public draw() {
        document.body.insertAdjacentHTML('beforeend'
            ,`<div style="height:200px;width:200px;background-color:${this.color};">Bleak</div>`
        )
    }

}

console.log(new Hd().draw())
元数据reflect-metadata的使用
元数据(metadata):即数据的数据,可以在数据中保存信息,我们可以根据元数据来在类上、类原型的属性添加元数据。
- 首先我们需要安装这个库:
pm install reflect-metadata --save - 然后我们使用这个库中的
Reflect.getMetadata和Reflect.defineMetadata以及Reflect.metadata
import 'reflect-metadata'


// metadata元数据:数据的数据
let dreamCode = {
    name: 'bleak'
}

Reflect.defineMetadata('bleak',{url:'https://www.cnblogs.com/bleaka/'}, dreamCode, 'name')

console.log(Reflect.getMetadata('bleak', dreamCode, 'name')) // { url: 'https://www.cnblogs.com/bleaka/' }
关于三个重要的apiReflect.getMetadata和Reflect.defineMetadata以及Reflect.metadata的参数解释:
Reflect.getMetadata
其可以接收两个参数或者是三个参数:
- 当接收两个参数的时候,是去找'类'所映射的对应关系使用,第一个参数是创建映射时候的'key',第二个 参数是这个'类'。
- 当接收三个参数的时候,是去找'类中属性'对应的映射关系时候,三个参数,第一个参数是创建映射时候的'key' ,第二个参数是这个'实例',第三个是实例中所对应的具体'属性',其实可以很容易理解这里 为什么用的是实例,因为有了实例才有了属性。
Reflect.defineMetadata
其可以给'类'和'属性'增加自定义映射关系。
- 当只有这三个参数'metadataKey,metadataValue, target'修饰类时,第一个参数代表映射的'key',第二个参数代表映射'key'对应的'value',第三个参数代表的需要映射对应的类。
- 当有四个参数''metadataKey,metadataValue, target, propertyKey'修饰属性时,第一个参数代表映射的'key',第二个参数代表映射'key'对应的'value',第三个参数代表的需要映射对应的类或实例,第四个参数代表实例上的属性。
Reflect.metadata
import 'reflect-metadata'

@Reflect.metadata('name', 'A')
class A {
  @Reflect.metadata('hello', 'world')
  public hello(): string {
    return 'hello world'
  }
}

Reflect.getMetadata('name', A) // 'A'
Reflect.getMetadata('hello', new A()) // 'world'
其可以给'类'和'属性'增加自定义映射关系,一般是传入两个参数,第一个参数代表映射的'key',第二个参数代表映射'key'对应的'value'。
使用Reflect-metadata的defineMetadata和getMetadata配置验证数据
import 'reflect-metadata'


const RequiredDecorator:ParameterDecorator = (target: Object, propertyKey: string | symbol, parameterIndex: number): void => {
    let requiredParams: number[] = Reflect.getMetadata('validate',target,propertyKey) || []
    requiredParams.push(parameterIndex)
    Reflect.defineMetadata('validate',requiredParams, target, propertyKey)
}

const validateDecorator:MethodDecorator = (target: Object, propertyKey: string | symbol, descriptor:PropertyDescriptor): PropertyDescriptor | void => {
    const method = descriptor.value
    descriptor.value = function() {
        let requiredParams:number[] = Reflect.getMetadata('validate',target,propertyKey) || []
        requiredParams.forEach(index => {
            if(index > arguments.length || arguments[index] === undefined) {
                throw new Error('请传递必要的参数')
            }
        })
        return method.apply(this, arguments)
    }

}

class User {
    @validateDecorator
    find(@RequiredDecorator name:string, @RequiredDecorator id: number) {
        console.log(id)
    }
}

 new User().find('sds', 2)
以上,如果传递参数少于2个的话就会报错,提示请传递必要的参数。

 浙公网安备 33010602011771号