Django表单
说起django表单,那么就需要深入理解request这个对象。下面是参考djangobook网站内容,加上自己学习理解后实践的一些经验分享。 版本:django2.2.2 + python3.6 。
1. 关于request
request.META 是一个Python字典,包含了所有本次HTTP请求的Header信息,比如用户IP地址和用户Agent(通常是浏览器的名称和版本号)。 手动写一个显示request.META信息的页面,这样可以直观的看到里面包含的元素信息, 如下:
views.py:


def display_meta(request):
    values = request.META.items()
    values = sorted(values, key=lambda x: x[0])
    return render_to_response('display_meta.html', {'meta': values})
urls.py:
urlpatterns = [
    path('admin/', admin.site.urls),
    path('meta/', views.display_meta),
]
templates/display_meta.html :
<!DOCTYPE html>
<html lang="en">
<head>
    <meta charset="UTF-8">
    <title>request meta</title>
</head>
<body>
<table border="1">
    <tr>
        <th>request</th>
        <th>info</th>
    </tr>
    {% for k, v in meta %}
        <tr>
            <td>{{ k }}</td>
            <td>{{ v }}</td>
        </tr>
    {% endfor %}
</table>
</body>
</html>
2. 一个简单的表单示例
通常,表单开发分为两个部分: 前端HTML页面用户接口和后台view函数对所提交数据的处理过程。下面演示一个通过搜索表单来验证前后台数据交互处理的示例。
(1)现在我们来建立个view来显示一个搜索表单:books/views.py
from django.shortcuts import render_to_response
from books.models import Book
# Create your views here.


def search(request):
    errors = []
    if 'q' in request.GET:
        q = request.GET['q']
        if not q:
            errors.append('Enter a search term.')
        elif len(q) > 20:
            errors.append('Please enter at most 20 characters.')
        else:
            books = Book.objects.filter(title__icontains=q)
            return render_to_response('search_results.html', {'books': books, 'query': q})
    return render_to_response('search_form.html', {'errors': errors})
这里对表单提交的数据进行了容错处理,对于输入错误或者不符合条件的给予一定提示。对于提交后的数据通过 title__icontains=q 进行数据库过滤匹配,匹配到返回数据。
(2)前端页面
templates/search_form.html
<!DOCTYPE html>
<html lang="en">
<head>
    <meta charset="UTF-8">
    <title>Search</title>
</head>
<body>
    {% if errors %}
        <ul>
            {% for error in errors %}
            <li style="color: red;">{{ error }}</li>
            {% endfor %}
        </ul>
    {% endif %}
    <form action="" method="get">
        <input type="text" name="q">
        <input type="submit" value="Search">
    </form>
</body>
</html>
templates/search_results.html
<!DOCTYPE html>
<html lang="en">
<head>
    <meta charset="UTF-8">
    <title>results</title>
</head>
<body>
<p>You searched for: <strong>{{ query }}</strong></p>
{% if books %}
    <p>Found {{ books|length }} book{{ books|pluralize }}.</p>
    <ul>
        {% for book in books %}
        <li>{{ book.title }}</li>
        {% endfor %}
    </ul>
{% else %}
    <p>No books matched your search criteria.</p>
{% endif %}
</body>
</html>
这里{{ books|length }}和{{ books|pluralize }}是django模板语言特有功能,前面表示计算书的数量,后面是以复数表示出来。
(3)url路径配置
from django.contrib import admin
from django.urls import path
from books import views as bk

urlpatterns = [
    path('admin/', admin.site.urls),
    path('search/', bk.search),
]
3. 较为复杂的表单示例
上面表单只包含一个字段 q , 这简单的例子,我们不需要使用Django表单库来处理,但是复杂一点的表单就需要多方面的处理。我们现在来一下一个较为复杂的例子:站点联系表单,这个表单包括用户提交的反馈信息,一个可选的e-mail回信地址,当这个表单提交并且数据通过验证后,系统将自动发送一封包含题用户提交的信息的e-mail给站点工作人员。
(1)先从前端页面入手,templates/contact_form.html
<!DOCTYPE html>
<html lang="en">
<head>
    <meta charset="UTF-8">
    <title>Contanct us</title>
</head>
<body>
    <h1>Contact us</h1>
    {% if errors %}
        <ul>
            {% for error in errors %}
            <li style="color: red;">{{ error }}</li>
            {% endfor %}
        </ul>
    {% endif %}

    <form action="/contact/" method="post">
        {% csrf_token %}
        <p>Subject: <input type="text" name="subject" value="{{ subject }}"></p>
        <p>Your e-mail (optional): <input type="text" name="email" value="{{ email }}"></p>
        <p>Message: <textarea name="message" rows="10" cols="50">{{ message }}</textarea></p>
        <input type="submit" value="Submit">
    </form>
</body>
</html>
定义了三个字段:主题、e-mail和反馈信息。除了e-mail字段可选,其他两个字段都是必填项。
(2)再来看看视图的代码,contact/views.py
#!/usr/bin/python
# _*_coding:utf-8_*_
# @Time     : 2019/7/4 上午10:47
# @Author   : blackysy
# @File     : views.py.py
# @Software : PyCharm

from django.core.mail import send_mail
from django.http import HttpResponseRedirect
from django.shortcuts import render_to_response


def contact(request):
    errors = []
    if request.method == 'POST':
        if not request.POST.get('subject', ''):
            errors.append('Enter a subject')
        if not request.POST.get('message', ''):
            errors.append('Enter a message.')
        if request.POST.get('email') and '@' not in request.POST['email']:
            errors.append('Enter a valid e-mail address.')
        if not errors:
            send_mail(
                request.POST['subject'],
                request.POST['message'],
                request.POST.get('email', 'norepl@example.com'),
                ['blackysy@qq.com'],
            )
            return HttpResponseRedirect('/contact/thanks/')
    return render_to_response('contact_form.html', {'errors': errors,
                                                    'subject': request.POST.get('subject', ''),
                                                    'message': request.POST.get('message', ''),
                                                    'email': request.POST.get('email', ''),
                                                    })
默认GET请求时,会直接返回一个表单页面给用户,只有POST才会进一步处理,因为有必填项,这里做了些验证。最后调用send_mail方法发送邮件,发送邮件还需要配置settings.py文件,配置参考如下:
EMAIL_HOST = 'mail.example.com.cn'
EMAIL_PORT = 25
EMAIL_HOST_USER = 'blackysy'
EMAIL_HOST_PASSWORD = 'blackysy'
(3)最后是url.py
from django.contrib import admin
from django.urls import path
from spider import views
from books import views as bk
from contact import views as ct

urlpatterns = [
    path('admin/', admin.site.urls),
    path('search/', bk.search),
    path('contact/', ct.contact),
]
4. 第一个Form类
表单框架最主要的用法是,为每一个将要处理的HTML的 <form> 定义一个Form类。 在这个例子中,我们只有一个 <form>,因此我们只需定义一个Form类。 这个类可以存在于任何地方,甚至直接写在 views.py 文件里也行,但是社区的惯例是把Form类都放到一个文件中:forms.py, 在存放 views.py 的目录中,创建这个文件。这里创建在contact/forms.py,代码如下:
from django import forms


class ContactForm(forms.Form):
    subject = forms.CharField(max_length=100)
    email = forms.EmailField(required=False, label='E-mail')
    message = forms.CharField(widget=forms.Textarea)

    def clean_message(self):
        message = self.cleaned_data['message']
        num_words = len(message.split())
        if num_words < 4:
            raise forms.ValidationError('Not enough words!')
        return message
表单中每一个字段作为Form类的属性,被展现为Field类,这里只使用到CharField和EmailField类。除了email其他的默认是必填项,通过required=False实现非必填。这里还加入了自定义规则校验的方法 clean_message ,校验提交字数如果小于4个就返回一个错误提示。Form表单自定义校验方法前面必须是 'clean_',后面是具体的字段名称,必须和上面定义的相同。
另外默认输出的是table格式,还可以通过as_ul()、as_p()输出这两种格式。标签<table>、<ul>、<form>的开闭合标记没有包含于输出当中,这样你就可以添加额外的行或者自定义格式。代码示例如下:
In [1]: from contact.forms import ContactForm
In [2]: f = ContactForm()
In [3]: print(f)
<tr><th><label for="id_subject">Subject:</label></th><td><input type="text" name="subject" required id="id_subject"></td></tr>
<tr><th><label for="id_email">Email:</label></th><td><input type="email" name="email" id="id_email"></td></tr>
<tr><th><label for="id_message">Message:</label></th><td><input type="text" name="message" required id="id_message"></td></tr>
In [4]: print(f.as_ul())
<li><label for="id_subject">Subject:</label> <input type="text" name="subject" required id="id_subject"></li>
<li><label for="id_email">Email:</label> <input type="email" name="email" id="id_email"></li>
<li><label for="id_message">Message:</label> <input type="text" name="message" required id="id_message"></li>
In [5]: print(f.as_p())
<p><label for="id_subject">Subject:</label> <input type="text" name="subject" required id="id_subject"></p>
<p><label for="id_email">Email:</label> <input type="email" name="email" id="id_email"></p>
<p><label for="id_message">Message:</label> <input type="text" name="message" required id="id_message"></p>
也可以单个字段获取,代码:
In [6]: print(f['subject'])
<input type="text" name="subject" required id="id_subject">
In [7]: print(f['email'])
<input type="email" name="email" id="id_email">
Form对象做的第二件事情是校验数据,下面创建一个新的Form对象,测试代码如下:
In [8]: f = ContactForm({'subject': 'hello', 'email': 'blackysy@qq.com', 'message': 'Nice site!'})
In [9]: f.is_valid()
Out[10]: True

In [15]: f = ContactForm({'subject': 'hello', 'message': ''})
In [17]: f.is_valid()
Out[17]: False
In [18]: f['message'].errors
Out[18]: ['This field is required.']
(2)编写templates/contact_form.html
默认基础版本的前端页面:
<!DOCTYPE html>
<html lang="en">
<head>
    <meta charset="UTF-8">
    <title>Contanct us</title>
</head>
<body>
    <h1>Contact us</h1>
    {% if form.errors %}
        <p style="color: red">
            Please correct the error{{ forms.errors|pluralize }} below.
        </p>
    {% endif %}

    <form action="" method="post">
       <table>
           {{ form.as_table }}
       </table>
        <input type="submit" value="Submit">
    </form>
</body>
</html>
上面的css是默认的,实际我们都需要自定义表单显示,所以需要重写,那么每一个字段部件(<input>, <select>, <textarea>)都通过调用{{ form.字段名 }}进行单独渲染,所以我们可以在这里自定义。代码如下:
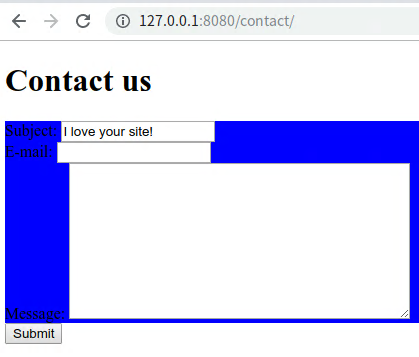
<!DOCTYPE html>
<html lang="en">
<head>
    <meta charset="UTF-8">
    <title>Contanct us</title>
    <style type="text/css">
        .field {
            background-color: blue;
        }

        ul {
            margin: 0;
            padding: 0;
        }

        .errorlist li {
            background-color: red;
            color: white;
            display: block;
            font-size: 10px;
            margin: 0 0 3px;
            padding: 4px 5px;
        }
    </style>
</head>
<body>
    <h1>Contact us</h1>
    {% if form.errors %}
        <p style="color: red">
            Please correct the error{{ forms.errors|pluralize }} below.
        </p>
    {% endif %}

    <form action="" method="post">
       <div class="field">
           {{ form.subject.errors }}
           <label for="id_subject">Subject:</label>
           {{ form.subject }}
       </div>
        <div class="field">
           {{ form.email.errors }}
           <label for="id_email">E-mail:</label>
           {{ form.email }}
       </div>
        <div class="field">
           {{ form.message.errors }}
           <label for="id_message">Message:</label>
           {{ form.message }}
       </div>
        <input type="submit" value="Submit">
    </form>
</body>
</html>
看起来有点难看,但验证示例将就一下吧~~