
springboot
1、Hello SpringbBoot
- 创建maven项目
- 引入依赖
    <parent>
        <groupId>org.springframework.boot</groupId>
        <artifactId>spring-boot-starter-parent</artifactId>
        <version>2.3.4.RELEASE</version>
    </parent>


    <dependencies>
        <dependency>
            <groupId>org.springframework.boot</groupId>
            <artifactId>spring-boot-starter-web</artifactId>
        </dependency>
    </dependencies>
- 创建主程序
@SpringBootApplication
public class springbootApplication {
    public static void main(String[] args) {
        SpringApplication.run(springbootApplication.class,args);
    }
}
- 编写业务
@RestController
public class HelloController {
    @RequestMapping("/hello")
    public String hello(){
        return  "hello springboot";
    }
}
- 测试
2、依赖管理
- 父项目做依赖管理,几乎声明了开发中常用的依赖版本号,自动版本仲裁机制,如果需要修改版本号,在当前项目中重写配置
    <parent>
        <groupId>org.springframework.boot</groupId>
        <artifactId>spring-boot-starter-parent</artifactId>
        <version>2.3.4.RELEASE</version>
    </parent>
- 开发导入starter场景启动器 spring-boot-starter-*
- 只要引入starter,这个场景的所有常规需要的依赖自动引入
- 第三方简化开发场景启动器 *-spring-boot-starter
- 所有场景启动器最底层依赖
<dependency>

  <groupId>org.springframework.boot</groupId>
  <artifactId>spring-boot-starter</artifactId>
  <version>2.3.4.RELEASE</version>
  <scope>compile</scope>

</dependency>
3、自动配置原理
- 自动配好tomcat、springmvc、web常见功能...
- 默认包结构
- 主程序所在包及其下面的所有子包里面的组件都会被默认扫描出来
- 改变扫描路径 @SpringBootApplication(scanBasePackages="")
- 各种配置拥有默认值
- 配置文件最终都是映射某个类上
- 配置文件的值最终都会绑定到每个类上,这个类会在容器中创建对象
- 按需加载所有自动配置项
- 引入了哪些场景这个场景的自动配置才会开启
- springboot所有的自动配置功能都在spring-boot-autoconfigure包里面
- @SpringBootApplication注解包含以下三个核心注解
- @SpringBootConfiguration
- @EnableAutoConfiguration
- @ComponentScan(excludeFilters = { @Filter(type = FilterType.CUSTOM, classes = TypeExcludeFilter.class),
@Filter(type = FilterType.CUSTOM, classes = AutoConfigurationExcludeFilter.class)})
- @SpringBootConfiguration
- @Configuration 代表当前是个配置类
- @ComponentScan 指定要扫描哪些文件
- @EnableAutoConfiguration
@AutoConfigurationPackage
@Import(AutoConfigurationImportSelector.class)
- @AutoConfigurationPackage 自动配置包
@Import(AutoConfigurationPackages.Registrar.class)

//利用Registrar给容器中导入一系列组件,将指定的一个包下(主程序所在的包)的所有组件导入进容器中
- Registrar
		public void registerBeanDefinitions(AnnotationMetadata metadata, BeanDefinitionRegistry registry) {
			register(registry, new PackageImport(metadata).getPackageName());
		}
-
@Import(AutoConfigurationImportSelector.class)
-
AutoConfigurationImportSelector
	public String[] selectImports(AnnotationMetadata annotationMetadata) {
		if (!isEnabled(annotationMetadata)) {
			return NO_IMPORTS;
		}
		AutoConfigurationMetadata autoConfigurationMetadata = AutoConfigurationMetadataLoader
				.loadMetadata(this.beanClassLoader);
		AutoConfigurationEntry autoConfigurationEntry = getAutoConfigurationEntry(autoConfigurationMetadata,
				annotationMetadata);
		return StringUtils.toStringArray(autoConfigurationEntry.getConfigurations());
	}
- 利用getAutoConfigurationEntry(autoConfigurationMetadata,annotationMetadata)方法给容器中导入一些组件
- getAutoConfigurationEntry(autoConfigurationMetadata,annotationMetadata)
	protected AutoConfigurationEntry getAutoConfigurationEntry(AutoConfigurationMetadata autoConfigurationMetadata,
			AnnotationMetadata annotationMetadata) {
		if (!isEnabled(annotationMetadata)) {
			return EMPTY_ENTRY;
		}
		AnnotationAttributes attributes = getAttributes(annotationMetadata);
		//获取到所有需要导入到容器中的组件
		List<String> configurations = getCandidateConfigurations(annotationMetadata, attributes);
		configurations = removeDuplicates(configurations);
		Set<String> exclusions = getExclusions(annotationMetadata, attributes);
		checkExcludedClasses(configurations, exclusions);
		configurations.removeAll(exclusions);
		configurations = filter(configurations, autoConfigurationMetadata);
		fireAutoConfigurationImportEvents(configurations, exclusions);
		return new AutoConfigurationEntry(configurations, exclusions);
	}
- 进入 getCandidateConfigurations(AnnotationMetadata metadata, AnnotationAttributes attributes) 方法
	protected List<String> getCandidateConfigurations(AnnotationMetadata metadata, AnnotationAttributes attributes) {
		//使用Spring的工厂加载器加载一些东西
		List<String> configurations = SpringFactoriesLoader.loadFactoryNames(getSpringFactoriesLoaderFactoryClass(),
				getBeanClassLoader());
		Assert.notEmpty(configurations, "No auto configuration classes found in META-INF/spring.factories. If you "
				+ "are using a custom packaging, make sure that file is correct.");
		return configurations;
	}
- loadFactoryNames()
private static Map<String, List<String>> loadSpringFactories(@Nullable ClassLoader classLoader)
- loadSpringFactories
//从META-INF/spring.factories位置类加载一个文件
Enumeration<URL> urls = classLoader != null ? classLoader.getResources("META-INF/spring.factories") : ClassLoader.getSystemResources("META-INF/spring.factories");
- spring-boot-autoconfigure-2.2.1.RELEASE.jar/META-INF/spring.factories文件
# Auto Configure
org.springframework.boot.autoconfigure.EnableAutoConfiguration=\
org.springframework.boot.autoconfigure.admin.SpringApplicationAdminJmxAutoConfiguration,\
org.springframework.boot.autoconfigure.aop.AopAutoConfiguration,\
org.springframework.boot.autoconfigure.amqp.RabbitAutoConfiguration,\
org.springframework.boot.autoconfigure.batch.BatchAutoConfiguration,\
...
- 文件里面写死了springboot一启动就要给容器中加载的所有的配置类,虽然我们127个场景的自动配置启动时默认全部加载,但最终会按照条件装配规则,按需配置
4、容器功能
@Configuration
/**
 * 1、配置类里面使用@Bean标注在方法上给容器注册组件,默认也是单实例的
 * 2、配置类本身也是组件
 * 3、proxyBeanMethods:代理bean的方法,默认true
 *      Full(proxyBeanMethods = true)、【保证每个@Bean方法被调用多少次返回的组件都是单实例的】
 *      Lite(proxyBeanMethods = false)【每个@Bean方法被调用多少次返回的组件都是新创建的】
 */
@Configuration(proxyBeanMethods = true) //告诉springboot这是一个配置类 == 配置文件
public class myConfig {

    @Bean //给容器中添加组件。以方法名作为组件id。返回类型为组件类型,返回的值就是组件的实例
    public User user(){  //给@Bean标注的方法传入对象参数,这个参数的值会从容器中找
        User user = new User("zhangsan",18);
        return user;
    }
}
@Bean、@Component、@Controller、@Service、@Repository
@ComponentScan
@Import
- @Import(User.class)
给容器中创建User组件,默认组件名为全类型,注解需放在spring容器的组件上
@Conditional
- 条件装配:满足Conditional指定的条件,则进行组件注入
/c23c72250d194a3eb4bee782546fa65dspringboot.png)
@Configuration
public class SpringBootConfig {

    @Bean("user1")
    @ConditionalOnBean(name = "user")  //容器中有user组件时才给容器注入user1
    public User user1(){
        return new User();
    }

}
@ImportResource
- 导入spring配置文件
@ImportResource("classpath:beans.xml")
@ConfigurationProperties
- 读取到properties文件中的内容,并且把它封装到JavaBean中
@Component
@ConfigurationProperties(prefix = "user")
@Data
public class User {
    private String userName;
    private int age;
}
- application.properties
user.userName=zhangsan
user.age=20
@EnableConfigurationProperties
@Configuration
@EnableConfigurationProperties(User.class)
//开启User配置绑定功能
//把User组件自动注入到容器中
public class SpringBootConfig {

}
@ConfigurationProperties(prefix = "entity.user")
public class User {
    private String name;
    public User(){

    }
}
4、web场景
4.1、简单功能分析
4.1.1、静态资源访问
- 静态资源默认路径,类路径下
- /static
- /pulic
- /resources
- /META-INF/resources
- 请求进来时,先去找controller看能不能处理,不能处理的所有请求又都交给静态资源处理器。静态资源也找不到则返回404
- 改变默认的静态资源访问前缀,默认无前缀
spring.mvc.static-path-pattren:
- 改变默认静态资源的路径
spring.resources.static-locations:
4.1.2、欢迎页支持
- 静态资源下 index.html
- controller能处理 /index
4.1.3、自定义Favicon
- favicon.ico 放在静态资源目录下即可
4.1.4、静态资源配置原理
- SpringMVC功能的自动配置类 /web/servlet/WebMvcAutoConfiguration
@Configuration(proxyBeanMethods = false)
@ConditionalOnWebApplication(type = Type.SERVLET)
@ConditionalOnClass({ Servlet.class, DispatcherServlet.class, WebMvcConfigurer.class })
@ConditionalOnMissingBean(WebMvcConfigurationSupport.class)
@AutoConfigureOrder(Ordered.HIGHEST_PRECEDENCE + 10)
@AutoConfigureAfter({ DispatcherServletAutoConfiguration.class, TaskExecutionAutoConfiguration.class,
		ValidationAutoConfiguration.class })
public class WebMvcAutoConfiguration {
	public static class WebMvcAutoConfigurationAdapter implements WebMvcConfigurer {

	}
}
- WebMvcAutoConfigurationAdapter
	@Configuration(proxyBeanMethods = false)
	@Import(EnableWebMvcConfiguration.class)
	@EnableConfigurationProperties({ WebMvcProperties.class, ResourceProperties.class })
	@Order(0)
	public static class WebMvcAutoConfigurationAdapter implements WebMvcConfigurer {

}
- WebMvcProperties.class,ResourceProperties.class和配置文件进行了绑定,并注入到容器中
@ConfigurationProperties(prefix = "spring.mvc")
public class WebMvcProperties {
}

@ConfigurationProperties(prefix = "spring.resources", ignoreUnknownFields = false)
public class ResourceProperties {
}
- WebMvcAutoConfigurationAdapter配置类只有一个有参构造器,有参构造器所有的值都会从容器中获取
		public WebMvcAutoConfigurationAdapter(ResourceProperties resourceProperties, WebMvcProperties mvcProperties,
				ListableBeanFactory beanFactory, ObjectProvider<HttpMessageConverters> messageConvertersProvider,
				ObjectProvider<ResourceHandlerRegistrationCustomizer> resourceHandlerRegistrationCustomizerProvider) {
			this.resourceProperties = resourceProperties;
			this.mvcProperties = mvcProperties;
			this.beanFactory = beanFactory;
			this.messageConvertersProvider = messageConvertersProvider;
			this.resourceHandlerRegistrationCustomizer = resourceHandlerRegistrationCustomizerProvider.getIfAvailable();
		}
- 资源处理的默认规则
		@Override
		public void addResourceHandlers(ResourceHandlerRegistry registry) {
			//spring.resources.add-mappings = false  禁用所有静态资源规则
			if (!this.resourceProperties.isAddMappings()) {
				logger.debug("Default resource handling disabled");
				return;
			}
			//获取配置的静态资源缓存时间
			Duration cachePeriod = this.resourceProperties.getCache().getPeriod();
			CacheControl cacheControl = this.resourceProperties.getCache().getCachecontrol().toHttpCacheControl();
			//wenjars的规则
			if (!registry.hasMappingForPattern("/webjars/**")) {
				customizeResourceHandlerRegistration(registry.addResourceHandler("/webjars/**")
						.addResourceLocations("classpath:/META-INF/resources/webjars/")
						.setCachePeriod(getSeconds(cachePeriod)).setCacheControl(cacheControl));
			}
			//静态资源路径的配置规则
			//获取配置的静态资源的位置,默认 /**
			String staticPathPattern = this.mvcProperties.getStaticPathPattern();
			if (!registry.hasMappingForPattern(staticPathPattern)) {
				customizeResourceHandlerRegistration(registry.addResourceHandler(staticPathPattern)
						.addResourceLocations(getResourceLocations(this.resourceProperties.getStaticLocations()))
						.setCachePeriod(getSeconds(cachePeriod)).setCacheControl(cacheControl));
			}
		}
- this.resourceProperties.getStaticLocations()返回的值
	private static final String[] CLASSPATH_RESOURCE_LOCATIONS = { "classpath:/META-INF/resources/",
			"classpath:/resources/", "classpath:/static/", "classpath:/public/" };

	private String[] staticLocations = CLASSPATH_RESOURCE_LOCATIONS;

	public String[] getStaticLocations() {
		return this.staticLocations;
	}
4.2、请求参数处理
4.2.1、请求映射
REST使用与原理
- Rest风格支持(使用HTTP请求方式动词来表示对资源的操作)
- /user GET-获取用户 DELETE-删除用户 PUT-修改用户 POST-保存用户
- 核心Filter: HiddenHttpMethodFilter
- 用法:表单method=post,隐藏域 _method=put
- SpringBoot中手动开启
    //自定义filter
    @Bean
    public HiddenHttpMethodFilter hiddenHttpMethodFilter(){
        HiddenHttpMethodFilter methodFilter = new HiddenHttpMethodFilter();
	//修改MethodParam为_m 默认_method
        methodFilter.setMethodParam("_m");
        return methodFilter;
    }
Rest原理(表单提交要使用REST的时候)
- 表单提交会带上_method=put
- 请求过来被HiddenHttpMethodFilter拦截
- 请求是否正常,并且是post
- 兼容以下请求:PUT DELETE PATCH
- 原生request(post),包装模式requesWrapper重写了getMethod方法,返回的是传入的值
- 过滤器链放行的时候用wrapper。以后的方法调用getMethod是调用requesWrapper的
请求映射原理
/366e0e133f174719bd7a3a45144a915bspringboot.png)
-
FrameworkServlet类重写了doGet、doPost、doPut、doDelete方法,进入方法在调用processRequest(HttpServletRequest request, HttpServletResponse response)方法
-
processRequest(HttpServletRequest request, HttpServletResponse response)方法再调用doService(HttpServletRequest var1, HttpServletResponse var2)方法
-
doService(HttpServletRequest request, HttpServletResponse response)方法调用doDispatch(HttpServletRequest request, HttpServletResponse response)方法
-
doDispatch(HttpServletRequest request, HttpServletResponse response)
    protected void doDispatch(HttpServletRequest request, HttpServletResponse response) throws Exception {
        HttpServletRequest processedRequest = request;
        HandlerExecutionChain mappedHandler = null;
        boolean multipartRequestParsed = false;
        WebAsyncManager asyncManager = WebAsyncUtils.getAsyncManager(request);

        try {
            try {
                ModelAndView mv = null;
                Object dispatchException = null;

                try {
                    processedRequest = this.checkMultipart(request);
                    multipartRequestParsed = processedRequest != request;

                    //找到当前请求使用哪个handler(controller的方法)处理
                    mappedHandler = this.getHandler(processedRequest);
                    if (mappedHandler == null) {
                        this.noHandlerFound(processedRequest, response);
                        return;
                    }

                    HandlerAdapter ha = this.getHandlerAdapter(mappedHandler.getHandler());
                    String method = request.getMethod();
                    boolean isGet = "GET".equals(method);
                    if (isGet || "HEAD".equals(method)) {
                        long lastModified = ha.getLastModified(request, mappedHandler.getHandler());
                        if ((new ServletWebRequest(request, response)).checkNotModified(lastModified) && isGet) {
                            return;
                        }
                    }

                    if (!mappedHandler.applyPreHandle(processedRequest, response)) {
                        return;
                    }

                    mv = ha.handle(processedRequest, response, mappedHandler.getHandler());
                    if (asyncManager.isConcurrentHandlingStarted()) {
                        return;
                    }

                    this.applyDefaultViewName(processedRequest, mv);
                    mappedHandler.applyPostHandle(processedRequest, response, mv);
                } catch (Exception var20) {
                    dispatchException = var20;
                } catch (Throwable var21) {
                    dispatchException = new NestedServletException("Handler dispatch failed", var21);
                }

                this.processDispatchResult(processedRequest, response, mappedHandler, mv, (Exception)dispatchException);
            } catch (Exception var22) {
                this.triggerAfterCompletion(processedRequest, response, mappedHandler, var22);
            } catch (Throwable var23) {
                this.triggerAfterCompletion(processedRequest, response, mappedHandler, new NestedServletException("Handler processing failed", var23));
            }

        } finally {
            if (asyncManager.isConcurrentHandlingStarted()) {
                if (mappedHandler != null) {
                    mappedHandler.applyAfterConcurrentHandlingStarted(processedRequest, response);
                }
            } else if (multipartRequestParsed) {
                this.cleanupMultipart(processedRequest);
            }

        }
    }
- HandlerExecutionChain getHandler(HttpServletRequest request)找到对应handler
    protected HandlerExecutionChain getHandler(HttpServletRequest request) throws Exception {
        if (this.handlerMappings != null) {
            Iterator var2 = this.handlerMappings.iterator();

            while(var2.hasNext()) {
                HandlerMapping mapping = (HandlerMapping)var2.next();
                HandlerExecutionChain handler = mapping.getHandler(request);
                if (handler != null) {
                    return handler;
                }
            }
        }

        return null;
    }

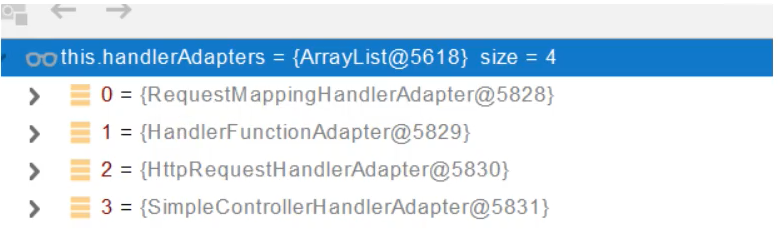
- RequestMappingHandlerMapping:保存了所有@RequestMapping和handler的映射规则

4.2.2、普通参数与基本注解
- @PathVariable
- 获取路径指定变量:@PathVariable("id") String id
- 获取路径中的所有变量:@PathVariable Map<String,String> map
- @RequestHeader
- 获取指定请求头:@RequestHeader("User-Agent") String userAgent
- 获取全部请求头:@RequestHeader Map<String,String> header
- @ModelAttribute
- @RequestParam
- 获取请求参数:@RequestParam("id") String id
- 获取所有的请求参数:@RequestParam Map<String,String> map
- @MatrixVariable
- 获取矩阵变量:@MatrixVariable("id") String id
- springboot默认关闭矩阵变量,需手动开启
- @CookieValue
- 获取cookie:@CookieValue("id") String id
- 获取所有cookie:@CookieValue Map<String,String> map
- @RequestBody
- 获取请求体(POST):@RequestBody String content
- @RequestAttribute
- 获取request域属性:@RequestAttribute("msg") String msg
4.2.3、参数解析原理
- HandlerMapping中找到能处理请求的Handler
- 为当前handler找一个适配器HandlerAdapter;RequestMappingHandlerAdapter
//DispatcherServlet.class -> doDispatch()

HandlerAdapter ha = this.getHandlerAdapter(mappedHandler.getHandler());
-
HandlerAdapter
- RequestMappingHandlerAdapter:支持方法上标注了@RequestMapping
- HandlerFunctionAdapter:支持函数式编程的
-
执行目标方法,返回ModelAndView对象
//DispatcherServlet -> doDispatch()

mv = ha.handle(processedRequest, response, mappedHandler.getHandler());
- AbstranctHandlerMethodAdapter -> hanlde()
public final ModelAndView handle(HttpServletRequest request, HttpServletResponse response, Object handler)
		throws Exception {

	return handleInternal(request, response, (HandlerMethod) handler);
}
- 执行目标方法
//RequestMappingHandlerAdapter -> handleInternal()

mav = this.invokeHandlerMethod(request, response, handlerMethod);
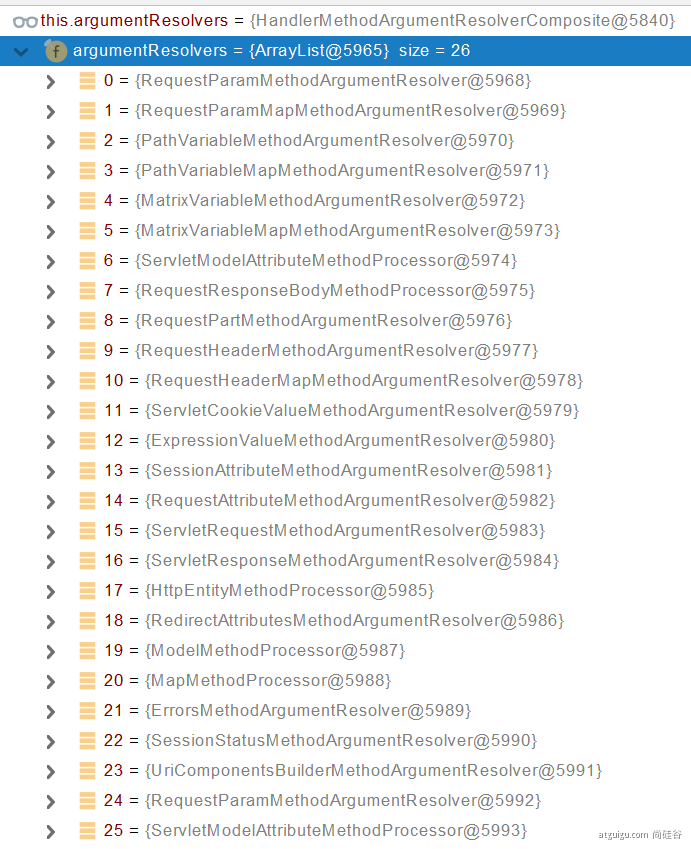
- 参数解析器,确定将要执行的目标方法的每一个参数值是什么,SpringMvc目标方法能写多少中参数类型,取决于参数解析器
//RequestMappingHandlerAdapter.class

private HandlerMethodArgumentResolverComposite argumentResolvers;
- 参数解析器接口
public interface HandlerMethodArgumentResolver {

	//当前解析器是否支持解析这种参数
	boolean supportsParameter(MethodParameter parameter);

	//如果支持则调用该方法
	@Nullable
	Object resolveArgument(MethodParameter parameter, @Nullable ModelAndViewContainer mavContainer,
			NativeWebRequest webRequest, @Nullable WebDataBinderFactory binderFactory) throws Exception;

}
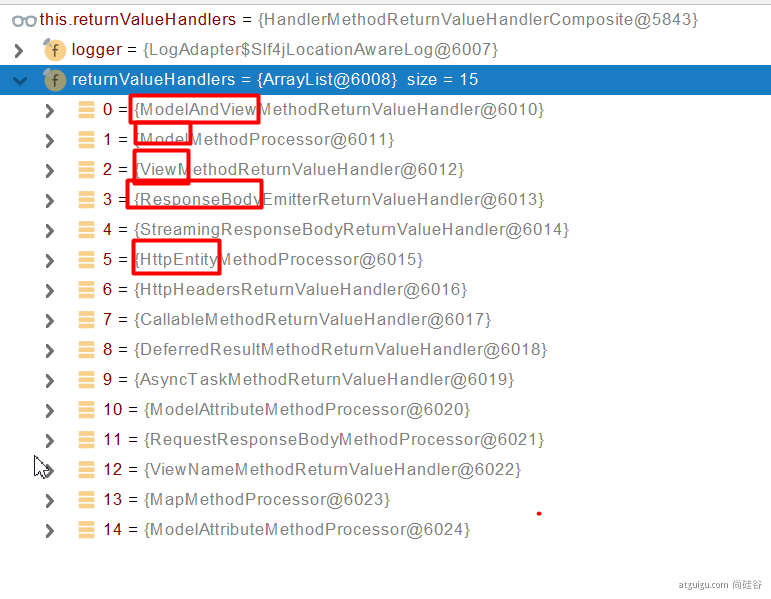
- 返回值处理器
//RequestMappingHandlerAdapter

private HandlerMethodReturnValueHandlerComposite returnValueHandlers;
- 返回值处理器接口
public interface HandlerMethodReturnValueHandler {

boolean supportsReturnType(MethodParameter returnType);

void handleReturnValue(@Nullable Object returnValue, MethodParameter returnType,
	ModelAndViewContainer mavContainer, NativeWebRequest webRequest) throws Exception;

}
- 将参数解析器和返回值处理器包装到ServletInvocableHandlerMethod对象中
//RequestMappingHandlerAdapter.class

            ServletInvocableHandlerMethod invocableMethod = this.createInvocableHandlerMethod(handlerMethod);
            if (this.argumentResolvers != null) {
                invocableMethod.setHandlerMethodArgumentResolvers(this.argumentResolvers);
            }

            if (this.returnValueHandlers != null) {
                invocableMethod.setHandlerMethodReturnValueHandlers(this.returnValueHandlers);
            }
- 执行并处理
//RequestMappingHandlerAdapter

invocableMethod.invokeAndHandle(webRequest, mavContainer, new Object[0]);
- 真正执行目标方法
//ServletInvocableHandlerMethod -> invokeAndHandler()

Object returnValue = this.invokeForRequest(webRequest, mavContainer, providedArgs);
- 获取方法所有参数值
//InvocableHandlerMethod -> invokeForRequest()
Object[] args = getMethodArgumentValues(request, mavContainer, providedArgs);
- 确定目标方法每一个参数的值
// InvocableHandlerMethod -> getMethodArgumentValues()

	protected Object[] getMethodArgumentValues(NativeWebRequest request, @Nullable ModelAndViewContainer mavContainer,
			Object... providedArgs) throws Exception {

		//获取方法所有参数的详细信息
		MethodParameter[] parameters = getMethodParameters();
		//判断参数是否为空
		if (ObjectUtils.isEmpty(parameters)) {
			return EMPTY_ARGS;
		}

		//新建Object对象数组
		Object[] args = new Object[parameters.length];
		for (int i = 0; i < parameters.length; i++) {
			//拿到具体的一个参数
			MethodParameter parameter = parameters[i];
			parameter.initParameterNameDiscovery(this.parameterNameDiscoverer);
			args[i] = findProvidedArgument(parameter, providedArgs);
			if (args[i] != null) {
				continue;
			}
			//判断参数解析器是否支持该参数类型,会遍历所有的参数解析器,找到支持该参数类型的解析器
			if (!this.resolvers.supportsParameter(parameter)) {
				throw new IllegalStateException(formatArgumentError(parameter, "No suitable resolver"));
			}
			try {
				//解析参数的值
				args[i] = this.resolvers.resolveArgument(parameter, mavContainer, request, this.dataBinderFactory);
			}
			catch (Exception ex) {
				// Leave stack trace for later, exception may actually be resolved and handled...
				if (logger.isDebugEnabled()) {
					String exMsg = ex.getMessage();
					if (exMsg != null && !exMsg.contains(parameter.getExecutable().toGenericString())) {
						logger.debug(formatArgumentError(parameter, exMsg));
					}
				}
				throw ex;
			}
		}
		return args;
	}
4.2.4、Servlet Api参数解析原理
- HttpServletRequest
    @GetMapping("/hello")
    public String hello(HttpServletRequest request){
        request.setAttribute("mes","hello");
        return "hello";
    }
- ServletRequestMethodArgumentResolver解析器判断通过
    public boolean supportsParameter(MethodParameter parameter) {
        Class<?> paramType = parameter.getParameterType();
        return WebRequest.class.isAssignableFrom(paramType) ||
		ServletRequest.class.isAssignableFrom(paramType) ||
		MultipartRequest.class.isAssignableFrom(paramType) ||
 		HttpSession.class.isAssignableFrom(paramType) ||
		pushBuilder != null && pushBuilder.isAssignableFrom(paramType) ||
 		Principal.class.isAssignableFrom(paramType) ||
		InputStream.class.isAssignableFrom(paramType) ||
		Reader.class.isAssignableFrom(paramType) ||
 		HttpMethod.class == paramType || Locale.class == paramType ||
		TimeZone.class == paramType || ZoneId.class == paramType;
    }
- ServletRequestMethodArgumentResolver参数解析器初期参数,如果参数类型是HttpServletRequest则返回源生的HttpServletRequest
	@Override
	public Object resolveArgument(MethodParameter parameter, @Nullable ModelAndViewContainer mavContainer,
			NativeWebRequest webRequest, @Nullable WebDataBinderFactory binderFactory) throws Exception {

		Class<?> paramType = parameter.getParameterType();

		// WebRequest / NativeWebRequest / ServletWebRequest
		if (WebRequest.class.isAssignableFrom(paramType)) {
			if (!paramType.isInstance(webRequest)) {
				throw new IllegalStateException(
						"Current request is not of type [" + paramType.getName() + "]: " + webRequest);
			}
			return webRequest;
		}

		// ServletRequest / HttpServletRequest / MultipartRequest / MultipartHttpServletRequest
		//如果参数类型是HttpServletRequest则返回源生的HttpServletRequest
		if (ServletRequest.class.isAssignableFrom(paramType) || MultipartRequest.class.isAssignableFrom(paramType)) {
			return resolveNativeRequest(webRequest, paramType);
		}

		// HttpServletRequest required for all further argument types
		return resolveArgument(paramType, resolveNativeRequest(webRequest, HttpServletRequest.class));
	}
4.2.4、Model Map参数解析原理
- Model,Map中存放的数据都会放在request域中
    @GetMapping("/hello")
    public String hello(Map<String,Object> map,
                        Model model){
        map.put("msg","hello world");
        model.addAttribute("msg","hello world");
        return "hello";
    }
- MapMethodProcessor参数解析器处理Map类型,返回mavContainer.getModel() --> BindingAwareModelMap对象
	public Object resolveArgument(MethodParameter parameter, @Nullable ModelAndViewContainer mavContainer,
			NativeWebRequest webRequest, @Nullable WebDataBinderFactory binderFactory) throws Exception {

		Assert.state(mavContainer != null, "ModelAndViewContainer is required for model exposure");
		return mavContainer.getModel();
	}
- BindingAwareModelMap对象实现了Map接口也实现了Model接口,所以BindingAwareModelMap是Model也是Map
- ModelMethodProcessor参数解析器处理Model类型,返回mavContainer.getModel() --> BindingAwareModelMap对象
	@Override
	@Nullable
	public Object resolveArgument(MethodParameter parameter, @Nullable ModelAndViewContainer mavContainer,
			NativeWebRequest webRequest, @Nullable WebDataBinderFactory binderFactory) throws Exception {

		Assert.state(mavContainer != null, "ModelAndViewContainer is required for model exposure");
		return mavContainer.getModel();
	}
- 无论是Map,还是Model类型底层都是调用mavContainer.getModel()获取到BindingAwareModelMap对象
- 参数解析完成以后,执行目标方法 doInvoke(args),返回一个Object对象
//InvocableHandlerMethod

	@Nullable
	public Object invokeForRequest(NativeWebRequest request, @Nullable ModelAndViewContainer mavContainer,
			Object... providedArgs) throws Exception {

		Object[] args = getMethodArgumentValues(request, mavContainer, providedArgs);
		if (logger.isTraceEnabled()) {
			logger.trace("Arguments: " + Arrays.toString(args));
		}
		//执行目标方法
		return doInvoke(args);
	}
4.3、拦截器
- 实现HandlerInterceptor接口
public class LoginInterceptor implements HandlerInterceptor {

    //目标方法执行前
    @Override
    public boolean preHandle(HttpServletRequest request, HttpServletResponse response, Object handler) throws Exception {
        return false;
    }

    //目标方法执行后
    @Override
    public void postHandle(HttpServletRequest request, HttpServletResponse response, Object handler, ModelAndView modelAndView) throws Exception {

    }

    //页面渲染以后
    @Override
    public void afterCompletion(HttpServletRequest request, HttpServletResponse response, Object handler, Exception ex) throws Exception {

    }
}
- 配置拦截器
@Configuration
public class AdminWebConfig implements WebMvcConfigurer {
    @Override
    public void addInterceptors(InterceptorRegistry registry) {
        registry.addInterceptor(new LoginInterceptor())
                .addPathPatterns("/**")    //所有请求都会被拦截包括静态资源
                .excludePathPatterns("/","/login");  //放行请求
    }
}
- 拦截器原理
- 根据当前请求,找到HandlerExecutionChain【可以处理请求的handler以及handler的所有拦截器】
- 先来顺序执行所有拦截器的preHandle方法
- 如果当前拦截器prehandler方法返回true。则执行下一个拦截器的prehandler
- 如果当前拦截器返回false。直接倒序执行所有已经执行了的拦截器的afterCompletion
- 如果任何一个拦截器返回false。直接跳出不执行目标方法
- 所有拦截器都返回true。执行目标方法
- 倒序执行所有拦截器的postHandler方法
- 前面的步骤有任何异常都会直接倒序触发afterCompletion
- 页面渲染完成后,也会倒序触发afterCompletion
/6bf4c285c6084baf8229c65f291a1abbspringboot.png)
4.4、文件上传
- 页面表单
<form method="post" action="/upload" enctype="multipart/form-data">

    <input type="file" name="file"><br>

    <input type="submit" value="提交">

</form>
- 文件上传代码
    @PostMapping("/upload")
    public String upload(@RequestPart("file") MultipartFile file) throws IOException {

        if(!file.isEmpty()){
            String originalFilename = file.getOriginalFilename();
            file.transferTo(new File("H:\\cache\\"+originalFilename));
        }

        return "success";
    }
4.5、Web原生组件注入(Servlet、Filter、Listener)
使用Servlet API
- @ServletComponentScan():指定扫描原生注解Servlet组件的位置
- @WebServlet(urlPatterns = ""):在编写的Servlet上添加注解
- @WebFilter(urlPatterns={""}):在编写的Filter上添加注解
- @WebListener:在编写的Listener上添加注解
使用RegistrantionBean
- ServletRegistrationBean
- FilterRegistrationBean
- ServletListenerRegistrationBean
@Configuration
public class MyRegistConfig {

    @Bean
    public ServletRegistrationBean myServlet(){
        MyServlet myServlet = new MyServlet();

        return new ServletRegistrationBean(myServlet,"/my","/my02");
    }


    @Bean
    public FilterRegistrationBean myFilter(){

        MyFilter myFilter = new MyFilter();
//        return new FilterRegistrationBean(myFilter,myServlet());
        FilterRegistrationBean filterRegistrationBean = new FilterRegistrationBean(myFilter);
        filterRegistrationBean.setUrlPatterns(Arrays.asList("/my","/css/*"));
        return filterRegistrationBean;
    }

    @Bean
    public ServletListenerRegistrationBean myListener(){
        MySwervletContextListener mySwervletContextListener = new MySwervletContextListener();
        return new ServletListenerRegistrationBean(mySwervletContextListener);
    }
}
5、数据访问
5.1、数据源的自动配置
- 导入JDBC场景和MySql驱动
        <dependency>
            <groupId>org.springframework.boot</groupId>
            <artifactId>spring-boot-starter-data-jdbc</artifactId>
        </dependency>

        <dependency>
            <groupId>mysql</groupId>
            <artifactId>mysql-connector-java</artifactId>
        </dependency>
- 配置数据源属性
spring.datasource.url=jdbc:mysql://localhost:3306/test?useUnicode=true&characterEncoding=utf-8&serverTimezone=UTC
spring.datasource.username=root
spring.datasource.password=1
spring.datasource.driver-class-name=com.mysql.jdbc.Driver
- 测试
    @Autowired
    private DataSource dataSource;

    @Autowired
    private JdbcTemplate jdbcTemplate;
    @Test
    void contextLoads() throws SQLException {
        //获取数据源
        Connection conn = dataSource.getConnection();
        System.out.println(conn);

        //使用JdbcTemplate查询
        int userCount = jdbcTemplate.queryForObject("select count(1) from user", int.class);
        System.out.println("查询到的用户个数:"+userCount);

    }
5.2、使用Druid数据源
5.2.1、自定义方式
- 引入Druid
        <dependency>
            <groupId>com.alibaba</groupId>
            <artifactId>druid</artifactId>
            <version>1.1.17</version>
        </dependency>
- 编写配置文件
@Configuration
public class MyDataSource {

    //@ConfigurationProperties("spring.datasource") 可以在properties中设置属性值
    @Bean
    public DataSource dataSource(){
        DruidDataSource dataSource = new DruidDataSource();
        dataSource.setUrl("jdbc:mysql://localhost:3306/test?useUnicode=true&characterEncoding=utf-8&serverTimezone=UTC");
        dataSource.setDriverClassName("com.mysql.jdbc.Driver");
        dataSource.setUsername("root");
        dataSource.setPassword("1");

        //加入监控功能
        dataSource.setFilters("stat");
        return dataSource;
    }
}
- 配置druid监控页
    @Bean
    public ServletRegistrationBean statViewServlet(){
        StatViewServlet statViewServlet = new StatViewServlet();
        ServletRegistrationBean<StatViewServlet> registrationBean = new ServletRegistrationBean<>(statViewServlet, "/druid/*");

        //设置监控页登录信息
        registrationBean.addInitParameter("loginUsername","admin");
        registrationBean.addInitParameter("loginPassword","123456");
        return registrationBean;
    }
5.2.2、使用官方starter方式
- 引入druid-starter
        <dependency>
            <groupId>com.alibaba</groupId>
            <artifactId>druid-spring-boot-starter</artifactId>
            <version>1.1.17</version>
        </dependency>
- 配置示例
spring:
  datasource:
    url: jdbc:mysql://localhost:3306/db_account
    username: root
    password: 123456
    driver-class-name: com.mysql.jdbc.Driver

    druid:
      aop-patterns: com.atguigu.admin.*  #监控SpringBean
      filters: stat,wall     # 底层开启功能,stat(sql监控),wall(防火墙)

      stat-view-servlet:   # 配置监控页功能
        enabled: true
        login-username: admin
        login-password: admin
        resetEnable: false

      web-stat-filter:  # 监控web
        enabled: true
        urlPattern: /*
        exclusions: '*.js,*.gif,*.jpg,*.png,*.css,*.ico,/druid/*'


      filter:
        stat:    # 对上面filters里面的stat的详细配置
          slow-sql-millis: 1000
          logSlowSql: true
          enabled: true
        wall:
          enabled: true
          config:
            drop-table-allow: false
5.3、整合mybatis
- 引入第三方的mybatis-spring-boot-starter
        <dependency>
            <groupId>org.mybatis.spring.boot</groupId>
            <artifactId>mybatis-spring-boot-starter</artifactId>
            <version>2.1.4</version>
        </dependency>
配置模式
- 配置mybatis属性
# xml位置
mybatis.mapper-locations=classpath:com/example/springboot/mapper/*.xml
# 开启驼峰命名
mybatis.configuration.map-underscore-to-camel-case=true
- 编写mapper
@Mapper
public interface UserMapper {
    User getUserById(String id);
}
- 编写映射mapper的xml
<?xml version="1.0" encoding="UTF-8" ?>

<!DOCTYPE mapper
        PUBLIC "-//mybatis.org//DTD Mapper 3.0//EN"
        "http://mybatis.org/dtd/mybatis-3-mapper.dtd">
<mapper namespace="com.example.springboot.mapper.UserMapper">

    <!--    public Account getAcct(Long id); -->

    <select id="getUserById" resultType="com.example.springboot.entity.User">
        select * from  user where  id=#{id}
    </select>

</mapper>
注解模式
@Mapper
public interface UserMapper {
    @Select("select * from user where id = #{id}")
    User getUserById(String id);
}
6、异步任务
- 给方法添加 @Async 注解
- 在主程序上添加 @EnableAsync ,开启异步功能
7、定时任务
- 给方法添加 @Scheduled(cron= "") 注解
- 在主程序上添加 @EnableSchedduling ,开启定时任务功能
8、邮件任务
- 引入maven依赖
<dependency>
   <groupId>org.springframework.boot</groupId>
   <artifactId>spring-boot-starter-mail</artifactId>
</dependency>
- 配置文件
spring.mail.username=507545713@qq.com
spring.mail.password=你的qq授权码
spring.mail.host=smtp.qq.com
# qq需要配置ssl
spring.mail.properties.mail.smtp.ssl.enable=true
-
获取授权码:在QQ邮箱中的设置->账户->开启pop3和smtp服务
-
测试
@Autowired
JavaMailSenderImpl mailSender;

@Test
public void contextLoads() {
   //邮件设置1:一个简单的邮件
   SimpleMailMessage message = new SimpleMailMessage();
   message.setSubject("邮件subject");
   message.setText("邮件text");

   message.setTo("507545713@qq.com");
   message.setFrom("507545713@qq.com");
   mailSender.send(message);
}

@Test
public void contextLoads2() throws MessagingException {
   //邮件设置2:一个复杂的邮件
   MimeMessage mimeMessage = mailSender.createMimeMessage();
   MimeMessageHelper helper = new MimeMessageHelper(mimeMessage, true);

   helper.setSubject("邮件subject");
   helper.setText("<b style='color:red'>邮件text</b>",true);

   //发送附件
   helper.addAttachment("1.jpg",new File(""));
   helper.addAttachment("2.jpg",new File(""));

   helper.setTo("507545713@qq.com");
   helper.setFrom("507545713@qq.com");

   mailSender.send(mimeMessage);
}

 浙公网安备 33010602011771号