002-maven开发Java脚手架archrtype【如无定制开发,请直接看3.3使用】
一、概述
项目基础构建需要:项目结构,spring框架,orm,连接池,数据库,单元测试等等。
上述即使复用:001-脚手架发展,基础代码结构+mybatis代码生成,基础代码结构,也需要修改成自己单位或者个人所属包,以及连接池,版本控制等。同时各个项目的结构迥异,不利于团队管理。
下述主要使用maven项目原型,搭建了一个团队共享的脚手架。maven自定义archetype(脚手架)
1.1、什么是archetype
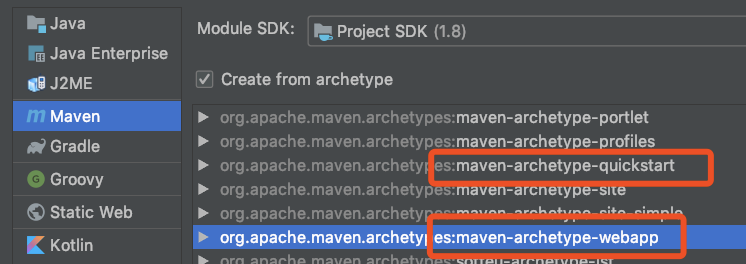
模板工具类,通过archetype我们可以快速的生成项目的基本架构。比如我们使用idea创建一个maven web项目时,常常会选择maven-archetype-webapp模板来初始化项目,使用maven-archetype-webapp生成的项目中包括webapp目录,里面包含web的配置文件

1.2、archetype由四部分组成
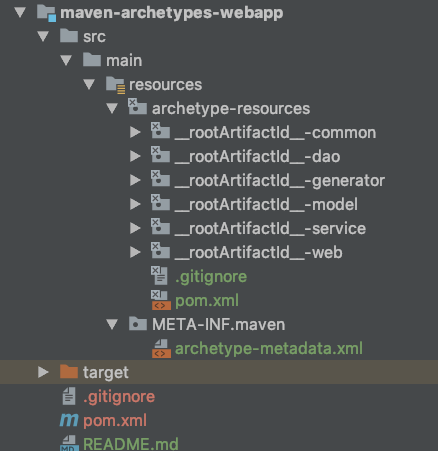
prototype files 原型文件
位于src/main/resources/archetype-resource目录下。prototype files 原型文件可以理解为多模块中的子模块或是单模块工程中的源文件[即src文件]。这些原型文件在使用对应archetype生成项目时被生成
archetype-metadata.xml
位于src/main/resources/META-INF/maven/目录下。该配置文件中主要列出了原型文件以及使用archetype生成模板工程需要的参数
prototype pom
位于src/main/resources/archetype-resources目录下。这个pom文件会出现在archetype创建的模板工程中,如果是单模块工程,则是对整个项目的依赖管理;如果是多模块工程,该pom是总pom文件,该文件中会定义项目的子模块以及对子模块的依赖进行管理等,子模块pom定义在子模块下,子模块pom文件只管理子模块的依赖。
archetype pom
位于自定义archetype工程的根目录下。这是archetype工程项目的pom文件,里面一般没什么东西,不会出现在archetype创建的模板工程中
1.3、为什么要自定义archetype
maven也内置了很多的archetype供用户选择使用什么样的骨架去创建一个项目,比如:
-
maven-archetype-webapp
-
maven-archetype-quickstart
在创建一个maven项目的时候会列出很多archetype供选择,maven默认的archetype是maven-archetype-webapp。
团队做开发的过程中,仅仅依靠maven预先提供的archetyp可能是不够的,团队之间协作有自己的定义方式,每个人的结构定义风格也不尽相同,在这样的背景下我们有必要去定义一个统一的代码骨架供团队使用,这样做的好处还有在新人加入团队的初期能够快速的理解项目。
二、插件开发
参数说明、Archetype的一些built-in参数
| Variable | Meaning |
|---|---|
| __rootArtifactId__ | 做文件夹名替换用,例如__rootArtifactId__-dal, 占位符来动态获取父工程的ArtifactId |
| ${rootArtifactId} |
it holds the value entered by the user as the project name (the value that maven ask as the 它保存用户输入的值作为项目名(maven在用户运行原型时在提示符中询问为artifactid:的值) |
${artifactId} |
If your project is composed by one module, this variable will have the same value as 如果您的项目由一个模块组成,则此变量的值将与${rootartifactid}相同,但如果项目包含多个模块,则此变量将由每个模块文件夹中的模块名替换,例如:给定一个名为Portlet domain的模块位于一个名为Portlet的项目中,此模块文件夹中要筛选的所有文件的变量${artifactid}的值将替换为portlet域,而${rootartifactid}的变量将替换为portlet |
${package} |
The user provided package for the project, also prompted by maven when the user runs the archetype 用户为项目提供的包,也在用户运行原型时由maven提示 |
${packageInPathFormat} |
The same value as 与${package}变量的值相同,但将“.”替换为字符“/”,例如:,对于包com.foo.bar,此变量为com/foo/bar |
${groupId} |
The user supplied 用户为项目提供的groupid,在用户运行原型时由maven提示 |
${version} |
The user supplied version for the project, prompted by maven when the user runs the archetype |
其中有些变量是系统支持的,有些变量是自定义的,例如rootArtifactId、project.version等都是系统支持的,有些是自动以的,例如上面用到的package
${rootArtifactId}也会被parent项目的artifactId替换
2.1、[自定义archetype]结构说明

包含了archetype的四个组成部分,两个pom文件,一个archtype-metadata文件和五个原型文件[__rootArtifactId__-*],其中__rootArtifactId__在生成模板工程时会被传入的值替代。
代码参看地址:https://github.com/bjlhx15/java_base_architecture.git
配置说明
2.1.1、archtype-metadata.xml配置文件
1、定义使用archetype生成模板工程需要传入的参数
    <!--需要输入的属性-->
    <requiredProperties>
        <requiredProperty key="groupId">
            <!--默认的groupId-->
            <defaultValue>com.github.bjlhx15.test</defaultValue>
        </requiredProperty>
        <requiredProperty key="artifactId">
            <!--默认的artifactId-->
            <defaultValue>demo</defaultValue>
        </requiredProperty>
        <requiredProperty key="package">
            <!--默认的包名和groupId一样-->
            <defaultValue>${groupId}</defaultValue>
        </requiredProperty>
    </requiredProperties>
${}标识的变量都是通过maven中的命令行传进来的
2、 定义原型文件
    <!--子模块-->
    <modules>
        <module id="${rootArtifactId}-web" name="${rootArtifactId}-web" dir="__rootArtifactId__-web">
            <fileSets>
                <fileSet filtered="true" encoding="UTF-8" packaged="true">
                    <directory>src/main/java</directory>
                    <includes>
                        <include>**/*.*</include>
                    </includes>
                </fileSet>
                <fileSet filtered="true" encoding="UTF-8" packaged="true">
                    <directory>src/test/java</directory>
                    <includes>
                        <include>**/*.*</include>
                    </includes>
                </fileSet>
                <fileSet encoding="UTF-8">
                    <directory>src/main/resources</directory>
                    <includes>
                        <include>**/*.*</include>
                    </includes>
                </fileSet>
                <fileSet encoding="UTF-8">
                    <directory>src/test/resources</directory>
                    <includes>
                        <include>**/*.*</include>
                    </includes>
                </fileSet>
            </fileSets>
        </module>
module属性介绍: id:子模块工程的artifactId dir:子模块工程源文件在archetype-resources里对应的directory name :子模块的名字.
可定制化自己的服务模块。
注意
src/main/resources/archetype-resources里必须要有一个顶级pom文件(如果是单工程就是工程pom文件),同时子文件夹代表了模块定义
2.1.2、prototype pom文件
1、定义了基础子模块
    <!--项目子模块-->
    <modules>
        <module>${rootArtifactId}-common</module>
        <module>${rootArtifactId}-dao</module>
        <module>${rootArtifactId}-service</module>
        <module>${rootArtifactId}-web</module>
        <module>${rootArtifactId}-model</module>
    </modules>
2、子模块依赖版本统一管理

    <dependencyManagement>
        <dependencies>
            <dependency>
                <groupId>org.springframework.boot</groupId>
                <artifactId>spring-boot-starter</artifactId>
                <version>2.0.4.RELEASE</version>
            </dependency>

            <dependency>
                <groupId>org.springframework.boot</groupId>
                <artifactId>spring-boot-starter-test</artifactId>
                <version>2.0.4.RELEASE</version>
                <scope>test</scope>
            </dependency>

            <dependency>
                <groupId>org.springframework.boot</groupId>
                <artifactId>spring-boot-starter-web</artifactId>
                <!-- 去掉springboot默认配置 -->
                <exclusions>
                    <exclusion>
                        <groupId>org.springframework.boot</groupId>
                        <artifactId>spring-boot-starter-logging</artifactId>
                    </exclusion>
                </exclusions>
                <version>2.0.4.RELEASE</version>
            </dependency>

            <!--mysql-->
            <dependency>
                <groupId>mysql</groupId>
                <artifactId>mysql-connector-java</artifactId>
                <version>6.0.6</version>
            </dependency>

            <!--mybatisplus-->
            <dependency>
                <groupId>com.baomidou</groupId>
                <artifactId>mybatis-plus-boot-starter</artifactId>
                <version>3.1.2</version>
            </dependency>

            <dependency>
                <groupId>com.baomidou</groupId>
                <artifactId>mybatis-plus-generator</artifactId>
                <version>3.1.2</version>
            </dependency>

            <dependency>
                <groupId>org.apache.velocity</groupId>
                <artifactId>velocity-engine-core</artifactId>
                <version>2.0</version>
            </dependency>

            <dependency>
                <groupId>org.freemarker</groupId>
                <artifactId>freemarker</artifactId>
                <version>2.3.23</version>
            </dependency>

            <!-- log4j2 -->
            <dependency>
                <groupId>org.springframework.boot</groupId>
                <artifactId>spring-boot-starter-log4j2</artifactId>
                <version>2.1.1.RELEASE</version>
            </dependency>

            <dependency>
                <groupId>com.lmax</groupId>
                <artifactId>disruptor</artifactId>
                <version>3.4.2</version>
            </dependency>

            <!--aop-->
            <dependency>
                <groupId>org.springframework.boot</groupId>
                <artifactId>spring-boot-starter-aop</artifactId>
                <version>2.0.5.RELEASE</version>
            </dependency>

            <dependency>
                <groupId>com.fasterxml.jackson.core</groupId>
                <artifactId>jackson-databind</artifactId>
                <version>2.9.8</version>
            </dependency>

            <!--modules-->
            <dependency>
                <groupId>${groupId}</groupId>
                <artifactId>${rootArtifactId}-common</artifactId>
                <version>${version}</version>
            </dependency>

            <dependency>
                <groupId>${groupId}</groupId>
                <artifactId>${rootArtifactId}-dao</artifactId>
                <version>${version}</version>
            </dependency>

            <dependency>
                <groupId>${groupId}</groupId>
                <artifactId>${rootArtifactId}-service</artifactId>
                <version>${version}</version>
            </dependency>

            <dependency>
                <groupId>${groupId}</groupId>
                <artifactId>${rootArtifactId}-model</artifactId>
                <version>${version}</version>
            </dependency>
        </dependencies>
    </dependencyManagement>
子模块所需依赖都定义在该pom中,子模块使用依赖时不需要<version>标签,但是需要显示引用
2.1.3、prototype files 原型文件
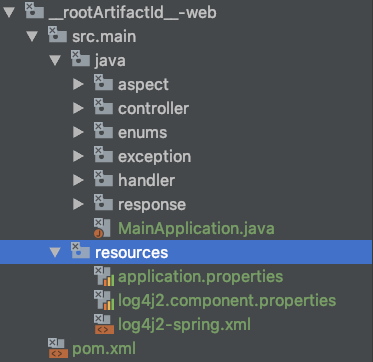
以web模块说明 就是一个简单的maven工程,里面写了使用archetype生成模板项目的类

2.1.4、archetype pom文件
主要打包用,远端发布,生成jar
三、主要技术框架以及应用
3.1、技术框架
DB【mysql】、ORM【mybatisplus】、Framework【springboot】、
3.2、主要结合
springboot与mybatisplus整合【代码生成器、分页、逻辑删除】参看 代码
log4j2整合【定时删除】参看 代码
统一响应【统一异常处理】
3.3、使用
3.3.1、下载maven pom
<dependency>
  <groupId>com.github.bjlhx15</groupId>
  <artifactId>maven-archetypes-webapp</artifactId>
  <version>0.0.1</version>
</dependency>
或者使用源码本地 mvn clean install -Dmaven.test.skip=true 安装到本地即可使用
3.3.2、使用自定义archetype初始化项目
mvn archetype:generate \
-DgroupId=com.aaa.test -DartifactId=test-demo -Dversion=1.0.0-SNAPSHOT \
-DarchetypeGroupId=com.github.bjlhx15 -DarchetypeArtifactId=maven-archetypes-webapp -DarchetypeVersion=0.0.1\
-X -DarchetypeCatalog=local -DinteractiveMode=false
参数说明
-DgroupId:组ID,默认项目的包名的组ID相同,也可以设置包名
-DartifactId:项目唯一标识符,即项目名称,maven会根据这个名称在当前目录下新建一个名为该名称的目录用于建立项目
-DarchetypeGroupId:脚手架maven-archetypes-webapp的组ID,值不需要进行修改,如 com.github.bjlhx15
-DarchetypeArtifactId:脚手架maven-archetypes-webapp的artifactId,值不需要进行改变,如 maven-archetypes-webapp
-DinteractiveMode=false 是否已交互模式进行,如果是false的话就会采用默认设置建立项目
3.3.3、使用生产的项目
1、修改参数配置
resources插件配置【默认开启】

            <!--  插件拷贝 资源文件 不必特殊标记 为source root-->
            <plugin>
                <groupId>org.apache.maven.plugins</groupId>
                <artifactId>maven-resources-plugin</artifactId>
                <configuration>
                    <encoding>UTF-8</encoding>
                    <!-- 对资源文件的过滤 过滤后缀为pem、pfx的证书文件 -->
                    <nonFilteredFileExtensions>
                        <nonFilteredFileExtension>pem</nonFilteredFileExtension>
                        <nonFilteredFileExtension>pfx</nonFilteredFileExtension>
                        <nonFilteredFileExtension>p12</nonFilteredFileExtension>
                    </nonFilteredFileExtensions>
                </configuration>
            </plugin>
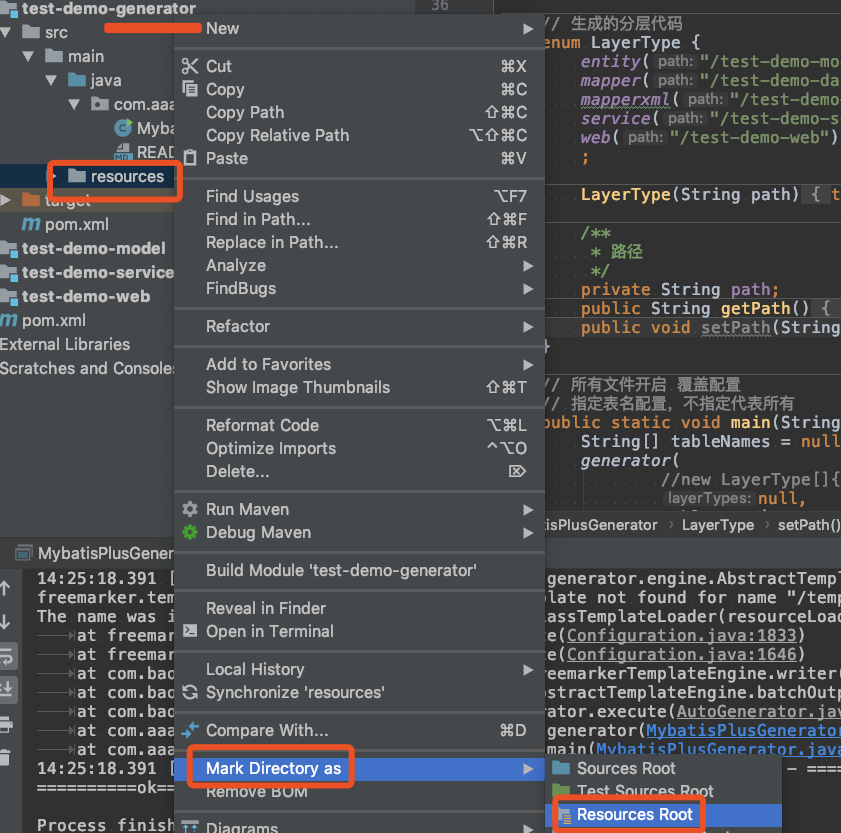
resources手工配置【上述不好用时候手工标记下即可】
配置resoueces:将XXXX-generator、以及XXXX-web等需要配置resources配置,步骤:resource文件件→右键→Make Directory as →Resources Root
默认使用插件配置,可以

其他配置
使用idea或其他工具打开项目,修改配置文件:resource文件夹下的配置文件,该文件夹下有application.properties ,log4j2.component.properties,log4j2-spring.xml 等配置文件
修改数据库配置、mybatis包别名配置,日志存储配置等。
2、代码生成
运行 MybatisPlusGenerator 中main方法生产 各层代码
3、启动项目即可
访问地址:http://localhost:8081/test/hello


