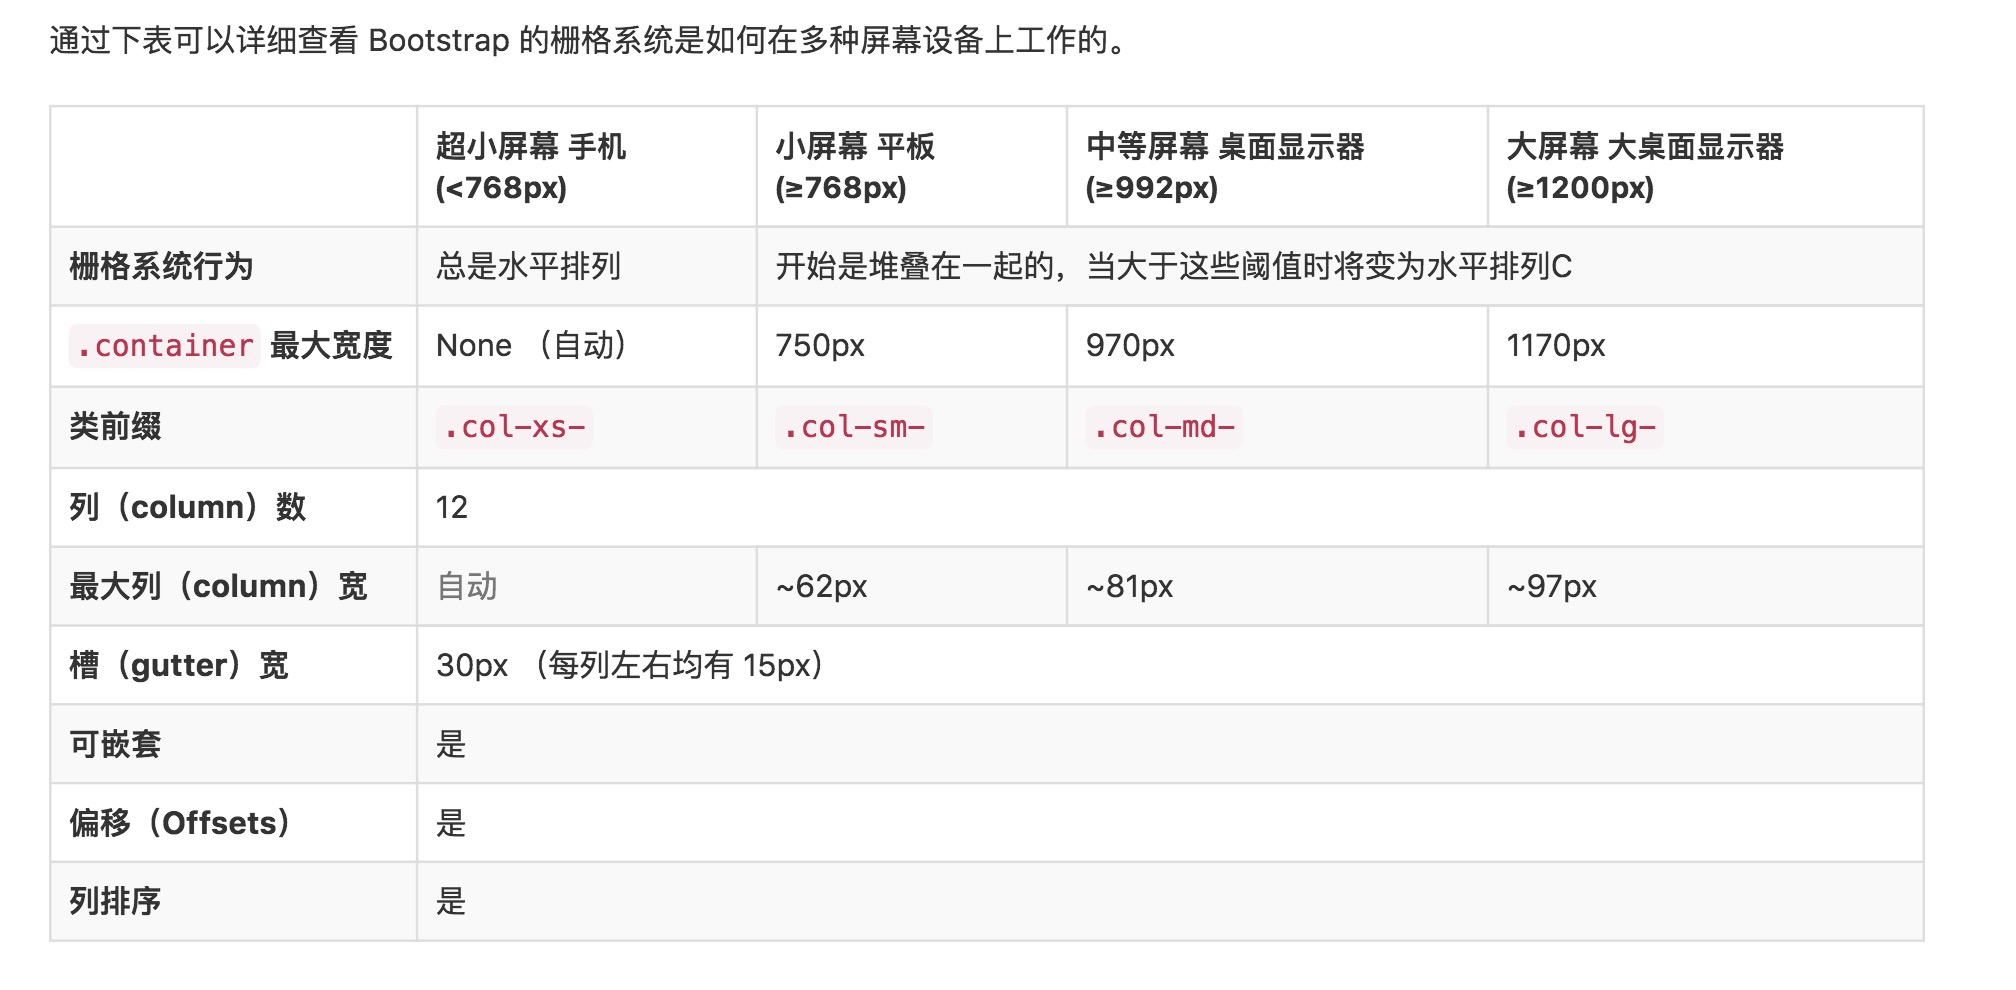
Bootstrap
1、Bootstrap的介绍和响应式
Bootstrap,来自 Twitter,是目前最受欢迎的前端框架。Bootstrap 是基于 HTML、CSS、javascript 的,它简洁灵活,使得 Web 开发更加快捷。
它用于开发响应式(自适应)布局、移动设备优先的 WEB 项目。
CSS3 的 @media 查询
定义和使用
使用 @media 查询,你可以针对不同的屏幕大小定义不同的样式。 @media 可以针对不同的屏幕尺寸设置不同的样式,特别是如果你需要设置设计响应式的页面,@media 是非常有用的。 当你重置浏览器大小的过程中,页面也会根据浏览器的宽度和高度重新渲染页面,这对调试来说是一个极大的便利。
CSS 语法:
@media mediaType and|not|only (media feature) {
     /*CSS-Code;*/
}
媒体类型(mediaType ) 类型有很多,在这里不一一列出来了,只列出了常用的几个。
all 用于所有设备、print 用于打印机和打印预览、 screen 用于电脑屏幕,平板电脑,智能手机等。(最常用) speech 应用于屏幕阅读器等发声设备 媒体功能(media feature) 媒体功能也有很多,以下列出常用的几个
值 描述
max-width:定义输出设备中的页面最大可见区域宽度;min-width:定义输出设备中的页面最小可见区域宽度
开始编写响应式页面
编写之前呢,有几个要准备的工作
准备工作1:设置Meta标签
首先我们在使用 @media 的时候需要先设置下面这段代码,来兼容移动设备的展示效果:
<meta name="viewport" content="width=device-width, initial-scale=1.0, user-scalable=no">
这段代码的几个参数解释:
width = device-width:宽度等于当前设备的宽度 ;initial-scale:初始的缩放比例(默认设置为1.0,即代表不缩放)
user-scalable:用户是否可以手动缩放(默认设置为no,因为我们不希望用户放大缩小页面) 其他还有很多参数呢,想要了解的童鞋可以直接去百度
准备工作2:加载兼容文件JS
因为IE8既不支持HTML5也不支持CSS3 @media ,所以我们需要加载两个JS文件,来保证我们的代码实现兼容效果:
<!--[if lt IE 9]>
  <script src="https://oss.maxcdn.com/libs/html5shiv/3.7.0/html5shiv.js"></script>
  <script src="https://oss.maxcdn.com/libs/respond.js/1.3.0/respond.min.js"></script>
<![endif]-->
准备工作3:设置IE渲染方式默认为最高(可选) 现在有很多人的IE浏览器都升级到IE9以上了,所以这个时候就有又很多诡异的事情发生了,例如现在是IE9的浏览器,但是浏览器的文档模式却是IE8 为了防止这种情况,我们需要下面这段代码来让IE的文档渲染模式永远都是最新的
<meta http-equiv="X-UA-Compatible" content="IE=Edge,chrome=1">
这段代码后面加了一个chrome=1,如果用户的电脑里安装了 chrome,就可以让电脑里面的IE不管是哪个版本的都可以使用Webkit引擎及V8引擎进行排版及运算,如果没有安装,就显示IE最新的渲染模式。
代码实例
1、如果文档宽度小于等于 300px 则应用花括号内的样式——修改body的背景颜色(background-color):
@media screen and (max-width: 300px) {
    body {
        background-color:lightblue;
    }
}
从上面的代码可以看出,媒体类型是屏幕(screen),使用 一个 and 连接后面的媒体功能,这里写的是 max-width:300px ,也就是说,当屏幕的最大宽度 小于等于 300px 的时候,就应用花括号里面的样式。
2、当文档宽度大于等于300px 的时候显示的样式
@media screen and (min-width: 300px){
    body {
        background-color:lightblue;
    }
}
注意,这里的媒体功能使用的是 min-width 而不是 max-width,我已经标红高亮显示出来了。
3、当文档宽度大于等于 300px 并且小于等于500px ( width >=300 && width <=500)的时候显示的样式
@media screen and (min-width:300px) and (max-width:500px) {
    /* CSS 代码 */
}
注意,这里使用了两个 and ,用来连接 两个媒体功能,一个用于限制最小,一个用于限制最大。
※ 需要注意的地方(划重点)
1、通过灵活应用以上技巧,开发出一个响应式页面,还不是近在咫尺的感觉。
2、不要被 min-width 和 max-width 所迷惑,初学者很容易误以为 min-width 的意思是小于xxx的时候才应用,然而这就陷入误区了,其实它的意思是:当设置了 min-width 的时候,文档的宽度如果小于设置的值,就不会应用这个区块里的CSS样式,所以 min-width 它才能实现大于等于设置的值得时候,才会应用区块里的CSS样式,max-width 也是如此。
3、或者这样想想,先看代码,这句代码的意思是宽度大于等于 300px ,小于等于 500px ( width >=300 && width <=500)的时候应用样式
@media screen and (min-width:300px) and (max-width:500px) {
    /* CSS 代码 */
}
min-width:300px 的作用是当文档宽度不小于 300px 的时候就应用 {} 里的CSS代码块,即大于等于 300px,max-width:500px 的作用是当文档宽度不大于 500px 的时候就应用{} 里的CSS代码块,即小于等于 500px
2、Bootstrap的引入和使用
<!DOCTYPE html>
<html lang="zh-CN">
  <head>
    <meta charset="utf-8">
    <meta http-equiv="X-UA-Compatible" content="IE=edge">
    <!--视口设置,媒体查询-->
    <meta name="viewport" content="width=device-width, initial-scale=1">
    <!-- 上述3个meta标签*必须*放在最前面,任何其他内容都*必须*跟随其后! -->
    <title>Bootstrap 101 Template</title>

    <!-- Bootstrap -->
    <link href="./bootstrap-3.3.7/css/bootstrap.css" rel="stylesheet" type="text/css">

    <!-- HTML5 shim 和 Respond.js 是为了让 IE8 支持 HTML5 元素和媒体查询(media queries)功能 -->
    <!-- 警告:通过 file:// 协议(就是直接将 html 页面拖拽到浏览器中)访问页面时 Respond.js 不起作用 -->
    <!--[if lt IE 9]>
      <script src="https://cdn.jsdelivr.net/npm/html5shiv@3.7.3/dist/html5shiv.min.js"></script>
      <script src="https://cdn.jsdelivr.net/npm/respond.js@1.4.2/dest/respond.min.js"></script>
    <![endif]-->
  </head>
  <body>
    <div class="container">
      <h1>你好,世界!</h1>
    </div>
    <div class="container-fluid">
      <h1>你好,欢迎</h1>
    </div>

    <!-- jQuery (Bootstrap 的所有 JavaScript 插件都依赖 jQuery,所以必须放在前边) -->
    <!--<script src="https://cdn.jsdelivr.net/npm/jquery@1.12.4/dist/jquery.min.js"></script>-->
    <!-- 加载 Bootstrap 的所有 JavaScript 插件。你也可以根据需要只加载单个插件。 -->
    <!--<script src="https://cdn.jsdelivr.net/npm/bootstrap@3.3.7/dist/js/bootstrap.min.js"></script>-->
  </body>
</html>
栅格系统
<!DOCTYPE html>
<html lang="en">
<head>
    <meta charset="utf-8">
    <meta http-equiv="X-UA-Compatible" content="IE=edge">
    <!--视口设置,媒体查询-->
    <meta name="viewport" content="width=device-width, initial-scale=1">
    <!-- 上述3个meta标签*必须*放在最前面,任何其他内容都*必须*跟随其后! -->
    <title>Bootstrap 101 Template</title>

    <!-- Bootstrap -->
    <link href="./bootstrap-3.3.7/css/bootstrap.css" rel="stylesheet" type="text/css">
    <style type="text/css">

    </style>
</head>
<body>
    <div class="container">
        <div class="row">
            <div class="col-lg-3 col-md-4 col-sm-6">
                 <div class="thumbnail" style="height: 336px">
                    Bootstrap 利用 Autoprefixer 自动为 某些 CSS 属性添加针对特定厂商的前缀。如果你是从 Less/Sass 源码编译
                    Bootstrap 的,并且没有使用 Bootstrap 自带的 Gruntfile 文件,那你就必须将 Autoprefixer 集成到你的编译工
                    具和编译过程中。如果你使用的是我们预先编译好的 Bootstrap 文件或者使用的是我们提供的 Gruntfile 文件,那
                    就无需操心了,我们已经将这些工作替你搞定了。
               </div>
            </div>
            <div class="col-lg-3 col-md-4 col-sm-6">
                 <div class="thumbnail" style="height: 336px">
                    Bootstrap 利用 Autoprefixer 自动为 某些 CSS 属性添加针对特定厂商的前缀。如果你是从 Less/Sass 源码编译
                    Bootstrap 的,并且没有使用 Bootstrap 自带的 Gruntfile 文件,那你就必须将 Autoprefixer 集成到你的编译工
                    具和编译过程中。如果你使用的是我们预先编译好的 Bootstrap 文件或者使用的是我们提供的 Gruntfile 文件,那
                    就无需操心了,我们已经将这些工作替你搞定了。
               </div>
            </div>
             <div class="col-lg-3 col-md-4 col-sm-6">
                 <div class="thumbnail" style="height: 336px">
                    Bootstrap 利用 Autoprefixer 自动为 某些 CSS 属性添加针对特定厂商的前缀。如果你是从 Less/Sass 源码编译
                    Bootstrap 的,并且没有使用 Bootstrap 自带的 Gruntfile 文件,那你就必须将 Autoprefixer 集成到你的编译工
                    具和编译过程中。如果你使用的是我们预先编译好的 Bootstrap 文件或者使用的是我们提供的 Gruntfile 文件,那
                    就无需操心了,我们已经将这些工作替你搞定了。
               </div>
            </div>
             <div class="col-lg-3 col-md-4 col-sm-6">
                 <div class="thumbnail" style="height: 336px">
                    Bootstrap 利用 Autoprefixer 自动为 某些 CSS 属性添加针对特定厂商的前缀。如果你是从 Less/Sass 源码编译
                    Bootstrap 的,并且没有使用 Bootstrap 自带的 Gruntfile 文件,那你就必须将 Autoprefixer 集成到你的编译工
                    具和编译过程中。如果你使用的是我们预先编译好的 Bootstrap 文件或者使用的是我们提供的 Gruntfile 文件,那
                    就无需操心了,我们已经将这些工作替你搞定了。
               </div>
            </div>
        </div>
    </div>
</body>
</html>

<!DOCTYPE html>
<html lang="en">
<head>
    <meta charset="utf-8">
    <!--以最高的ie浏览器渲染-->
    <meta http-equiv="X-UA-Compatible" content="IE=edge">

    <!--视口的设置  移动设备优先 支持移动端 在多个设备上适应  PC iphone 安卓等-->
    <meta name="viewport" content="width=device-width, initial-scale=1">
    <!-- 上述3个meta标签*必须*放在最前面,任何其他内容都*必须*跟随其后! -->
    <title>LuffyCity</title>

    <!-- Bootstrap 必须引入Bootstrap -->
    <!--<link href="https://cdn.bootcss.com/bootstrap/3.3.7/css/bootstrap.min.css" rel="stylesheet">-->

    <link rel="stylesheet" type="text/css" href="bootstrap-3.3.7/css/bootstrap.min.css"/>
    <style type="text/css">
        /*不要随意修改Bootstrap提供出来的系统类*/
        [class^='col']{
            border: 1px solid gray;
        }
    </style>

</head>
<body>
<!--固定宽度容器 .container-->

<div class="container">
    <h1>栅格系统</h1>

    <!--一行-->
    <div class="row">
        <div class="col-lg-2 col-md-4 col-sm-6 col-xs-12">
            Bootstrap 需要为页面内容和栅格系统包裹一个 .container 容器。我们提供了两个作此用处的类。注意,由于 padding 等属性的原因,这两种 容器类不能互相嵌套
        </div>
        <div class="col-lg-2 col-md-4 col-sm-6 col-xs-12">
            Bootstrap 需要为页面内容和栅格系统包裹一个 .container 容器。我们提供了两个作此用处的类。注意,由于 padding 等属性的原因,这两种 容器类不能互相嵌套
        </div>
        <div class="col-lg-2 col-md-4 col-sm-6 col-xs-12">
            Bootstrap 需要为页面内容和栅格系统包裹一个 .container 容器。我们提供了两个作此用处的类。注意,由于 padding 等属性的原因,这两种 容器类不能互相嵌套
        </div>
        <div class="col-lg-2 col-md-4 col-sm-6 col-xs-12">
            Bootstrap 需要为页面内容和栅格系统包裹一个 .container 容器。我们提供了两个作此用处的类。注意,由于 padding 等属性的原因,这两种 容器类不能互相嵌套
        </div>
        <div class="col-lg-2 col-md-4 col-sm-6 col-xs-12">
            Bootstrap 需要为页面内容和栅格系统包裹一个 .container 容器。我们提供了两个作此用处的类。注意,由于 padding 等属性的原因,这两种 容器类不能互相嵌套
        </div>
        <div class="col-lg-2 col-md-4 col-sm-6 col-xs-12">
            Bootstrap 需要为页面内容和栅格系统包裹一个 .container 容器。我们提供了两个作此用处的类。注意,由于 padding 等属性的原因,这两种 容器类不能互相嵌套
        </div>
    </div>


</div>

</body>
</html>
3、Bootstrap的css全局样式
在标题内还可以包含 <small> 标签或赋予 .small 类的元素,可以用来标记副标题。
Bootstrap 将全局 font-size 设置为 14px,line-height 设置为 1.428。这些属性直接赋予 <body> 元素和所有段落元素。另外,<p> (段落)元素还被设置了等于 1/2 行高(即 10px)的底部外边距(margin)。
<!DOCTYPE html>
<html lang="en">
<head>
    <meta charset="UTF-8">
    <!--以最高的ie浏览器渲染-->
    <meta http-equiv="X-UA-Compatible" content="IE=edge">

    <!--视口的设置  移动设备优先 支持移动端 在多个设备上适应  PC iphone 安卓等-->
    <meta name="viewport" content="width=device-width, initial-scale=1">
    <!-- 上述3个meta标签*必须*放在最前面,任何其他内容都*必须*跟随其后! -->
    <title>LuffyCity</title>

    <!-- Bootstrap 必须引入Bootstrap -->
    <!--<link href="https://cdn.bootcss.com/bootstrap/3.3.7/css/bootstrap.min.css" rel="stylesheet">-->

    <link rel="stylesheet" type="text/css" href="bootstrap-3.3.7/css/bootstrap.min.css" />
    <style type="text/css">
        /*不要随意修改Bootstrap提供出来的系统类*/

        [class^='col'] {
            border: 1px solid gray;
        }
    </style>

</head>
<body>
    <div class="container">
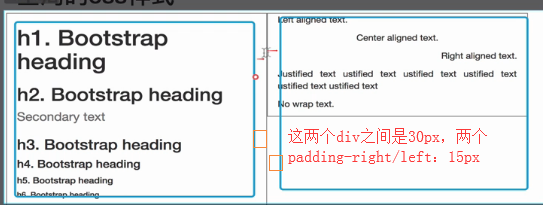
        <h1>全局的css样式</h1>
            <!--行-->
        <div class="row">
            <div class="col-md-4">
                <h1>h1. Bootstrap heading</h1>
                <h2>h2. Bootstrap heading <small>Secondary text</small></h2>
                <h3>h3. Bootstrap heading</h3>
                <h4>h4. Bootstrap heading</h4>
                <h5>h5. Bootstrap heading</h5>
                <h6>h6. Bootstrap heading</h6>

                <p>我是<span class="lead">页面</span>主题</p>
            </div>
        </div>

        <div class="col-md-4">
            <p class="text-left">Left aligned text.</p>
            <p class="text-center">Center aligned text.</p>
            <p class="text-right">Right aligned text.</p>
            <p class="text-justify">Justified text ustified text ustified text ustified text ustified text ustified text</p>
            <p class="text-nowrap">No wrap text.</p>    <!--nowrap是不对齐;  Justified是左右两边顶头,中间对齐; -->

            <p class="text-lowercase">Lowercased text.</p>
            <p class="text-uppercase">Uppercased text.</p>
            <p class="text-capitalize">capitalized text.</p>
        </div>

        <div class="col-md-4">

            <!--响应式的表格-->
            <div class="table-responsive">

                <table class="table table-striped table-bordered table-hover">
                    <thead>
                    <tr>
                        <th>#</th>
                        <th>姓名</th>
                        <th>年龄</th>
                        <th>身高</th>

                    </tr>
                    </thead>
                    <tbody>
                    <tr class="success">
                        <td>1</td>
                        <td>小马哥小马哥小马哥小马哥小马哥小马哥小马哥小马哥小马哥小马哥小马哥小马哥小马哥小马哥</td>
                        <td>18</td>
                        <td>180</td>
                    </tr>
                    <tr class="danger">
                        <td>2</td>
                        <td>小马哥</td>
                        <td>18</td>
                        <td>180</td>
                    </tr>
                    <tr class="info">
                        <td>3</td>
                        <td>小马哥</td>
                        <td>18</td>
                        <td>180</td>
                    </tr>
                    <tr>
                        <td>4</td>
                        <td>小马哥</td>
                        <td>18</td>
                        <td>180</td>
                    </tr>
                    </tbody>
                </table>
            </div>
        </div>

    </div>
</body>
</html>

表单、按钮
<!DOCTYPE html>
<html lang="en">
<head>
    <meta charset="UTF-8">
    <!--以最高的ie浏览器渲染-->
    <meta http-equiv="X-UA-Compatible" content="IE=edge">

    <!--视口的设置  移动设备优先 支持移动端 在多个设备上适应  PC iphone 安卓等-->
    <meta name="viewport" content="width=device-width, initial-scale=1">
    <!-- 上述3个meta标签*必须*放在最前面,任何其他内容都*必须*跟随其后! -->
    <title>LuffyCity</title>

    <!-- Bootstrap 必须引入Bootstrap -->
    <!--<link href="https://cdn.bootcss.com/bootstrap/3.3.7/css/bootstrap.min.css" rel="stylesheet">-->

    <link rel="stylesheet" type="text/css" href="bootstrap-3.3.7/css/bootstrap.min.css" />
    <style type="text/css">
        /*不要随意修改Bootstrap提供出来的系统类*/

        [class^='col'] {
            border: 1px solid gray;
        }
    </style>
</head>
<body>
    <div class="container">

        <div class="row">
            <div class="col-md-6">
                <form >
                    <div class="form-group">
                        <!--隐藏当前元素  用户名没了-->
                        <label for="username" class="sr-only">用户名</label>
                        <input type="text" class="form-control" id="username" placeholder="用户名">
                    </div>
                    <div class="form-group">
                        <label for="pwd">密码</label>
                        <input type="password" class="form-control" id="pwd" placeholder="密码">
                    </div>

                    <button type="submit" class="btn btn-success">登录</button>  <!--按钮样式 btn-success;btn-info-->
                    <button type="submit" class="btn btn-info">注册</button>
                </form>
            </div>


            <div class="col-md-6">
                <form class="">
                    <div class="form-group">
                        <!--隐藏了-->
                        <label class="sr-only" for="exampleInputAmount">Amount (in dollars)</label>
                        <div class="input-group">  <!--表单的组-->
                            <div class="input-group-addon"><span class="glyphicon glyphicon-yen"></span></div>  <!--调用它的图标 ;在组件里边;还有阿里巴巴矢量图标库-->
                            <input type="text" class="form-control" id="exampleInputAmount" placeholder="Amount">
                            <div class="input-group-addon">.00</div>
                        </div>
                    </div>
                    <button type="submit" class="btn btn-primary">Transfer cash</button>
                </form>
            </div>
        </div>

    </div>
</body>


</html>

表单
<!DOCTYPE html>
<html lang="en">
<head>
    <meta charset="utf-8">
    <meta http-equiv="X-UA-Compatible" content="IE=edge">
    <!--视口设置,媒体查询-->
    <meta name="viewport" content="width=device-width, initial-scale=1">
    <!-- 上述3个meta标签*必须*放在最前面,任何其他内容都*必须*跟随其后! -->
    <title>Bootstrap 101 Template</title>

    <!-- Bootstrap -->
    <link href="./bootstrap-3.3.7/css/bootstrap.css" rel="stylesheet" type="text/css">
    <style type="text/css">

    </style>
</head>
<body>
    <div class="container">
        <div class="row">
            <div class="col-md-4">
                <div class="thumbnail" style="height: 336px">

                </div>
            </div>
            <div class="col-md-4">
                <div class="thumbnail" style="height: 336px">
                    <form>
                          <div class="form-group">
                              <label for="user">用户名</label>
                              <input type="user" class="form-control" id="user" placeholder="请输入用户名">
                          </div>
                          <div class="form-group">
                              <label for="pwd">密码</label>
                              <input type="pwd" class="form-control" id="pwd" placeholder="请输入密码">
                          </div>
                          <div class="form-group">
                              <label for="exampleInputFile">上传文件</label>
                              <input type="file" id="exampleInputFile">
                              <p class="help-block">Example block-level help text here.</p>
                          </div>
                          <div class="checkbox">
                              <label>
                                  <input type="checkbox"> 已阅读
                              </label>
                          </div>
                          <button type="submit" class="btn btn-default">提交</button>
                          <button type="submit" class="btn btn-danger">提交</button>
                          <button type="submit" class="btn btn-success">提交</button>
                          <button type="submit" class="btn btn-info">提交</button>
                          <button type="submit" class="btn btn-warning">提交</button>
                    </form>
                </div>
            </div>
        </div>
    </div>
</body>
</html>
4、组件
<!DOCTYPE html>
<html lang="en">
<head>
    <meta charset="utf-8">
    <meta http-equiv="X-UA-Compatible" content="IE=edge">
    <!--视口设置,媒体查询-->
    <meta name="viewport" content="width=device-width, initial-scale=1">
    <!-- 上述3个meta标签*必须*放在最前面,任何其他内容都*必须*跟随其后! -->
    <title>路飞学城</title>

    <!-- Bootstrap -->
    <link href="./bootstrap-3.3.7/css/bootstrap.css" rel="stylesheet" type="text/css">
    <style type="text/css">
        body { padding-top: 70px; }
    </style>
</head>
<body style="height:2000px">
    <!--导航-->
    <nav class="navbar navbar-default navbar-fixed-top">
      <div class="container-fluid">

        <!-- Brand and toggle get grouped for better mobile display -->
        <div class="navbar-header">
          <button type="button" class="navbar-toggle collapsed" data-toggle="collapse" data-target="#bs-example-navbar-collapse-1" aria-expanded="false">
            <span class="sr-only">Toggle navigation</span>
            <span class="icon-bar"></span>
            <span class="icon-bar"></span>
            <span class="icon-bar"></span>
          </button>
          <a class="navbar-brand" href="#">路飞学城</a>
        </div>

        <!-- Collect the nav links, forms, and other content for toggling -->
        <div class="collapse navbar-collapse" id="bs-example-navbar-collapse-1">
          <ul class="nav navbar-nav">
            <li class="active">
                <a href="#">
                    首页
                    <!--sr-only隐藏元素-->
                    <span class="sr-only">(current)</span>
                </a>
            </li>
            <li><a href="#">免费课程</a></li>
            <li><a href="#">轻课</a></li>
            <li><a href="#">学位课</a></li>
          </ul>
          <form class="navbar-form navbar-right">
            <div class="form-group">
              <input type="text" class="form-control" placeholder="Search">
            </div>
            <button type="submit" class="btn btn-default">
                <span class="glyphicon glyphicon-search"></span>
            </button>
          </form>
          <ul class="nav navbar-nav navbar-right">

            <li class="dropdown">
              <a href="#" class="dropdown-toggle" data-toggle="dropdown" role="button" aria-haspopup="true" aria-expanded="false">alex <span class="caret"></span></a>
              <ul class="dropdown-menu">
                <li><a href="#">我的账户</a></li>
                <li><a href="#">我的订单</a></li>
                <li><a href="#">我的优惠券</a></li>
                <li role="separator" class="divider"></li>
                <li><a href="#">退出</a></li>
              </ul>
            </li>
          </ul>
        </div><!-- /.navbar-collapse -->
      </div><!-- /.container-fluid -->
    </nav>
    <div class="container">
        <div class="row">
            <div class="col-md-4">
                <div class="panel panel-default">
                    <div class="panel-heading">
                        <h3 class="panel-title">下拉菜单</h3>
                    </div>
                    <div class="panel-body">
                        <div class="dropdown">
                            <!--在bootstrap中,凡是看到data-xxx的属性说明与js有很大关联-->
                            <button class="btn btn-default dropdown-toggle" type="button" id="dropdownMenu1" data-toggle="dropdown" aria-haspopup="true" aria-expanded="true">
                                Dropdown
                            <span class="caret"></span>
                            </button>
                            <ul class="dropdown-menu" aria-labelledby="dropdownMenu1">
                                <li><a href="#">Action</a></li>
                                <li><a href="#">Another action</a></li>
                                <li class="disabled"><a href="#">Disabled link</a></li>
                                <li><a href="#">Something else here</a></li>
                                <li role="separator" class="divider"></li>
                                <li><a href="#">Separated link</a></li>
                            </ul>

                        </div>
                        <div class="btn-group" role="group" aria-label="...">
                              <button type="button" class="btn btn-default">Left</button>
                              <button type="button" class="btn btn-default">Middle</button>
                              <button type="button" class="btn btn-default">Right</button>
                        </div>
                    </div>
                </div>
            </div>
        </div>
    </div>
    <div>

    </div>
    <script src="https://cdn.bootcss.com/jquery/1.12.4/jquery.min.js"></script>
    <script src="./bootstrap-3.3.7/js/bootstrap.min.js"></script>
</body>
</html>
做图标的网站:阿里巴巴矢量图标库http://iconfont.cn/home/index?spm=a313x.7781069.1998910419.2 、bootstrap里边的图标
做图表的网站 http://echarts.baidu.com/ http://www.chartjs.org/ https://www.hcharts.cn/demo/highcharts/


