DOM元素
事件概述
HTML 事件的例子:
- 当用户点击鼠标时
- 当网页已加载时
- 当图片已加载时
- 当鼠标移动到元素上时
- 当输入字段被改变时
- 当 HTML 表单被提交时
- 当用户触发按键时
JavaScript 使我们有能力创建动态页面,而事件是可以被 JavaScript 侦测到的行为。
简单理解: 触发--- 响应机制。
网页中的每个元素都可以产生某些可以触发 JavaScript 的事件,例如,我们可以在用户点击某按钮时产生一个事件,然后去执行某些操作。
事件三要素
-
事件源 (谁)
-
事件类型 (什么事件)
-
事件处理程序 (做啥)
事件执行过程
- 获取事件源(按钮)
- 注册事件(绑定事件)
- 添加事件处理程序
常用事件类型

鼠标事件
| 属性 | 描述 | DOM |
|---|---|---|
| onclick | 当用户点击某个对象时调用的事件句柄。 | 2 |
| oncontextmenu | 在用户点击鼠标右键打开上下文菜单时触发 | |
| ondblclick | 当用户双击某个对象时调用的事件句柄。 | 2 |
| onmousedown | 鼠标按钮被按下。 | 2 |
| onmouseenter | 当鼠标指针移动到元素上时触发。 | 2 |
| onmouseleave | 当鼠标指针移出元素时触发 | 2 |
| onmousemove | 鼠标被移动。 | 2 |
| onmouseover | 鼠标移到某元素之上。 | 2 |
| onmouseout | 鼠标从某元素移开。 | 2 |
| onmouseup | 鼠标按键被松开。 |
键盘事件
| 属性 | 描述 | DOM |
|---|---|---|
| onkeydown | 某个键盘按键被按下。 | 2 |
| onkeypress | 某个键盘按键被按下并松开。 | 2 |
| onkeyup | 某个键盘按键被松开。 |
表单事件
| 属性 | 描述 | DOM |
|---|---|---|
| onblur | 元素失去焦点时触发 | 2 |
| onchange | 该事件在表单元素的内容改变时触发( <input>, <keygen>, <select>, 和 <textarea>) |
2 |
| onfocus | 元素获取焦点时触发 | 2 |
| onfocusin | 元素即将获取焦点时触发 | 2 |
| onfocusout | 元素即将失去焦点时触发 | 2 |
| oninput | 元素获取用户输入时触发 | 3 |
| onreset | 表单重置时触发 | 2 |
| onsearch | 用户向搜索域输入文本时触发 ( <input="search">) | |
| onselect | 用户选取文本时触发 ( <input> 和 <textarea>) |
2 |
| onsubmit | 表单提交时触发 |
元素操作
更改元素内容
element.innerText
从起始位置到终止位置的内容, 但它去除 html 标签, 同时空格和换行也会去掉
element.innerHTML(常用)
起始位置到终止位置的全部内容,包括 html 标签,同时保留空格和换行
操作元素属性
-
innerText、innerHTML 改变元素内容
-
src、href
-
id、alt、title
表单元素的属性操作
type、value、checked、selected、disabled
样式属性操作
我们可以通过 JS 修改元素的大小、颜色、位置等样式。
element.style  //行内样式操

element.className
<!--element.style-->
<head>
	<style>
        div {
            width: 200px;
            height: 200px;
            background-color: pink;
        }
    </style>
</head>

<body>
    <div></div>
    <script>
        // 1. 获取元素
        var div = document.querySelector('div');
        // 2. 注册事件 处理程序
        div.onclick = function() {
            // div.style里面的属性 采取驼峰命名法
            //this表示当前对象,即div
            this.style.backgroundColor = 'purple';
            this.style.width = '250px';
            //box.style.display = 'none'
        }
    </script>
</body>
注意:
- JS 里面的样式采取驼峰命名法 比如 fontSize、 backgroundColor
- JS 修改 style 样式操作,产生的是行内样式,CSS 权重比较高
<!--element.className-->
<head>
    <style>
        .first {
            width: 200px;
            height: 200px;
            background-color: pink;
        }

        .change {
            background-color: red;
        }

    </style>
</head>
<body>
    <div class="first">123</div>
    <input type="button" id="btn"></input>
    <script>
        let btn = document.getElementById('btn');
        let box = document.querySelector('.first')
        btn.onclick = function () {
            box.className = 'change'

              //若想同时包含多个样式
            box.className = 'change first'
        }
    </script>
</body>
案例
登录框显示/隐藏密码
<div id="box">
    <input type="password" id="pwd">
    <img src="images/close.png">
</div>
<script>
    //获取事件源
let input = document.getElementById('pwd');
let img = document.querySelector('img');

//注册事件:点击事件
//添加事件处理程序:1.切换输入框类型 2.切换图片
let flag = 0
img.onclick = function () {
    if(flag == 0){
        input.type = 'text'
        img.src = 'images/open.png'
        flag = 1
    } else {
        if(flag == 1){
            input.type = 'password'
            img.src = 'images/close.png'
            flag = 0
        }
    }
}
</script>
<style>
	#box {
            margin: 100px auto;
            position: relative;
            width: 400px;
            border-bottom: 1px solid #ccc ;
        }

        div input {
            width: 370px;
            height: 30px;
            border: 0;
            outline: none;
        }
        img {
            position: absolute;
            top: 2px;
            right: 2px;
            width: 24px;
        }
    </style>
开关灯
<script>
    var btn = document.getElementById('btn');
    var flag = 0;
    btn.onclick = function() {
        if (flag == 0) {
            document.body.style.backgroundColor = 'black';
            flag = 1;
        } else {
            document.body.style.backgroundColor = '#fff';
            flag = 0;
        }
    }
</script>
下拉菜单
 <style>
        * {
            margin: 0;
            padding: 0;
        }

        li {
            list-style-type: none;
        }

        a {
            text-decoration: none;
            font-size: 14px;
        }

        .nav {
            margin: 100px;
        }

        .nav>li {
            position: relative;
            float: left;
            width: 80px;
            height: 41px;
            text-align: center;
        }

        .nav li a {
            display: block;
            width: 100%;
            height: 100%;
            line-height: 41px;
            color: #333;
        }

        .nav>li>a:hover {
            background-color: #eee;
        }

        .nav ul {
            display: none;
            position: absolute;
            top: 41px;
            left: 0;
            width: 100%;
            border-left: 1px solid #FECC5B;
            border-right: 1px solid #FECC5B;
        }

        .nav ul li {
            border-bottom: 1px solid #FECC5B;
        }

        .nav ul li a:hover {
            background-color: #FFF5DA;
        }
    </style>
</head>

<body>
    <ul class="nav">
        <li>
            <a href="#">微博</a>
            <ul>
                <li>
                    <a href="">私信</a>
                </li>
                <li>
                    <a href="">评论</a>
                </li>
                <li>
                    <a href="">@我</a>
                </li>
            </ul>
        </li>
    </ul>
    <script>
        // 1. 获取元素
        var nav = document.querySelector('.nav');
        var lis = nav.children; // 得到4个小li
        // 2.循环注册事件
        for (var i = 0; i < lis.length; i++) {
            lis[i].onmouseover = function() {
                this.children[1].style.display = 'block';
            }
            lis[i].onmouseout = function() {
                this.children[1].style.display = 'none';
            }
        }
    </script>
</body>
全选
<body>
<div class="wrap">
    <table>
        <thead>
        <tr>
            <th>
                <input type="checkbox" id="j_cbAll" />
            </th>
            <th>商品</th>
            <th>价钱</th>
        </tr>
        </thead>
        <tbody id="j_tb">
        <tr>
            <td>
                <input type="checkbox" />
            </td>
            <td>iPhone8</td>
            <td>8000</td>
        </tr>
        <tr>
            <td>
                <input type="checkbox" />
            </td>
            <td>iPad Pro</td>
            <td>5000</td>
        </tr>
        <tr>
            <td>
                <input type="checkbox" />
            </td>
            <td>iPad Air</td>
            <td>2000</td>
        </tr>
        <tr>
            <td>
                <input type="checkbox" />
            </td>
            <td>Apple Watch</td>
            <td>2000</td>
        </tr>

        </tbody>
    </table>
</div>
<script>
    // 1. 全选和取消全选做法:  让下面所有复选框的checked属性(选中状态) 跟随 全选按钮即可
    // 获取元素
    let j_cbAll = document.getElementById('j_cbAll'); // 全选按钮
    let j_tbs = document.getElementById('j_tb').getElementsByTagName('input'); // 复选框
    // 注册事件
    j_cbAll.onclick = function() {
        // this.checked 它可以得到当前复选框的选中状态如果是true 就是选中,如果是false 就是未选中
        console.log(this.checked);
        for (let k of j_tbs) {
            k.checked = this.checked;
        }
    }
    // 2. 当所有复选框都选中时,全选框自动选中
    //逆向思维:只要有一个复选框未选中则全选框不选中
    for (let k of j_tbs) {
        k.onclick = function() {
            // flag 控制全选按钮是否选中
            let flag = true;
            // 每次点击下面的复选框都要循环检查者4个小按钮是否全被选中
            for (let k of j_tbs) {
                if (!k.checked) {
                    flag = false;
                    break; // 退出for循环 这样可以提高执行效率 因为只要有一个没有选中,剩下的就无需循环判断了
                }
            }
            j_cbAll.checked = flag;
        }
    }

</script>
</body>
排他思想
如果有一组相同元素,我们想要其中一个元素实现某种样式, 需要用到循环的排他思想算法:
-
所有元素全部清除样式(干掉其他人)
-
给当前元素设置样式 (留下我自己)
注意顺序不能颠倒
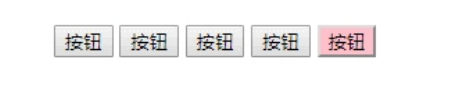
 <div>
        <input type="button" value="按钮">
        <input type="button" value="按钮">
        <input type="button" value="按钮">
        <input type="button" value="按钮">
        <input type="button" value="按钮">
    </div>

    <script>
        let btns = document.getElementsByTagName('input');

        for (let btn of btns) {
            btn.onclick = function () {
                //清空全部按钮样式
                for (let item of btns) {
                    item.style.backgroundColor = '#fff'
                }
                //设置选中按钮样式
                btn.style.backgroundColor = 'pink'
            }

        }
    </script>
自定义属性
获取属性的两种方法:
- element.属性 获取属性值。
- element.getAttribute('属性');
区别:
element.属性获取内置属性值(元素本身自带的属性)element.getAttribute(‘属性’)主要用于获取自定义的属性 (标准)
自定义属性常用操作
//获取属性
element.getAttribute('属性');

//设置属性值
element.setAttribute('属性', '值');

//移除属性
element.removeAttribute('属性')
注意:自定义属性一般格式为
data-
案例:导航栏切换(重点)
鼠标点击时内容跟着切换
<head>
<meta charset="UTF-8">
<title>导航栏</title>
<style>
* {
margin: 0;
padding: 0;
}
li {
list-style-type: none;
}
.nav {
width: 978px;
margin: 100px auto;
}
.nav_list {
height: 39px;
border: 1px solid #ccc;
background-color: #f1f1f1;
}
.nav_list li {
float: left;
height: 39px;
line-height: 39px;
padding: 0 20px;
text-align: center;
cursor: pointer;
}
.nav .current {
background-color: #c81623;
color: #fff;
}
.item_info {
padding: 20px 0 0 20px;
}
.item {
display: none;
}
</style>
</head>
<body>
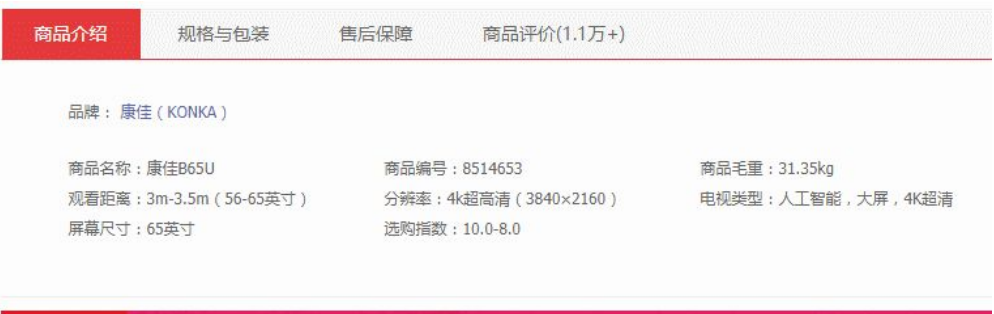
<div class="nav">
<div class="nav_list">
<ul>
<li class="current">商品介绍</li>
<li>规格与包装</li>
<li>售后保障</li>
<li>商品评价(50000)</li>
<li>手机社区</li>
</ul>
</div>
<div class="nav_con">
<div class="item" style="display: block;">
商品介绍模块内容
</div>
<div class="item">
规格与包装模块内容
</div>
<div class="item">
售后保障模块内容
</div>
<div class="item">
商品评价(50000)模块内容
</div>
<div class="item">
手机社区模块内容
</div>
</div>
</div>
<script>
// 获取元素
let tab_list = document.querySelector('.nav_list');
let lis = tab_list.querySelectorAll('li');
let items = document.querySelectorAll('.item');
for(let i in lis) {
lis[i].onclick = function () {
//1.设置选中导航栏样式
//所有导航栏样式清空,排他思想
for (let j of lis) {
j.className = ''
}
//设置选中的导航栏样式
lis[i].className = 'current'
//2.切换内容
//设置自定义属性data-index用于标记选中的选项
lis[i].setAttribute('data-index',i)
let index = lis[i].getAttribute('data-index');
console.log(index);
//隐藏所有导航栏内容,排他思想
for (let item of items) {
item.style.display = 'none'
}
//展示选中导航栏内容
items[index].style.display = 'block'
}
}
</script>
</body>
分析:
① Tab栏切换有2个大的模块:列表选项模块和内容模块
② 列表选项卡,点击时变色,其余不变(排他思想),修改类名的方式
③内容模块,跟随上面的选项卡变化。所以写到点击事件里面。
④ 规律:下面的模块显示内容和上面的选项卡一一对应,相匹配。
⑤ 核心思路: 给上面的nav_list 里面的所有小li 添加自定义属性,属性值从0开始编号。
⑥ 当我们点击nav_list 里面的某个小li,让nav_con 里面对应序号的 内容显示,其余隐藏(排他思想)