SpringBoot04-web
简介
- 使用SpringBoot三部曲
- 创建SpringBoot应用, 选中我们需要的模块.
- SpringBoot已经默认将这些场景配置好了, 只需要在配置文件中指定少量配置就能运行.
- 编写业务代码.
- xxxAutoConfiguration: 帮我们给容器中自动配置组件.
- xxxProperties: 配置类来封装配置文件的内容.
SpringBoot对静态资源的映射规则
- ResourceProperties类中设置和静态资源有关的参数, 如缓存参数.
@ConfigurationProperties( prefix = "spring.resources", ignoreUnknownFields = false ) public class ResourceProperties { private static final String[] CLASSPATH_RESOURCE_LOCATIONS = new String[]{"classpath:/META-INF/resources/",
"classpath:/resources/", "classpath:/static/", "classpath:/public/"}; ...... - WebMvcAutoConfiguration类中有指出
- addResourceHandlers()
public void addResourceHandlers(ResourceHandlerRegistry registry) {
            if (!this.resourceProperties.isAddMappings()) {
                logger.debug("Default resource handling disabled");
            } else {
                Duration cachePeriod = this.resourceProperties.getCache().getPeriod();
                CacheControl cacheControl = this.resourceProperties.getCache().getCachecontrol().toHttpCacheControl();
                if (!registry.hasMappingForPattern("/webjars/**")) {
                    this.customizeResourceHandlerRegistration(registry.addResourceHandler(new String[]{"/webjars/**"})
                       .addResourceLocations(new String[]{"classpath:/META-INF/resources/webjars/"})
                        .setCachePeriod(this.getSeconds(cachePeriod)).setCacheControl(cacheControl));
                }

                String staticPathPattern = this.mvcProperties.getStaticPathPattern();
                if (!registry.hasMappingForPattern(staticPathPattern)) {
                    this.customizeResourceHandlerRegistration(registry.addResourceHandler(new String[]{staticPathPattern})
                        .addResourceLocations(WebMvcAutoConfiguration.getResourceLocations(this.resourceProperties.getStaticLocations()))
                        .setCachePeriod(this.getSeconds(cachePeriod)).setCacheControl(cacheControl));
                }
            }
        }
- 所有的/webjars/**访问, 都会去classpath:/META-INF/resources/webjars/目录下找资源.
- webjars: 以jar包的方式引入静态资源
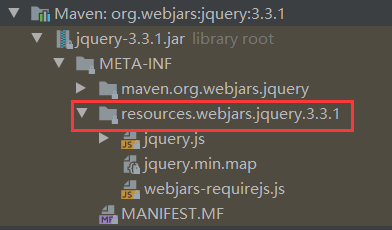
- localhost:8080/webjars/jquery/3.3.1/jquery.js
- 默认静态资源路径
"classpath:/META‐INF/resources/", "classpath:/resources/", "classpath:/static/", "classpath:/public/" "/":当前项目的根路径- 举例: localhost:8080/aaa.jpg -> 会去静态资源文件夹里找aaa.jpg
- 所有的/webjars/**访问, 都会去classpath:/META-INF/resources/webjars/目录下找资源.
- 欢迎页: 静态资源下所有的index.html页面, 会被/**映射
WelcomePageHandlerMapping(TemplateAvailabilityProviders templateAvailabilityProviders, ApplicationContext applicationContext,
Optional<Resource> welcomePage, String staticPathPattern) { if (welcomePage.isPresent() && "/**".equals(staticPathPattern)) { logger.info("Adding welcome page: " + welcomePage.get()); this.setRootViewName("forward:index.html"); } else if (this.welcomeTemplateExists(templateAvailabilityProviders, applicationContext)) { logger.info("Adding welcome page template: index"); this.setRootViewName("index"); } }- 如localhost:8080/ 会去找静态资源中的index.html
- 配置喜欢的图标:
- 所有的 **/favicon.ico 都是在静态资源文件下找
- 当然, 我们是可以自己设置静态资源文件夹的
spring.resources.static-locations=classpath:/hello/, classpath:/aaa/

#这样, 原本默认的静态资源文件夹将不能被访问
模板引擎
- 有JSP、Velocity、Freemarker、Thymeleaf.
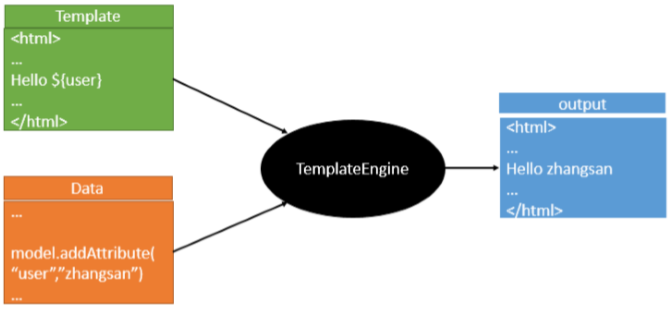
- 原理
- SpringBoot推荐我们使用thymeleaf, 其语法更简单, 功能也更强大.
- 引入thymeleaf
<dependency>
    <groupId>org.springframework.boot</groupId>
    <artifactId>spring-boot-starter-thymeleaf</artifactId>
</dependency>
- thymeleaf使用规则
public class ThymeleafProperties {
    private static final Charset DEFAULT_ENCODING;
    public static final String DEFAULT_PREFIX = "classpath:/templates/";
    public static final String DEFAULT_SUFFIX = ".html";
    private boolean checkTemplate = true;
    private boolean checkTemplateLocation = true;
    private String prefix = "classpath:/templates/";
    private String suffix = ".html";
......
- 只需要我们把html页面放在classpath:/templates/中, thymeleaf就能自动渲染了.
- 使用
- 导入名称空间
<html lang="en" xmlns:th="http://www.thymeleaf.org">
- 使用
<h1>SUCCESS</h1>
    <!-- th:text 将div里的文本内容设置为指定值 -->
    <div th:text="${hello}">
        显示欢迎信息
    </div>
- 导入名称空间
thymeleaf的语法
- 修改标签文本值
<!-- 服务器解析thymeleaf代码, 会读取th:text属性值, 替换原本标签体的值 -->
<p th:text="经过服务器可见">直接在浏览器上可见</p>
- 修改指定属性值
<input value="old-value" th:value="new-value">

<div style="background-color: yellow" th:style="background-color: green"></div>
- 在表达式中访问属性域
- controller方法
@Controller
public class Test {

    @Autowired
    private ServletContext servletContext;

    @RequestMapping("/themeleaf")
    public String test(ModelMap modelMap, HttpSession session) {

        //存入请求域
        modelMap.addAttribute("requestScope", "xxx");
        //存入会话域
        session.setAttribute("sessionScope", "xxx");
        //存入应用域
        servletContext.setAttribute("appScope", "xxx");

        return "hello";
    }
}
- 页面
<p th:text="${requestScope}"></p>

<p th:text="${session.sessionScope}"></p>

<p th:text="${application.appScope}"></p>
- controller方法
- 解析URL地址
- @{}的作用是把根路径的值附加到指定的地址前
<p th:text="@{/aaa/bbb/ccc}"> </p>

<a href="../aaa/bbb/ccc.html" th:href="@{/aaa/bbb/ccc.html}"> </a>
- @{}的作用是把根路径的值附加到指定的地址前
- 直接执行表达式
- 不在thymeleaf属性中用, 直接使用
- [[ ]]: 有转义效果
- [( )]: 无转义效果
- 条件判断
<p th:if="${not #strings.isEmpty(requestScope)}">xxx</p>

~<p th:if="${#strings.isEmpty(requestScope)}">xxx</p>
- 遍历集合
<!-- 使用th:each进行集合数据迭代 -->
<!-- th:each="声明遍历: ${集合}"  -->
<!-- th:each用在哪个标签上, 哪个标签就多次出现 -->
<div>
    <p th:text="${str}" th:each="str: ${list}" ></p>
</div>
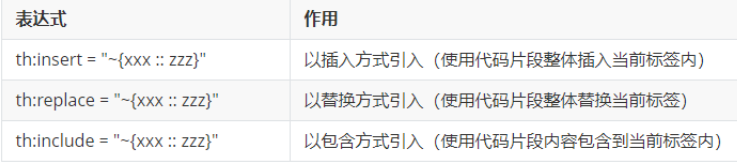
- 包含其他模板文件
- templates/aaa.html中
<div th:fragment="Part1">
    <p>will be include content 1</p>
</div>
- 主页面
<!-- :: 左边的值拼接前后缀后必须能找到要包含的文件 -->
<!-- :: 右边的值是代码片段的名字 -->
<div th:insert="~{aaa :: Part1}
- 三种插入代码片段方式
- templates/aaa.html中
- 国际化
- ##################
SpringMVC自动配置
- SpringBoot对SpringMVC提供自动配置, 是在Spring默认配置上, 添加了以下功能. 包括ContentNegotiatingViewResolver和BeanNameViewResolver.(Bean)
- ContentNegotiatingViewResolver执行其内部initServletContext()初始化方法. 从BeanFactoryUtils中获取全部ViewResolver.
- 当一个请求进来时, 调用ContentNegotiatingViewResolver下的resolveViewName()方法根据方法的返回值得到视图对象(View), 并返回bestView, 主要包括beanName参数,即对应渲染的(比如:html)文件名称.
- 支持提供静态资源,包括对WebJars的支持.
- 自动注册Converter,GenericConverter和Formatter
- Converter: 转换器.
- Formatter: 格式化器.
- 支持HttpMessageConverters
- HttpMessageConverter: SpringMVC用来转换Http请求和响应的(User -> json)
- HttpMessageConverters: 是从容器中确定; 获取所有的HttpMessageConverter.
- 自动注册MessageCodesResolver
- 定义错误代码生成规则.
- 静态 index.html 页面支持
- 自定义Favicon支持.
- 自动使用ConfigurableWebBindingInitializer
- 我们可以配置一个ConfigurableWebBindingInitializer来替换默认的(要添加到容器中).
定制web扩展配置
- 扩展SpringMVC: 编写一个配置类@Configuration, 要实现WebMvcConfigurer接口, 但不能标注@EnableWebMvc.
- 即保留了所有的自动配置, 也能用扩展配置.
//使用WebMvcConfigurer可以扩展SpringMVC的功能
@Configuration
public class MyMvcConfig implements WebMvcConfigurer {

    @Override
    public void addViewControllers(ViewControllerRegistry registry) {
        //浏览器发送xxx请求, 也会来到success页面.
        registry.addViewController("/xxx").setViewName("success");
    }
}
- 即保留了所有的自动配置, 也能用扩展配置.
- 全面接管SpringMVC
- SpringBoot对SpringMVC的自动配置不需要了, 所有的都是我们自己配. 所有的SpringMVC的自动配置全部失效了.
- 只需要在配置类中添加@EnableWebMvc.
错误处理原理
- SpringBoot默认的错误处理机制
- 浏览器: 返回一个错误的页面.
- 其他客户端: 默认响应一个json数据.
- 原理: 可以参照ErrorMvcAutoConfiguration: 错误处理的自动配置.
- 给容器中添加了以下组件
- DefaultErrorAttributes:
    @Override
    public Map<String, Object> getErrorAttributes(RequestAttributes requestAttributes,
            boolean includeStackTrace) {
        Map<String, Object> errorAttributes = new LinkedHashMap<String, Object>();
        errorAttributes.put("timestamp", new Date());
        addStatus(errorAttributes, requestAttributes);
        addErrorDetails(errorAttributes, requestAttributes, includeStackTrace);
        addPath(errorAttributes, requestAttributes);
        return errorAttributes;
    }
- BasicErrorController:
@Controller
@RequestMapping("${server.error.path:${error.path:/error}}")
public class BasicErrorController extends AbstractErrorController {

    @RequestMapping(produces = "text/html")//产生html类型的数据;浏览器发送的请求来到这个方法处理
    public ModelAndView errorHtml(HttpServletRequest request,
            HttpServletResponse response) {
        HttpStatus status = getStatus(request);
        Map<String, Object> model = Collections.unmodifiableMap(getErrorAttributes(
                request, isIncludeStackTrace(request, MediaType.TEXT_HTML)));
        response.setStatus(status.value());

        //去哪个页面作为错误页面;包含页面地址和页面内容
        ModelAndView modelAndView = resolveErrorView(request, response, status, model);
        return (modelAndView == null ? new ModelAndView("error", model) : modelAndView);
    }

    @RequestMapping
    @ResponseBody    //产生json数据,其他客户端来到这个方法处理;
    public ResponseEntity<Map<String, Object>> error(HttpServletRequest request) {
        Map<String, Object> body = getErrorAttributes(request,
                isIncludeStackTrace(request, MediaType.ALL));
        HttpStatus status = getStatus(request);
        return new ResponseEntity<Map<String, Object>>(body, status);
    }
- ErrorPageCustomizer:
@Value("${error.path:/error}") private String path = "/error"; //系统出现错误以后来到error请求进行处理. - DefaultErrorViewResolver:
@Override
    public ModelAndView resolveErrorView(HttpServletRequest request, HttpStatus status,
            Map<String, Object> model) {
        ModelAndView modelAndView = resolve(String.valueOf(status), model);
        if (modelAndView == null && SERIES_VIEWS.containsKey(status.series())) {
            modelAndView = resolve(SERIES_VIEWS.get(status.series()), model);
        }
        return modelAndView;
    }

    private ModelAndView resolve(String viewName, Map<String, Object> model) {
        //默认SpringBoot可以去找到一个页面?  如: error/404
        String errorViewName = "error/" + viewName;

        //模板引擎可以解析这个页面地址就用模板引擎解析
        TemplateAvailabilityProvider provider = this.templateAvailabilityProviders
                .getProvider(errorViewName, this.applicationContext);
        if (provider != null) {
            //模板引擎可用的情况下返回到errorViewName指定的视图地址
            return new ModelAndView(errorViewName, model);
        }
        //模板引擎不可用,就在静态资源文件夹下找errorViewName对应的页面   error/404.html
        return resolveResource(errorViewName, model);
    }
- 步骤
- 一旦系统出现4xx或5xx之类的错误, ErrorPageCustomizer就会生效.(定制错误的相应规则). 会来到/error请求, 会被BasicErrorController处理.
- 响应页面: 去哪个页面是由ErrorViewResolver解析得到.
protected ModelAndView resolveErrorView(HttpServletRequest request,
      HttpServletResponse response, HttpStatus status, Map<String, Object> model) {
    //所有的ErrorViewResolver得到ModelAndView
   for (ErrorViewResolver resolver : this.errorViewResolvers) {
      ModelAndView modelAndView = resolver.resolveErrorView(request, status, model);
      if (modelAndView != null) {
         return modelAndView;
      }
   }
   return null;
}
如何定制错误响应
- 定制错误页面
- 有模板引擎的情况下: error/状态码. [将错误页面命名为错误状态码.html放在模板引擎文件夹里面的error文件夹下], 发生此状态码错误时就会来到对应的页面.
- 我们可以使用4xx, 5xx作为错误页面的文件名来匹配这种类型的所有错误, 精准优先.
- 页面能够获取的信息
- timestamp: 时间戳
- status: 状态码
- error: 错误提示
- exception: 异常对象
- message: 异常消息.
- errors: JSR303数据校验错误都在这里.
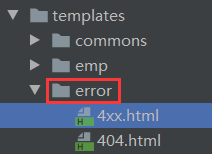
- 若模板引擎找不到这个错误页面, 会去静态资源文件夹下找.
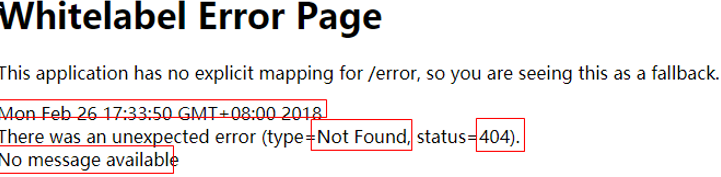
- 若以上都未找到错误页面, 来到SpringBoot默认的错误提示页面
- 定制错误的json数据
- 第一种写法: 自定义异常处理, 返回定制json数据.
//自定义异常
public class UserNotExistException extends RuntimeException { public UserNotExistException() { super("用户不存在"); } }
// @Controller public class HelloController { @ResponseBody @RequestMapping("/hello") public String hello(@RequestParam("user") String user) { if("aaa".equals(user)) { throw new UserNotExistException(); } return "Hello World"; } } //异常处理器 @ControllerAdvice public class MyExceptionHandler { @ResponseBody @ExceptionHandler(UserNotExistException.class) //捕获异常后开始处理. public Map<String, Object> handlerException(Exception e) { Map<String, Object> map = new HashMap<>(); map.put("code", "user.notexists"); map.put("message", e.getMessage()); return map; } }- 如果只这么写的话, 没有自适应效果, 浏览器和客户端都是json
- 第二种: 转发到/error进行自适应响应效果处理.
//异常处理器
@ControllerAdvice
public class MyExceptionHandler {

    @ExceptionHandler(UserNotExistException.class)
    public String handlerException(Exception e, HttpServletRequest request) {
        Map<String, Object> map = new HashMap<>();
        //传入我们自己的错误状态码
        //否则就不会进入我们自定义的错误页面
        request.setAttribute("javax.servlet.error.status_code", 500);
        map.put("code", "user.notexists");
        map.put("message", e.getMessage());
        return "forward:/error";
    }
}
- 但这样写的问题是无法把我们写的数据携带出去(map中写的).
- 将我们的定制数据携带出去.
- 分析: 出现错误后, 会来到/error请求, 被BasicErrorController处理, 响应出去可以获取的数据是由getErrorAttributes()得到的. [AbstractErrorController规定的方法].
- 所以我们可以编写一个ErrorController的实现类, 放在容器中.
- 页面上能用的数据,或者是json返回能用的数据都是通过errorAttributes.getErrorAttributes得到的
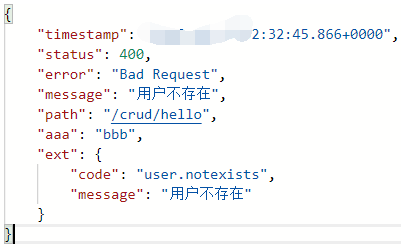
//异常处理器 @ControllerAdvice public class MyExceptionHandler { @ExceptionHandler(UserNotExistException.class) public String handlerException(Exception e, HttpServletRequest request) { Map<String, Object> map = new HashMap<>(); //传入我们自己的错误状态码 //否则就不会进入我们自定义的错误页面 request.setAttribute("javax.servlet.error.status_code", 500); map.put("code", "user.notexists"); map.put("message", e.getMessage()); request.setAttribute("ext", map); return "forward:/error"; } } //给容器中加入我们自己定义的ErrorAttributes @Component public class MyErrorAttributes extends DefaultErrorAttributes { //返回的map是页面和json能获取的所有字段. @Override public Map<String, Object> getErrorAttributes(WebRequest webRequest, boolean includeStackTrace) { Map<String, Object> map = super.getErrorAttributes(webRequest, includeStackTrace); map.put("aaa", "bbb"); /**
* webRequest中封装了Request对象. * int SCOPE_REQUEST = 0; * int SCOPE_SESSION = 1; */ //异常处理器携带的数据. Map<String, Object> ext = (Map<String, Object>) webRequest.getAttribute("ext", 0); map.put("ext", ext); return map; } } - 效果