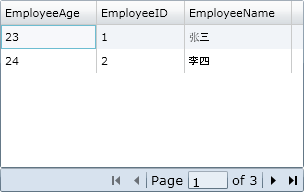
在DataGrid的开发设计中,我们经常会碰到设计样式各异的表头以满足各种要求。而头模板的作用是显示DataGrid控件的首行中的文本、图片或是绑定数据的。通过对头模板的设定,可以为我们定制所需样式的DataGrid。本文将为大家介绍如何自定义DataGrid的头模板。
具体步骤:
说明:Silverlight的ChildWindow组件给我们的开发带来了便利,比如说我们可以用它开发自定义对话框等。然而,这同时也带来了这样一个问题,ChildWindow组件只能以Modal Window(模式窗口)的形式进行应用,这也就是说同一时间只能有一个子窗体出现在应用程序中;另外,ChildWindow组件不能进行窗体大小的自定义缩放。如果我们想要开发多窗口的应用程序的话,ChildWindow显然就不能满足我们的要求了。幸运的是,Tim Heuer为我们提供了Non-Modal Used ChildWindow组件(非模式使用子窗体——Tim Heuer称之为浮动窗体[FloatableWindow])【下载】【应用程序模板】。这样我们就能轻松地开发多窗体应用了。
组件所在的命名空间:
System.Windows.Controls
组件常用属性:
[以下属性继承自ChildWindow]
DialogResult:获取或者设置一个值用来显示子窗体的反馈内容是否被接受或是取消。
HasCloseButton:获取或者设置一个值用来显示子窗体是否包含关闭按钮。
OverlayBrush:获取或者设置被用于当子窗体打开时覆盖在父窗体上的遮盖层的笔刷。
OverlayOpacity:获取或者设置被用于当子窗体打开时覆盖在父窗体上的遮盖层的笔刷的透明度。
Title:获取或者设置子窗体的窗口标题。
[以下属性为该组件特有属性]
HorizontalOffset:获取或者设置浮动窗口出现位置的水平偏移量。
IsModal:获取浮动窗体是否为模式窗体。
ParentLayoutRoot:获取或者设置父窗体的根部布局。[使用时必须设置]
ResizeMode:获取或者设置浮动窗体的缩放模式。
VerticalOffset:获取或者设置浮动窗口出现位置的垂直偏移量。
组件常用方法:
Close:关闭子窗体。
Show:以非模式窗口形式打开子窗体并返回而不等待该子窗体关闭。[此时,IsModal为false]
Show(horizontalOffset,verticalOffset):设置出现位置后,以非模式窗口形式打开子窗体并返回而不等待该子窗体关闭。[此时,IsModal为false]
ShowDialog:以模式窗口形式打开子窗体并返回而不等待该子窗体关闭。[此时,IsModal为true]
组件常用事件:
Closed:当子窗体关闭后发生。
Closing:当子窗体正在关闭时发生。
实例:
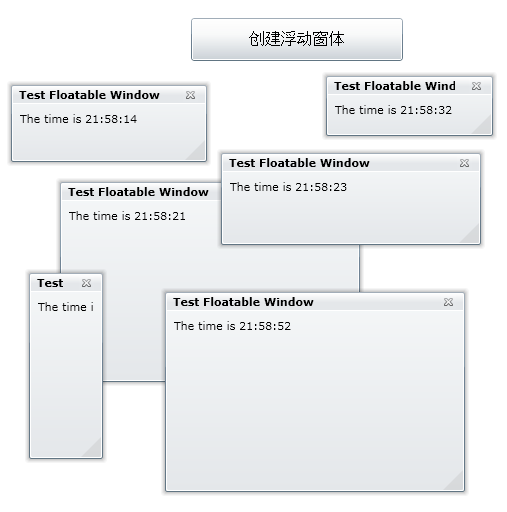
效果图:
在线显示效果如下:
代码段:
MainPage.xaml代码:
<UserControl x:Class="SilverlightClient.MainPage"
xmlns="http://schemas.microsoft.com/winfx/2006/xaml/presentation"
xmlns:x="http://schemas.microsoft.com/winfx/2006/xaml"
xmlns:d="http://schemas.microsoft.com/expression/blend/2008" xmlns:mc="http://schemas.openxmlformats.org/markup-compatibility/2006"
mc:Ignorable="d" d:DesignWidth="640" d:DesignHeight="480" Width="640" Height="480">
<Grid x:Name="LayoutRoot" Background="White" Width="640" Height="480">
<Button x:Name="btnCreateFloatableWindow" Margin="207,30,221,0" Content="创建浮动窗体" Height="43" VerticalAlignment="Top" FontSize="16" Width="212"/>
</Grid>
</UserControl>
MainPage.xaml.cs代码:
using System;
using System.Collections.Generic;
using System.Linq;
using System.Net;
using System.Windows;
using System.Windows.Controls;
using System.Windows.Documents;
using System.Windows.Input;
using System.Windows.Media;
using System.Windows.Media.Animation;
using System.Windows.Shapes;
namespace SilverlightClient
{
public partial class MainPage : UserControl
{
public MainPage()
{
InitializeComponent();
//注册事件触发处理
this.btnCreateFloatableWindow.Click += new RoutedEventHandler(btnCreateFloatableWindow_Click);
}
void btnCreateFloatableWindow_Click(object sender, RoutedEventArgs e)
{
FloatableWindow fw = new FloatableWindow();//创建浮动窗口实例
fw.ParentLayoutRoot = LayoutRoot;//指定承载浮动窗口的父窗口的根布局元素[这里为Grid x:Name="LayoutRoot"]
fw.Title = "Test Floatable Window";//浮动窗口标题
fw.Content = "The time is " + DateTime.Now.ToLongTimeString();//浮动窗体内容
fw.Width = 300;//浮动窗口的宽度
fw.Height = 200;//浮动窗口的高度
fw.ResizeMode = ResizeMode.CanResize;//设置浮动窗口可自定义缩放
fw.Show();//以非模式窗口形式打开窗体
}
}
}
FloatableWindowDemo.xaml代码:
<controls:FloatableWindow x:Class="SilverlightClient.control.FloatableWindowDemo"
xmlns="http://schemas.microsoft.com/winfx/2006/xaml/presentation"
xmlns:x="http://schemas.microsoft.com/winfx/2006/xaml"
xmlns:controls="clr-namespace:System.Windows.Controls;assembly=FloatableWindow"
Width="400" Height="300"
Title="FloatableWindowDemo">
<Grid x:Name="LayoutRoot" Margin="2">
<Grid.RowDefinitions>
<RowDefinition />
<RowDefinition Height="Auto" />
</Grid.RowDefinitions>
<Button x:Name="CancelButton" Content="Cancel" Click="CancelButton_Click" Width="75" Height="23" HorizontalAlignment="Right" Margin="0,12,0,0" Grid.Row="1" />
<Button x:Name="OKButton" Content="OK" Click="OKButton_Click" Width="75" Height="23" HorizontalAlignment="Right" Margin="0,12,79,0" Grid.Row="1" />
</Grid>
</controls:FloatableWindow>
FloatableWindowDemo.xaml.cs代码:
using System;
using System.Collections.Generic;
using System.Linq;
using System.Net;
using System.Windows;
using System.Windows.Controls;
using System.Windows.Documents;
using System.Windows.Input;
using System.Windows.Media;
using System.Windows.Media.Animation;
using System.Windows.Shapes;
namespace SilverlightClient.control
{
public partial class FloatableWindowDemo : FloatableWindow
{
public FloatableWindowDemo()
{
InitializeComponent();
}
private void OKButton_Click(object sender, RoutedEventArgs e)
{
this.DialogResult = true;
}
private void CancelButton_Click(object sender, RoutedEventArgs e)
{
this.DialogResult = false;
}
}
}
准备工作:
1)测试项目的建立
2)创建测试用数据库
详情请参考我的强大的DataGrid组件[2]_数据交互之ADO.NET Entity Framework——Silverlight学习笔记[10]。
建立存储过程:
存储过程1——DataPager:
Create PROCEDURE dbo.DataPager
(
@pagesize int,
@currentpage int
)
AS
declare @totalnum int
set @totalnum = (select count(EmployeeID) from Employee)
if @currentpage <= ceiling(convert(real,@totalnum)/convert(real,@pagesize))
select * from
(select TOP (@pagesize) * FROM (SELECT TOP (@pagesize * @currentpage) * from Employee ORDER BY EmployeeID ASC) as A ORDER BY EmployeeID DESC) as B ORDER BY EmployeeID ASC
存储过程2——GetTotalPagers:
Create PROCEDURE dbo.GetTotalPagers
@pagesize int
AS
declare @totalnum int
set @totalnum = (select count(EmployeeID) from Employee)
return (ceiling(convert(real,@totalnum)/convert(real,@pagesize)))
创建Linq to SQL 数据模型类
基本操作参见强大的DataGrid组件[3]_数据交互之Linq to SQL——Silverlight学习笔记[11]。本教程需要添加的新内容如下:
打开Server Explorer,将刚才建立的两个存储过程拖入至EmployeesModel.dbml所在的右侧窗口中。(如下图)
按Ctrl+Shift+B进行项目的编译。
建立Silverlight-enabled WCF Service数据通信服务
操作步骤参见强大的DataGrid组件[3]_数据交互之Linq to SQL——Silverlight学习笔记[11]。然而,必须将下述代码添加至EmployeeInfoWCFService.svc.cs文件中。
using System;
using System.Linq;
using System.Runtime.Serialization;
using System.ServiceModel;
using System.ServiceModel.Activation;
using System.Collections.Generic;
using System.Text;
using EmployeesContext;
using EmployeesEntities;
namespace datapager
{
[ServiceContract(Namespace = "")]
[AspNetCompatibilityRequirements(RequirementsMode = AspNetCompatibilityRequirementsMode.Allowed)]
public class EmployeesInfoService
{
[OperationContract]//得到总分页数
public int GetTotalPagers(int PageSize)
{
EmployeesModelDataContext db = new EmployeesModelDataContext();
return db.GetTotalPagers(PageSize);
}
[OperationContract]//得到分页内容
public List<DataPagerResult> GetPagedEmployeesInfo(int PageSize, int CurrentPage)
{
EmployeesModelDataContext db = new EmployeesModelDataContext();
return db.DataPager(PageSize, CurrentPage).ToList();
}
// Add more operations here and mark them with [OperationContract]
}
}
按Ctrl+Shift+B进行项目的编译。
创建SilverlightClient界面及组件代码
MainPage.xaml文件代码:
<UserControl
xmlns="http://schemas.microsoft.com/winfx/2006/xaml/presentation"
xmlns:x="http://schemas.microsoft.com/winfx/2006/xaml"
xmlns:d="http://schemas.microsoft.com/expression/blend/2008" xmlns:mc="http://schemas.openxmlformats.org/markup-compatibility/2006"
mc:Ignorable="d" xmlns:data="clr-namespace:System.Windows.Controls;assembly=System.Windows.Controls.Data" x:Class="SilverlightClient.MainPage"
d:DesignWidth="320" d:DesignHeight="240">
<Grid x:Name="LayoutRoot" Background="White" Width="320" Height="240">
<data:DataGrid x:Name="dgEmployee" Margin="8,8,8,64" Width="304" Height="168"/>
<data:DataPager x:Name="dpEmployee" Height="24" Margin="8,0,8,40" VerticalAlignment="Bottom" Background="#FFD7E2EE" FontSize="13.333" Width="304"/>
</Grid>
</UserControl>
MainPage.xaml.cs文件代码:
using System;
using System.Collections.Generic;
using System.Linq;
using System.Net;
using System.Windows;
using System.Windows.Controls;
using System.Windows.Data;
using System.Windows.Documents;
using System.Windows.Input;
using System.Windows.Media;
using System.Windows.Media.Animation;
using System.Windows.Shapes;
using System.Data.Services.Client;
using SilverlightClient.EmployeesInfoService;
namespace SilverlightClient
{
public partial class MainPage : UserControl
{
int PageSize = 2;//设定分页大小
List<int> itemCount = new List<int>();//用于DataPager的数据提供
public MainPage()
{
InitializeComponent();
//注册事件触发处理
this.Loaded += new RoutedEventHandler(MainPage_Loaded);
this.dpEmployee.PageIndexChanged += new EventHandler<EventArgs>(dpEmployee_PageIndexChanged);
}
void MainPage_Loaded(object sender, RoutedEventArgs e)
{
//页面初始化
EmployeesInfoServiceClient webClient = new EmployeesInfoServiceClient();
webClient.GetPagedEmployeesInfoAsync(PageSize, 1);
webClient.GetPagedEmployeesInfoCompleted += new EventHandler<GetPagedEmployeesInfoCompletedEventArgs>(webClient_GetPagedEmployeesInfoCompleted);
GeneralDataPagerContent();//生成DataPager的数据提供
}
void dpEmployee_PageIndexChanged(object sender, EventArgs e)//DataPager的当前页发生改变时的处理
{
EmployeesInfoServiceClient webClient = new EmployeesInfoServiceClient();
webClient.GetPagedEmployeesInfoAsync(PageSize, dpEmployee.PageIndex+1);//索引值从0开始,所以要加1
webClient.GetPagedEmployeesInfoCompleted += new EventHandler<GetPagedEmployeesInfoCompletedEventArgs>(webClient_GetPagedEmployeesInfoCompleted);
}
void webClient_GetPagedEmployeesInfoCompleted(object sender, GetPagedEmployeesInfoCompletedEventArgs e)
{
dgEmployee.ItemsSource = e.Result;
}
//生成DataPager的数据提供,这里学习使用了园友小庄的做法
void GeneralDataPagerContent()
{
EmployeesInfoServiceClient webClient = new EmployeesInfoServiceClient();
webClient.GetTotalPagersAsync(PageSize);
webClient.GetTotalPagersCompleted +=
new EventHandler<GetTotalPagersCompletedEventArgs>(webClient_GetTotalPagersCompleted);
}
void webClient_GetTotalPagersCompleted(object sender, GetTotalPagersCompletedEventArgs e)
{
int totalpagers = e.Result;
for (int i = 1; i <= totalpagers; i++) itemCount.Add(i);
PagedCollectionView pcv = new PagedCollectionView(itemCount);
pcv.PageSize = 1;
dpEmployee.Source = pcv;
}
}
}
最终效果图:

1)在XAML文件中的UserControl标签中加入如下命名空间:
xmlns:dataprimitives="clr-namespace:System.Windows.Controls.Primitives;assembly=System.Windows.Controls.Data"
2)设置呈现头模板的样式HeaderStyle的属性
3)可以利用StackPanel标签组合编排添加在头模板内的组件的位置。
实例:
通过实例来了解头模板制定的基本方法。
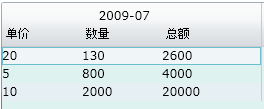
先来看看效果:

在代码中会指明操作的关键步骤。
MainPage.xaml文件代码:
<UserControl
xmlns="http://schemas.microsoft.com/winfx/2006/xaml/presentation"
xmlns:x="http://schemas.microsoft.com/winfx/2006/xaml"
xmlns:d="http://schemas.microsoft.com/expression/blend/2008" xmlns:mc="http://schemas.openxmlformats.org/markup-compatibility/2006"
xmlns:dataprimitives="clr-namespace:System.Windows.Controls.Primitives;assembly=System.Windows.Controls.Data"
mc:Ignorable="d" xmlns:data="clr-namespace:System.Windows.Controls;assembly=System.Windows.Controls.Data" x:Class="SilverlightClient.MainPage"
d:DesignWidth="640" d:DesignHeight="320">
<Grid x:Name="LayoutRoot" Width="640" Height="320" Background="White">
<data:DataGrid x:Name="dgEmployee" AutoGenerateColumns="False" Margin="8,8,36,71" Background="#FFDEF2F0" FontSize="12">
<data:DataGrid.Columns>
<data:DataGridTemplateColumn Width="260">
<data:DataGridTemplateColumn.HeaderStyle>
<Style TargetType="dataprimitives:DataGridColumnHeader">
<Setter Property="ContentTemplate">
<Setter.Value>
<DataTemplate>
<!--呈现的关键-->
<StackPanel Orientation="Vertical">
<StackPanel Orientation="Horizontal">
<TextBlock Text="" Width="80"/>
<TextBlock Text=" 2009-07" Width="80"/>
<TextBlock Text="" Width="100"/>
</StackPanel>
<StackPanel Orientation="Horizontal">
<TextBlock Text="单价" Width="80"/>
<TextBlock Text="数量" Width="80"/>
<TextBlock Text="总额" Width="100"/>
</StackPanel>
</StackPanel>
</DataTemplate>
</Setter.Value>
</Setter>
</Style>
</data:DataGridTemplateColumn.HeaderStyle>
<!--这里用到了我上一篇中提到的方法-->
<data:DataGridTemplateColumn.CellTemplate>
<DataTemplate>
<StackPanel Orientation="Horizontal">
<TextBlock Width="80" Text="{Binding Quantity}"/>
<TextBlock Width="80" Text="{Binding Price}"/>
<TextBlock Width="100" Text="{Binding Total}"/>
</StackPanel>
</DataTemplate>
</data:DataGridTemplateColumn.CellTemplate>
<data:DataGridTemplateColumn.CellEditingTemplate>
<DataTemplate>
<StackPanel Orientation="Horizontal">
<TextBox Width="80" Text="{Binding Quantity,Mode=TwoWay}"/>
<TextBox Width="80" Text="{Binding Price,Mode=TwoWay}"/>
<TextBox Width="100" Text="{Binding Total,Mode=TwoWay}"/>
</StackPanel>
</DataTemplate>
</data:DataGridTemplateColumn.CellEditingTemplate>
</data:DataGridTemplateColumn>
</data:DataGrid.Columns>
</data:DataGrid>
</Grid>
</UserControl>
MainPage.xaml.cs文件代码:
using System;
using System.Collections.Generic;
using System.Linq;
using System.Net;
using System.Windows;
using System.Windows.Controls;
using System.Windows.Documents;
using System.Windows.Input;
using System.Windows.Media;
using System.Windows.Media.Animation;
using System.Windows.Shapes;
namespace SilverlightClient
{
public class Products
{
public int Quantity { get; set; }
public int Price { get;set;}
public int Total { get; set; }
}
public partial class MainPage : UserControl
{
public MainPage()
{
InitializeComponent();
this.Loaded += new RoutedEventHandler(MainPage_Loaded);
}
void MainPage_Loaded(object sender, RoutedEventArgs e)
{
List<Products> em1 = new List<Products>();
em1.Add(new Products() { Quantity = 20, Price = 130, Total = 2600 });
em1.Add(new Products() { Quantity = 5, Price=800, Total = 4000 });
em1.Add(new Products() { Quantity = 10, Price=2000, Total = 20000 });
dgEmployee.ItemsSource = em1;
}
}
}


