ray tracing in one weekend - 1
the basic
#include <iostream>

int main() {

  // Image

  int image_width = 256;
  int image_height = 256;

  // Render

  std::cout << "P3\n" << image_width << ' ' << image_height << "\n255\n";

  for (int j = 0; j < image_height; j++) {
    for (int i = 0; i < image_width; i++) {
      std::clog << "\rScanlines remaining: " << (image_height - j) << ' ' << std::flush;
      auto r = double(i) / (image_width - 1);
      auto g = double(j) / (image_height - 1);
      auto b = 0.0;

      int ir = int(255.999 * r);
      int ig = int(255.999 * g);
      int ib = int(255.999 * b);

      std::cout << ir << ' ' << ig << ' ' << ib << '\n';
    }
  }
    std::clog << "\rDone.                 \n";
}
the vec3
#ifndef VEC3_H
#define VEC3_H

#include <cmath>
#include <iostream>

using std::sqrt;

class vec3 {
  public:
    double e[3];

    vec3() : e{0,0,0} {}
    vec3(double e0, double e1, double e2) : e{e0, e1, e2} {}

    double x() const { return e[0]; }
    double y() const { return e[1]; }
    double z() const { return e[2]; }

    vec3 operator-() const { return vec3(-e[0], -e[1], -e[2]); }
    double operator[](int i) const { return e[i]; }
    double& operator[](int i) { return e[i]; }

    vec3& operator+=(const vec3& v) {
        e[0] += v.e[0];
        e[1] += v.e[1];
        e[2] += v.e[2];
        return *this;
    }

    vec3& operator*=(double t) {
        e[0] *= t;
        e[1] *= t;
        e[2] *= t;
        return *this;
    }

    vec3& operator/=(double t) {
        return *this *= 1/t;
    }

    double length() const {
        return sqrt(length_squared());
    }

    double length_squared() const {
        return e[0]*e[0] + e[1]*e[1] + e[2]*e[2];
    }
};

// point3 is just an alias for vec3, but useful for geometric clarity in the code.
using point3 = vec3;


// Vector Utility Functions

inline std::ostream& operator<<(std::ostream& out, const vec3& v) {
    return out << v.e[0] << ' ' << v.e[1] << ' ' << v.e[2];
}

inline vec3 operator+(const vec3& u, const vec3& v) {
    return vec3(u.e[0] + v.e[0], u.e[1] + v.e[1], u.e[2] + v.e[2]);
}

inline vec3 operator-(const vec3& u, const vec3& v) {
    return vec3(u.e[0] - v.e[0], u.e[1] - v.e[1], u.e[2] - v.e[2]);
}

inline vec3 operator*(const vec3& u, const vec3& v) {
    return vec3(u.e[0] * v.e[0], u.e[1] * v.e[1], u.e[2] * v.e[2]);
}

inline vec3 operator*(double t, const vec3& v) {
    return vec3(t*v.e[0], t*v.e[1], t*v.e[2]);
}

inline vec3 operator*(const vec3& v, double t) {
    return t * v;
}

inline vec3 operator/(const vec3& v, double t) {
    return (1/t) * v;
}

inline double dot(const vec3& u, const vec3& v) {
    return u.e[0] * v.e[0]
         + u.e[1] * v.e[1]
         + u.e[2] * v.e[2];
}

inline vec3 cross(const vec3& u, const vec3& v) {
    return vec3(u.e[1] * v.e[2] - u.e[2] * v.e[1],
                u.e[2] * v.e[0] - u.e[0] * v.e[2],
                u.e[0] * v.e[1] - u.e[1] * v.e[0]);
}

inline vec3 unit_vector(const vec3& v) {
    return v / v.length();
}

#endif
color.h
#ifndef COLOR_H
#define COLOR_H

#include "vec3.h"

#include <iostream>

using color = vec3;

void write_color(std::ostream& out, const color& pixel_color) {
    auto r = pixel_color.x();
    auto g = pixel_color.y();
    auto b = pixel_color.z();

    // Translate the [0,1] component values to the byte range [0,255].
    int rbyte = int(255.999 * r);
    int gbyte = int(255.999 * g);
    int bbyte = int(255.999 * b);

    // Write out the pixel color components.
    out << rbyte << ' ' << gbyte << ' ' << bbyte << '\n';
}

#endif
Rays, camera and background
rays
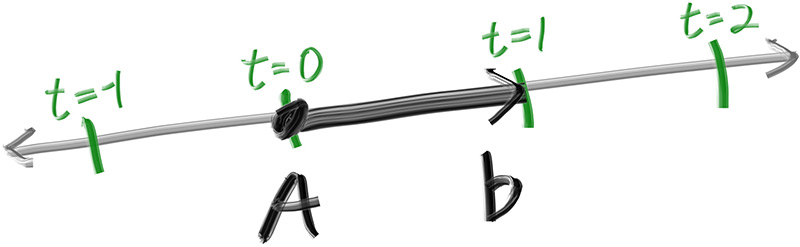
ray function $P(t) = A + tb$
A : ray origin
b : direction
t : double
the basic ray class
#ifndef RAY_H
#define RAY_H

#include "vec3.h"

class ray {
  public:
    ray() {}

    ray(const point3& origin, const vec3& direction) : orig(origin), dir(direction) {}

    const point3& origin() const  { return orig; }
    const vec3& direction() const { return dir; }

    point3 at(double t) const {
        return orig + t*dir;
    }

  private:
    point3 orig;
    vec3 dir;
};

#endif
向场景发射光线
光线追踪器的核心是通过像素发送光线,并计算在这些光线方向上看到的颜色
- 计算通过像素从眼睛发出的光线
- 决定哪些物体是和光线相交的
- 计算得到最近的相交点
使用 宽高比为 16/9 的大小, 此时我们就可以使用一个 宽度 和 宽高比 来得到高度。通过这种方式,我们可以通过改变图像宽度来放大或缩小图像,而且它不会偏离我们想要的宽高比。我们必须确保当我们解出图像高度时得到的高度至少是1。
$$
\frac{width}{height} = \frac{16}{9} = 1.7778
$$
视口 除了设置渲染图像的像素尺寸外,我们还需要设置一个虚拟视口,通过它来传递场景光线。视口是3D世界中的一个虚拟矩形,包含图像像素位置的网格。如果像素的水平间距与垂直间距相同,则限定它们的视口将具有与渲染图像相同的宽高比。两个相邻像素之间的距离称为像素间距,以平方像素为标准。
首先,我们将选择2.0的任意视口高度,并缩放视口宽度以获得所需的长宽比。下面是该代码的一个片段
auto aspect_ratio = 16.0 / 9.0;
int image_width = 400;

// Calculate the image height, and ensure that it's at least 1.
int image_height = int(image_width / aspect_ratio);
image_height = (image_height < 1) ? 1 : image_height;

// Viewport widths less than one are ok since they are real valued.
auto viewport_height = 2.0;
auto viewport_width = viewport_height * (double(image_width)/image_height);
请注意,宽高比是一个理想的比率,我们用基于整数的图像宽度与图像高度的比率尽可能地近似它。为了使我们的视口比例完全匹配我们的图像比例,我们使用计算的图像长宽比来确定我们的最终视口宽度。
定义相机类的中心 :三维空间中所有场景光线的起始点 (这里的光线是反向的)。从相机中心到视口中心的矢量将与视口正交。 我们使用计算的图像长宽比来确定最终的视口宽度。
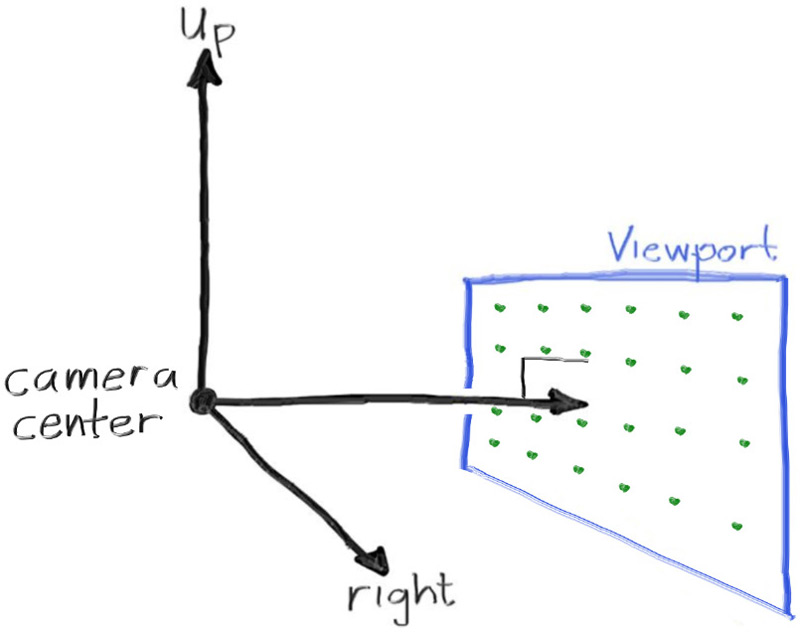
虽然我们的3D空间具有上述约定,但这与我们的图像坐标相冲突,我们希望在左上角有第0个像素,并一直向下到右下角的最后一个像素。这意味着我们的图像坐标Y轴是倒置的:Y向下增加图像。
我们从左上,逐行扫描向下。我们的像素网格将从视口边缘以像素到像素距离的一半插入。这样,我们的视口区域被均匀地划分为宽度高度相同的区域。这是我们的视口和像素网格的样子
![]()
基础 camera 类
#include "color.h"
#include "ray.h"
#include "vec3.h"

#include <iostream>

color ray_color(const ray& r) {
    return color(0,0,0);
}

int main() {

    // Image

    auto aspect_ratio = 16.0 / 9.0;
    int image_width = 400;

    // Calculate the image height, and ensure that it's at least 1.
    int image_height = int(image_width / aspect_ratio);
    image_height = (image_height < 1) ? 1 : image_height;

    // Camera

    auto focal_length = 1.0;
    auto viewport_height = 2.0;
    auto viewport_width = viewport_height * (double(image_width)/image_height);
    auto camera_center = point3(0, 0, 0);

    // Calculate the vectors across the horizontal and down the vertical viewport edges.
    auto viewport_u = vec3(viewport_width, 0, 0);
    auto viewport_v = vec3(0, -viewport_height, 0);

    // Calculate the horizontal and vertical delta vectors from pixel to pixel.
    auto pixel_delta_u = viewport_u / image_width;
    auto pixel_delta_v = viewport_v / image_height;

    // Calculate the location of the upper left pixel.
    auto viewport_upper_left = camera_center
                             - vec3(0, 0, focal_length) - viewport_u/2 - viewport_v/2;
    auto pixel00_loc = viewport_upper_left + 0.5 * (pixel_delta_u + pixel_delta_v);

    // Render

    std::cout << "P3\n" << image_width << " " << image_height << "\n255\n";

    for (int j = 0; j < image_height; j++) {
        std::clog << "\rScanlines remaining: " << (image_height - j) << ' ' << std::flush;
        for (int i = 0; i < image_width; i++) {
            auto pixel_center = pixel00_loc + (i * pixel_delta_u) + (j * pixel_delta_v);
            auto ray_direction = pixel_center - camera_center;
            ray r(camera_center, ray_direction);

            color pixel_color = ray_color(r);
            write_color(std::cout, pixel_color);
        }
    }

    std::clog << "\rDone.                 \n";
}
颜色函数 : 按照 y 轴进行变换并, 我们使用线性插值的方式。
$$
blendedValue=(1−a)⋅startValue+a⋅endValue
$$
color ray_color(const ray& r) {
    vec3 unit_direction = unit_vector(r.direction());
    auto a = 0.5*(unit_direction.y() + 1.0);
    return (1.0-a)*color(1.0, 1.0, 1.0) + a*color(0.5, 0.7, 1.0);
}

 浙公网安备 33010602011771号