【2020Python修炼记】MySQL之 数据备份、pymysql模块
【目录】
一、IDE工具介绍与安装使用——navicat 神器
二、MySQL数据备份
三、pymysql模块
1、安装
2、使用模块
一、IDE工具介绍与安装使用——navicat 神器
https://www.cnblogs.com/bigorangecc/p/12851845.html
二、MySQL数据备份
https://zhuanlan.zhihu.com/p/115504709
三、pymysql模块
模块安装包下载官网:https://pypi.org/search/?q=pymysql
其他下载地址,参考博客 https://www.cnblogs.com/bigorangecc/p/12852337.html
1、安装
方法一:cmd 中输入指令 pip install pymysql (pip 未规定具体版本,具体情况而定)

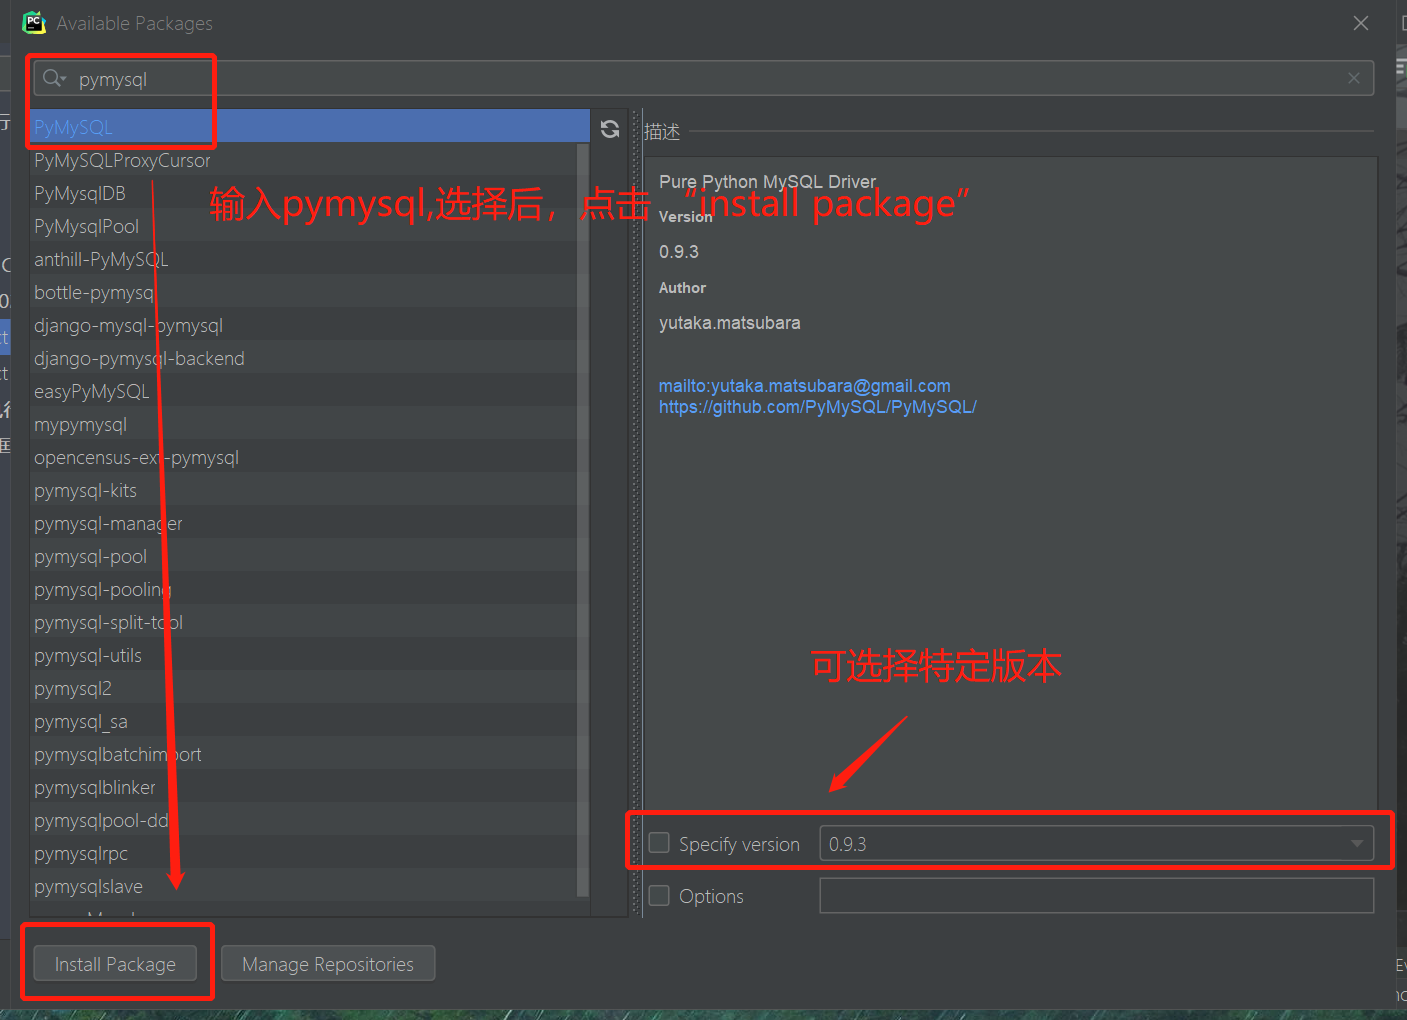
方法二:直接在 pycharm中安装
(1)傻瓜式
先新建一个python文件,输入代码
import pymysql
此时你会发现,pymysql下面标有红线,光标移至pymysql,查看错误提示,神奇地发现 有“install package pymysql”,点击即可安装
(2)专业式
pycharm 软件中,菜单栏【文件】——【设置】——【项目】——【Project Interpreter】——点击 + 号

搜索需要安装的模块包

【安装时可能会遇到的问题--时区问题】
参考:https://www.cnblogs.com/arxive/p/10332254.html
方法三:使用Anaconda进行安装
(待续)
2、使用模块
(1)链接、执行sql、关闭(游标)
import pymysql
user=input('用户名: ').strip()
pwd=input('密码: ').strip()

#链接
conn=pymysql.connect(host='localhost',user='root',password='123',database='egon',charset='utf8')
#游标
cursor=conn.cursor() #执行完毕返回的结果集默认以元组显示
#cursor=conn.cursor(cursor=pymysql.cursors.DictCursor)


#执行sql语句
sql='select * from userinfo where name="%s" and password="%s"' %(user,pwd) #注意%s需要加引号
print(sql)
res=cursor.execute(sql) #执行sql语句,返回sql查询成功的记录数目
print(res)

cursor.close()
conn.close()

if res:
    print('登录成功')
else:
    print('登录失败')
(2)execute()之sql注入
注意:符号--会注释掉它之后的sql,正确的语法:--后至少有一个任意字符
根本原理:就根据程序的字符串拼接name='%s',我们输入一个xxx' -- haha,用我们输入的xxx加'在程序中拼接成一个判断条件name='xxx' -- haha'
最后那一个空格,在一条sql语句中如果遇到select * from t1 where id > 3 -- and name='egon';则--之后的条件被注释掉了

#1、sql注入之:用户存在,绕过密码
egon' -- 任意字符

#2、sql注入之:用户不存在,绕过用户与密码
xxx' or 1=1 -- 任意字符
解决方法:
# 原来是我们自己对sql进行字符串拼接
# sql="select * from userinfo where name='%s' and password='%s'" %(user,pwd)
# print(sql)
# res=cursor.execute(sql)

#改写为(execute帮我们做字符串拼接,我们无需且一定不能再为%s加引号了)
sql="select * from userinfo where name=%s and password=%s" #!!!注意%s需要去掉引号,因为pymysql会自动为我们加上
res=cursor.execute(sql,[user,pwd]) #pymysql模块自动帮我们解决sql注入的问题,只要我们按照pymysql的规矩来。
(3)增、删、改:conn.commit()
import pymysql
#链接
conn=pymysql.connect(host='localhost',user='root',password='123',database='egon')
#游标
cursor=conn.cursor()

#执行sql语句
#part1
# sql='insert into userinfo(name,password) values("root","123456");'
# res=cursor.execute(sql) #执行sql语句,返回sql影响成功的行数
# print(res)

#part2
# sql='insert into userinfo(name,password) values(%s,%s);'
# res=cursor.execute(sql,("root","123456")) #执行sql语句,返回sql影响成功的行数
# print(res)

#part3
sql='insert into userinfo(name,password) values(%s,%s);'
res=cursor.executemany(sql,[("root","123456"),("lhf","12356"),("eee","156")]) #执行sql语句,返回sql影响成功的行数
print(res)

conn.commit() #提交后才发现表中插入记录成功
cursor.close()
conn.close()
(4)查:fetchone,fetchmany,fetchall
import pymysql
#链接
conn=pymysql.connect(host='localhost',user='root',password='123',database='egon')
#游标
cursor=conn.cursor()

#执行sql语句
sql='select * from userinfo;'
rows=cursor.execute(sql) #执行sql语句,返回sql影响成功的行数rows,将结果放入一个集合,等待被查询

# cursor.scroll(3,mode='absolute') # 相对绝对位置移动
# cursor.scroll(3,mode='relative') # 相对当前位置移动
res1=cursor.fetchone()
res2=cursor.fetchone()
res3=cursor.fetchone()
res4=cursor.fetchmany(2)
res5=cursor.fetchall()
print(res1)
print(res2)
print(res3)
print(res4)
print(res5)
print('%s rows in set (0.00 sec)' %rows)


conn.commit() #提交后才发现表中插入记录成功
cursor.close()
conn.close()

'''
(1, 'root', '123456')
(2, 'root', '123456')
(3, 'root', '123456')
((4, 'root', '123456'), (5, 'root', '123456'))
((6, 'root', '123456'), (7, 'lhf', '12356'), (8, 'eee', '156'))
rows in set (0.00 sec)
'''
(5) 获取插入的最后一条数据的自增ID-----cursor.lastrowid
import pymysql
conn=pymysql.connect(host='localhost',user='root',password='123',database='egon')
cursor=conn.cursor()

sql='insert into userinfo(name,password) values("xxx","123");'
rows=cursor.execute(sql)
print(cursor.lastrowid) #在插入语句后查看

conn.commit()

cursor.close()
conn.close()
参考:
https://zhuanlan.zhihu.com/p/115504709
https://zhuanlan.zhihu.com/p/115504709
🐱不负韶华,只争朝夕🍚


 浙公网安备 33010602011771号