56.1 django forms组件 &&django操作cookies sessions
记忆:forms组件作用 :渲染forms标签 数据 校验前端发过来的数据

1.引入
小需求:
小需求
        我们写一个注册页面 获取用户输入的用户名和密码
        用户点击注册发送到后端做用户名密码的校验
        用户名中不能包含金瓶美             不符合社会主义核心价值观
        密码不能为空                    你个DSB,密码怎么能为空

        1.手写获取用户输入的前端页面代码                    渲染页面
        2.后端获取用户数据并做合法性校验                    校验数据
        3.将校验之后的结果渲染到前端页面                    展示信息
前端 html
<body>
<form action="" method="post">
    <p>username:
        <input type="text" name="username">
        <span style="color: red">{{ error_dict.username }}</span>
    </p>
    <p>password:
        <input type="text" name="password">
        <span style="color: red">{{ error_dict.password }}</span>
    </p>
    <input type="submit">
</form>
</body>
后端 views
def register(request):
    error_dict = {'username':'','password':''}
    if request.method == 'POST':
        username = request.POST.get("username")
        password = request.POST.get("password")
        if '金瓶美' in username:
            # 提示报错信息
            error_dict['username'] = '不符合社会主义核心价值观'
        if not password:
            # 提示报错信息
            error_dict['password'] = '密码不能为空 你个DSB'
    return render(request,'register.html',locals())
2.forms组件使用
1. 基本使用:导入forms 模块
from django import forms

            class MyRegForm(forms.Form):
                # 用户名最少3位最多8位
                username = forms.CharField(max_length=8,min_length=3)
                password = forms.CharField(max_length=8,min_length=3)
                # email字段必须填写符合邮箱格式的数据
                email = forms.EmailField()
2. 创建测试环境的第二种方式:直接点击pycharm中的 PythonConsole
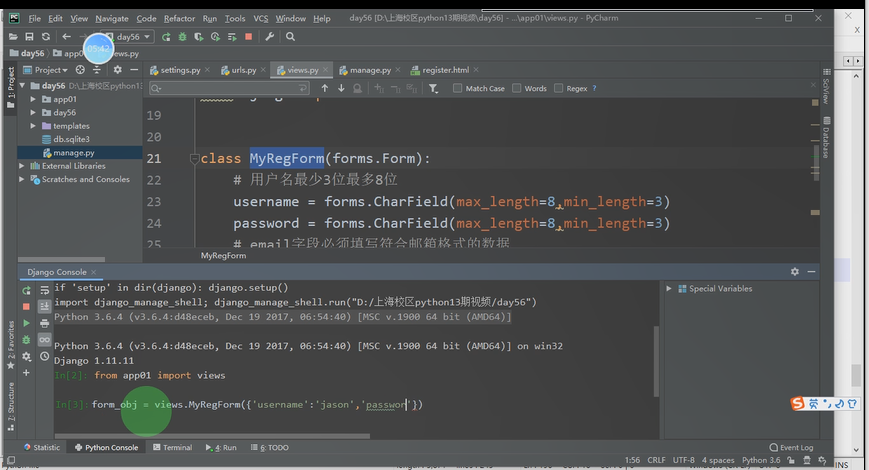
3.校验数据 console测试 is_valid() cleaned_data errors 返回的数据都是字典格式
如何校验数据
            # 1.传入待校验的数据  用自己写的类 传入字典格式的待校验的数据
            form_obj = views.MyRegForm({'username':'jason','password':'12','email':'123456'})
            # 2.判断数据是否符合校验规则
            form_obj.is_valid()  # 该方法只有在所有的数据全部符合校验规则才会返回True
            False
            # 3.如何获取校验之后通过的数据
            form_obj.cleaned_data
            {'username': 'jason'}
            # 4.如何获取校验失败及失败的原因
            form_obj.errors
            {
             'password': ['Ensure this value has at least 3 characters (it has 2).'],
             'email': ['Enter a valid email address.']
             }
            Out[16]: {}
4. 数据校验 注意点
注意 forms组件默认所有的字段都必须传值 也就意味着传少了是肯定不行的 而传多了则没有任何关系 只校验类里面写的字段 多传的直接忽略了
form_obj = views.MyRegForm({'username': 'jason', 'password': '123456'})
form_obj.is_valid()
Out[12]: False
form_obj.errors
Out[18]: {'email': ['This field is required.']}

form_obj = views.MyRegForm({'username': 'jason', 'password': '123456', "email": '123@qq.com', "hobby": 'hahahaha'})
form_obj.is_valid()
Out[14]: True
form_obj.cleaned_data
Out[15]: {'username': 'jason', 'password': '123456', 'email': '123@qq.com'}
form_obj.errors
5. forms渲染标签: form组件只能渲染input select
1.渲染标签
后端


前端
如何渲染页面
            你需要先写一个类

            forms组件只帮你渲染获取用户输入(输入 选择 下拉 文件)的标签 不渲染按钮和form表单标签
            渲染出来的每一个input提示信息都是类中字段首字母大写

            <p>第一种渲染方式:多个p标签  本地测试方便 封装程度太高了 不便于扩展</p>
            {{ form_obj.as_p }}
            {{ form_obj.as_ul }}
            {{ form_obj.as_table }}

            <p>第二种渲染方式:  扩展性较高 书写较为繁琐</p>
            <label for="{{ form_obj.username.id_for_label }}">{{ form_obj.username.label }}</label>
            {{ form_obj.username }}
            {{ form_obj.password.label }}{{ form_obj.password }}
            {{ form_obj.email.label }}{{ form_obj.email }}

            <p>第三种渲染方式  推荐使用</p>
            {% for form in form_obj %}
                <p> {{ form.label }}{{ form }}</p>
            {% endfor %}
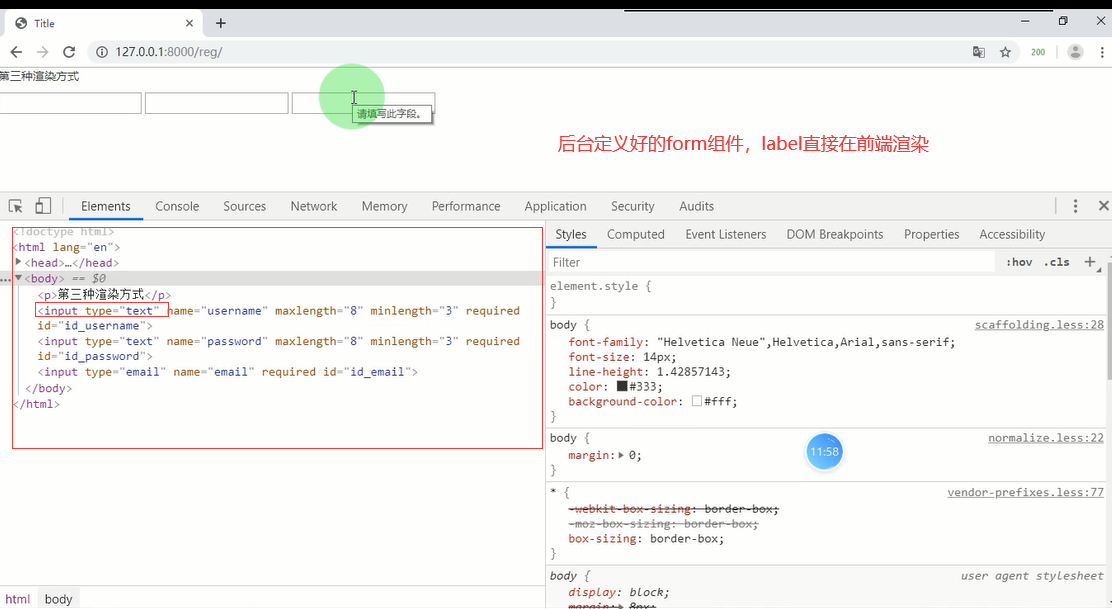
6 .forms组件的渲染+获取前端数据+后端校验+渲染错误信息+
补充:取消浏览器的自动校验功能 novalidate
<form action="" method="post" novalidate>
前端
如何渲染错误信息
            前端
                <form action="" method="post" novalidate>
                    {% for form in form_obj %}
                    <p>
                        {{ form.label }}{{ form }}
                        <span>{{ form.errors.0 }}</span>  # 这个是模板语法 索引不会出现超出报错
                    </p>
                    {% endfor %}
                    <input type="submit">
                </form>
后端: get请求 form_obj为空 先渲染form标签
然后post请求 form_obj接收前端数据 进行处理
后端
                def reg(request):
                    # 1 先生成一个空的类对象
                    form_obj = MyRegForm()
                    if request.method == 'POST':
                        # 3 获取用户数据并交给forms组件校验  request.POST
                        form_obj = MyRegForm(request.POST)
                        # 4 获取校验结果
                        if form_obj.is_valid():
                            return HttpResponse('数据没问题')
                        else:
                            # 5 获取校验失败的字段和提示信息
                            print(form_obj.errors)

                    # 2 直接将该对象传给前端页面
                    return render(request,'reg.html',locals())
7.forms组件常用参数

1.常用参数
    常用参数
        label                input的提示信息
        error_messages       自定义报错的提示信息
        required             设置字段是否允许为空
        initial             设置默认值
        widget              控制type类型及属性(可以使用bootstrap的样式)
            widget=forms.widgets.TextInput(attrs={'class':'form-control c1  c2'})
            widget=forms.widgets.PasswordInput(attrs={'class':'form-control'})
后端写法
class MyRegForm(forms.Form):
    # 用户名最少3位最多8位
    username = forms.CharField(max_length=8,min_length=3,label='用户名',
                               error_messages={
                                   'max_length':"用户名最长8位",
                                   'min_length':"用户名最短3位",
                                   'required':"用户名不能为空"
                               },required=False,initial='jason',
                               widget=forms.widgets.TextInput(attrs={'class':'form-control c1 c2'}),
                               )
    password = forms.CharField(max_length=8,min_length=3,label='密码',
                               # widget=forms.widgets.PasswordInput(attrs={'class':'form-control'})
                               )
    confirm_password = forms.CharField(max_length=8,min_length=3,label='确认密码',
                               # widget=forms.widgets.PasswordInput(attrs={'class':'form-control'})
                               )
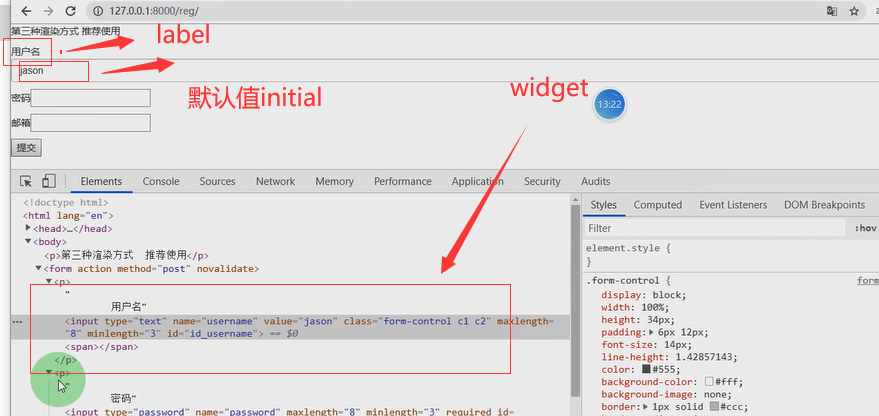
8.钩子函数
作用:用于forms组件的数据校验 记忆:把cleandata 勾出来校验 校验完成再放回去
    钩子函数
        全局钩子(针对多个字段)
            校验密码与确认面是否一致       记忆:特例法:


        局部钩子(针对单个字段)
            校验用户名中不能包含666

        # 全局钩子
        def clean(self):
            # 校验密码和确认密码是否一致
            password = self.cleaned_data.get('password')
            confirm_password = self.cleaned_data.get('confirm_password')
            if not password == confirm_password:
                # 展示提示信息
                self.add_error('confirm_password','两次密码不一致')
            return self.cleaned_data

        # 局部钩子
        def clean_username(self):
            username = self.cleaned_data.get('username')
            if '666' in username:
                self.add_error('username','光喊666是不行的')
            return username

        # 如果你想同时操作多个字段的数据你就用全局钩子
        # 如果你想操作单个字段的数据 你就用局部钩子
后端代码
class MyRegForm(forms.Form):
    # 用户名最少3位最多8位
    username = forms.CharField(max_length=8,min_length=3,label='用户名',
                               error_messages={
                                   'max_length':"用户名最长8位",
                                   'min_length':"用户名最短3位",
                                   'required':"用户名不能为空"
                               },required=False,initial='jason',
                               widget=forms.widgets.TextInput(attrs={'class':'form-control c1 c2'}),
                               )
    password = forms.CharField(max_length=8,min_length=3,label='密码',
                               # widget=forms.widgets.PasswordInput(attrs={'class':'form-control'})
                               )
    confirm_password = forms.CharField(max_length=8,min_length=3,label='确认密码',
                               # widget=forms.widgets.PasswordInput(attrs={'class':'form-control'})
                               )

        # 全局钩子
    def clean(self):
        # 校验密码和确认密码是否一致
        password = self.cleaned_data.get('password')
        confirm_password = self.cleaned_data.get('confirm_password')
        if not password == confirm_password:
            # 展示提示信息
            self.add_error('confirm_password','两次密码不一致')
        return self.cleaned_data

    # 局部钩子
    def clean_username(self):
        username = self.cleaned_data.get('username')
        if '666' in username:
            self.add_error('username','光喊666是不行的')
        return username
9.正则校验(forms组件补充知识点)
正则校验   手机号开头校验
        from django.core.Validators import RegexValidator
            phone = forms.CharField(
                validators=[
                    RegexValidator(r'^[0-9]+$', '请输入数字'),
                    RegexValidator(r'^159[0-9]+$', '数字必须以159开头')
                ]
            )

 百度身份证正则
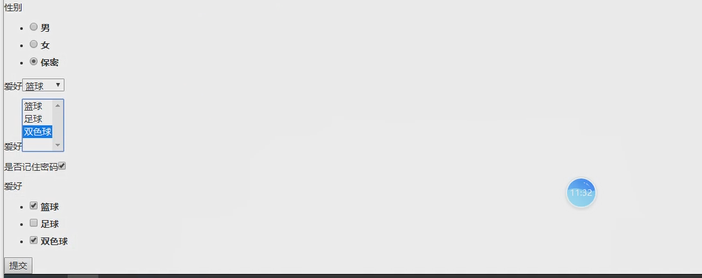
10.单选框 下拉框。。。 (不需要记,用的时候过来copy)
 ################了解知识点(指定去哪里拷贝即可)################
    gender = forms.ChoiceField(
        choices=((1, "男"), (2, "女"), (3, "保密")),
        label="性别",
        initial=3,
        widget=forms.widgets.RadioSelect()
    )

    hobby = forms.ChoiceField(
        choices=((1, "篮球"), (2, "足球"), (3, "双色球"),),
        label="爱好",
        initial=3,
        widget=forms.widgets.Select()
    )
    hobby1 = forms.MultipleChoiceField(
        choices=((1, "篮球"), (2, "足球"), (3, "双色球"),),
        label="爱好",
        initial=[1, 3],
        widget=forms.widgets.SelectMultiple()
    )
    keep = forms.ChoiceField(
        label="是否记住密码",
        initial="checked",
        widget=forms.widgets.CheckboxInput()
    )
    hobby2 = forms.MultipleChoiceField(
        choices=((1, "篮球"), (2, "足球"), (3, "双色球"),),
        label="爱好",
        initial=[1, 3],
        widget=forms.widgets.CheckboxSelectMultiple()
    )
django操作cookies 和 sessions 只要是临时存储 都可以考虑cookies sessions
1.cookies 和 session 介绍
django操作cookie与session

    cookie与session的作用
        保存信息

    当你第一次登陆成功之后 服务端给你返回了一个随机字符串
    保存客户端浏览器上 之后再次朝服务端发请求 只需要携带该随机字符串
    服务端就能够识别当前用户身份
    超时时间的概念

    cookie虽然是保存在客户端的浏览器上的 但是是服务端设置的
    浏览器也是可以拒绝服务端对要求 不保存cookie
2.cookies使用
cookie是保存在浏览器上的键值对
1.设置cookies的步骤 :1. obj= render(....) 2. obj.set_cookies() request.COOKIES.get() obj.delete_cookie()
cookie
        保存在客户端浏览器上的键值对
        return HttpResponse('...')

        return render(...)

        return redirect(...)

        # 变形
        obj = HttpResponse('...')
        return obj

        obj1 = render(...)
        return obj1

        obj2 = redirect(...)

        设置cookie
            obj.set_cookie()
        获取cookie
            request.COOKIES.get()
        删除cookie
            obj.delete_cookie()
        print('request.path_info:',request.path_info)  # 只拿路径部分 不拿参数
        print('request.get_full_path():',request.get_full_path())  # 路径加参数
        request.path_info: /home/

        request.get_full_path(): /home/?username=jason&password=123
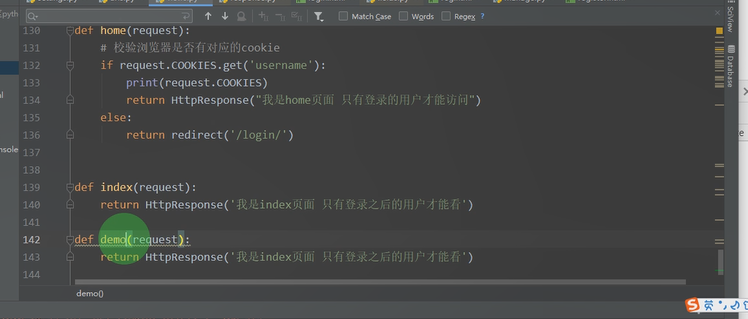
示例: 思路: 1.用户登录成功后,服务端给浏览器设置一个cookies
2. 其它功能函数获取浏览器cookies 如果有,说明用户已经登录可以访问该函数功能
3.使用登录装饰器

2.from functool import wraps 装饰器修复技术
@wraps(func)
装饰器中@wraps(func) 作用:
函数中的@wraps(func)又是做什么的呢?这里就涉及到了装饰器的一个小细节问题:被装饰后的函数本质上已经不是原来的函数了,
所以原函数的某些信息比如:__name__、__doc__等值就变了。而@wraps()的作用就是把原函数的相关信息代入到新的函数中。
3.基于cookies的登录装饰
from functools import wraps
def login_auth(func):
    @wraps(func)
    def inner(request,*args,**kwargs):
        # 执行被装饰函数之前你可以做的事情
        if request.COOKIES.get('username'):
            res = func(request,*args,**kwargs)
            return res
        else:
            return redirect('/login/)
    return inner

def login(request):
    if request.method == 'POST':
        username = request.POST.get('username')
        password = request.POST.get('password')
        if username == 'jason' and password == '123':

             obj = redirect('/home/')
            # 设置cookie
            obj.set_cookie('username','jason666',max_age=3)
            return obj
    return render(request,'login.html')
@login_auth
def home(request):
    # 校验浏览器是否有对应的cookie
    # if request.COOKIES.get('username'):
    #     print(request.COOKIES)
    #     return HttpResponse("我是home页面 只有登录的用户才能访问")
    # else:
    #     return redirect('/login/')
    return HttpResponse("我是home页面 只有登录的用户才能访问")

@login_auth
def index(request):
    return HttpResponse('我是index页面 只有登录之后的用户才能看')
4.新需求:用户没登陆先访问了index 页面 跳转到了登录页面 如何在用户登录之后再跳回index页面
'/index'--->走装饰器--->login()---->'/index'
这里结合了cookies 的设置,获取,删除
# 装饰器模板
from functools import wraps
def login_auth(func):
    @wraps(func)
    def inner(request,*args,**kwargs):
        # print('request.path_info:',request.path_info)
        # print('request.get_full_path():',request.get_full_path())
        # 执行被装饰函数之前你可以做的事情
        target_url = request.path_info                           第一步: 拿到url
        if request.COOKIES.get('username'):      # 获取cookies
            res = func(request,*args,**kwargs)
            return res
        else:
            return redirect('/login/?next=%s'%target_url)        第二步:跳转到登录页面  提交后 把target_url当成参数传给login函数
    return inner


def login(request):
    if request.method == 'POST':
        username = request.POST.get('username')
        password = request.POST.get('password')
        if username == 'jason' and password == '123':
            # target_url = request.GET.get("next",'/home/')
            target_url = request.GET.get("next")                 第三步:获取target_url
            # 判断用户登录之前是否有想要访问的url
            if target_url:
                # 保存用户登录状态
                obj = redirect(target_url)                       第四步: 重定向到目标url
            else:
                obj = redirect('/home/')
            # 设置cookie
            obj.set_cookie('username','jason666',max_age=3)       #  设置cookies 有效时常3秒
            return obj
    return render(request,'login.html')
注销 删除cookies
@login_auth
def logout(request):
    obj = HttpResponse('注销了')
    obj.delete_cookie('username')
    return obj
3.session使用
保存在服务器上的键值对
session
        保存在服务端上的键值对

        设置
            request.session['key'] = value
            """
            1.django内部会自动生成一个随机字符串
            2.去django_session表中存储数据 键就是随机字符串 值是要保存的数据(中间件干的)
            3.将生成好的随机字符串返回给客户端浏览器   浏览器保存键值对
                sessionid  随机字符串
            """

        获取
            request.session.get('key')
            """
            1.django会自动取浏览器的cookie查找sessionid键值对 获取随机字符串
            2.拿着该随机字符串取django_session表中比对数据
            3.如果比对上了 就将随机字符串对应的数据获取出来并封装到request.session供用户调用
            """

        django中默认的session超时时间为14天

        # 设置会话Session和Cookie的超时时间
        request.session.set_expiry(value)
            * 如果value是个整数,session会在些秒数后失效。
            * 如果value是个datatime或timedelta,session就会在这个时间后失效。
            * 如果value是0,用户关闭浏览器session就会失效。
            * 如果value是None,session会依赖全局session失效策略。

        # 删除当前会话的所有Session数据
        request.session.delete()

        # 删除当前的会话数据并删除会话的Cookie。  推荐使用
        request.session.flush()
            这用于确保前面的会话数据不可以再次被用户的浏览器访问
            例如,django.contrib.auth.logout() 函数中就会调用它。

        session是保存在服务端
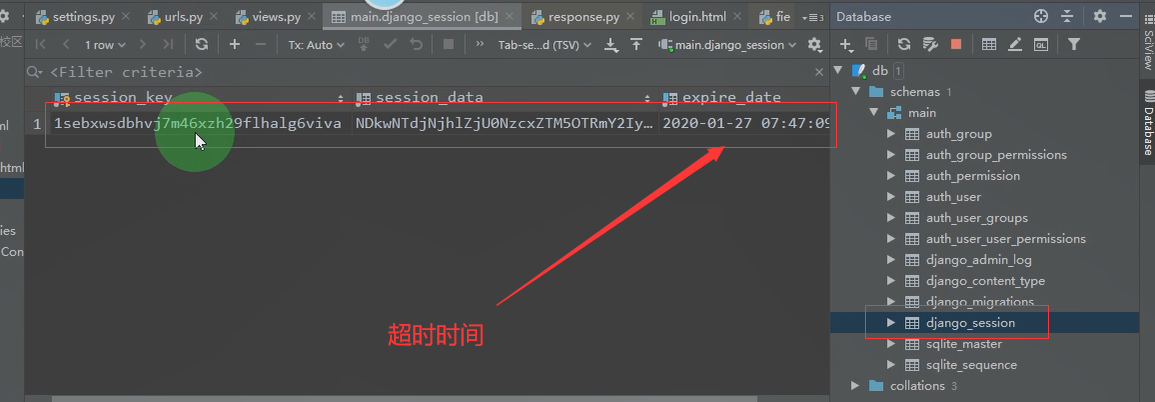
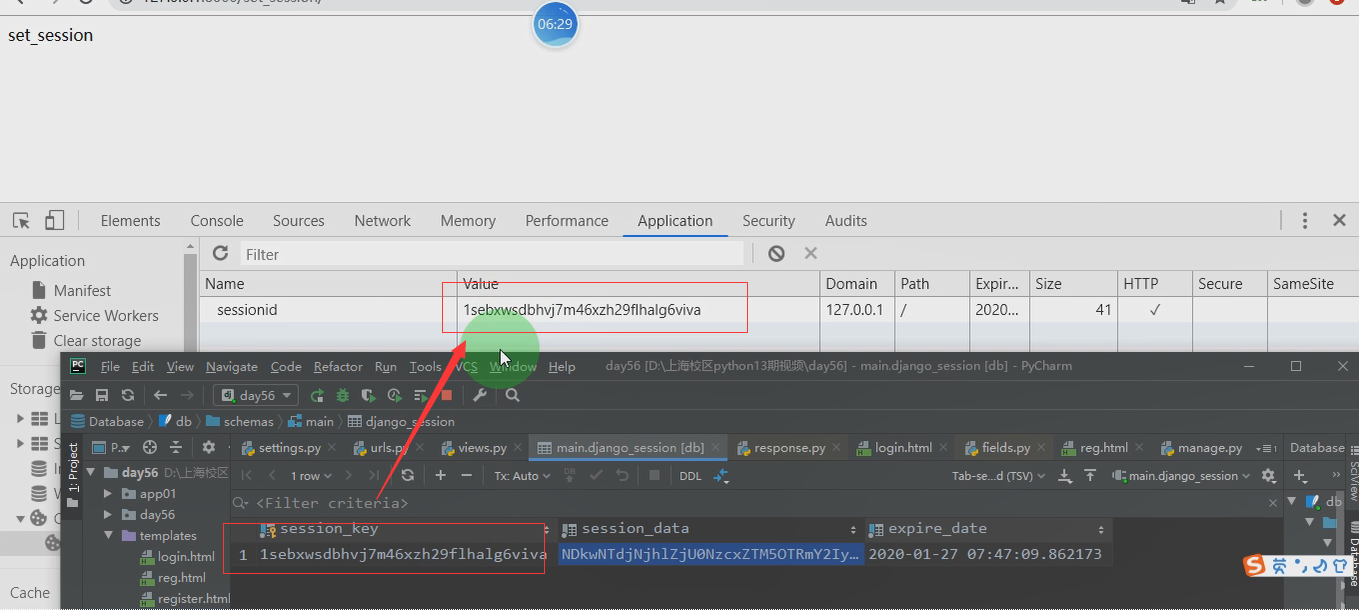
示例: request.session 设置
项目大体思路 登录设置session key会给到浏览器,request.session.get(key) 获取浏览器发过来的sessionkey 作对比
def set_session(request):
    # request.session['username'] = 'egondsb'
    request.session['name'] = 'egon'
    # request.session.set_expiry(5)
    return HttpResponse("set_session")

from django.http import JsonResponse
def get_session(request):
    # print(request.session)  # <django.contrib.sessions.backends.db.SessionStore object at 0x00000259F72683C8>

    print(request.session.get('name'))

    return HttpResponse("get_session")


def del_session(request):
    request.session.flush()
    return HttpResponse('注销了')


 浙公网安备 33010602011771号