elasticsearch5之Elastalert 安装使用 配置邮件报警和微信报警
简介
Elastalert是用python2写的一个报警框架(目前支持python2.6和2.7,不支持3.x),github地址为 https://github.com/Yelp/elastalert。他提供不同场景的规则配置,若觉得规则、告警不满足需求时,可以用python编写插件Adding a New Rule Type、Adding a New Alerter。
环境
系统:centos6.8
python:2.7.12(请参看升级centos6 默认python版本到2.7.12)
elasticsearch:5.5
kibana:5.5
Elastalert内置的告警方式:
- Email JIRA
- OpsGenie
- Commands
- HipChat MS
- Teams Slack
- Telegram
- AWS SNS
- VictorOps
- PagerDuty
- Exotel
- Twilio
- Gitter
安装
pip安装elastalert
安装pip包管理工具(参考)
$ pip install elastalert
- 1
或者 git clone (推荐)
$ git clone https://github.com/Yelp/elastalert.git
- 1
安装模块
$ pip install "setuptools>=11.3"
$ python setup.py install
- 1
- 2
根据不同的Elasticsearch版本安装elasticsearch-py。
Elasticsearch 5.x/2.x
$ pip install "elasticsearch>=5.0.0" ##5.x
$ pip install "elasticsearch<3.0.0" ##2.x
- 1
- 2
将源码放置在你指定的目录下:
$ cd /usr/local/elastalert/
$ cp config.yaml.example config.yaml
$ mkdir es_rules

[xxx@crmnginx elastalert]$ egrep  -v '^#|^$' config.yaml
rules_folder: es_rules
run_every:
  minutes: 5
buffer_time:
  minutes: 5
es_host: 10.xx.xx.xxx
es_port: xxxx
use_ssl: false
verify_certs: false
es_username: elastic
es_password: changeme
writeback_index: elastalert_status
alert_time_limit:
  days: 2

$ ll
[root@crmnginx elastalert]# ll
total 124
drwxr-xr-x. 4 root root  4096 Nov 12 09:39 build
-rw-r--r--. 1 root root  9737 Nov 12 09:39 changelog.md
-rw-r--r--. 1 root root  2001 Nov 12 14:39 config.yaml
-rw-r--r--. 1 root root  2029 Nov 12 09:39 config.yaml.example
drwxr-xr-x. 2 root root  4096 Nov 12 09:39 dist
-rw-r--r--. 1 root root   261 Nov 12 09:39 docker-compose.yml
-rw-r--r--. 1 root root   264 Nov 12 09:39 Dockerfile-test
drwxr-xr-x. 3 root root  4096 Nov 12 09:39 docs
drwxr-xr-x. 2 root root  4096 Nov 12 11:15 elastalert
drwxr-xr-x. 2 root root  4096 Nov 12 09:39 elastalert.egg-info
drwxr-xr-x. 2 root root  4096 Nov 12 14:14 elastalert_modules
drwxr-xr-x. 2 root root  4096 Nov 12 14:51 es_rules
drwxr-xr-x. 2 root root  4096 Nov 12 09:39 example_rules
-rw-r--r--. 1 root root 11359 Nov 12 09:39 LICENSE
-rw-r--r--. 1 root root   480 Nov 12 09:39 Makefile
-rw-r--r--. 1 root root 15945 Nov 12 09:39 README.md
-rw-r--r--. 1 root root    87 Nov 12 09:39 requirements-dev.txt
-rw-r--r--. 1 root root   372 Nov 12 09:39 requirements.txt
-rw-r--r--. 1 root root   100 Nov 12 09:39 setup.cfg
-rw-r--r--. 1 root root  1650 Nov 12 09:39 setup.py
-rw-r--r--. 1 root root   117 Nov 12 11:14 smtp_auth_file.yaml
-rw-r--r--. 1 root root   780 Nov 12 09:39 supervisord.conf.example
drwxr-xr-x. 2 root root  4096 Nov 12 09:39 tests
-rw-r--r--. 1 root root   606 Nov 12 09:39 tox.ini
- 1
- 2
- 3
- 4
- 5
- 6
- 7
- 8
- 9
- 10
- 11
- 12
- 13
- 14
- 15
- 16
- 17
- 18
- 19
- 20
- 21
- 22
- 23
- 24
- 25
- 26
- 27
- 28
- 29
- 30
- 31
- 32
- 33
- 34
- 35
- 36
- 37
- 38
- 39
- 40
- 41
- 42
- 43
- 44
- 45
- 46
- 47
配置解析
此处的配置文件是指config.yaml文件。
- rules_folder:ElastAlert将加载规则配置文件的地方,它将尝试加载文件夹中的每个.yaml文件(这里是加载es_rules目录下)。
- run_every:ElastAlert查询Elasticsearch的频率。
- buffer_time:是查询窗口的大小,从每个查询运行的时间向后延伸。对于其中use_count_query或use_terms_query设置为true的规则,此值将被忽略。
- es_host:是Elasticsearch集群的地址,ElastAlert将存储有关其状态、查询运行、警报和错误的数据。每个规则也可以设置不同的elasticsearch主机进行查询。
- es_port:Elasticsearch对应的端口。
- use_ssl: (可选的)是否使用TLS;连接到es_host;设置为True或False。
- verify_certs: (可选的)是否验证TLS证书; 设置为True或False,默认是True。
- client_cert: (可选的)PEM证书的路径。
- client_key: (可选的) 作为客户端密钥使用的私钥文件的路径。
- ca_certs: (可选的) 用于验证SSL连接的CA证书的路径。
- es_username: (可选的) 用于连接Elasticsearch的basic-auth用户名。
- es_password: (可选的) 用于连接Elasticsearch的密码。
- es_url_prefix: (可选的) Elasticsearch端点的URL前缀。
- es_send_get_body_as: (可选的) 查询Elasticsearch方法- GET,POST或- source,默认是GET。
- writeback_index:是ElastAlert将存储数据的索引名称。
- alert_time_limit: 是失败警报的重试窗口。
创建Elasticsearch索引
elastalert-create-index这个命令会在elasticsearch创建索引,便于ElastAlert将有关其查询及其警报的信息和元数据保存回Elasticsearch。这不是必须的步骤,但是强烈建议创建。因为对于审计,测试很有用,并且重启elastalert不影响计数和发送alert。默认情况下,创建的索引叫 elastalert_status。
$ elastalert-create-index --host 10.xxx.xx.xxx --port xxxx --username xxx --password xxx --no-ssl --no-verify-certs
- 1
创建成功之后,我们可以在Elasticsearch中看到所创建的索引elastalert_status:
$ curl  -u xxx  'localhost:9200/_cat/indices?v' |grep elastalert_status
green  open   elastalert_status                                               eWjVRAzjTX2vmhvAK931Ng   5   1        110            0    513.8kb          266kb
- 1
- 2
elastalert_status
ElastAlert 根据elastalert_status去确定首次启动的时候在什么时间范围内去查询,以避免重复查询。对于每个规则,它将从最近的结束时间开始查询。包括:
- @timestamp:文件上传到Elasticsearch的时间。这是在运行查询并且已经处理结果之后。
- rule_name:相应规则的名称。
- starttime:查询的开始时间戳。
- endtime:查询结束时间戳。
- hits:查询结果的数量。
- matches:处理命中后规则返回的匹配数。请注意,这并不一定意味着警报被触发。
- time_taken:此查询运行所需的秒数。
配置SMTP邮件报警
在/usr/local/elastalert/目录下创建文件smtp_auth_file.yaml,内容如下:
[root@crmnginx elastalert]$ cat smtp_auth_file.yaml
#邮箱用户名
user: no-xx@chtxx.com
##不是邮箱密码,是设置的SMTP密码
password: YdYfxxx
- 1
- 2
- 3
- 4
- 5
配置规则
在es_rules目录下修改配置文件,如下:
$ cd /opt/elastalert/es_rules
[xxx@crmnginx elastalert]$ egrep  -v '^#|^$' es_rules/frequency.yaml
 es_host: 10.xxx.xx.xxx
 es_port: 9200
 use_ssl: false
 verify_certs: false
 es_username: xxx
 es_password: xxx
 name: es_rule
 writeback_index: elastalert_status
 type: frequency
 index: logstash-nginx-*
 num_events: 5
 timeframe:
   minutes: 5
 filter:
 - query:
     query_string:
       query: "status:>=400"
     query_string:
       query: "status: >=500"
#SMTP configration
 smtp_host: smtp.263.net
 smtp_port: 25

#SMTP auth
 smtp_auth_file: /usr/local/elastalert/smtp_auth_file.yaml
 email_reply_to: no-xxx@chxxx.com
 from_addr: no-xxx@chxxx.com

# (Required)
# The alert is use when a match is found
 alert:
 - "email"

# (required, email specific)
# a list of email addresses to send alerts to
 email:
 - "xxx@chxxx.com"
- 1
- 2
- 3
- 4
- 5
- 6
- 7
- 8
- 9
- 10
- 11
- 12
- 13
- 14
- 15
- 16
- 17
- 18
- 19
- 20
- 21
- 22
- 23
- 24
- 25
- 26
- 27
- 28
- 29
- 30
- 31
- 32
- 33
- 34
- 35
- 36
- 37
- 38
- 39
- 40
上述规则表示:在elastalert执行的五分钟内,出现五条有status:>=400 或者 status: >=500的日志,则触发告警,并且告警通知将以email的形式从no-xxx@chxxx.com邮箱发送给xxx@chxxx.com
规则配置解析:
-
es_host、es_port:应该指向我们要查询的Elasticsearch集群。
-
name:是这个规则的唯一名称。如果两个规则共享相同的名称,ElastAlert将不会启动。
-
type:每个规则都有不同的类型,可能会采用不同的参数。该frequency类型表示“在timeframe时间内匹配成功次数超过num_events发出警报”。有关其他类型的信息,请参阅规则类型。
-
index:要查询的索引的名称。配置,从某类索引里读取数据,目前已经支持Ymd格式,需要先设置use_strftime_index:true,然后匹配索引,配置形如:index: logstash-es-test%Y.%m.%d,表示匹配logstash-es-test名称开头,以年月日作为索引后缀的index。
-
num_events:此参数特定于frequency类型,是触发警报时的阈值。
-
timeframe:timeframe是num_events必须发生的时间段。
-
filter:是用于过滤结果的Elasticsearch过滤器列表。有关
详细信息,请参阅编写过滤规则。 -
email:是要发送警报的地址列表。
-
alert:配置,设置触发报警时执行哪些报警手段。不同的type还有自己独特的配置选项。目前ElastAlert 有以下几种自带ruletype:
- any:只要有匹配就报警;
- blacklist:compare_key字段的内容匹配上 blacklist数组里任意内容;
- whitelist:compare_key字段的内容一个都没能匹配上whitelist数组里内容;
- change:在相同query_key条件下,compare_key字段的内容,在 timeframe范围内 发送变化;
- frequency:在相同 query_key条件下,timeframe 范围内有num_events个被过滤出 来的异常;
- spike:在相同query_key条件下,前后两个timeframe范围内数据量相差比例超过spike_height。其中可以通过spike_type设置具体涨跌方向是- up,down,both 。还可以通过threshold_ref设置要求上一个周期数据量的下限,threshold_cur设置要求当前周期数据量的下限,如果数据量不到下限,也不触发;
- flatline:timeframe 范围内,数据量小于threshold 阈值;
- new_term:fields字段新出现之前terms_window_size(默认30天)范围内最多的terms_size (默认50)个结果以外的数据;
- cardinality:在相同 query_key条件下,timeframe范围内cardinality_field的值超过 max_cardinality 或者低于min_cardinality
demo测试
命令如下:
$ python -m elastalert.elastalert --config ./config.yaml #运行命令,加载所有rules
$ python -m elastalert.elastalert --config ./config.yaml --rule ./es_rules/frequency.yaml ## 或者单独执行 rules_folder 里的某个 rule
- 1
- 2
给Elasticsearch添加测试数据:
$ curl -X POST "http://127.0.0.1:9200/logstash-nginx-xx/test"  -d '{
"@timestamp": "2018-11-12T10:54:41.000Z",
"status": "500"
}'
- 1
- 2
- 3
- 4
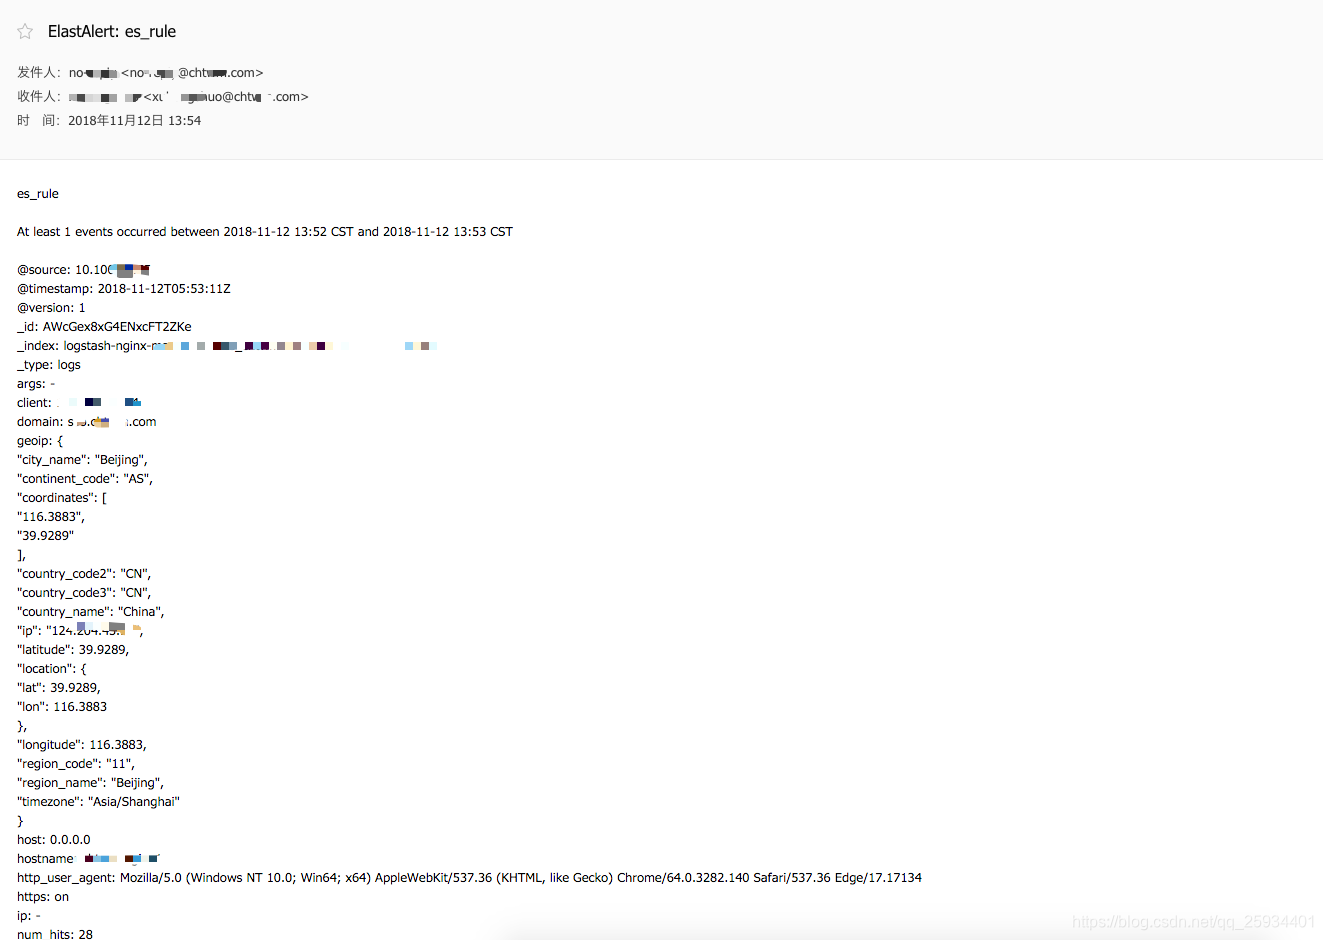
产看邮件报警
配置微信报警
微信报警项目地址:https://github.com/anjia0532/elastalert-wechat-plugin
配置地址:https://anjia0532.github.io/2017/02/16/elastalert-wechat-plugin/
配置文件
$ cd ~/
$ git clone https://github.com/Yelp/elastalert.git
$ cd elastalert
$ wget https://raw.githubusercontent.com/anjia0532/elastalert-wechat-plugin/master/elastalert_modules/wechat_qiye_alert.py
$ touch ~/elastalert/elastalert_modules/__init__.py
$ cp  config.yaml.example config.yaml
$ vi es_rules/wechat_frequency.yaml
- 1
- 2
- 3
- 4
- 5
- 6
- 7
[root@crmnginx elastalert]# egrep  -v '^#|^$' es_rules/wechat_frequency.yaml
 es_host: 10.xxx.xx.xxx
 es_port: xxxx
 use_ssl: false
 verify_certs: false
 es_username: xx
 es_password: xxxx
 name: es_rule
 writeback_index: elastalert_status
 type: frequency
 index: logstash-nginx-*
 num_events: 1
 timeframe:
   minutes: 1
 filter:
 - query:
     query_string:
       query: "status:>=400"
     query_string:
       query: "status: >=500"
 alert:
 - "elastalert_modules.wechat_qiye_alert.WeChatAlerter"
#后台登陆后【设置】->【权限管理】->【普通管理组】->【创建并设置通讯录和应用权限】->【CorpID,Secret】
#设置微信企业号的appid
 corp_id: 'xx'
#设置微信企业号的Secret
 secret: 'xxx'
#后台登陆后【应用中心】->【选择应用】->【应用id】
#设置微信企业号应用id
 agent_id: 'x'
#部门id
 party_id: 'x'
#用户微信号
 user_id: xx
# 标签id
 tag_id: xx
- 1
- 2
- 3
- 4
- 5
- 6
- 7
- 8
- 9
- 10
- 11
- 12
- 13
- 14
- 15
- 16
- 17
- 18
- 19
- 20
- 21
- 22
- 23
- 24
- 25
- 26
- 27
- 28
- 29
- 30
- 31
- 32
- 33
- 34
- 35
- 36
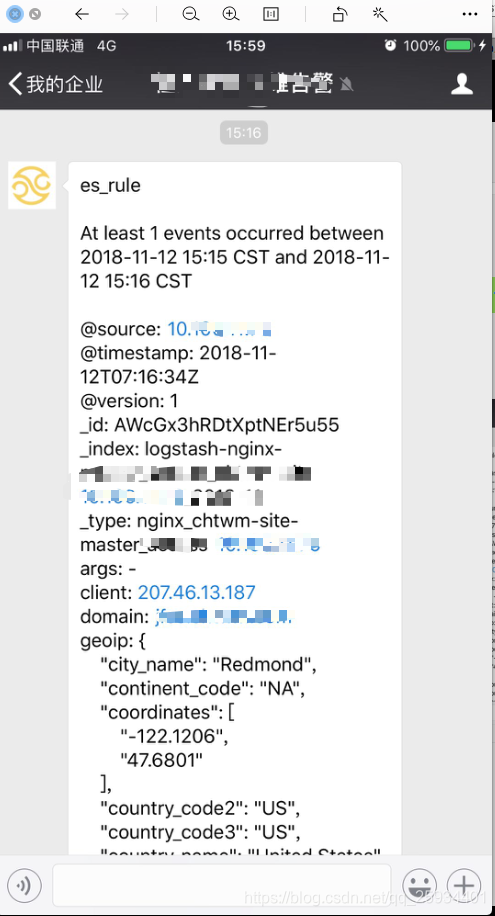
微信接收报警截图
配置微信报警模版
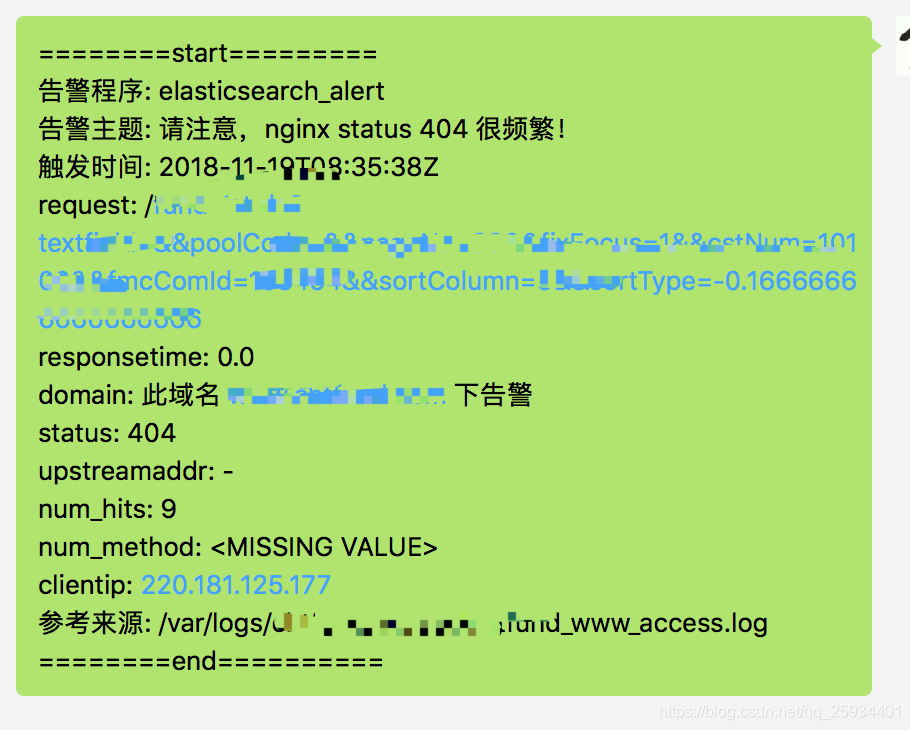
在rule文件加上一下内容:
 alert:
- "elastalert_modules.wechat_qiye_alert.WeChatAlerter"
alert_text_type: alert_text_only
alert_text: |
  ========start=========
  告警程序: elasticsearch_alert
  告警主题: 接口 {} 响应时间大于2秒!
  触发时间: {}
  request: {}
  responsetime: {}
  domain: 此域名 {} 下接口告警
  status: {}
  upstreamaddr: {}
  num_hits: {}
  num_method: {}
  clientip: {}
  参考来源: {}
  ========end==========
alert_text_args:
 - request
 - "@timestamp"
 - request
 - responsetime
 - domain
 - status
 - upstreamaddr
 - num_hits
 - num_method
 - client
 - path
- 1
- 2
- 3
- 4
- 5
- 6
- 7
- 8
- 9
- 10
- 11
- 12
- 13
- 14
- 15
- 16
- 17
- 18
- 19
- 20
- 21
- 22
- 23
- 24
- 25
- 26
- 27
- 28
- 29
- 30
安装python爬虫scrapy踩过的那些坑和编程外的思考
这些天应朋友的要求抓取某个论坛帖子的信息,网上搜索了一下开源的爬虫资料,看了许多对于开源爬虫的比较发现开源爬虫scrapy比较好用。但是以前一直用的java和php,对python不熟悉,于是花一天时间粗略了解了一遍python的基础知识。然后就开干了,没想到的配置一个运行环境就花了我一天时间。下面记录下安装和配置scrapy踩过的那些坑吧。
运行环境:CentOS 6.0 虚拟机
开始上来先得安装python运行环境。然而我运行了一下python命令,发现已经自带了,窃(大)喜(坑)。于是google搜索了一下安装步骤,pip install Scrapy直接安装,发现不对。少了pip,于是安装pip。再次pip install Scrapy,发现少了python-devel,于是这么来回折腾了一上午。后来下载了scrapy的源码安装,突然曝出一个需要python2.7版本,再通过python --version查看,一个2.6映入眼前;顿时千万个草泥马在心中奔腾。
于是查看了官方文档(http://doc.scrapy.org/en/master/intro/install.html),果然是要python2.7。没办法,只能升级python的版本了。
1、升级python
- 下载python2.7并安装

wget https://www.python.org/ftp/python/2.7.10/Python-2.7.10.tgz
tar -zxvf Python-2.7.10.tgz
cd Python-2.7.10
./configure
make all
make installmake clean
make distclean
- 检查python版本
python --version
发现还是2.6
- 更改python命令指向
mv /usr/bin/python /usr/bin/python2.6.6_bak
ln -s /usr/local/bin/python2.7 /usr/bin/python
- 再次检查版本
# python --version
Python 2.7.10
到这里,python算是升级完成了,继续安装scrapy。于是pip install scrapy,还是报错。
-bash: pip: command not found
- 安装pip
wget https://bootstrap.pypa.io/get-pip.py
python get-pip.py
于是pip install scrapy,还是报错
Collecting Twisted>=10.0.0 (from scrapy)
  Could not find a version that satisfies the requirement Twisted>=10.0.0 (from scrapy) (from versions: )
No matching distribution found for Twisted>=10.0.0 (from scrapy)
少了Twisted,于是安装Twisted
2、安装Twisted
- 下载Twisted(https://pypi.python.org/packages/source/T/Twisted/Twisted-15.2.1.tar.bz2#md5=4be066a899c714e18af1ecfcb01cfef7)
- 安装
wget https://pypi.python.org/packages/source/T/Twisted/Twisted-15.2.1.tar.bz2
tar -xjvf Twisted-15.2.1.tar.bz2
cd Twisted-15.2.1
python setup.py install
- 查看是否安装成功
python
Python 2.7.10 (default, Jun  5 2015, 17:56:24)
[GCC 4.4.4 20100726 (Red Hat 4.4.4-13)] on linux2
Type "help", "copyright", "credits" or "license" for more information.
>>> import twisted
>>>
此时索命twisted已经安装成功。于是继续pip install scrapy,还是报错。
3、安装libxlst、libxml2和xslt-config
Collecting libxlst
  Could not find a version that satisfies the requirement libxlst (from versions: )
No matching distribution found for libxlst
Collecting libxml2
  Could not find a version that satisfies the requirement libxml2 (from versions: )
No matching distribution found for libxml2
wget http://xmlsoft.org/sources/libxslt-1.1.28.tar.gz
tar -zxvf libxslt-1.1.28.tar.gz
cd libxslt-1.1.28/
./configure
make
make install
wget ftp://xmlsoft.org/libxml2/libxml2-git-snapshot.tar.gz
tar -zxvf libxml2-git-snapshot.tar.gz
cd libxml2-2.9.2/
./configure
make
make install
安装好以后继续pip install scrapy,幸运之星仍未降临
4、安装cryptography
Failed building wheel for cryptography
下载cryptography(https://pypi.python.org/packages/source/c/cryptography/cryptography-0.4.tar.gz)
安装
wget https://pypi.python.org/packages/source/c/cryptography/cryptography-0.4.tar.gz
tar -zxvf cryptography-0.4.tar.gz
cd cryptography-0.4
python setup.py build
python setup.py install
发现安装的时候报错:
No package 'libffi' found
于是下载libffi下载并安装
wget ftp://sourceware.org/pub/libffi/libffi-3.2.1.tar.gz
tar -zxvf libffi-3.2.1.tar.gz
cd libffi-3.2.1
./configure
make
make install
安装后发现仍然报错
Package libffi was not found in the pkg-config search path.
    Perhaps you should add the directory containing `libffi.pc'
    to the PKG_CONFIG_PATH environment variable
    No package 'libffi' found
于是设置:PKG_CONFIG_PATH
export PKG_CONFIG_PATH=/usr/local/lib/pkgconfig:$PKG_CONFIG_PATH
再次安装scrapy
pip install scrapy
幸运女神都去哪儿了?
ImportError: libffi.so.6: cannot open shared object file: No such file or directory
于是
whereis libffi
libffi: /usr/local/lib/libffi.a /usr/local/lib/libffi.la /usr/local/lib/libffi.so
已经正常安装,网上搜索了一通,发现是LD_LIBRARY_PATH没设置,于是
export LD_LIBRARY_PATH=/usr/local/lib
于是继续安装cryptography-0.4
python setup.py build
python setup.py install
此时正确安装,没有报错信息了。
5、继续安装scrapy
pip install scrapy
看着提示信息:
Building wheels for collected packages: cryptography
  Running setup.py bdist_wheel for cryptography
在这里停了好久,在想幸运女神是不是到了。等了一会
Requirement already satisfied (use --upgrade to upgrade): zope.interface>=3.6.0 in /usr/local/lib/python2.7/site-packages/zope.interface-4.1.2-py2.7-linux-i686.egg (from Twisted>=10.0.0->scrapy)
Collecting cryptography>=0.7 (from pyOpenSSL->scrapy)
  Using cached cryptography-0.9.tar.gz
Requirement already satisfied (use --upgrade to upgrade): setuptools in /usr/local/lib/python2.7/site-packages (from zope.interface>=3.6.0->Twisted>=10.0.0->scrapy)
Requirement already satisfied (use --upgrade to upgrade): idna in /usr/local/lib/python2.7/site-packages (from cryptography>=0.7->pyOpenSSL->scrapy)
Requirement already satisfied (use --upgrade to upgrade): pyasn1 in /usr/local/lib/python2.7/site-packages (from cryptography>=0.7->pyOpenSSL->scrapy)
Requirement already satisfied (use --upgrade to upgrade): enum34 in /usr/local/lib/python2.7/site-packages (from cryptography>=0.7->pyOpenSSL->scrapy)
Requirement already satisfied (use --upgrade to upgrade): ipaddress in /usr/local/lib/python2.7/site-packages (from cryptography>=0.7->pyOpenSSL->scrapy)
Requirement already satisfied (use --upgrade to upgrade): cffi>=0.8 in /usr/local/lib/python2.7/site-packages (from cryptography>=0.7->pyOpenSSL->scrapy)
Requirement already satisfied (use --upgrade to upgrade): ordereddict in /usr/local/lib/python2.7/site-packages (from enum34->cryptography>=0.7->pyOpenSSL->scrapy)
Requirement already satisfied (use --upgrade to upgrade): pycparser in /usr/local/lib/python2.7/site-packages (from cffi>=0.8->cryptography>=0.7->pyOpenSSL->scrapy)
Building wheels for collected packages: cryptography
  Running setup.py bdist_wheel for cryptography
  Stored in directory: /root/.cache/pip/wheels/d7/64/02/7258f08eae0b9c930c04209959c9a0794b9729c2b64258117e
Successfully built cryptography
Installing collected packages: cryptography
  Found existing installation: cryptography 0.4
    Uninstalling cryptography-0.4:
      Successfully uninstalled cryptography-0.4
Successfully installed cryptography-0.9
显示如此的信息。看到此刻,内流马面。谢谢CCAV,感谢MTV,钓鱼岛是中国的。终于安装成功了。
6、测试scrapy
创建测试脚本
cat > myspider.py <<EOF

from scrapy import Spider, Item, Field

class Post(Item):
    title = Field()

class BlogSpider(Spider):
    name, start_urls = 'blogspider', ['http://www.cnblogs.com/rwxwsblog/']

    def parse(self, response):
        return [Post(title=e.extract()) for e in response.css("h2 a::text")]

EOF
测试脚本能否正常运行
scrapy runspider myspider.py
2015-06-06 20:25:16 [scrapy] INFO: Scrapy 1.0.0rc2 started (bot: scrapybot)
2015-06-06 20:25:16 [scrapy] INFO: Optional features available: ssl, http11
2015-06-06 20:25:16 [scrapy] INFO: Overridden settings: {}
2015-06-06 20:25:16 [py.warnings] WARNING: :0: UserWarning: You do not have a working installation of the service_identity module: 'No module named service_identity'.  Please install it from <https://pypi.python.org/pypi/service_identity> and make sure all of its dependencies are satisfied.  Without the service_identity module and a recent enough pyOpenSSL to support it, Twisted can perform only rudimentary TLS client hostname verification.  Many valid certificate/hostname mappings may be rejected.

2015-06-06 20:25:16 [scrapy] INFO: Enabled extensions: CloseSpider, TelnetConsole, LogStats, CoreStats, SpiderState
2015-06-06 20:25:16 [scrapy] INFO: Enabled downloader middlewares: HttpAuthMiddleware, DownloadTimeoutMiddleware, UserAgentMiddleware, RetryMiddleware, DefaultHeadersMiddleware, MetaRefreshMiddleware, HttpCompressionMiddleware, RedirectMiddleware, CookiesMiddleware, ChunkedTransferMiddleware, DownloaderStats
2015-06-06 20:25:16 [scrapy] INFO: Enabled spider middlewares: HttpErrorMiddleware, OffsiteMiddleware, RefererMiddleware, UrlLengthMiddleware, DepthMiddleware
2015-06-06 20:25:16 [scrapy] INFO: Enabled item pipelines:
2015-06-06 20:25:16 [scrapy] INFO: Spider opened
2015-06-06 20:25:16 [scrapy] INFO: Crawled 0 pages (at 0 pages/min), scraped 0 items (at 0 items/min)
2015-06-06 20:25:16 [scrapy] DEBUG: Telnet console listening on 127.0.0.1:6023
2015-06-06 20:25:17 [scrapy] DEBUG: Crawled (200) <GET http://www.cnblogs.com/rwxwsblog/> (referer: None)
2015-06-06 20:25:17 [scrapy] INFO: Closing spider (finished)
2015-06-06 20:25:17 [scrapy] INFO: Dumping Scrapy stats:
{'downloader/request_bytes': 226,
 'downloader/request_count': 1,
 'downloader/request_method_count/GET': 1,
 'downloader/response_bytes': 5383,
 'downloader/response_count': 1,
 'downloader/response_status_count/200': 1,
 'finish_reason': 'finished',
 'finish_time': datetime.datetime(2015, 6, 6, 12, 25, 17, 310084),
 'log_count/DEBUG': 2,
 'log_count/INFO': 7,
 'log_count/WARNING': 1,
 'response_received_count': 1,
 'scheduler/dequeued': 1,
 'scheduler/dequeued/memory': 1,
 'scheduler/enqueued': 1,
 'scheduler/enqueued/memory': 1,
 'start_time': datetime.datetime(2015, 6, 6, 12, 25, 16, 863599)}
2015-06-06 20:25:17 [scrapy] INFO: Spider closed (finished)
运行正常(此时心中窃喜,^_^....)。
7、创建自己的scrapy项目(此时换了一个会话)
scrapy startproject tutorial
输出以下信息
Traceback (most recent call last):
  File "/usr/local/bin/scrapy", line 9, in <module>
    load_entry_point('Scrapy==1.0.0rc2', 'console_scripts', 'scrapy')()
  File "/usr/local/lib/python2.7/site-packages/pkg_resources/__init__.py", line 552, in load_entry_point
    return get_distribution(dist).load_entry_point(group, name)
  File "/usr/local/lib/python2.7/site-packages/pkg_resources/__init__.py", line 2672, in load_entry_point
    return ep.load()
  File "/usr/local/lib/python2.7/site-packages/pkg_resources/__init__.py", line 2345, in load
    return self.resolve()
  File "/usr/local/lib/python2.7/site-packages/pkg_resources/__init__.py", line 2351, in resolve
    module = __import__(self.module_name, fromlist=['__name__'], level=0)
  File "/usr/local/lib/python2.7/site-packages/Scrapy-1.0.0rc2-py2.7.egg/scrapy/__init__.py", line 48, in <module>
    from scrapy.spiders import Spider
  File "/usr/local/lib/python2.7/site-packages/Scrapy-1.0.0rc2-py2.7.egg/scrapy/spiders/__init__.py", line 10, in <module>
    from scrapy.http import Request
  File "/usr/local/lib/python2.7/site-packages/Scrapy-1.0.0rc2-py2.7.egg/scrapy/http/__init__.py", line 11, in <module>
    from scrapy.http.request.form import FormRequest
  File "/usr/local/lib/python2.7/site-packages/Scrapy-1.0.0rc2-py2.7.egg/scrapy/http/request/form.py", line 9, in <module>
    import lxml.html
  File "/usr/local/lib/python2.7/site-packages/lxml/html/__init__.py", line 42, in <module>
    from lxml import etree
ImportError: /usr/lib/libxml2.so.2: version `LIBXML2_2.9.0' not found (required by /usr/local/lib/python2.7/site-packages/lxml/etree.so)
心中无数个草泥马再次狂奔。怎么又不行了?难道会变戏法?定定神看了下:ImportError: /usr/lib/libxml2.so.2: version `LIBXML2_2.9.0' not found (required by /usr/local/lib/python2.7/site-packages/lxml/etree.so)。这是那样的熟悉呀!想了想,这怎么和前面的ImportError: libffi.so.6: cannot open shared object file: No such file or directory那么类似呢?于是
8、添加环境变量
export LD_LIBRARY_PATH=/usr/local/lib
再次运行:
scrapy startproject tutorial
输出以下信息:
[root@bogon scrapy]# scrapy startproject tutorial
2015-06-06 20:35:43 [scrapy] INFO: Scrapy 1.0.0rc2 started (bot: scrapybot)
2015-06-06 20:35:43 [scrapy] INFO: Optional features available: ssl, http11
2015-06-06 20:35:43 [scrapy] INFO: Overridden settings: {}
New Scrapy project 'tutorial' created in:
    /root/scrapy/tutorial

You can start your first spider with:
    cd tutorial
    scrapy genspider example example.com
尼玛的终于成功了。由此可见,scrapy运行的时候需要LD_LIBRARY_PATH环境变量的支持。可以考虑将其加入环境变量中
vi /etc/profile
添加:export LD_LIBRARY_PATH=/usr/local/lib 这行(前面的PKG_CONFIG_PATH也可以考虑添加进来,export PKG_CONFIG_PATH=/usr/local/lib/pkgconfig:$PKG_CONFIG_PATH)
注:安装的时候可以留意Libraries安装的路径,以libffi为例:
libtool: install: /usr/bin/install -c .libs/libffi.so.6.0.4 /usr/local/lib/../lib64/libffi.so.6.0.4
libtool: install: (cd /usr/local/lib/../lib64 && { ln -s -f libffi.so.6.0.4 libffi.so.6 || { rm -f libffi.so.6 && ln -s libffi.so.6.0.4 libffi.so.6; }; })
libtool: install: (cd /usr/local/lib/../lib64 && { ln -s -f libffi.so.6.0.4 libffi.so || { rm -f libffi.so && ln -s libffi.so.6.0.4 libffi.so; }; })
libtool: install: /usr/bin/install -c .libs/libffi.lai /usr/local/lib/../lib64/libffi.la
libtool: install: /usr/bin/install -c .libs/libffi.a /usr/local/lib/../lib64/libffi.a
libtool: install: chmod 644 /usr/local/lib/../lib64/libffi.a
libtool: install: ranlib /usr/local/lib/../lib64/libffi.a
libtool: finish: PATH="/usr/local/sbin:/usr/local/bin:/sbin:/bin:/usr/sbin:/usr/bin:/www/wdlinux/mysql/bin:/root/bin:/sbin" ldconfig -n /usr/local/lib/../lib64
----------------------------------------------------------------------
Libraries have been installed in:
   /usr/local/lib/../lib64

If you ever happen to want to link against installed libraries
in a given directory, LIBDIR, you must either use libtool, and
specify the full pathname of the library, or use the `-LLIBDIR'
flag during linking and do at least one of the following:
   - add LIBDIR to the `LD_LIBRARY_PATH' environment variable
     during execution
   - add LIBDIR to the `LD_RUN_PATH' environment variable
     during linking
   - use the `-Wl,-rpath -Wl,LIBDIR' linker flag
   - have your system administrator add LIBDIR to `/etc/ld.so.conf'

See any operating system documentation about shared libraries for
more information, such as the ld(1) and ld.so(8) manual pages.
----------------------------------------------------------------------
 /bin/mkdir -p '/usr/local/share/info'
 /usr/bin/install -c -m 644 ../doc/libffi.info '/usr/local/share/info'
 install-info --info-dir='/usr/local/share/info' '/usr/local/share/info/libffi.info'
 /bin/mkdir -p '/usr/local/lib/pkgconfig'
 /usr/bin/install -c -m 644 libffi.pc '/usr/local/lib/pkgconfig'
make[3]: Leaving directory `/root/python/libffi-3.2.1/x86_64-unknown-linux-gnu'
make[2]: Leaving directory `/root/python/libffi-3.2.1/x86_64-unknown-linux-gnu'
make[1]: Leaving directory `/root/python/libffi-3.2.1/x86_64-unknown-linux-gnu'
这里可以知道libffi安装的路径为/usr/local/lib/../lib64,因此在引入LD_LIBRARY_PATH时应该为:export LD_LIBRARY_PATH=/usr/local/lib:/usr/local/lib64:$LD_LIBRARY_PATH,此处需要特别留意。
保存后检查是否存在异常:
source /etc/profile
开一个新的会话运行
scrapy runspider myspider.py
发现正常运行,可见LD_LIBRARY_PATH是生效的。至此scrapy就算正式安装成功了。
查看scrapy版本:运行scrapy version,看了下scrapy的版本为“Scrapy 1.0.0rc2”
9、编程外的思考(感谢阅读到此的你,我自己都有点晕了。)
-
- 有没有更好的安装方式呢?我的这种安装方式是否有问题?有的话请告诉我。(很多依赖包我采用pip和easy_install都无法安装,感觉是pip配置文件配置源的问题)
- 一定要看官方的文档,Google和百度出来的结果往往是碎片化的,不全面。这样可以少走很多弯路,减少不必要的工作量。
- 遇到的问题要先思考,想想是什么问题再Google和百度。
- 解决问题要形成文档,方便自己也方便别人。
10、参考文档
http://scrapy.org/
http://doc.scrapy.org/en/master/
http://blog.csdn.net/slvher/article/details/42346887
http://blog.csdn.net/niying/article/details/27103081
http://www.cnblogs.com/xiaoruoen/archive/2013/02/27/2933854.html

扫描公众号,关注更多信息

 浙公网安备 33010602011771号