多级缓存实现 - nginx本地缓存 - redis缓存 - JVM缓存
概要

步骤:
1. 安装redis 省略
2. 安装OpenResty
2.1 OpenResty概要说明
OpenResty是一个基于Nginx的高性能Web平台,用于方便地搭建能够处理超高并发、扩展性极高的动态Web应用、Web服务和动态网关,具有以下特点:
-
具备Nginx的完整功能
-
基于Lua语言进行扩展,集成了大量的Lua库、第三方模块
-
允许使用Lua自定义业务逻辑、自定义库
官方网站 -- https://openresty.org/cn
官网安装说明 -- https://openresty.org/cn/installation.html
2.2 安装
2.2.1 安装前准备,需要先安装这些库 perl 5.6.1+ ,libpcre, libssl 执行下面命令安装Debian和ubuntu用户
apt-get install libpcre3-dev libssl-dev perl make build-essential curl
2.2.2 下载OpenResty源码
https://openresty.org/cn/download.html
滚动到页面最下方可下载的历史版本
2.2.3 解压
tar -xzvf openresty-VERSION.tar.gz
2.2.4 然后在进入 openresty-VERSION/ 目录
输入命令 ./config
默认安装到/usr/local/openresty目录,可以用下面命令指定安装目录
./config --prefix=指定目录
2.2.5 编译
输入命令 make
2.2.6 安装
输入命令 make install
安装完成后的目录结构

进入到bin目录,openresty的启动其实就是将所集成的nginx服务启动

启动: 安装目录/nginx/sbin/nginx
停止: 安装目录/nginx/sbin/nginx -s stop
重启: 安装目录/nginx/sbin/nginx -s reload
访问: 打开浏览器输nginx.conf中配置的端口号

3. 安装Canal
3.1 Canal概要说明
Canal是阿里巴巴旗下的一款开源项目,基于java开发,基于数据库增量日志解析,提供增量数据订阅&消费, GitHub地址:https://github.com/alibaba/canal
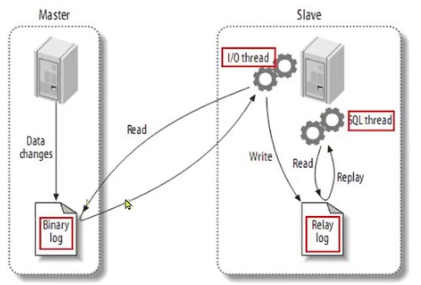
Canal是基于Mysql的主从同步来实现的,MySQL主从同步的原理如下:

-
MySQL master将数据变更写入二进制日志(binary log),其中记录的数据叫做binary log events
-
MySQL slave将master的binary log events拷贝到它的中继日志(relay log)
-
MySQL slave重放relay log中事件,将数据变更反映它自己的数据
Canal就是把自己伪装成MySQL的一个slave节点,从而监听master的binary log变化,再把得到的变化信息通知给Canal的客户端,进而完成对器数据库的同步。

3.2 安装
3.2.1 下载Canal
下载地址: https://github.com/alibaba/canal/releases
3.2.2 解压到指定目录
tar -zxvf canal.deployer-version.tar.gz -C /usr/local/canal
-C后面接安装目录
3.2.3 解压后的目录结构

3.2.4 修改conf/canal.properties文件中以下属性,如没有则添加
# canal监听端口,默认也是11111
canal.port = 11111
# canal实例名称
canal.destinations = example
# mysql数据库地址和端口
canal.instance.master.address=localhost:3306
# mysql数据库用户名
canal.instance.dbUsername=canal
# mysql数据库密码
canal.instance.dbPassword=canal
# 编码方式
canal.instance.connectionCharset=UTF-8
canal.instance.tsdb.enable=true
canal.instance.gtidon=false
# 要监听的表名称
# 表名支持正则表达式,多个正则之间逗号(,)分隔,转义字符要用双斜杠(\\)
# 所有表: .*
# canal库下所有表: canal\\..*
# canal下以canal打头的表: canal\\.canal.*
# canal下的test表: canal.test
canal.instance.filter.regex=goods\\..*
3.2.5 启动Canal
./bin/startup.sh
关闭Canal
./bin/stop.sh
3.2.6 查看Canal日志
查看canal日志
tail -f ./logs/canal/canal.log
查看实例日志
tail -f ./logs/example/example.log
以下内容说明启动成功

3.2.7 在mysql中创建canal用户并分配权限
create user canal@'%' IDENTIFIED by 'canal';

GRANT SELECT,REPLICATION SLAVE,REPLICATION CLIENT,SUPER ON *.* TO 'canal'@'%' identified by 'canal';

FLUSH privileges;
3.2.8 配置mysql的主从同步并重启mysql
修改my.cnf文件添加以下内容:
# 设置binary log文件存储地址和文件名
log_bin=/var/log/mysql/mysql-bin
# 指定对哪个database记录binary log events,这里记录goods这个库
binlog_do_db=goods

注:如启动失败请先启动Canal之后再启动mysql
重启mysql: service mysql restart
mysql启动后在/var/log/mysql/生成以下文件,.000001会不断的自增

4. 编写服务器端JVM缓存代码和redis存储代码
4.1 处理流程
-
工程启动将商品信息添加到jvm缓存,同时存储到redis
-
定义查询接口api,根据id查询商品,优先到jvm缓存获取,未查询到再到mysql数据库获取,mysql中查询到再将其添加到jvm缓存
-
canal监听product表的变化,实现jvm缓存和redis的同步
4.2 工程目录结构

4.3 依赖-springboot版本-jdk版本
<parent>
        <groupId>org.springframework.boot</groupId>
        <artifactId>spring-boot-starter-parent</artifactId>
        <version>2.3.0.RELEASE</version>
        <relativePath/> <!-- lookup parent from repository -->
    </parent>
    <properties>
        <java.version>1.8</java.version>
    </properties>
    <dependencies>
        <dependency>
            <groupId>org.springframework.boot</groupId>
            <artifactId>spring-boot-starter-web</artifactId>
        </dependency>
        <dependency>
            <groupId>org.springframework.boot</groupId>
            <artifactId>spring-boot-starter-jdbc</artifactId>
        </dependency>
        <!-- mysql 连接驱动依赖 -->
        <dependency>
            <groupId>mysql</groupId>
            <artifactId>mysql-connector-java</artifactId>
            <version>8.0.20</version>
        </dependency>
        <!-- mybatis-plus依赖 不再需要额外引入mybatis依赖  -->
        <dependency>
            <groupId>com.baomidou</groupId>
            <artifactId>mybatis-plus-boot-starter</artifactId>
            <version>3.4.2</version>
        </dependency>
        <!-- mybatis-plus代码生成器 -->
        <dependency>
            <groupId>com.baomidou</groupId>
            <artifactId>mybatis-plus-generator</artifactId>
            <version>3.5.1</version>
        </dependency>
        <!-- mybatis-plus代码生成器依赖的Velocity引擎模板 -->
        <dependency>
            <groupId>org.apache.velocity</groupId>
            <artifactId>velocity-engine-core</artifactId>
            <version>2.1</version>
        </dependency>
        <!-- mybatis-plus代码生成器依赖的Freemarker引擎模板 -->
        <dependency>
            <groupId>org.freemarker</groupId>
            <artifactId>freemarker</artifactId>
            <version>2.3.28</version>
        </dependency>
        <!-- redis依赖 -->
        <dependency>
            <groupId>org.springframework.boot</groupId>
            <artifactId>spring-boot-starter-data-redis</artifactId>
        </dependency>
        <!-- redis的lettuce依赖commons-pool2 -->
        <dependency>
            <groupId>org.apache.commons</groupId>
            <artifactId>commons-pool2</artifactId>
        </dependency>
        <!-- 工具类 -->
        <dependency>
            <groupId>cn.hutool</groupId>
            <artifactId>hutool-all</artifactId>
            <version>4.5.16</version>
        </dependency>
        <!-- caffeine缓存依赖 -->
        <dependency>
            <groupId>com.github.ben-manes.caffeine</groupId>
            <artifactId>caffeine</artifactId>
            <version>2.8.0</version>
        </dependency>
        <!-- Canal -->
        <dependency>
            <groupId>top.javatool</groupId>
            <artifactId>canal-spring-boot-starter</artifactId>
            <version>1.2.1-RELEASE</version>
        </dependency>
    </dependencies>
4.4 application.yml配置
spring:
  datasource:
    url: jdbc:mysql://192.168.128.128:3306/goods?useUnicode=true&characterEncoding=utf-8&serverTimezone=UTC
    driver-class-name: com.mysql.cj.jdbc.Driver
    username: root
    password: 123456
  redis:
    host: localhost
    database: 1
    port: 6379
    password: 123456
    timeout: 300ms

canal:
  destination: example # canal实例名称
  server: 192.168.128.128:11111  # canal地址
4.5 MybatisPlus自动生成器代码
package com.qiang.cache.generator;

import com.baomidou.mybatisplus.generator.FastAutoGenerator;
import com.baomidou.mybatisplus.generator.config.DataSourceConfig;
import com.baomidou.mybatisplus.generator.config.OutputFile;
import com.baomidou.mybatisplus.generator.config.converts.MySqlTypeConvert;
import com.baomidou.mybatisplus.generator.config.querys.MySqlQuery;
import com.baomidou.mybatisplus.generator.engine.FreemarkerTemplateEngine;
import com.baomidou.mybatisplus.generator.keywords.MySqlKeyWordsHandler;
import java.util.ArrayList;
import java.util.Collections;
import java.util.List;

/**
 * 代码生成器
 */
public class MybatisGenerator {

    public static void main(String[] args) {

        //获得当前项目路径
        String projectPath = System.getProperty("user.dir") + "\\";
        String parent = "com.qiang.cache";
        List<String> tables = new ArrayList<>();
        tables.add("product");//数据库-表名

        System.out.println("projectPath:"+projectPath);

        DataSourceConfig.Builder dataSourceConfig = new DataSourceConfig
                .Builder(
                "jdbc:mysql://192.168.128.128:3306/goods?useUnicode=true&characterEncoding=utf-8&serverTimezone=UTC",
                "root",
                "123456")
                .dbQuery(new MySqlQuery())
                .typeConvert(new MySqlTypeConvert())
                .keyWordsHandler(new MySqlKeyWordsHandler());

        FastAutoGenerator.create(dataSourceConfig)
                .globalConfig(builder -> {
                    builder.author("yuqiang") // 设置作者
                            .fileOverride() // 覆盖已生成文件
                            .outputDir(projectPath + "src/main/java")
                            .disableOpenDir(); // 指定输出目录
                })
                .packageConfig(builder -> {
                    builder.parent(parent) // 设置父包名
                            // .moduleName("test") // 设置父包模块名
                            .entity("dto")
                            .service("service")
                            .serviceImpl("service.impl")
                            .mapper("mapper")
                            .xml("mapper.xml")
                            .controller("controller")
                            .pathInfo(Collections.singletonMap(OutputFile.mapperXml, projectPath + "src/main/resources/mapper")); // 设置mapperXml生成路径
                })
                .strategyConfig(builder -> {
                    builder.addInclude(tables)// 设置需要生成的表名
                            // .addTablePrefix("t_", "c_"); // 设置过滤表前缀
                            .entityBuilder()
                            .formatFileName("%s")
                            .controllerBuilder()
                            .enableRestStyle()
                            .formatFileName("%sController").build()
                            .serviceBuilder()
                            .formatServiceFileName("%sService")
                            .formatServiceImplFileName("%sServiceImpl").build()
                            .mapperBuilder()
                            .enableMapperAnnotation()
                            .formatMapperFileName("%sMapper")
                            .formatXmlFileName("%sMapper");
                })
                .templateEngine(new FreemarkerTemplateEngine()) // 使用Freemarker引擎模板,默认的是Velocity引擎模板
                .execute();
    }
}
4.6 配置JVM缓存Bean
package com.qiang.cache.config;

import com.github.benmanes.caffeine.cache.Cache;
import com.github.benmanes.caffeine.cache.Caffeine;
import com.qiang.cache.dto.Product;
import org.springframework.context.annotation.Bean;
import org.springframework.context.annotation.Configuration;

@Configuration
public class CaffeineConfig {

    @Bean
    public Cache<Integer, Product> productCache(){

        return Caffeine.newBuilder()
                .initialCapacity(100)//初始容量
                //最大容量,达到内存上限后会对内存做清理,访问量少的会先被清除
                .maximumSize(10000)
                //设置缓存有效期
                //默认情况下,当一个缓存元素过期时,Caffeine不会自动立即将其清除和驱逐,
                //而是在一次读或写操作后,或者在空闲时间完成对失效数据的驱逐。
//                .expireAfterWrite(Duration.ofSeconds(30*60))
                .build();
    }

}
4.7 工程启动自动将商品信息添加到redis和jvm缓存
package com.qiang.cache.config;

import com.fasterxml.jackson.databind.ObjectMapper;
import com.github.benmanes.caffeine.cache.Cache;
import com.qiang.cache.dto.Product;
import com.qiang.cache.service.ProductService;
import org.springframework.beans.factory.InitializingBean;
import org.springframework.beans.factory.annotation.Autowired;
import org.springframework.data.redis.core.StringRedisTemplate;
import org.springframework.stereotype.Component;

import java.util.List;
import java.util.concurrent.TimeUnit;

/**
 * 实现InitializingBean接口的类会在该类实例化完成后执行afterPropertiesSet函数
 * 所有会在项目启动之后会自动执行afterPropertiesSet函数
 */
@Component
public class RedisHandler implements InitializingBean {
    @Autowired
    private StringRedisTemplate redisTemplate;

    @Autowired
    private ProductService productService;

    @Autowired
    private Cache<Integer,Product> productCache;

    private static final ObjectMapper mapper=new ObjectMapper();

    @Override
    public void afterPropertiesSet() throws Exception {
        //项目启动时将全部商品信息存储到redis,正常业务是不会这样做的,需要通过计算或大数据运算来决定将哪些商品添加到redis
        //查询所有商品
        List<Product> list = productService.list();
        if(list!=null && !list.isEmpty()){
            for(Product item:list){
                //将product添加到jvm缓存
                productCache.put(item.getId(),item);

                //将Product对象转换成json字符串
                String strJson=mapper.writeValueAsString(item);
                //设置30分钟后过期
                redisTemplate.opsForValue().set("prod:id:"+item.getId(),strJson,30*60*1000, TimeUnit.SECONDS);
            }
        }
    }
}
4.8 创建Canal监听product表的更新
package com.qiang.cache.config;

import com.fasterxml.jackson.core.JsonProcessingException;
import com.fasterxml.jackson.databind.ObjectMapper;
import com.github.benmanes.caffeine.cache.Cache;
import com.qiang.cache.dto.Product;
import org.springframework.beans.factory.annotation.Autowired;
import org.springframework.data.redis.core.StringRedisTemplate;
import org.springframework.stereotype.Component;
import top.javatool.canal.client.annotation.CanalTable;
import top.javatool.canal.client.handler.EntryHandler;

import java.util.concurrent.TimeUnit;

/**
 * CanalTable指定要监听的表
 * EntryHandler<Product> 指定关联的表的实体类
 */
@CanalTable("product")
@Component
public class CacheHandler implements EntryHandler<Product> {
    @Autowired
    private StringRedisTemplate redisTemplate;

    @Autowired
    private Cache<Integer,Product> productCache;

    private static final ObjectMapper mapper=new ObjectMapper();
    @Override
    public void insert(Product product) {
        //新增Product表数据时触发
        try {
            //数据添加到redis
            //将Product对象转换成json字符串
            String strJson = mapper.writeValueAsString(product);
            //设置30分钟后过期
            redisTemplate.opsForValue().set("prod:id:"+product.getId(),strJson,30*60*1000, TimeUnit.SECONDS);

            //将product添加到jvm缓存
            productCache.put(product.getId(),product);
        } catch (JsonProcessingException e) {
            e.printStackTrace();
        }

    }

    @Override
    public void update(Product before, Product after) {
        //修改Product表数据时触发
        try {
            //数据添加到redis
            //将Product对象转换成json字符串
            String strJson = mapper.writeValueAsString(after);
            //设置30分钟后过期
            redisTemplate.opsForValue().set("prod:id:"+after.getId(),strJson,30*60*1000, TimeUnit.SECONDS);

            //将product添加到jvm缓存
            productCache.put(after.getId(),after);
        } catch (Exception e) {
            e.printStackTrace();
        }
    }

    @Override
    public void delete(Product product) {
        //删除Product表数据时触发

        //删除jvm缓存
        productCache.invalidate(product.getId());
        //删除redis数据
        redisTemplate.delete("prod:id:"+product.getId());
    }
}
4.9 创建api接口实现根据id查询商品
package com.qiang.cache.controller;

import com.github.benmanes.caffeine.cache.Cache;
import com.qiang.cache.dto.Product;
import com.qiang.cache.service.ProductService;
import org.springframework.beans.factory.annotation.Autowired;
import org.springframework.web.bind.annotation.GetMapping;
import org.springframework.web.bind.annotation.PathVariable;
import org.springframework.web.bind.annotation.RequestMapping;
import org.springframework.web.bind.annotation.RestController;

@RestController
@RequestMapping("/product")
public class ProductController {

    @Autowired
    private Cache<Integer,Product> productCache;
    @Autowired
    private ProductService productService;

    @GetMapping("/{id}")
    public Product findById(@PathVariable("id") Integer id){

        //先到jvm缓存获取product
        Product product = productCache.getIfPresent(id);
        if(product!=null){
            //获取到直接返回
            return product;
        }
        //jvm缓存中未查询到,则到mysql数据库中查询
        product =productService.query().eq("id",id.intValue()).one();
        if(product!=null){
            // 查询到将其添加到jvm缓存
            productCache.put(id,product);
        }
        return product;
//        //productCache.get函数会先到cache中根据id查找,如果没有
//        //会执行后面的函数到数据库中查询
//        return productCache.get(id,key->productService.query()
//                .eq("id",key).one()
//        );
    }
}
4.10 html部署在nginx中需要配置前后端分离
增加下面配置类即可
@Configuration
public class GlobalCorsConfig {
    /**
     * 允许跨域调用的过滤器
     */
    @Bean
    public CorsFilter corsFilter() {
        CorsConfiguration config = new CorsConfiguration();
        //允许所有域名进行跨域调用
        config.addAllowedOrigin("*");
        //允许跨越发送cookie
        config.setAllowCredentials(true);
        //放行全部原始头信息
        config.addAllowedHeader("*");
        //允许所有请求方法跨域调用
        config.addAllowedMethod("*");
        UrlBasedCorsConfigurationSource source = new UrlBasedCorsConfigurationSource();
        source.registerCorsConfiguration("/**", config);
        return new CorsFilter(source);
    }
}
5. 修改/local/openresty/nginx/conf/nginx.conf配置,看下面增加的部分
说明: 配置nginx执行lua脚本, lua脚本内完成本地缓存、nginx直接访问redis,本地缓存和redis不存在再访问http
worker_processes  1;

events {
    worker_connections  1024;
}

http {
    include       mime.types;
    default_type  application/octet-stream;
    sendfile        on;
    keepalive_timeout  65;
    # 增加 - lua 模块
    lua_package_path "/home/qiang/local/openresty/lualib/?.lua;;";
    # 增加 - c 模块
    lua_package_cpath "/home/qiang/local/openresty/lualib/?.so;;";
    #  增加 - 添加共享词典,本地缓存,名称叫做:item_cache, 大小150m
    lua_shared_dict item_cache 150m;

    # 增加 - location /product会反向代理到下面的server集群
    upstream tomcat-cluster {
	    # 不添加hash则表示集群会按照顺序轮询请求server地址
		# 添加hash后可以保证同一个请求地址会被指向同一个server地址
        hash $request_uri;
        server 192.168.1.100:8080;
        server 192.168.1.100:8082;
        server 192.168.1.100:8083;
    }

    server {
        listen       8081;
        server_name  localhost;

		# 增加 - 在lua/product.lua脚本内使用了/product作为请求服务器的地址
		# 使用下面代理后请求地址会重定向到http://tomcat-cluster/product/*
		# tomcat-cluster会被上面定义的upstream tomcat-cluster中的server取代
        location /product {
           proxy_pass http://tomcat-cluster;
        }

		# 增加 - ~表示后面可以接正则表达式
		# (\d+)表示后面至少有一个数字
		# 如可以匹配html页面内请求服务器的url为/api/item/1的地址
        location ~ /api/item/(\d+) {
            # 默认响应类型
			default_type application/json;
            # 响应结果由lua/product.lua文件决定
            content_by_lua_file lua/product.lua;
        }

        location / {
            root   html;
            index  index.html index.htm;
        }

        error_page   500 502 503 504  /50x.html;
        location = /50x.html {
            root   html;
        }
    }
}
6. 编写lua脚本
6.1 封装http请求和访问redis的lua脚本
在/local/openresty/lualib目录下创建common.lua文件,内容如下
在lualib目录中的.lua文件会自动被加载,所以可以在该目录创建自定义函数方便后期使用
common.lua文件内容如下:
-- 引入redis模块
local redis = require('resty.redis')
-- 初始化Redis对象
local red = redis:new()
-- 设置Redis超时时间,分别是建立连接、发起请求和请求响应的超时时间
red:set_timeouts(1000,1000,1000)

-- 封装redis关闭连接函数,实则是将其放入连接池
local function close_redis(red)
	local pool_max_idle_time = 1000 --连接空闲时间,单位毫秒
	local pool_size = 100 -- 连接池大小
	local ok, err = red:set_keepalive(pool_max_idle_time,pool_size)
	if not ok then
		ngx.log(ngx.ERR,"放入redis连接池失败:",err)
	end
end

-- 封装redis查询函数,ip和port是redis地址,key是要查询的key
local function read_redis(ip,port,key)
	-- 连接redis
	local ok, err = red:connect(ip,port)
	if not ok then
		ngx.log(ngx.ERR,"连接redis失败:",err)
		return nil
	end
	-- 查询redis
	local resp, err = red:get(key)
	-- 查询结果处理
	if not resp then
		ngx.log(ngx.ERR,"查询redis失败:",err,", key = ",key)
	end
	-- 得到空数据处理
	if resp == ngx.null then
		resp = nil
		ngx.log(ngx.ERR,"查询redis数据为空, key = ", key)
	end
	-- 关闭redis连接
	close_redis(red)
	return resp
end

-- 封装函数,发送http请求,并解析响应
local function read_http(path,params)
	local resp=ngx.location.capture(path,{
		method = ngx.HTTP_GET,
		args = params,
	})
	if not resp then
		-- 记录错误信息,返回404
		ngx.log(ngx.ERR,"请求不存在:",path,", args:",params)
	end
	return resp.body
end

-- 将方法导出
local _M = {
	read_http = read_http,
	read_redis = read_redis
}
return _M
6.2 创建product.lua脚本,实现请求数据的处理
product.lua文件内容如下:
-- 导入common函数库
local common = require('common')
local read_http = common.read_http
local read_redis = common.read_redis
--导入cjson库
local cjson = require('cjson')
-- 导入共享词典,本地缓存
local item_cache = ngx.shared.item_cache

-- 封装查询
local function read_data(key,expire,path,params)
	-- 查询本地缓存
	local val = item_cache:get(key)
	if not val then
		ngx.log(ngx.ERR,"本地缓存查询失败,尝试查询redis, key: ", key)
		-- 查询redis
		val = read_redis("192.168.128.128",6379,key)
		--判断redis查询结果
		if not val then
			ngx.log(ngx.ERR,"redis查询失败,尝试查询http, key: ", key)
			-- redis查询失败,去查http
			ngx.log(ngx.ERR,"path: ", path)
			val = read_http(path,params)
		end
	end
	-- 查询结束
	if val then
		-- 将结果加入本地缓存,并设置过期时间
		item_cache:set(key,val,expire)
	end
	-- 返回数据
	return val
end

--获取路径参数
local id = ngx.var[1]

--查询商品信息
local product =read_data("prod:id:" .. id, 60000, "/product/" .. id , nil)


--local productJson = read_http("/product/" .. id , nil)

--JSON转化为lua的table
-- local product = cjson.decode(productJson)
-- 修改product属性值
-- product.stock = 99
-- 把product序列化为json
-- local strJson = cjson.encode(product)
-- 返回结果
ngx.say(product)
7. 编辑/local/openresty/nginx/html/index.html文件,实现异步请求商品数据
拷贝jquery脚本到html目录如下

index.html中增加如下内容
<div id="div1" style="border:1px solid #cccccc; width:500px; height:300px;">
</div>
<script src="jquery-3.6.0.min.js"></script>
<script type="text/javascript">
$(document).ready(function(){
	var url = location.search;
	var id=1;
	if(url.indexOf('?')>-1){
		id=url.split('=')[1]
	}
	 $.ajax({
	   type : 'GET',
	   url : "/api/item/"+id,
	   contentType : "application/json",
	   dataType : "json"
   }).done(function(data) {

	$("#div1").html(JSON.stringify(data));
   });
});
</script>
8. 验证
8.1 启动服务器
8.2 启动nginx
进入目录 /local/openresty/nginx/sbin
执行 ./nginx -s start 或者 ./nginx -s reload
8.3 浏览器访问nginx

8.4 说明
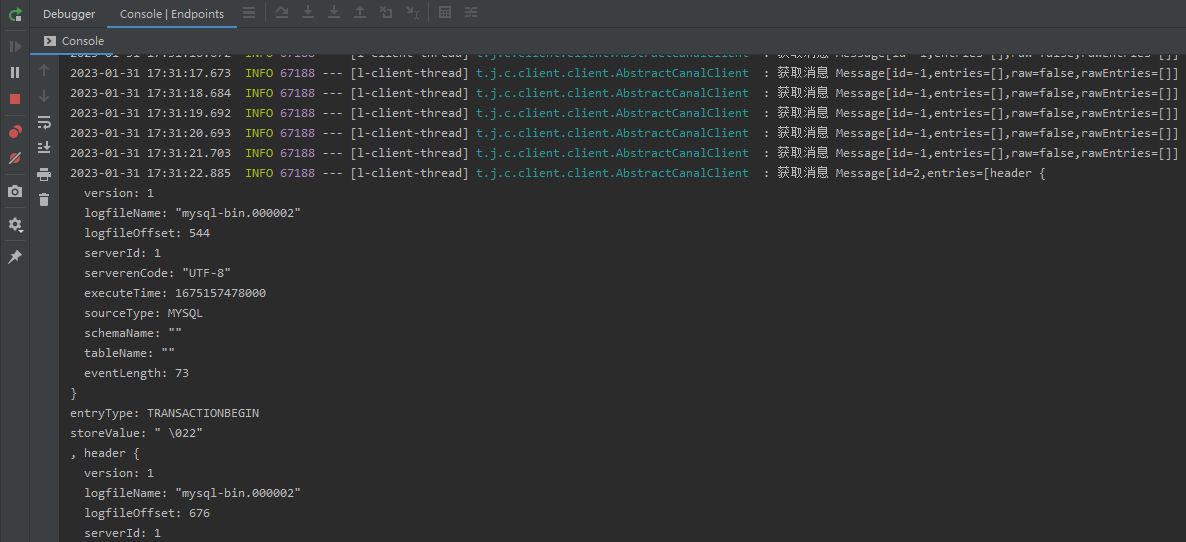
可以通过在服务器端加断点或日志,和访问nginx的日志跟踪数据来源自哪个缓存

product数据改动后服务器端打印的日志

9. OpenResty补充说明
OpenResty提供了各种API用来获取不同类型的请求参数:


lua脚本中ngx.say(product)就是写数据到Response中
lua基本语法请参考 - lua基础使用说明 https://www.cnblogs.com/big-strong-yu/p/17075058.html


【推荐】国内首个AI IDE,深度理解中文开发场景,立即下载体验Trae
【推荐】编程新体验,更懂你的AI,立即体验豆包MarsCode编程助手
【推荐】抖音旗下AI助手豆包,你的智能百科全书,全免费不限次数
【推荐】轻量又高性能的 SSH 工具 IShell:AI 加持,快人一步
· 分享一个免费、快速、无限量使用的满血 DeepSeek R1 模型,支持深度思考和联网搜索!
· 25岁的心里话
· 基于 Docker 搭建 FRP 内网穿透开源项目(很简单哒)
· ollama系列01:轻松3步本地部署deepseek,普通电脑可用
· 按钮权限的设计及实现