

Spring Boot:Spring Security + JWT + CORS 自定义用户身份验证 自定义认证实现验证码 自动登录
源码:
链接:https://pan.baidu.com/s/1qrcGekoc9zevp3m7ixdsZw
提取码:99wd
步骤:
1.添加依赖
2.自定义User实体类并继承UserDetails
3.自定义MyUserDetailsService实现UserDetailsService接口 添加注解@Service
4.自定义WebSecurityConfig继承WebSecurityConfigurerAdapter 添加注解@EnableWebSecurity 覆盖configure函数编辑自己的配置项
以上4个步骤可以完成Spring Security的基本访问控制
5.验证码
6.自动登录
7.其他相关类
8.Cors配置
9.JWT实现
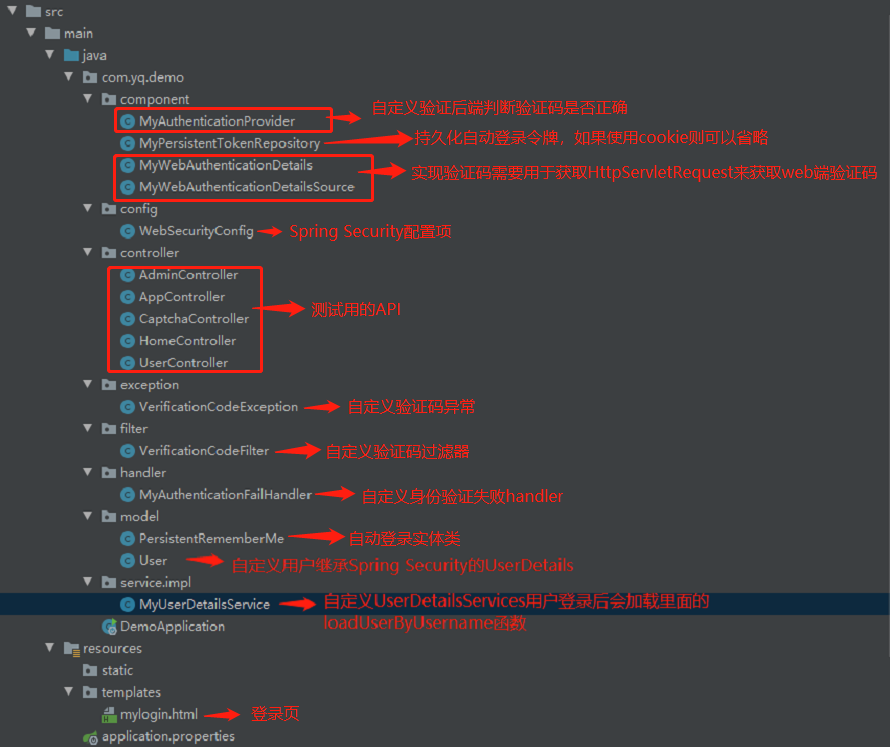
项目目录结构
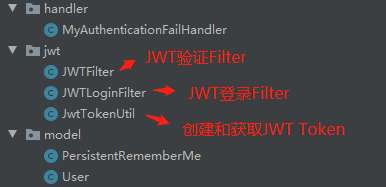
JWT 新增如下文件
1.添加依赖
            <!-- security-->
	<dependency>
		<groupId>org.springframework.boot</groupId>
		<artifactId>spring-boot-starter-security</artifactId>
	</dependency>
	<!-- web-->
	<dependency>
		<groupId>org.springframework.boot</groupId>
		<artifactId>spring-boot-starter-web</artifactId>
	</dependency>
	<dependency>
		<groupId>org.springframework.boot</groupId>
		<artifactId>spring-boot-starter-thymeleaf</artifactId>
	</dependency>

	<!-- 图形验证码 -->
	<dependency>
		<groupId>com.github.penggle</groupId>
		<artifactId>kaptcha</artifactId>
		<version>2.3.2</version>
	</dependency>
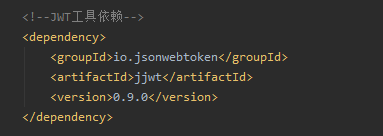
JWT新增依赖
2.自定义User实体类并继承UserDetails
点击查看代码
import org.springframework.security.core.GrantedAuthority;
import org.springframework.security.core.userdetails.UserDetails;
import java.util.Collection;
import java.util.List;

public class User implements UserDetails {
    private Long id;
    private String username;
    private String password;
    private String roles;
    private boolean enabled;
    private List<GrantedAuthority> authorities;
    public void setAuthorities(List<GrantedAuthority> authorities) {
        this.authorities = authorities;
    }
    public Long getId() {
        return id;
    }
    public void setId(Long id) {
        this.id = id;
    }
    public String getUsername() {
        return username;
    }
    @Override
    public boolean isAccountNonExpired() {
        return true;
    }
    @Override
    public boolean isAccountNonLocked() {
        return true;
    }
    @Override
    public boolean isCredentialsNonExpired() {
        return true;
    }
    public void setUsername(String username) {
        this.username = username;
    }
    @Override
    public Collection<? extends GrantedAuthority> getAuthorities() {
        return this.authorities;
    }
    public String getPassword() {
        return password;
    }
    public void setPassword(String password) {
        this.password = password;
    }
    public String getRoles() {
        return roles;
    }
    public void setRoles(String roles) {
        this.roles = roles;
    }

    @Override
    public boolean isEnabled() {
        return enabled;
    }

    public void setEnabled(boolean enabled) {
        this.enabled = enabled;
    }

    /**
     * 用户登录成功会用user作为Key将sessionId存储到ConcurrentHashMap中
     * 验证用户登录时遍历ConcurrentHashMap根据key值是否存在,如不实现equals和hashCode则每次登录都会增加一个session
     * 因为hashMap以对象为Key必须覆写下面两个方法
     * */
    @Override
    public boolean equals(Object obj){
        return obj instanceof User?this.username.equals(((User)obj).getUsername()):false;
    }
    @Override
    public int hashCode(){
        return this.getUsername().hashCode();
    }
}
3.自定义MyUserDetailsService实现UserDetailsService接口 添加注解@Service
点击查看代码
import org.springframework.beans.factory.annotation.Qualifier;
import org.springframework.context.annotation.Bean;
import org.springframework.security.core.GrantedAuthority;
import org.springframework.security.core.authority.AuthorityUtils;
import org.springframework.security.core.authority.SimpleGrantedAuthority;
import org.springframework.security.core.userdetails.UserDetails;
import org.springframework.security.core.userdetails.UserDetailsService;
import org.springframework.security.core.userdetails.UsernameNotFoundException;
import org.springframework.security.crypto.bcrypt.BCryptPasswordEncoder;
import org.springframework.security.web.session.HttpSessionEventPublisher;
import org.springframework.stereotype.Service;

import java.util.ArrayList;
import java.util.List;

/**
 * 集成UserDetailsService并添加@Service后Spring Security会加载loadUserByUsername覆盖默认的UserDetails
 * Spring Security的验证过程是通过AuthenticationProvider完成的, 是由由ProviderManager管理的
 * Spring Security提供了要给DaoAuthenticationProvider来完成验证,DaoAuthenticationProvider -> AbstractUserDetailsAuthenticationProvider -> AuthenticationProvider
 * 在DaoAuthenticationProvider类中能看到调用loadUserByUsername函数如下:
 * UserDetails loadedUser = this.getUserDetailsService().loadUserByUsername(username);
 * @author yuqiang
 * @date 2022.1.7
 * */
@Service
@Qualifier("MyUserDetailsService")
public class MyUserDetailsService implements UserDetailsService {

    /**
     * 暴露Session 监听器实现在Spring Security注销时将Session删除,如果不将器暴露则每次登录都会增加一个新的Session
     * 存在内容溢出的风险,同时User对象要覆盖equals和hashCode两个函数,因session主题是存储在concurrentmap中的而key使用的是user对象
     * 判断用户是否登录他是用keyk到concurrentmap中查找没有则新增,有则删除后再增加,如果User不覆盖equals和hashCode则每次都会新增
     * */
    @Bean
    public HttpSessionEventPublisher httpSessionEventPublisher(){
        return new HttpSessionEventPublisher();
    }

    /**
     * 用户登录时会自动执行此函数,
     * @param username 是web端表单
     * */
    @Override
    public UserDetails loadUserByUsername(String username) throws UsernameNotFoundException {
        //此处可以是从DB中查询User
        com.yq.demo.model.User user=new com.yq.demo.model.User();
        user.setUsername("admin");
        user.setPassword("123456");
        user.setEnabled(true);
        user.setRoles("ROLE_ADMIN,ROLE_USER");
        //注册用户时密码可以使用下面的加密方式
        //如果从DB中查询的密码已是加密的则下面步骤可以省略
        //Spring Security是获取web端输入的密码加密之后与UserDetail对象的password属性比较是否相等,相等则认证通过
        String password = new BCryptPasswordEncoder().encode("123456");
        user.setPassword(password);

        //AuthorityUtils.commaSeparatedStringToAuthorityList是Spring Security提供的,该方法用于将逗号隔开的权限集
        //字符串切割成可用权限对象列表
        //可参考generateAuthorities自己实现
        List<GrantedAuthority> listGA=AuthorityUtils.commaSeparatedStringToAuthorityList(user.getRoles());
        user.setAuthorities(listGA);
        return user;
    }

    private List<GrantedAuthority> generateAuthorities(String roles){
        List<GrantedAuthority> authorities=new ArrayList<>();
        if(roles!=null && !"".equals(roles)){
            String roleArray[]=roles.split(";");
            for (String s : roleArray) {
                authorities.add(new SimpleGrantedAuthority(s));
            }
        }
        return authorities;
    }
}
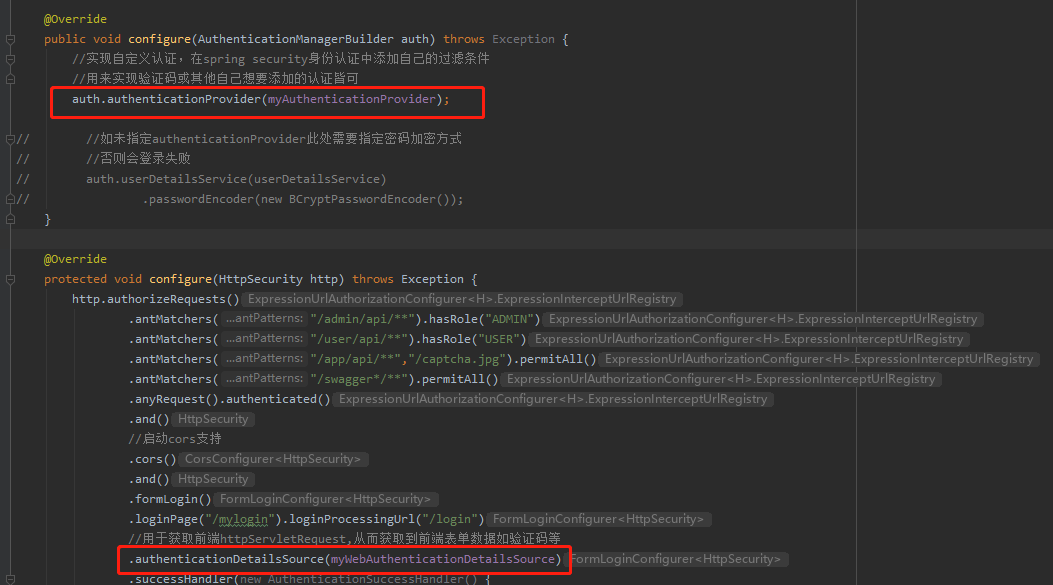
4.自定义WebSecurityConfig继承WebSecurityConfigurerAdapter 添加注解@EnableWebSecurity 覆盖configure函数编辑自己的配置项
JWT 新增两个过滤器

点击查看代码
import com.yq.demo.component.MyPersistentTokenRepository;
import com.yq.demo.handler.MyAuthenticationFailHandler;
import com.yq.demo.service.impl.MyUserDetailsService;
import org.springframework.beans.factory.annotation.Autowired;
import org.springframework.context.annotation.Bean;
import org.springframework.security.authentication.AuthenticationDetailsSource;
import org.springframework.security.authentication.AuthenticationProvider;
import org.springframework.security.config.annotation.authentication.builders.AuthenticationManagerBuilder;
import org.springframework.security.config.annotation.web.builders.HttpSecurity;
import org.springframework.security.config.annotation.web.configuration.EnableWebSecurity;
import org.springframework.security.config.annotation.web.configuration.WebSecurityConfigurerAdapter;
import org.springframework.security.core.Authentication;
import org.springframework.security.web.authentication.AuthenticationSuccessHandler;
import org.springframework.security.web.authentication.WebAuthenticationDetails;
import org.springframework.web.cors.CorsConfiguration;
import org.springframework.web.cors.CorsConfigurationSource;
import org.springframework.web.cors.UrlBasedCorsConfigurationSource;
import javax.servlet.ServletException;
import javax.servlet.http.HttpServletRequest;
import javax.servlet.http.HttpServletResponse;
import java.io.IOException;
import java.io.PrintWriter;
/**
* Spring Security配置
*
* */
@EnableWebSecurity
public class WebSecurityConfig extends WebSecurityConfigurerAdapter {
/**
* Spring Security需要指定UserDetails实例
* */
@Autowired
private MyUserDetailsService userDetailsService;
/**
* 用户获取HttpServletRequest从而获取到前端的表单数据,此示例用来获取前端的验证码
* */
@Autowired
private AuthenticationDetailsSource<HttpServletRequest, WebAuthenticationDetails> myWebAuthenticationDetailsSource;
/**
* 用于自定义认证,此示例用来实现验证码
* */
@Autowired
private AuthenticationProvider myAuthenticationProvider;
/**
* 用于自动登录持久化令牌
* */
@Autowired
private MyPersistentTokenRepository myPersistentTokenRepository;
@Override
public void configure(AuthenticationManagerBuilder auth) throws Exception {
//实现自定义认证,在spring security身份认证中添加自己的过滤条件
//此示例用来实现验证码
auth.authenticationProvider(myAuthenticationProvider);
// //如未指定authenticationProvider此处需要指定密码加密方式
// //否则会登录失败
// auth.userDetailsService(userDetailsService)
// .passwordEncoder(new BCryptPasswordEncoder());
}
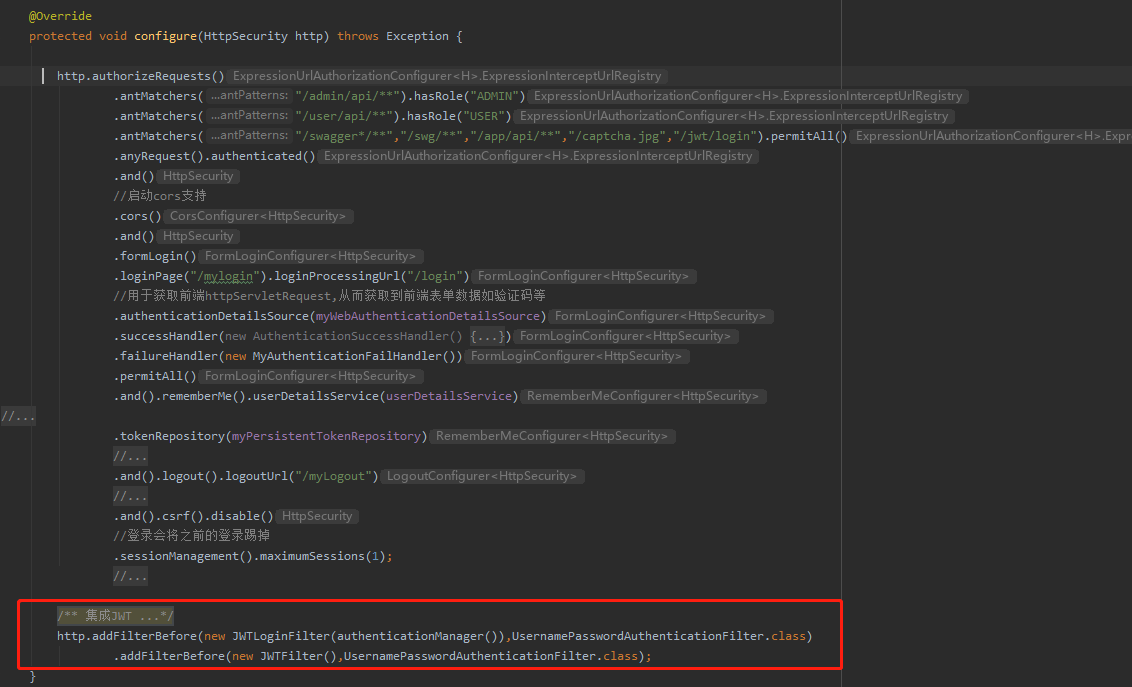
@Override
protected void configure(HttpSecurity http) throws Exception {
http.authorizeRequests()
.antMatchers("/admin/api/**").hasRole("ADMIN")
.antMatchers("/user/api/**").hasRole("USER")
.antMatchers("/app/api/**","/captcha.jpg").permitAll()
.antMatchers("/swagger*/**").permitAll()
.anyRequest().authenticated()
.and()
//启动cors支持
.cors()
.and()
.formLogin()
.loginPage("/mylogin").loginProcessingUrl("/login")
//用于获取前端httpServletRequest,从而获取到前端表单数据如验证码等
.authenticationDetailsSource(myWebAuthenticationDetailsSource)
.successHandler(new AuthenticationSuccessHandler() {
@Override
public void onAuthenticationSuccess(HttpServletRequest request, HttpServletResponse response, Authentication authentication) throws IOException, ServletException {
response.setContentType("application/json;charset=UTF-8");
PrintWriter out=response.getWriter();
out.write("{\"error_code\":\"0\",\"message\":\"欢迎登录系统\"}");
}
})
.failureHandler(new MyAuthenticationFailHandler())
.permitAll()
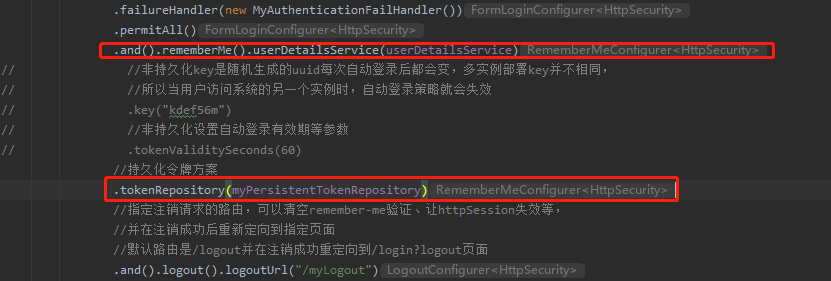
.and().rememberMe().userDetailsService(userDetailsService)
// //非持久化key是随机生成的uuid每次自动登录后都会变,多实例部署key并不相同,
// //所以当用户访问系统的另一个实例时,自动登录策略就会失效
// .key("kdef56m")
// //非持久化设置自动登录有效期等参数
// .tokenValiditySeconds(60)
//持久化令牌方案
.tokenRepository(myPersistentTokenRepository)
//指定注销请求的路由,可以清空remember-me验证、让httpSession失效等,
//并在注销成功后重新定向到指定页面
//默认路由是/logout并在注销成功重定向到/login?logout页面
.and().logout().logoutUrl("/myLogout")
//注销后使session失效
// .invalidateHttpSession(true)
//删除认证
// .clearAuthentication(true)
//删除cookies
//.deleteCookies()
.and().csrf().disable()
//登录会将之前的登录踢掉
.sessionManagement().maximumSessions(1);
//默认maxSessionsPreventsLogin是false登录会将之前的登录踢掉
//如果maxSessionsPreventsLogin=true则不允许新的登录,只有注销之后才可以再登录
// .maxSessionsPreventsLogin(true);
// //将验证码过滤器添加在UsernamePasswordAuthenticationFilter之前
// //实现简单但是多了一层过滤器,每次的api请求都会执行到这里
// http.addFilterBefore(new VerificationCodeFilter(), UsernamePasswordAuthenticationFilter.class);
/**
* 集成JWT
* */
http.addFilterBefore(new JWTLoginFilter(authenticationManager()),UsernamePasswordAuthenticationFilter.class)
.addFilterBefore(new JWTFilter(),UsernamePasswordAuthenticationFilter.class);
}
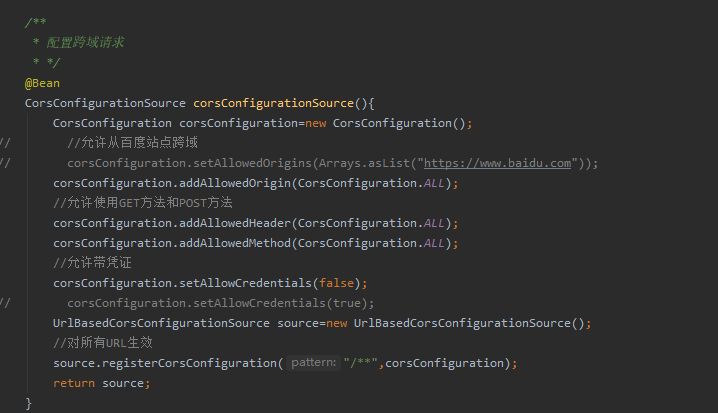
/**
* 配置跨域请求
* */
@Bean
CorsConfigurationSource corsConfigurationSource(){
CorsConfiguration corsConfiguration=new CorsConfiguration();
// //允许从百度站点跨域
// corsConfiguration.setAllowedOrigins(Arrays.asList("https://www.baidu.com"));
corsConfiguration.addAllowedOrigin(CorsConfiguration.ALL);
//允许使用GET方法和POST方法
corsConfiguration.addAllowedHeader(CorsConfiguration.ALL);
corsConfiguration.addAllowedMethod(CorsConfiguration.ALL);
//允许带凭证
corsConfiguration.setAllowCredentials(false);
// corsConfiguration.setAllowCredentials(true);
UrlBasedCorsConfigurationSource source=new UrlBasedCorsConfigurationSource();
//对所有URL生效
source.registerCorsConfiguration("/**",corsConfiguration);
return source;
}
}
5.验证码
5.1 创建验证码Controler
点击查看代码
import com.google.code.kaptcha.Producer;
import com.google.code.kaptcha.impl.DefaultKaptcha;
import com.google.code.kaptcha.util.Config;
import org.springframework.beans.factory.annotation.Autowired;
import org.springframework.context.annotation.Bean;
import org.springframework.stereotype.Controller;
import org.springframework.web.bind.annotation.GetMapping;

import javax.imageio.ImageIO;
import javax.servlet.ServletOutputStream;
import javax.servlet.http.HttpServletRequest;
import javax.servlet.http.HttpServletResponse;
import java.awt.image.BufferedImage;
import java.io.IOException;
import java.util.Properties;

@Controller
public class CaptchaController {
    @Bean
    public Producer captcha(){
        Properties properties=new Properties();
        //图片宽度
        properties.setProperty("kaptcha.image.width","150");
        //图片高度
        properties.setProperty("kaptcha.image.height","50");
        //验证码字符集
        properties.setProperty("kaptcha.textproducer.char.string","0123456789");
        //字符长度
        properties.setProperty("kaptcha.textproducer.char.length","4");

        Config config=new Config(properties);

        DefaultKaptcha defaultKaptcha=new DefaultKaptcha();
        defaultKaptcha.setConfig(config);
        return defaultKaptcha;
    }

    @Autowired
    private Producer captchaProducer;

    @GetMapping("/captcha.jpg")
    public void getCaptcha(HttpServletRequest request, HttpServletResponse response) throws IOException {
        //设置内容类型
        response.setContentType("image/jpeg");
        //创建验证码文本
        String capText=captchaProducer.createText();
        //将验证码文本设置到session
        request.getSession().setAttribute("captcha",capText);
        //创建验证码图片
        BufferedImage bi=captchaProducer.createImage(capText);
        //获取响应输出流
        ServletOutputStream out=response.getOutputStream();
        //将图片写到相应输出流
        ImageIO.write(bi,"jpg",out);
        //推送并关闭响应输出流
        try {
            out.flush();
        }finally {
            out.close();
        }
    }
}
5.2web端使用验证码
点击查看代码
<form class="form-signin" method="post" action="/login">
        <h2 class="form-signin-heading">Please sign in</h2>
        <p>
            <label for="username" class="sr-only">Username</label>
            <input type="text" id="username" name="username" class="form-control" placeholder="Username" required="" autofocus="">
        </p>
        <p>
            <label for="password" class="sr-only">Password</label>
            <input type="password" id="password" name="password" class="form-control" placeholder="Password" required="">
        </p>
        <p>
            <input type="text" id="captcha" name="captcha" class="form-control" required="">
            <img src="/captcha.jpg" alt="captcha" height="50px" width="150px" style="margin-left: 20px;">
        </p>
        <p><input type="checkbox" name="remember-me"> Remember me on this computer.</p>
        <button class="btn btn-lg btn-primary btn-block" type="submit">Sign in</button>
    </form>
5.3 验证-验证码 见下面截图
获取HttpServletRequest从而取到web端验证码需要实现两个类:WebAuthenticationDetails和AuthenticationDetailsSource<HttpServletRequest, WebAuthenticationDetails> 代码如下:
点击查看代码
import org.springframework.security.authentication.AuthenticationDetailsSource;
import org.springframework.security.web.authentication.WebAuthenticationDetails;
import org.springframework.stereotype.Component;

import javax.servlet.http.HttpServletRequest;
/**
 * @author yuqiang
 * @date 2022.1.7
 * */
@Component
public class MyWebAuthenticationDetailsSource implements
        AuthenticationDetailsSource<HttpServletRequest, WebAuthenticationDetails> {
    @Override
    public WebAuthenticationDetails buildDetails(HttpServletRequest httpServletRequest) {
        return new MyWebAuthenticationDetails(httpServletRequest);
    }
}

import org.springframework.security.web.authentication.WebAuthenticationDetails;
import org.thymeleaf.util.StringUtils;

import javax.servlet.http.HttpServletRequest;
/**
 *  所有的AuthenticationProvider包含的Authentication都来源于UsernamePasswordAuthenticationFilter
 *  UsernamePasswordAuthenticationFilter实现了获取前端的username和password,
 *  在UsernamePasswordAuthenticationFilter中使用的AuthenticationDetailsSource是一个标准的Web认证
 * 源,携带的是用户的sessionId和IP地址。
 *  在AuthenticationDetailsSource里面绑定了WebAuthenticationDetails
 *  所以我们可以通过继承WebAuthenticationDetails来获取到HttpServletRequest
 *  自然而然就可以取到验证码和存储的seesion值
 *
 *  用于获取前端验证码
 * @author yuqiang
 * @date 2022.1.7
 * */
public class MyWebAuthenticationDetails extends WebAuthenticationDetails
{
    private boolean imageCodeIsRight=false;

    public boolean isImageCodeIsRight() {
        return imageCodeIsRight;
    }

    public MyWebAuthenticationDetails(HttpServletRequest request) {
        super(request);
        String imageCode=request.getParameter("captcha");
        String savedImageCode=(String)request.getSession().getAttribute("captcha");
        if(!StringUtils.isEmpty(savedImageCode)){
            request.getSession().removeAttribute("captcha");
            if(!StringUtils.isEmpty(imageCode) && imageCode.equals(savedImageCode)){
                this.imageCodeIsRight=true;
            }
        }
    }
}
自定义认证的MyAuthenticationProvider类代码:
点击查看代码
import com.yq.demo.exception.VerificationCodeException;
import org.springframework.beans.factory.annotation.Qualifier;
import org.springframework.security.authentication.UsernamePasswordAuthenticationToken;
import org.springframework.security.authentication.dao.DaoAuthenticationProvider;
import org.springframework.security.core.AuthenticationException;
import org.springframework.security.core.userdetails.UserDetails;
import org.springframework.security.core.userdetails.UserDetailsService;
import org.springframework.security.crypto.bcrypt.BCryptPasswordEncoder;
import org.springframework.stereotype.Component;

/**
 * DaoAuthenticationProvider继承自AbstractUserDetailsAuthenticationProvider
 * AbstractUserDetailsAuthenticationProvider继承自AuthenticationProvider
 * AuthenticationProvider是由ProviderManager管理
 * ProviderManager是由UsernamePasswordAuthenticationFilter调用
 * 身份认证是在DaoAuthenticationProvider和AbstractUserDetailsAuthenticationProvider里面被处理
 * 主要有两个函数retrieveUser和additionalAuthenticationChecks分别是查找User和附加认证
 * retrieveUser会调用this.getUserDetailsService().loadUserByUsername(username);
 * 此处我们覆盖additionalAuthenticationChecks即可来完成认证
 * @author yuqiang
 * @date 2022.1.7
 * */

@Component
public class MyAuthenticationProvider extends DaoAuthenticationProvider {

    public MyAuthenticationProvider(@Qualifier("MyUserDetailsService") UserDetailsService userDetailsService){
        //此处必须指定UserDetailsService,否则编译出错
        this.setUserDetailsService(userDetailsService);
        this.setPasswordEncoder(new BCryptPasswordEncoder());
    }

    @Override
    protected void additionalAuthenticationChecks(UserDetails userDetails, UsernamePasswordAuthenticationToken authentication) throws AuthenticationException {

        //获取详细信息
        MyWebAuthenticationDetails details=(MyWebAuthenticationDetails)authentication.getDetails();
        //一旦发现验证码不正确,立刻抛出相应异常
        //details==null非web页面登录
        if(details!=null && !details.isImageCodeIsRight()){
            throw new VerificationCodeException();
        }
        super.additionalAuthenticationChecks(userDetails,authentication);
    }
}
6.自动登录
6.1相关配置项
6.2涉及两个类实体类PersistentRememberMe和Token存储库类MyPersistentTokenRepository
存储库类MyPersistentTokenRepository代码如下:
点击查看代码
import com.yq.demo.model.PersistentRememberMe;
import org.springframework.security.web.authentication.rememberme.PersistentRememberMeToken;
import org.springframework.security.web.authentication.rememberme.PersistentTokenRepository;
import org.springframework.stereotype.Component;

import java.lang.reflect.Array;
import java.util.ArrayList;
import java.util.Date;
import java.util.List;
/**
 * 实现持久化令牌自动登录
 * 认证过程:从cookie读取series和token
 * 执行getTokenForSeries根据series值去查找上次登录存储的token和登录时间
 * 比较token值,比较过期时间
 * 创建新的token并执行updateToken更新token
 * 登录成功:
 * 创建新的token执行createNewToken
 * 将token添加到cookie
 * @author yuqiang
 * @date 2022.1.7
 * */
@Component
public class MyPersistentTokenRepository implements PersistentTokenRepository {

    public static List<PersistentRememberMe> userList=new ArrayList<>();

    /**
     * 此处可以将相关信息存储到db
     * 持久化令牌
     * */
    @Override
    public void createNewToken(PersistentRememberMeToken persistentRememberMeToken) {
        PersistentRememberMe prm=new PersistentRememberMe();
        prm.setSeries(persistentRememberMeToken.getSeries());
        prm.setDate(persistentRememberMeToken.getDate());
        prm.setTokenValue(persistentRememberMeToken.getTokenValue());
        prm.setUsername(persistentRememberMeToken.getUsername());
        userList.add(prm);
    }

    @Override
    public void updateToken(String series, String token, Date date) {
        if(userList!=null && userList.size()>0){
            for(PersistentRememberMe v:userList)
            {
                if(v.getSeries().equals(series)){
                    v.setTokenValue(token);
                    v.setDate(date);
                    break;
                }
            };
        }
    }

    /**
     * 根据series查下username\token\date
     * 此处可以从db中查找
     * */
    @Override
    public PersistentRememberMeToken getTokenForSeries(String series) {

        if(userList!=null && userList.size()>0){
            for(PersistentRememberMe v:userList)
            {
                if(v.getSeries().equals(series)){
                    //String username, String series, String tokenValue, Date date
                    return new PersistentRememberMeToken(v.getUsername(),
                            v.getSeries(),v.getTokenValue(),v.getDate());
                }
            };
        }
        return null;
    }

    @Override
    public void removeUserTokens(String username) {
        if(userList!=null && userList.size()>0){
            for(PersistentRememberMe v:userList)
            {
                if(v.getUsername().equals(username)){
                   userList.remove(v);
                }
            };
        }
    }
}
实体类PersistentRememberMe代码如下:
点击查看代码
import java.util.Date;

public class PersistentRememberMe {
    private String username;
    private String series;
    private String tokenValue;
    private Date date;

    public String getUsername() {
        return username;
    }

    public void setUsername(String username) {
        this.username = username;
    }

    public String getSeries() {
        return series;
    }

    public void setSeries(String series) {
        this.series = series;
    }

    public String getTokenValue() {
        return tokenValue;
    }

    public void setTokenValue(String tokenValue) {
        this.tokenValue = tokenValue;
    }

    public Date getDate() {
        return date;
    }

    public void setDate(Date date) {
        this.date = date;
    }
}
7.其他类如下
点击查看代码
import org.springframework.web.bind.annotation.GetMapping;
import org.springframework.web.bind.annotation.RequestMapping;
import org.springframework.web.bind.annotation.RestController;

@RestController
@RequestMapping("/app/api")
public class AppController {

    @GetMapping("hello")
    public String hello(){
        return "hello, app";
    }
}

@Controller
public class HomeController {

    @GetMapping("/mylogin")
    public String login(){
        return "mylogin.html";
    }
}

@RestController
@RequestMapping("/user/api")
public class UserController {

    @GetMapping("hello")
    public String hello(){
        return "hello, user";
    }
}

@RestController
@RequestMapping("/admin/api")
public class AdminController {
    @GetMapping("hello")
    public String hello(){
        return "hello, admin";
    }
}

import org.springframework.security.core.AuthenticationException;
import org.springframework.security.web.authentication.AuthenticationFailureHandler;

import javax.servlet.ServletException;
import javax.servlet.http.HttpServletRequest;
import javax.servlet.http.HttpServletResponse;
import java.io.IOException;
import java.io.PrintWriter;
/**
 * 自定义登录失败处理
 * @author yuqiang
 * @date 2022.1.7
 * */
public class MyAuthenticationFailHandler implements AuthenticationFailureHandler {
    @Override
    public void onAuthenticationFailure(HttpServletRequest httpServletRequest, HttpServletResponse httpServletResponse, AuthenticationException e) throws IOException, ServletException {
        httpServletResponse.setContentType("application/json;charset=UTF-8");
        PrintWriter out=httpServletResponse.getWriter();
        out.write("{\"error_code\":\"401\",\"message\":\""+e.getMessage()+"\"}");
    }
}


import org.springframework.security.core.AuthenticationException;

/**
* 自定义验证码校验失败的异常
* @author:yuqiang
* @date:2022.1.7
* */
public class VerificationCodeException extends AuthenticationException {
    public VerificationCodeException(){
        super("图形验证码校验失败");
    }
}

import com.yq.demo.exception.VerificationCodeException;
import com.yq.demo.handler.MyAuthenticationFailHandler;
import org.springframework.security.web.authentication.AuthenticationFailureHandler;
import org.springframework.web.filter.OncePerRequestFilter;
import org.thymeleaf.util.StringUtils;

import javax.servlet.FilterChain;
import javax.servlet.ServletException;
import javax.servlet.http.HttpServletRequest;
import javax.servlet.http.HttpServletResponse;
import javax.servlet.http.HttpSession;
import java.io.IOException;

/**
* 自定义校验验证码的过滤器
 * OncePerRequestFilter可以确保一次请求只会通过一次该过滤器
 * @author yuqiang
 * @date 2022.1.7
* */
public class VerificationCodeFilter extends OncePerRequestFilter {


    private AuthenticationFailureHandler authenticationFailureHandler=new MyAuthenticationFailHandler();

    @Override
    protected void doFilterInternal(HttpServletRequest httpServletRequest, HttpServletResponse httpServletResponse, FilterChain filterChain) throws ServletException, IOException {
        //非登录请求不校验验证码
        if (!"/login".equals(httpServletRequest.getRequestURI())){
            filterChain.doFilter(httpServletRequest,httpServletResponse);
        }else{
            try{
                verificationCode(httpServletRequest);
                filterChain.doFilter(httpServletRequest,httpServletResponse);
            }catch (VerificationCodeException e){
                authenticationFailureHandler.onAuthenticationFailure(httpServletRequest,httpServletResponse,e);
            }
        }
    }

    public void verificationCode(HttpServletRequest request) throws VerificationCodeException {
        String requestCode=request.getParameter("captcha");//获取前端输入的验证码
        HttpSession session=request.getSession();
        String savedCode=(String)session.getAttribute("captcha");//从session读取验证码
        if(!StringUtils.isEmpty(savedCode)){
            //无论成功与否清除验证码,客户端应在登录失败时刷新验证码
            session.removeAttribute("captcha");
        }
        if(StringUtils.isEmpty(requestCode) || StringUtils.isEmpty(savedCode) || !requestCode.equals(savedCode)){
            //验证码不通过 抛出异常
            throw new VerificationCodeException();
        }
    }
}
-
Cors配置见Spring Security配置类,下面两个截图都在这个配置类中 代码见 步骤 4

-
JWT实现
9.1 JWT登录在配置中增加两个Filter来拦截登录和验证Token
9.2 JWT登录
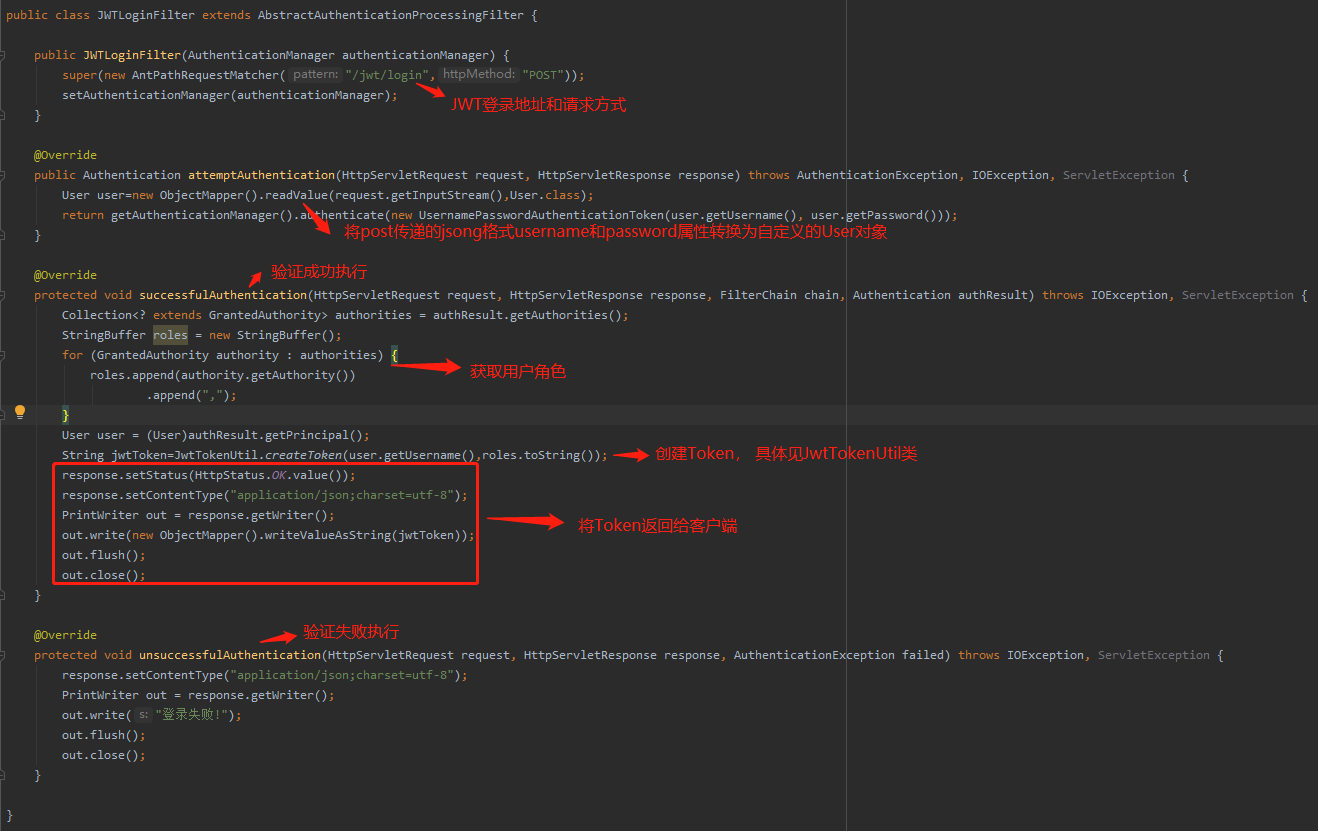
9.3 创建和获取Token
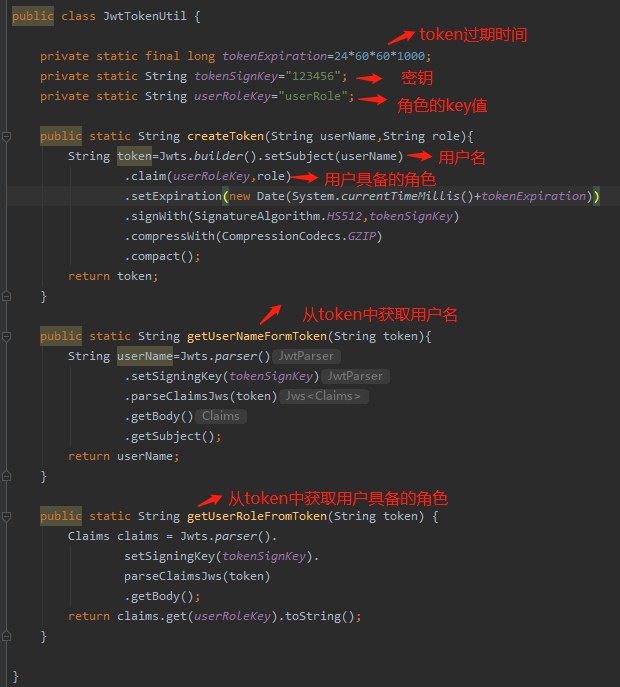
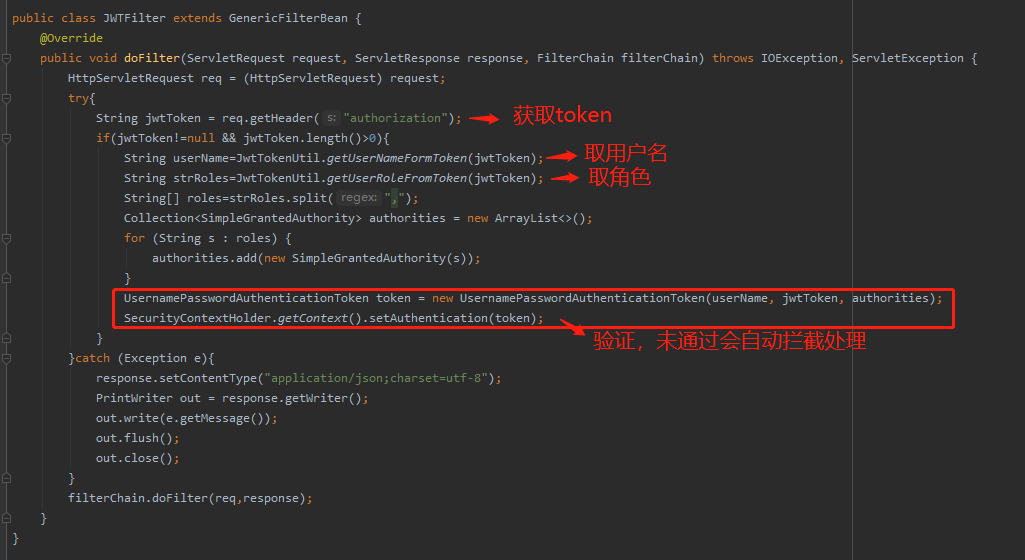
9.4 拦截Token验证
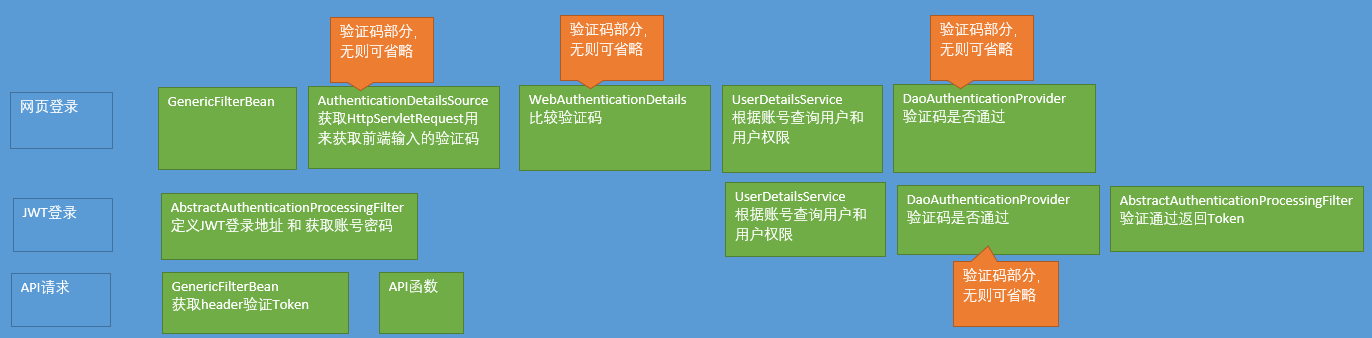
spring security请求流程


【推荐】国内首个AI IDE,深度理解中文开发场景,立即下载体验Trae
【推荐】编程新体验,更懂你的AI,立即体验豆包MarsCode编程助手
【推荐】抖音旗下AI助手豆包,你的智能百科全书,全免费不限次数
【推荐】轻量又高性能的 SSH 工具 IShell:AI 加持,快人一步
· winform 绘制太阳,地球,月球 运作规律
· AI与.NET技术实操系列(五):向量存储与相似性搜索在 .NET 中的实现
· 超详细:普通电脑也行Windows部署deepseek R1训练数据并当服务器共享给他人
· 【硬核科普】Trae如何「偷看」你的代码?零基础破解AI编程运行原理
· 上周热点回顾(3.3-3.9)