CentOS 6.5环境安装搭建Zabbix 3.x监控以及邮件报警
一、环境准备
1)CentOS release 6.5 (Final)
2)zabbix-3.2.6.tar.gz
3)nginx-1.9.15.tar.gz
4)php-5.5.35.tar.gz
5)mysql-5.5.49.tar.gz
6)fping-3.5.tar.gz
二、部署安装
1)源码安装nginx:
YUM安装所需要的依赖包:
yum -y install gcc gcc-c++ autoconf automake zlib zlib-devel openssl openssl-devel pcre* make gd-devel libjpeg-devel libpng-devel libxml2-devel bzip2-devel libcurl-devel
创建nginx组:
[root@zabbix ~]# useradd nginx -s /sbin/nologin -M
开始编译安装:
[root@zabbix ~]# cd /usr/local/src/
[root@zabbix src]# tar zxvf nginx-1.9.15.tar.gz && cd nginx-1.9.15
[root@zabbix nginx-1.9.15]# ./configure --prefix=/usr/local/nginx1.9.15 --user=www --group=www --with-http_ssl_module --with-http_v2_module --with-http_stub_status_module --with-pcre
[root@zabbix nginx-1.9.15]# make && make install
[root@zabbix nginx-1.9.15]# ln -s /usr/local/nginx1.9.15/  /usr/local/nginx
[root@zabbix nginx-1.9.15]# ll /usr/local
总用量 44
drwxr-xr-x. 2 root root 4096 9月 23 2011 bin
drwxr-xr-x. 2 root root 4096 9月 23 2011 etc
drwxr-xr-x. 2 root root 4096 9月 23 2011 games
drwxr-xr-x. 2 root root 4096 9月 23 2011 include
drwxr-xr-x. 2 root root 4096 9月 23 2011 lib
drwxr-xr-x. 2 root root 4096 9月 23 2011 lib64
drwxr-xr-x. 2 root root 4096 9月 23 2011 libexec
lrwxrwxrwx. 1 root root 23 9月 16 01:14 nginx -> /usr/local/nginx1.9.15/
drwxr-xr-x. 6 root root 4096 9月 16 01:12 nginx1.9.15
drwxr-xr-x. 2 root root 4096 9月 23 2011 sbin
drwxr-xr-x. 5 root root 4096 8月 7 21:19 share
drwxr-xr-x. 3 root root 4096 9月 16 01:09 src
一些参数说明:
--with-http_stub_status_module:支持nginx状态查询
--with-http_ssl_module:支持https
--with-http_spdy_module:支持google的spdy,想了解请百度spdy,这个必须有ssl的支持
--with-pcre:为了支持rewrite重写功能,必须制定pcre
2)安装PHP
[root@zabbix src]# tar zxvf php-5.5.35.tar.gz && cd php-5.5.35
[root@zabbix php-5.5.35]# ./configure --prefix=/usr/local/product/php-5.5.35 --with-config-file-path=/usr/local/product/php-5.5.35/etc --with-bz2 --with-curl --enable-ftp --enable-sockets --disable-ipv6 --with-gd --with-jpeg-dir=/usr/local --with-png-dir=/usr/local --with-freetype-dir=/usr/local --enable-gd-native-ttf --with-iconv-dir=/usr/local --enable-mbstring --enable-calendar --with-gettext --with-libxml-dir=/usr/local --with-zlib --with-pdo-mysql=mysqlnd --with-mysqli=mysqlnd --with-mysql=mysqlnd --enable-dom --enable-xml --enable-fpm --with-libdir=lib64 --enable-bcmath
[root@zabbix php-5.5.35]# make && make install
[root@zabbix php-5.5.35]# ln -s /usr/local/product/php-5.5.35 /usr/local/php
[root@zabbix php-5.5.35]# cp php.ini-production /usr/local/php/etc/php.ini
[root@zabbix php-5.5.35]# cd /usr/local/php/etc/
[root@zabbix etc]# cp php-fpm.conf.default php-fpm.conf

根据需求修改以下参数:
max_execution_time = 300
memory_limit = 128M
post_max_size = 16M
upload_max_filesize = 2M
max_input_time = 300
date.timezone = PRC
3)安装mysql:
[root@zabbix mysql-5.5.49]# groupadd mysql
[root@zabbix mysql-5.5.49]# mkdir -pv /data/mysql
[root@zabbix mysql-5.5.49]# useradd -r -g mysql -d /data/mysql -s /sbin/nologin mysql
[root@zabbix mysql-5.5.49]# chown -R mysql:mysql /data/mysql/
[root@zabbix mysql-5.5.49]# yum install cmake gcc* ncurses-devel -y
[root@zabbix src]# tar zxvf mysql-5.5.49.tar.gz && cd mysql-5.5.49
[root@zabbix mysql-5.5.49]# cmake -DCMAKE_INSTALL_PREFIX=/usr/local/product/mysql5.5.49 -DDEFAULT_CHARSET=utf8 -DENABLED_LOCAL_INFILE=1 -DMYSQL_DATADIR=/data/mysql -DWITH_EXTRA_CHARSETS=all -DWITH_READLINE=1 -DWITH_INNOBASE_STORAGE_ENGINE=1 -DMYSQL_TCP_PORT=3306 -DDEFAULT_COLLATION=utf8_general_ci
[root@zabbix ~]# ln -s /usr/local/product/mysql5.5.49 /usr/local/mysql
[root@zabbix ~]# chown -R mysql.mysql /usr/local/mysql

拷贝mysql配置文件:
[root@zabbix ~]# cd /usr/local/mysql/support-files/
[root@zabbix support-files]# cp my-medium.cnf /data/mysql/my.cnf
[root@zabbix support-files]# cp mysql.server /etc/init.d/mysqld
[root@zabbix support-files]# chmod +x /etc/init.d/mysqld

mysql初始化:
[root@zabbix support-files]# cd /usr/local/mysql/scripts
修改/etc/my.cnf
datadir=/data/mysql/
[root@zabbix scripts]# /etc/init.d/mysqld start #启动
Starting MySQL... SUCCESS!
[root@zabbix sbin]# ln -s /usr/local/mysql/bin/mysql /usr/local/sbin/mysql
[root@zabbix sbin]# mysql -u root -p
Enter password:
mysql> create database zabbix default charset utf8;
Query OK, 1 row affected (0.00 sec)
mysql> grant all privileges on zabbix.* to zabbix@'localhost' identified by 'zabbix';
Query OK, 0 rows affected (0.00 sec)
mysql> flush privileges;
Query OK, 0 rows affected (0.00 sec)
mysql> show databases;
+--------------------+
| Database |
+--------------------+
| information_schema |
| mysql |
| performance_schema |
| test |
| zabbix |
+--------------------+
5 rows in set (0.01 sec)
mysql>
4)安装zabbix server :
[root@zabbix ~]# cd /usr/local/src/zabbix-3.2.6
[root@zabbix zabbix-3.2.6]# ./configure --prefix=/usr/local/zabbix-3.2.6/ --enable-server --enable-agent --with-mysql --with-net-snmp --with-libcurl --with-libxml2
[root@zabbix zabbix-3.2.6]# make && make install
[root@zabbix zabbix-3.2.6]# groupadd zabbix
[root@zabbix zabbix-3.2.6]# useradd zabbix -s /sbin/nologin -M
导入数据库:
[root@zabbix zabbix-3.2.6]# mysql -uroot -pzabbix zabbix < database/mysql/schema.sql
[root@zabbix zabbix-3.2.6]# mysql -uroot -pzabbix zabbix < database/mysql/images.sql
[root@zabbix zabbix-3.2.6]# mysql -uroot -pzabbix zabbix < database/mysql/data.sql
5)部署nginx网站配置:
[root@zabbix ~]# mkdir /data/web/ -p
[root@zabbix ~]# mkdir /data/logs/zabbix/ -p
[root@zabbix zabbix-3.2.6]# cd /usr/local/src/zabbix-3.2.6
[root@zabbix zabbix-3.2.6]# cp -rp frontends/php/* /data/web/
配置nginx:
[root@zabbix conf]# cd /usr/local/nginx/conf/
[root@zabbix conf]# mkdir extra/
[root@zabbix conf]# cd extra/
[root@zabbix extra]# vim zabbix.conf
--------------------------------------------------------------------------
server {
listen 8027;
server_name zabbix.lifec.com;
access_log /data/logs/zabbix/zabbix.lifec.com.access.log main;
index index.html index.php index.html;
root /data/web/zabbix.lifec.com;
location /{
try_files $uri $uri/ /index.php?$args;
}
location ~ ^(.+.php)(.*)$ {
fastcgi_split_path_info ^(.+.php)(.*)$;
include fastcgi.conf;
fastcgi_pass 127.0.0.1:9000;
fastcgi_index index.php;
fastcgi_param PATH_INFO $fastcgi_path_info;
}
}
-----------------------------------------------------------------------
[root@zabbix extra]# cd ../

[root@zabbix conf]# vim nginx.conf
---------------------------------------------------------------------
user nobody;
worker_processes 1;
#error_log logs/error.log;
#error_log logs/error.log notice;
#error_log logs/error.log info;
pid logs/nginx.pid;
events {
worker_connections 1024;
}
http {
include mime.types;
default_type application/octet-stream;
log_format main '$remote_addr - $remote_user [$time_local] "$request" '
'$status $body_bytes_sent "$http_referer" '
'"$http_user_agent" "$http_x_forwarded_for"';
access_log logs/access.log main;
sendfile on;
#tcp_nopush on;
#keepalive_timeout 0;
keepalive_timeout 65;
#gzip on;
include extra/*.conf;
}
编辑zabbix_server.conf 配置文件:
LogFile=/tmp/zabbix_server.log

PidFile=/tmp/zabbix_server.pid

DBHost=localhost

DBName=zabbix

DBUser=zabbix

DBPassword=zabbix
6)启动服务:
[root@zabbix etc]# /usr/local/nginx/sbin/nginx
[root@zabbix etc]# /usr/local/php/sbin/php-fpm
[root@zabbix etc]# /usr/local/zabbix-3.2.6/sbin/zabbix_server
开机自动启动:
[root@zabbix etc]# echo "/usr/local/nginx/sbin/nginx" >>/etc/rc.local
[root@zabbix etc]# echo "/usr/local/php/sbin/php-fpm" >>/etc/rc.local
[root@zabbix etc]# echo "/etc/init.d/mysqld start" >>/etc/rc.local
[root@zabbix etc]# echo "/usr/local/zabbix-3.0.3/sbin/zabbix_server" >>/etc/rc.local
[root@zabbix etc]# netstat -tulpn
Active Internet connections (only servers)
Proto Recv-Q Send-Q Local Address Foreign Address State PID/Program name
tcp 0 0 0.0.0.0:22 0.0.0.0:* LISTEN 1221/sshd
tcp 0 0 127.0.0.1:25 0.0.0.0:* LISTEN 1079/master
tcp 0 0 0.0.0.0:8027 0.0.0.0:* LISTEN 20814/nginx
tcp 0 0 0.0.0.0:10051 0.0.0.0:* LISTEN 35538/zabbix_server
tcp 0 0 127.0.0.1:9000 0.0.0.0:* LISTEN 35530/php-fpm
tcp 0 0 0.0.0.0:3306 0.0.0.0:* LISTEN 10391/mysqld
tcp 0 0 :::22 :::* LISTEN 1221/sshd
tcp 0 0 ::1:25 :::* LISTEN 1079/master
udp 0 0 0.0.0.0:68 0.0.0.0:* 898/dhclient
7)初始化配置:
打开地址:http://192.168.195.137:8027/setup.php
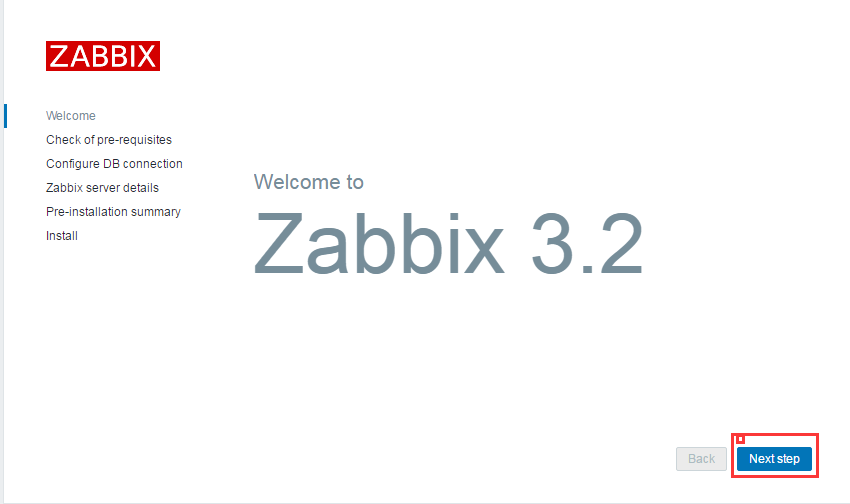
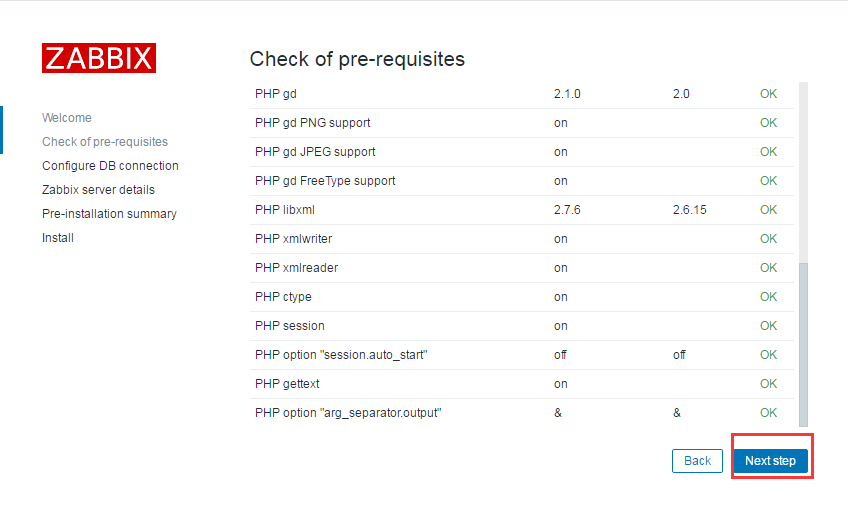
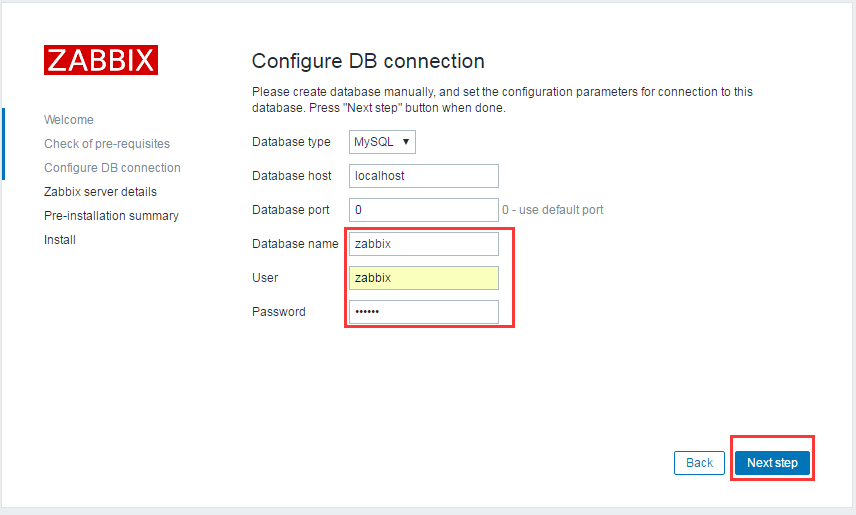
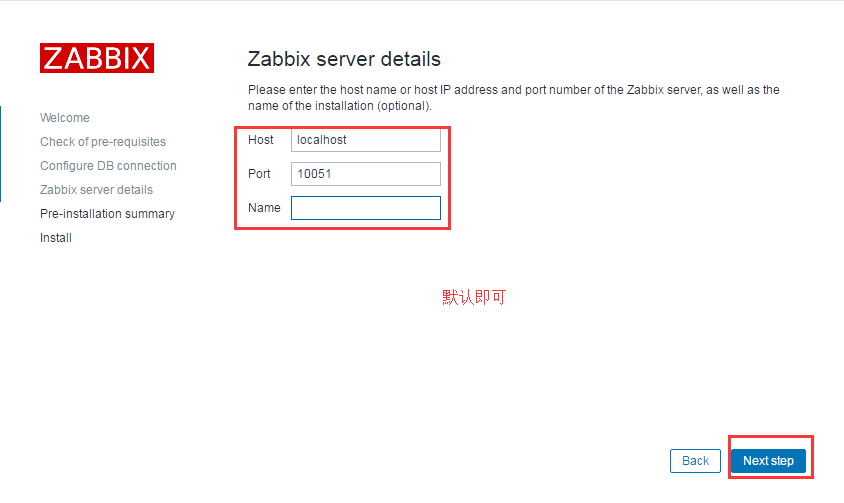
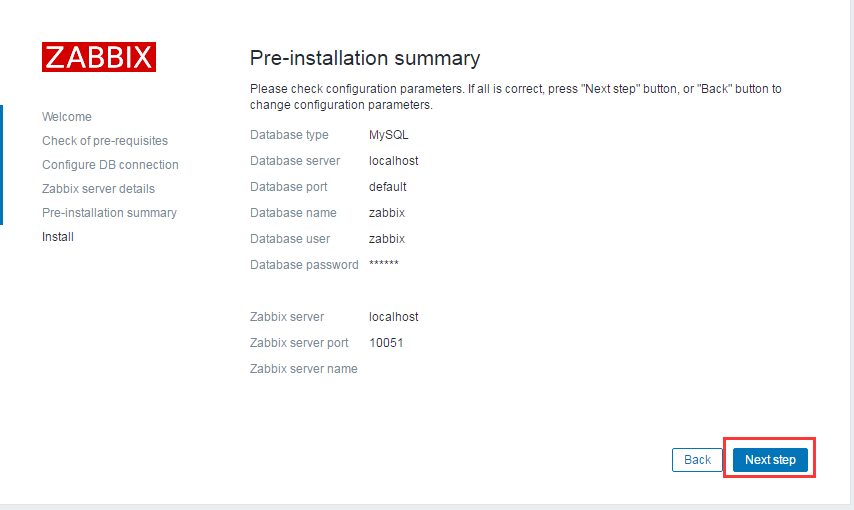
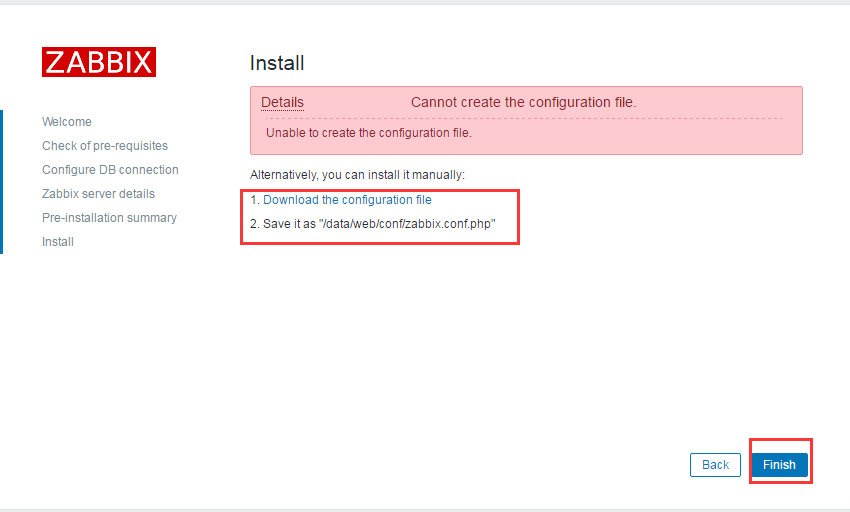
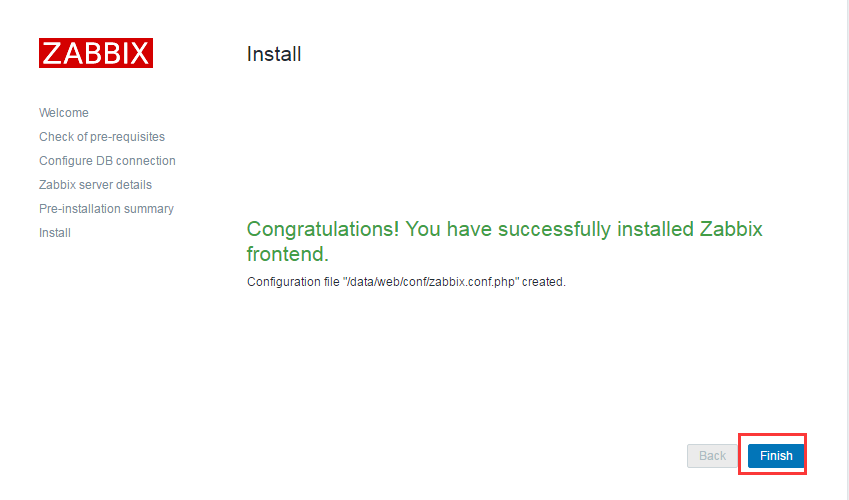
开启zabbix之旅!!!
三、邮件告警
1)安装fping工具:
[root@zabbix src]# tar zxvf fping-3.5.tar.gz
[root@zabbix src]# cd fping-3.5
[root@zabbix fping-3.5]# ./configure --prefix=/opt/fping
[root@zabbix fping-3.5]# make && make install
[root@zabbix fping-3.5]# vim /usr/local/zabbix-3.2.6/etc/zabbix_server.conf
FpingLocation=/opt/fping/sbin/fping
[root@zabbix fping-3.5]# chown root.zabbix /opt/fping/sbin/fping
[root@zabbix fping-3.5]# chmod 4710 /opt/fping/sbin/fping
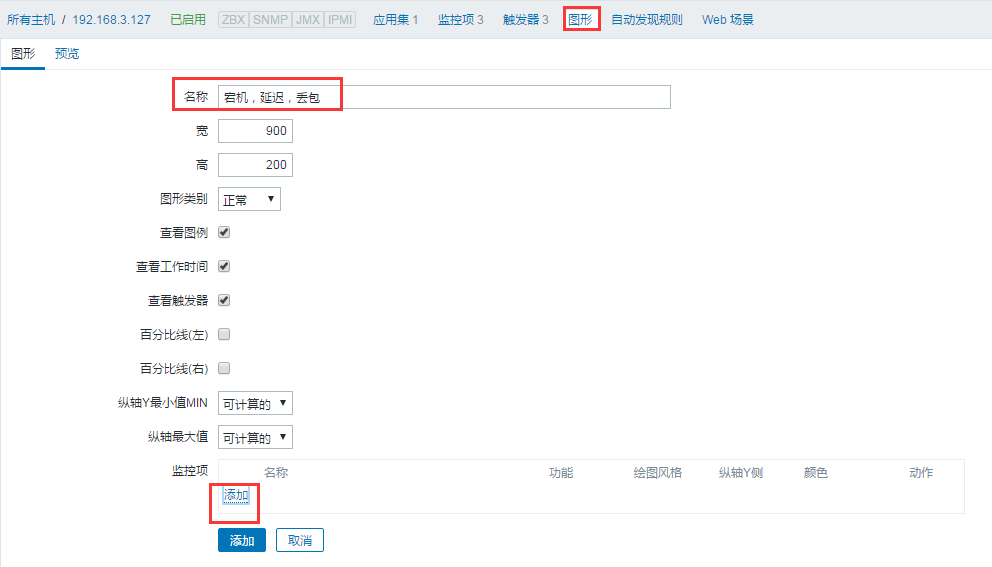
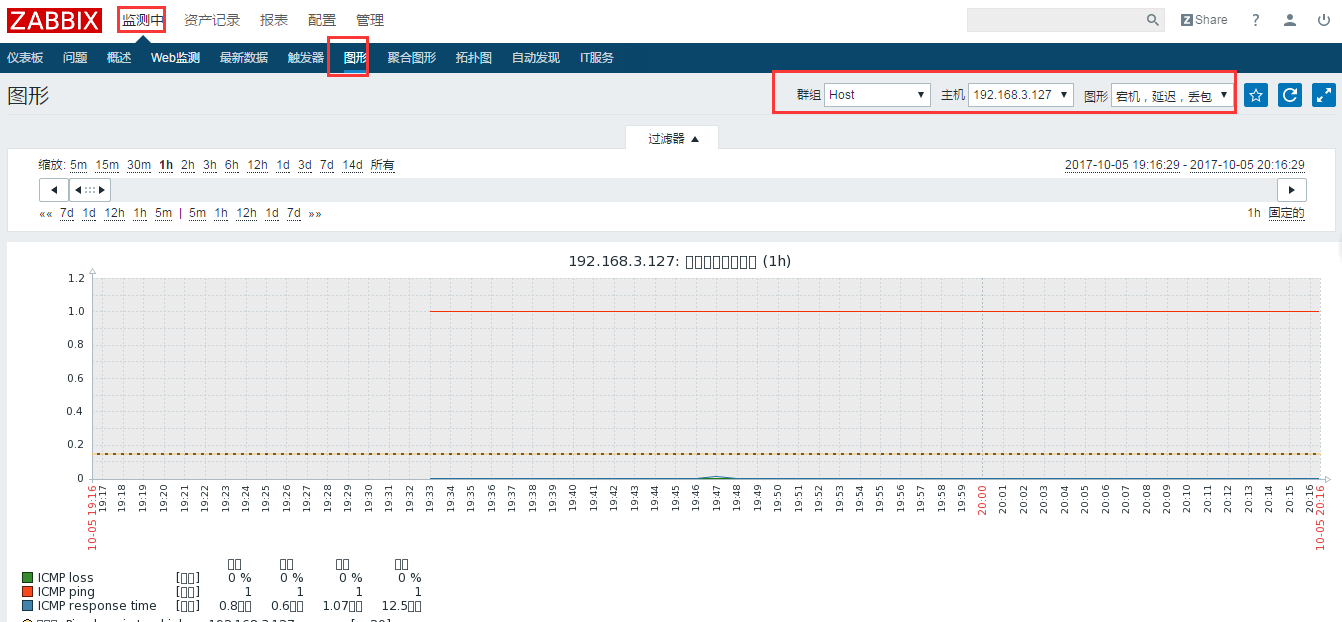
2)添加主机

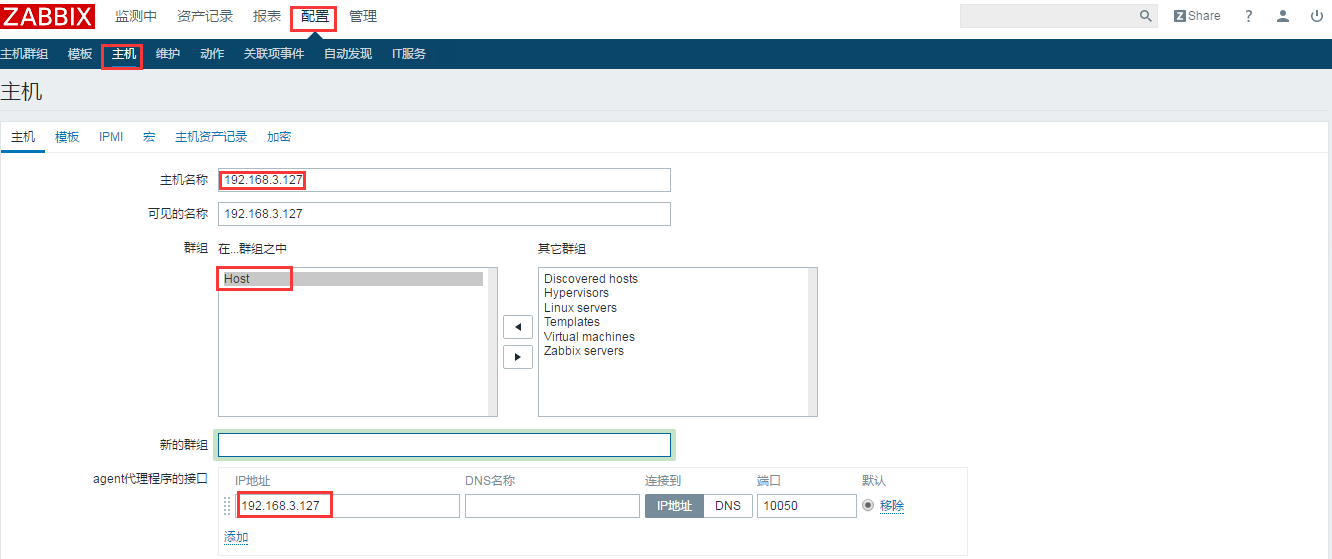
点击确定。




3)安装sendmail或者postfix:
[root@zabbix conf]# rpm -qa |grep postfix
postfix-2.6.6-2.2.el6_1.x86_64
[root@zabbix conf]# service postfix start
[root@zabbix conf]# chkconfig postfix on
4)安装mailx邮件发送工具:
[root@zabbix ~]# yum install -y mailx
[root@zabbix ~]# vim /etc/mail.rc  #最后添加下面内容
set from=biezz@wangsu.com
set smtp=mail.wangsu.com
set smtp-auth-user=biezz@wangsu.com
set smtp-auth-password=xxxxxxx
set smtp-auth=login
[root@zabbix ~]# echo "zabbix" |mail -s "zabbix" 1234567@qq.com #测试

5)编写服务器端邮件发送脚本
[root@zabbix ~]# cd /usr/local/zabbix-3.2.6/share/zabbix/alertscripts/
[root@zabbix alertscripts]# vim sendmail.sh
messages=`echo $3 | tr '\r\n' '\n'`
subject=`echo $2 | tr '\r\n' '\n'`
echo "${messages}" | mail -s "${subject}" $1 >>/tmp/sendmail.log 2>&1

[root@zabbix alertscripts]# chown zabbix.zabbix sendmail.sh
[root@zabbix alertscripts]# chmod +x sendmail.sh
[root@zabbix alertscripts]# /usr/local/zabbix-3.2.6/share/zabbix/alertscripts/sendmail.sh xxxxxxx@qq.com "hello" "world"  #用脚本测试发送
6)web端相关设置
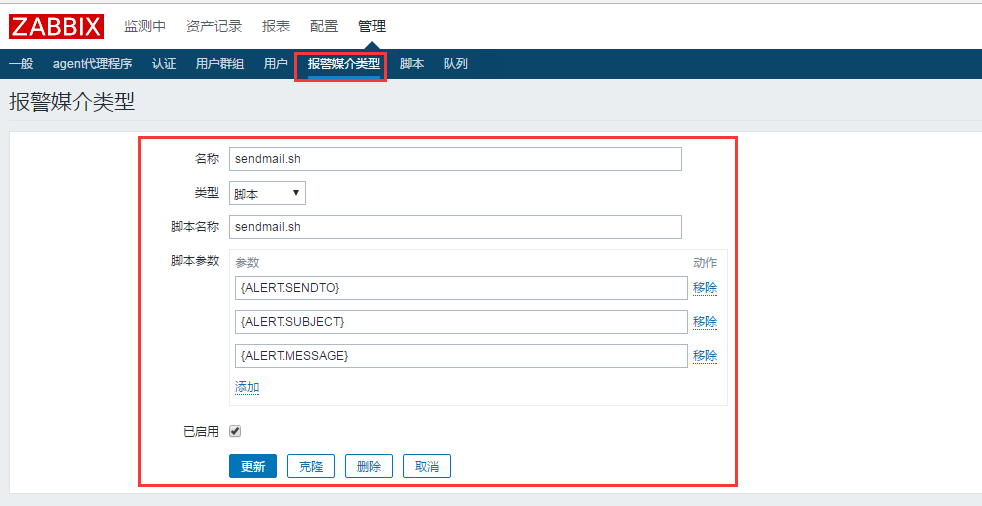

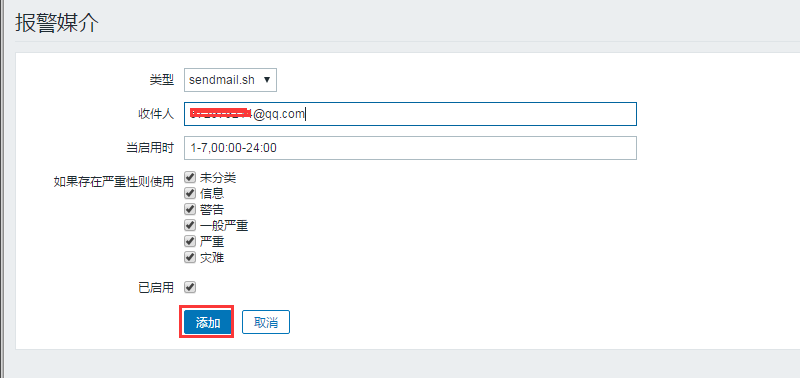
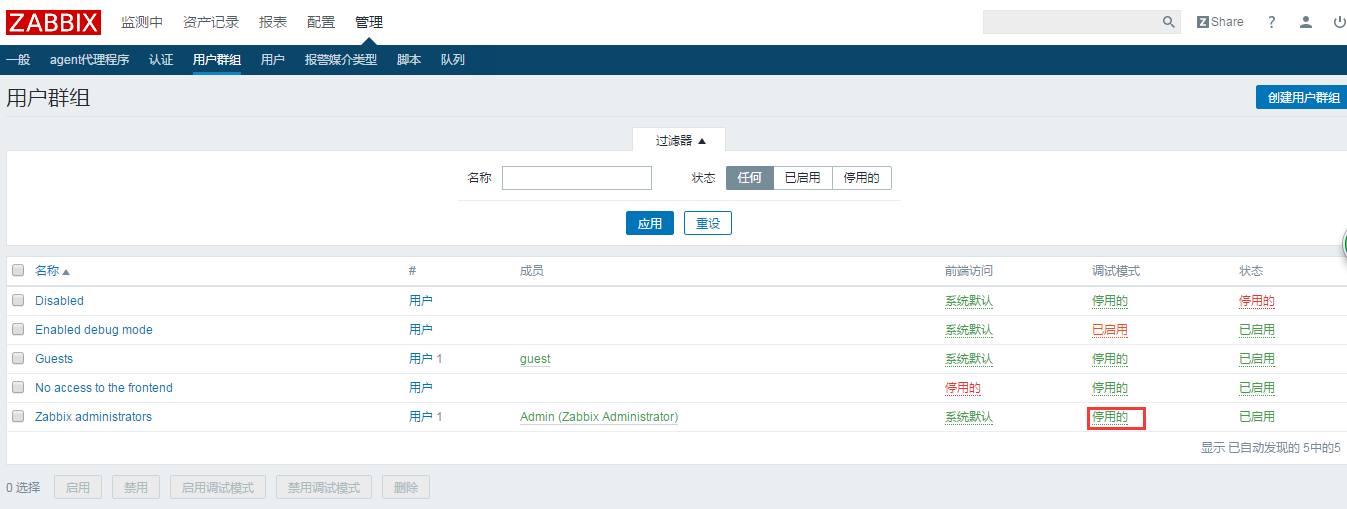
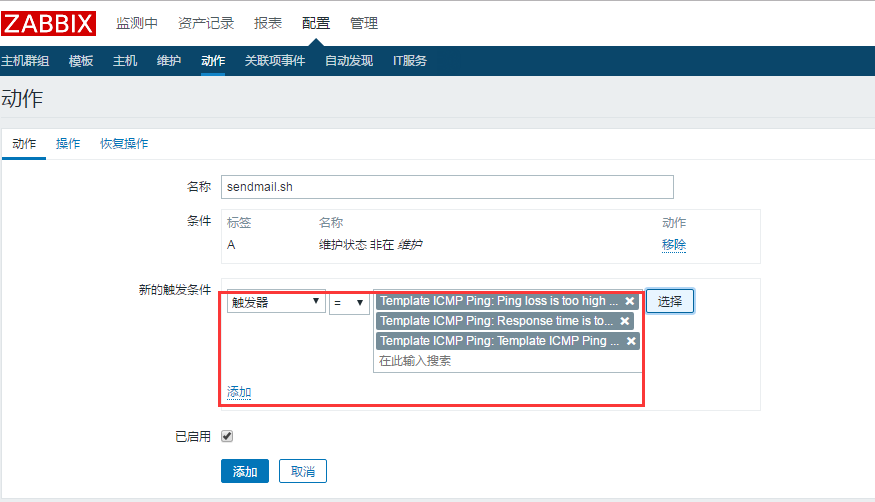
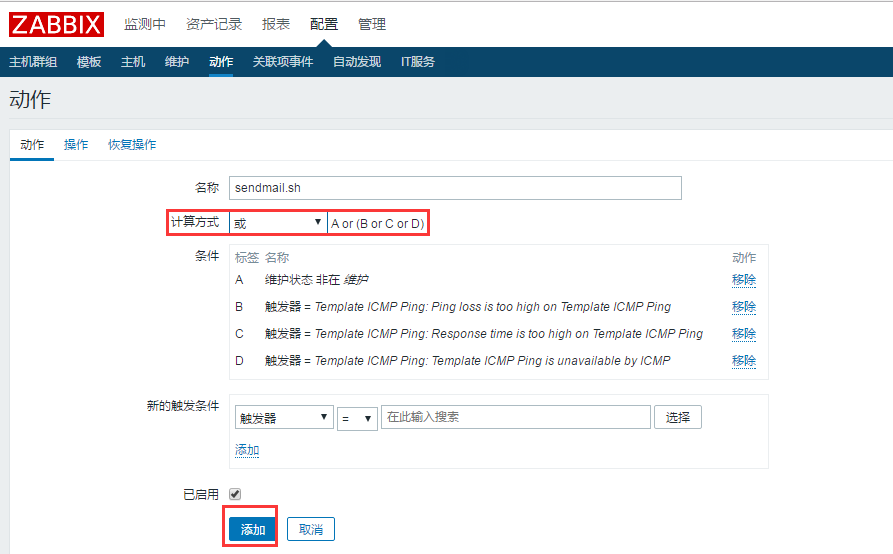
点击启用调试模式。下一步,创建动作

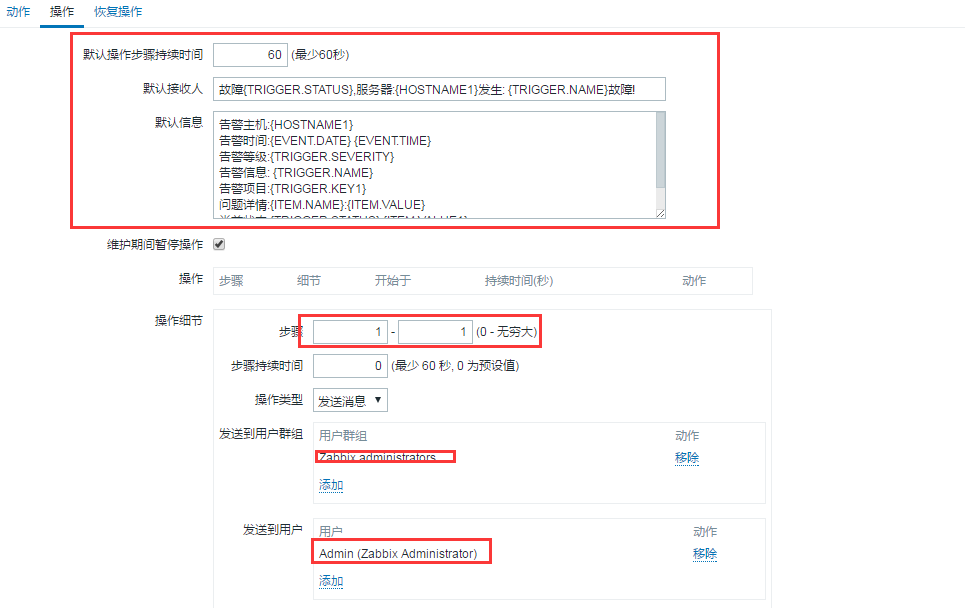
故障{TRIGGER.STATUS},服务器:{HOSTNAME1}发生: {TRIGGER.NAME}故障!
告警主机:{HOSTNAME1}
告警时间:{EVENT.DATE} {EVENT.TIME}
告警等级:{TRIGGER.SEVERITY}
告警信息: {TRIGGER.NAME}
告警项目:{TRIGGER.KEY1}
问题详情:{ITEM.NAME}:{ITEM.VALUE}
当前状态:{TRIGGER.STATUS}:{ITEM.VALUE1}
事件ID:{EVENT.ID}
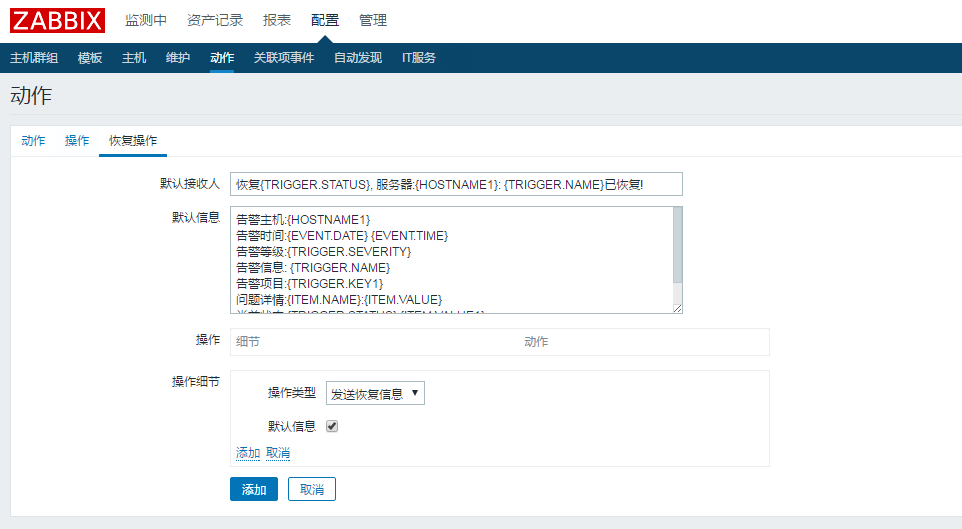
恢复{TRIGGER.STATUS}, 服务器:{HOSTNAME1}: {TRIGGER.NAME}已恢复!

告警主机:{HOSTNAME1}
告警时间:{EVENT.DATE} {EVENT.TIME}
告警等级:{TRIGGER.SEVERITY}
告警信息: {TRIGGER.NAME}
告警项目:{TRIGGER.KEY1}
问题详情:{ITEM.NAME}:{ITEM.VALUE}
当前状态:{TRIGGER.STATUS}:{ITEM.VALUE1}
事件ID:{EVENT.ID}
7)告警邮件测试:
把被监控的主机关机,再开机,观察web端动作日志以及邮件
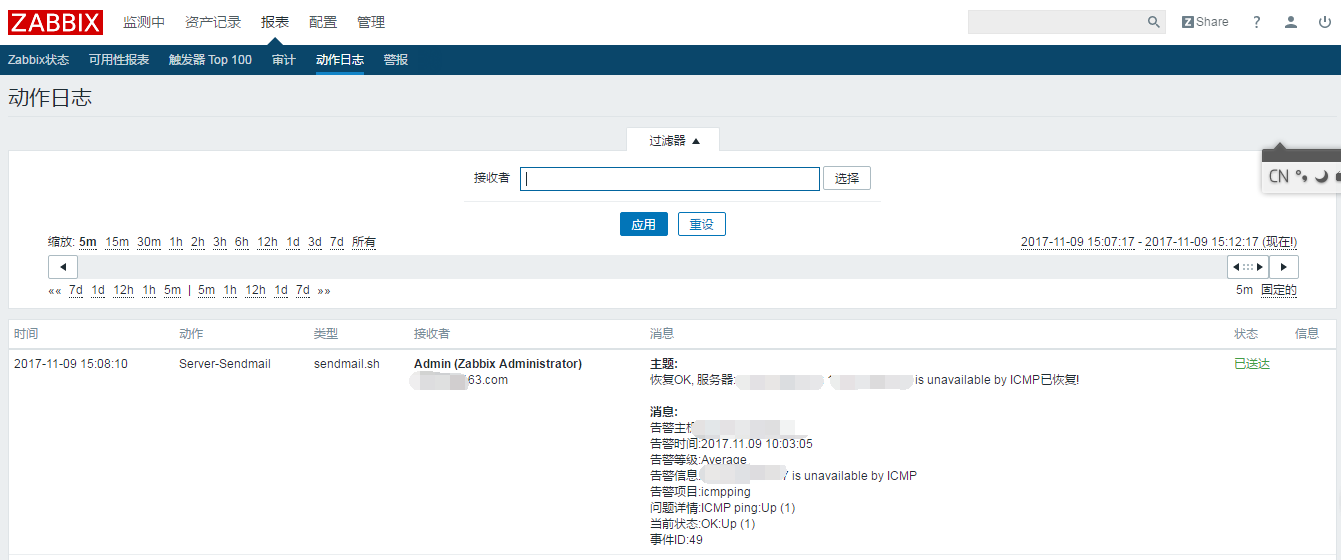
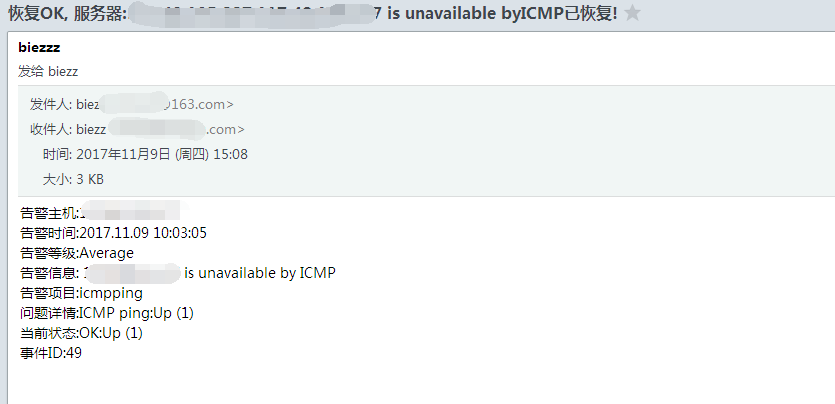
到此,所有的搭建部署已经完成。
小结:邮件报警中会遇到各种设置好,实际却收不到邮件。说一种特殊情况,web端所有设置没问题,动作日志中也提示邮件已发送,用脚本测试发送邮件,收件人又可以收到邮件。此时,有2种情况:1)路径问题,脚本路径和zabbix_server配置文件中路径不一致 2)权限问题,脚本本身的权限是否可执行,属于zabbix用户,以及脚本本身是否可以被执行。 我遇到的是脚本内目录也要有合适的权限


