mybatis_generator_逆向工程的使用笔记
1:解压mybatis_generator_1.3.1.zip文件。
2:把features,pougins文件夹copy到D:\java\eclipse\eclipse目录下(D:\java\eclipse\eclipse为eclipse的安装目录)。
3:进入D:\java\eclipse\eclipse\dropins目录,并新建mybatis.link文件,添加内容:path=D:\java\eclipse\eclipse。
4:启动eclipse。
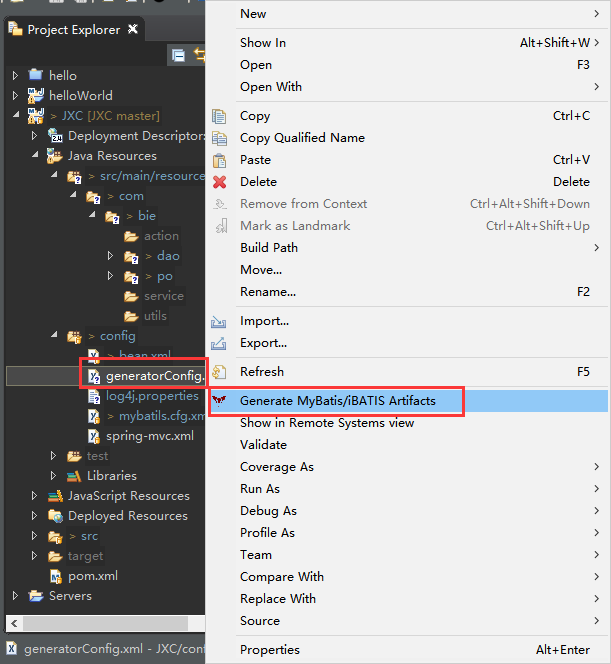
5:项目中添加generatorConfig.xml文件,并修改相关内容。右建可以找到generator mybatis artifacts生成。操作如下所示:
1 <?xml version="1.0" encoding="UTF-8"?> 2 <!DOCTYPE generatorConfiguration 3 PUBLIC "-//mybatis.org//DTD MyBatis Generator Configuration 1.0//EN" 4 "http://mybatis.org/dtd/mybatis-generator-config_1_0.dtd"> 5 6 <generatorConfiguration> 7 <!-- 8 <properties resource="conn.properties" /> 9 --> 10 <!-- 处理1 --> 11 <classPathEntry location="D:\java\mysql-connector-java-5.1.8.jar"/> 12 <!-- 指定运行环境是mybatis3的版本 --> 13 <context id="testTables" targetRuntime="MyBatis3"> 14 15 <commentGenerator> 16 <!-- 是否取消注释 --> 17 <property name="suppressAllComments" value="true" /> 18 <!-- 是否生成注释代时间戳 --> 19 <property name="suppressDate" value="true" /> 20 </commentGenerator> 21 <!-- 处理2 jdbc 连接信息 --> 22 <jdbcConnection 23 driverClass="com.mysql.jdbc.Driver" 24 connectionURL="jdbc:mysql://localhost:3306/jxc?useUnicode=true&characterEncoding=UTF-8" 25 userId="root" 26 password="123456"> 27 </jdbcConnection> 28 29 <!--处理3 targetPackage指定模型在生成在哪个包 ,targetProject指定项目的src,--> 30 <javaModelGenerator targetPackage="com.bie.po" 31 targetProject="JXC/src/main/resources"> 32 <!-- 去除字段前后空格 --> 33 <property name="trimStrings" value="false" /> 34 </javaModelGenerator> 35 <!--处理4 配置SQL映射文件生成信息 --> 36 <sqlMapGenerator targetPackage="com.bie.dao" 37 targetProject="JXC/src/main/resources" /> 38 <!-- 处理5 配置dao接口生成信息--> 39 <javaClientGenerator type="XMLMAPPER" targetPackage="com.bie.dao" targetProject="JXC/src/main/resources" /> 40 41 <!-- 42 处理6 修改自己对应的数据表和实体类的类名称 43 注意:如果添加其他数据表,将下面这些注释以后再添加,然后执行。 44 --> 45 <table tableName="jxc_admin" domainObjectName="JxcAdmin"/> 46 <table tableName="jxc_customer" domainObjectName="JxcCustomer"/> 47 <table tableName="jxc_employee" domainObjectName="JxcEmployee"/> 48 <table tableName="jxc_goods" domainObjectName="JxcGoods"/> 49 <table tableName="jxc_log" domainObjectName="JxcLog"/> 50 <table tableName="jxc_menu" domainObjectName="JxcMenu"/> 51 <table tableName="jxc_purchaseorder" domainObjectName="JxcPurchaseorder"/> 52 <table tableName="jxc_role" domainObjectName="JxcRole"/> 53 <table tableName="jxc_salesorder" domainObjectName="JxcSalesorder"/> 54 <table tableName="jxc_stock" domainObjectName="JxcStock"/> 55 <table tableName="jxc_supplier" domainObjectName="JxcSupplier"/> 56 <table tableName="jxc_warehouse" domainObjectName="JxcWarehouse"/> 57 </context> 58 59 </generatorConfiguration>
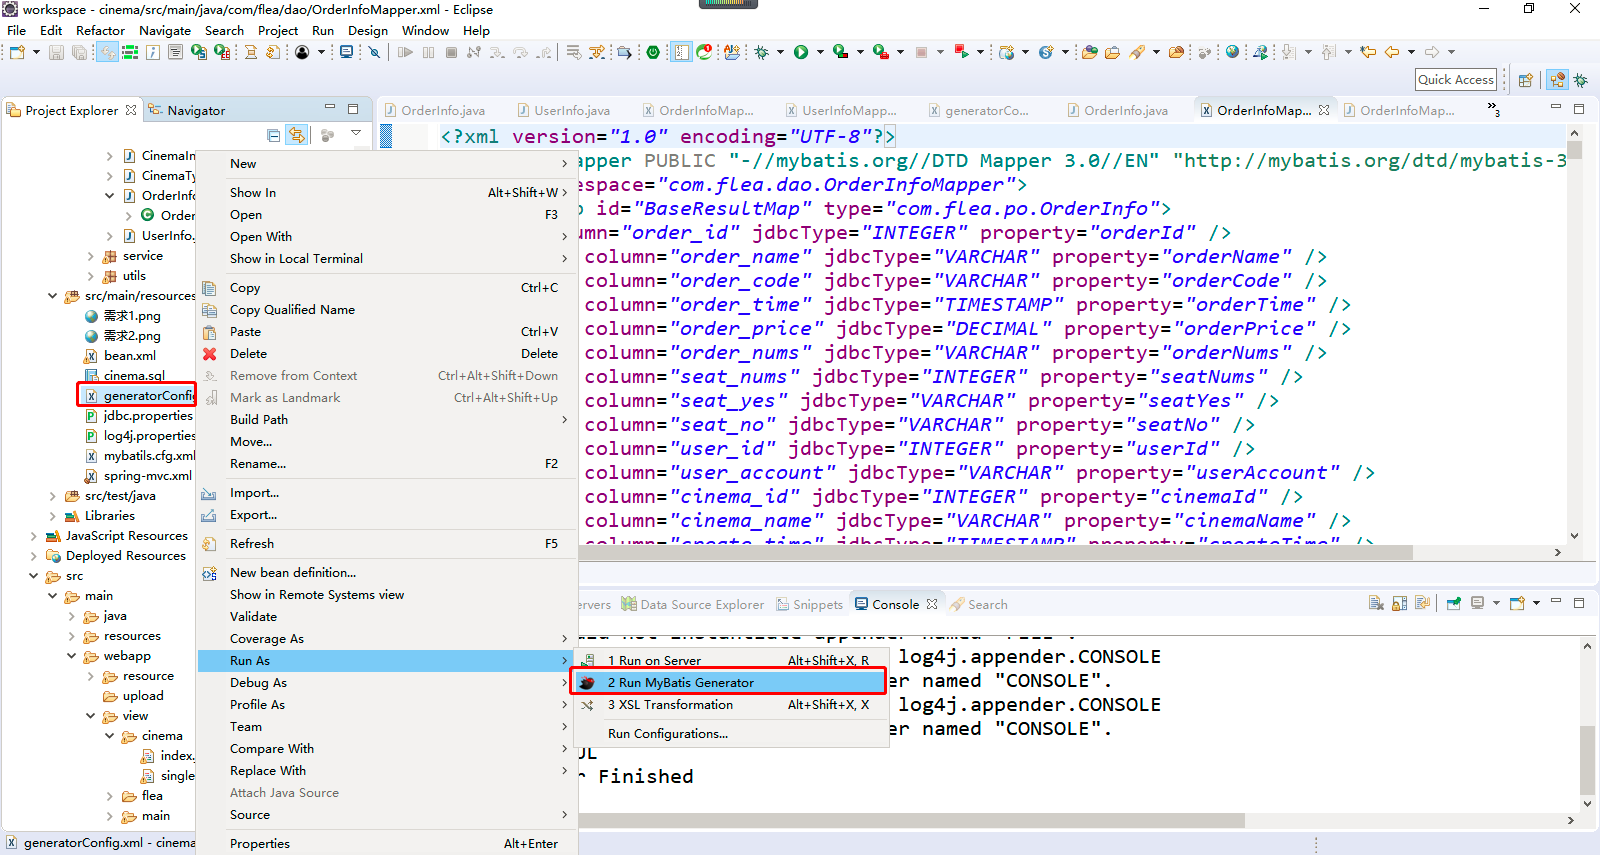
操作如下所示:

最后在实体类包里面将xxxExample.java文件全部删除即可。即完成自动生成实体类和dao层接口和xxxmapper.xml映射文件。
注意:完成后记得把实体实现Serializable,重写一下toString()方法,方便以后使用。

2020-08-04 16:31:34
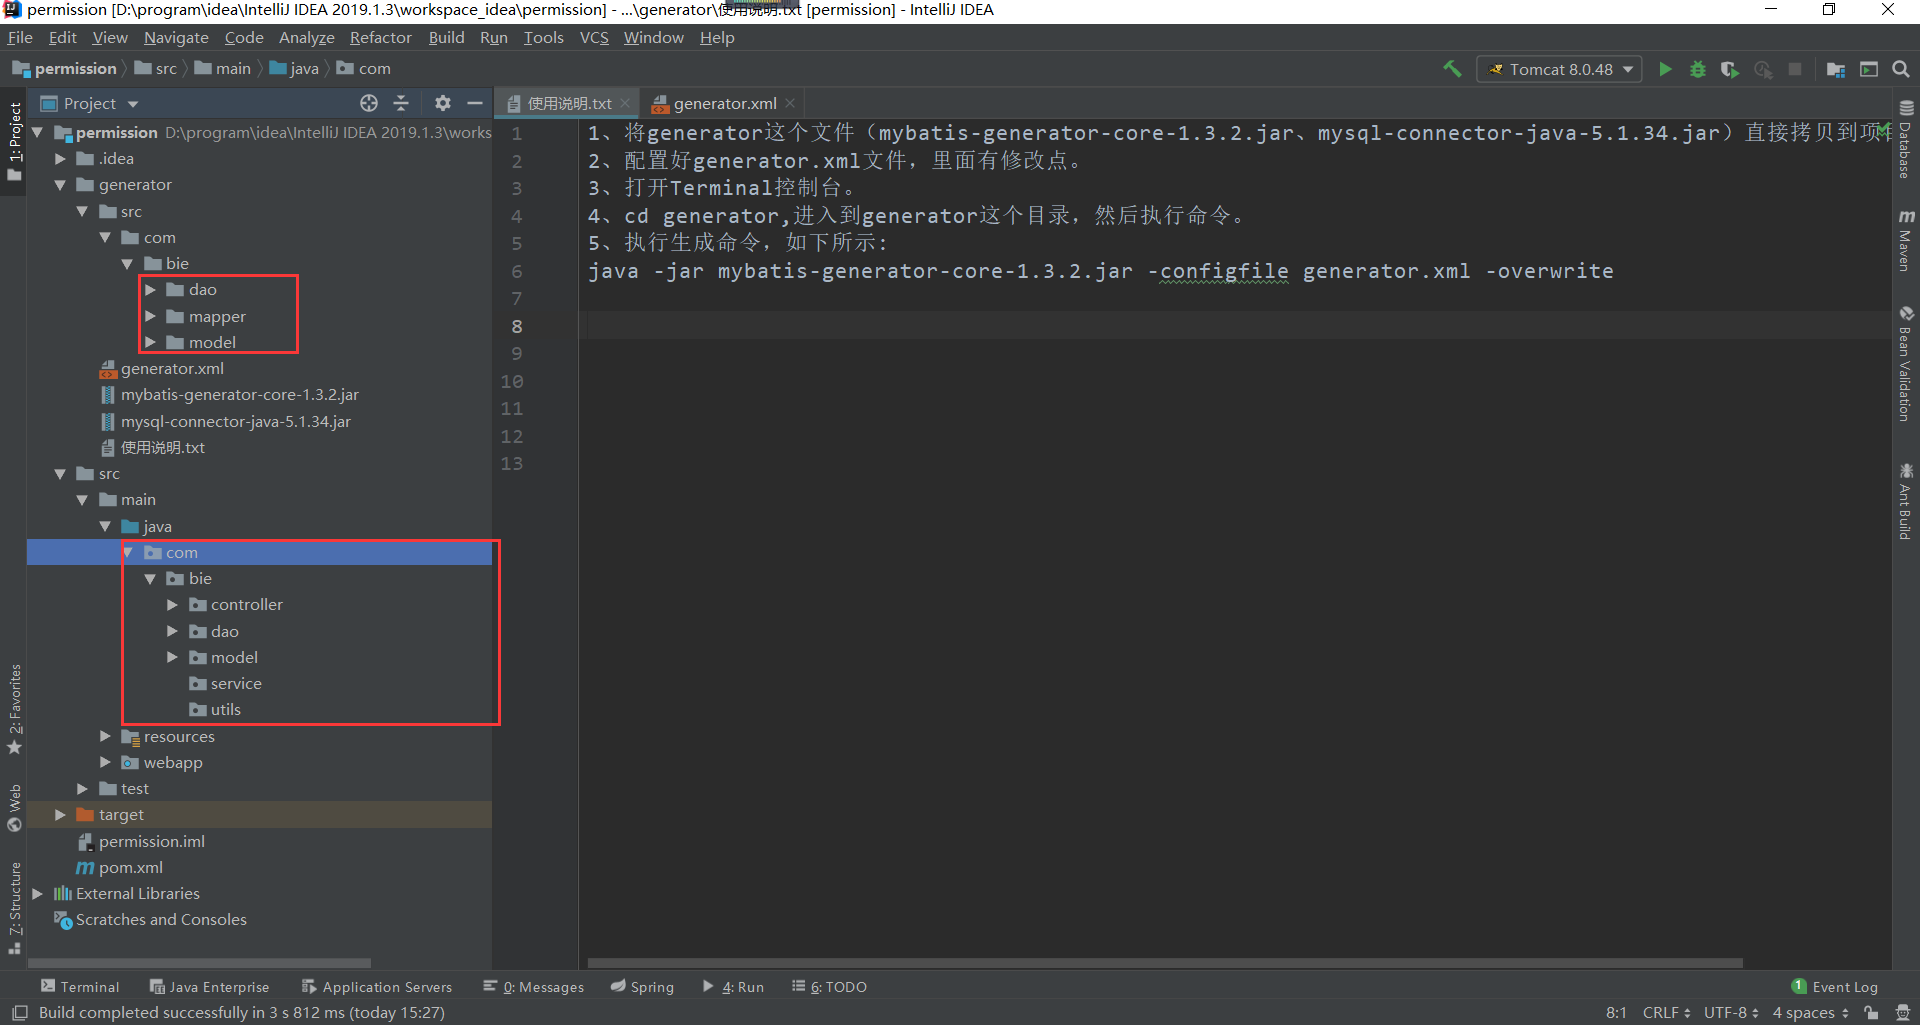
1、使用Idea进行逆向工程生成文件,如下所示:

这里主要是将mybatis-generator-core-1.3.2.jar这个jar包放到项目里面,配置好generator.xml文件,里面有修改点。
 1 <?xml version="1.0" encoding="UTF-8"?>
 2 <!DOCTYPE generatorConfiguration PUBLIC "-//mybatis.org//DTD MyBatis Generator Configuration 1.0//EN"
 3         "http://mybatis.org/dtd/mybatis-generator-config_1_0.dtd">
 4 <generatorConfiguration>
 5     <!-- 数据库驱动包位置 -->
 6     <classPathEntry
 7             location="D:/program/idea/IntelliJ IDEA 2019.1.3/workspace_idea/permission/generator/mysql-connector-java-5.1.34.jar"/>
 8     <!-- 1 -->
 9
10     <context id="DB2Tables" targetRuntime="MyBatis3">
11
12         <commentGenerator>
13             <property name="suppressAllComments" value="true"/>
14         </commentGenerator>
15
16         <!-- 数据库链接URL、用户名、密码 -->
17         <jdbcConnection driverClass="com.mysql.jdbc.Driver"
18                         connectionURL="jdbc:mysql://localhost:3306/rbac?characterEncoding=utf8"
19                         userId="root"
20                         password="123456">  <!-- 2 -->
21         </jdbcConnection>
22
23         <javaTypeResolver>
24             <property name="forceBigDecimals" value="false"/>
25         </javaTypeResolver>
26
27         <!-- 生成模型的包名和位置 --> <!-- 3 -->
28         <javaModelGenerator targetPackage="com.bie.model"
29                             targetProject="D:/program/idea/IntelliJ IDEA 2019.1.3/workspace_idea/permission/generator/src">
30             <property name="enableSubPackages" value="true"/>
31             <property name="trimStrings" value="true"/>
32         </javaModelGenerator>
33
34         <!-- 生成的映射文件包名和位置 --> <!-- 4 -->
35         <sqlMapGenerator targetPackage="com.bie.mapper" targetProject="D:/program/idea/IntelliJ IDEA 2019.1.3/workspace_idea/permission/generator/src">
36             <property name="enableSubPackages" value="true"/>
37         </sqlMapGenerator>
38
39         <!-- 生成DAO的包名和位置 --> <!-- 5 -->
40         <javaClientGenerator type="XMLMAPPER" targetPackage="com.bie.dao"
41                              targetProject="D:/program/idea/IntelliJ IDEA 2019.1.3/workspace_idea/permission/generator/src">
42             <property name="enableSubPackages" value="true"/>
43         </javaClientGenerator>
44
45         <!-- 要生成那些表(更改tableName和domainObjectName就可以) --><!-- 6 -->
46         <table tableName="sys_user" domainObjectName="SysUser" enableCountByExample="false"
47                enableUpdateByExample="false" enableDeleteByExample="false" enableSelectByExample="false"
48                selectByExampleQueryId="false"/>
49         <table tableName="sys_dept" domainObjectName="SysDept" enableCountByExample="false"
50                enableUpdateByExample="false" enableDeleteByExample="false" enableSelectByExample="false"
51                selectByExampleQueryId="false"/>
52         <table tableName="sys_acl" domainObjectName="SysAcl" enableCountByExample="false" enableUpdateByExample="false"
53                enableDeleteByExample="false" enableSelectByExample="false" selectByExampleQueryId="false"/>
54         <table tableName="sys_acl_module" domainObjectName="SysAclModule" enableCountByExample="false"
55                enableUpdateByExample="false" enableDeleteByExample="false" enableSelectByExample="false"
56                selectByExampleQueryId="false"/>
57         <table tableName="sys_role" domainObjectName="SysRole" enableCountByExample="false"
58                enableUpdateByExample="false" enableDeleteByExample="false" enableSelectByExample="false"
59                selectByExampleQueryId="false"/>
60         <table tableName="sys_role_acl" domainObjectName="SysRoleAcl" enableCountByExample="false"
61                enableUpdateByExample="false" enableDeleteByExample="false" enableSelectByExample="false"
62                selectByExampleQueryId="false"/>
63         <table tableName="sys_role_user" domainObjectName="SysRoleUser" enableCountByExample="false"
64                enableUpdateByExample="false" enableDeleteByExample="false" enableSelectByExample="false"
65                selectByExampleQueryId="false"/>
66         <table tableName="sys_log" domainObjectName="SysLog" enableCountByExample="false" enableUpdateByExample="false"
67                enableDeleteByExample="false" enableSelectByExample="false" selectByExampleQueryId="false"/>
68     </context>
69
70 </generatorConfiguration>
打开Terminal控制台。cd generator,进入到generator这个目录,然后执行命令。执行生成命令,如下所示:
1 java -jar mybatis-generator-core-1.3.2.jar -configfile generator.xml -overwrite
最后将生成的文件拷贝到指定的目录即可,拷贝完可以将生成的删除掉,嗯,有点卸磨杀驴的味道了:

把更多的时间花费到写更有用的代码上也是一种乐趣啊!


【推荐】国内首个AI IDE,深度理解中文开发场景,立即下载体验Trae
【推荐】编程新体验,更懂你的AI,立即体验豆包MarsCode编程助手
【推荐】抖音旗下AI助手豆包,你的智能百科全书,全免费不限次数
【推荐】轻量又高性能的 SSH 工具 IShell:AI 加持,快人一步
· 如何编写易于单元测试的代码
· 10年+ .NET Coder 心语,封装的思维:从隐藏、稳定开始理解其本质意义
· .NET Core 中如何实现缓存的预热?
· 从 HTTP 原因短语缺失研究 HTTP/2 和 HTTP/3 的设计差异
· AI与.NET技术实操系列:向量存储与相似性搜索在 .NET 中的实现
· 周边上新:园子的第一款马克杯温暖上架
· Open-Sora 2.0 重磅开源!
· 分享 3 个 .NET 开源的文件压缩处理库,助力快速实现文件压缩解压功能!
· Ollama——大语言模型本地部署的极速利器
· DeepSeek如何颠覆传统软件测试?测试工程师会被淘汰吗?