第一个Struts2实例之hello world!
Struts官网: http://struts.apache.org/
Struts2框架预先实现了一些功能
1:请求数据自动封装
2:文件上传的功能
3:对国际化功能的简化
4:数据校验的功能
第一:首先需要说明的是Struts就是基于MVC模式的框架!(struts其实也是servlet封装,提高开发效率!)
第二:Struts开发步骤:
1. web项目,引入struts - jar包
2. web.xml中,引入struts的核心功能,配置过滤器
3. 开发action
4. 配置action --->src/struts.xml
下面详细介绍一下第一个struts2的开发流程:
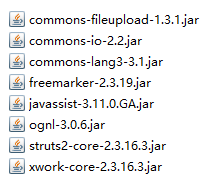
1. 创建动态web项目,引入struts - jar包(这里引入8个jar包,如下所示。很容易就可以得到就不分享了哦)

commons-fileupload-1.3.1.jar 【文件上传相关包】
commons-io-2.2.jar
commons-lang3-3.1.jar 【struts对java.lang包的扩展】
freemarker-2.3.19.jar 【struts对标签模板库jar文件】
javassist-3.11.0.GA.jar 【struts对字节码的处理相关jar】
ognl-3.0.6.jar 【Ognl表达式功能支持表】
struts2-core-2.3.16.3.jar 【struts2核心功能包】
xwork-core-2.3.16.3.jar 【xwork核心包】
2. 在web.xml中,引入struts的核心功能,配置过滤器(已经加了注释,不作多叙述)
Tomcat启动---》加载自身web.xml---》加载所有项目的web.xml
通过在项目的web.xml中引入过滤器
struts2的核心功能的初始化,是通过过滤器完成的。
 1 <?xml version="1.0" encoding="UTF-8"?>
 2 <web-app xmlns:xsi="http://www.w3.org/2001/XMLSchema-instance" xmlns="http://java.sun.com/xml/ns/javaee" xsi:schemaLocation="http://java.sun.com/xml/ns/javaee http://java.sun.com/xml/ns/javaee/web-app_3_0.xsd" id="WebApp_ID" version="3.0">
 3   <display-name>struts2_20170219</display-name>
 4   <welcome-file-list>
 5     <welcome-file>index.html</welcome-file>
 6     <welcome-file>index.htm</welcome-file>
 7     <welcome-file>index.jsp</welcome-file>
 8     <welcome-file>default.html</welcome-file>
 9     <welcome-file>default.htm</welcome-file>
10     <welcome-file>default.jsp</welcome-file>
11   </welcome-file-list>
12
13
14   <!-- 其他过滤器 -->
15
16   <!-- 引入struts2的核心过滤器 -->
17   <filter>
18       <!-- 过滤器的名称 -->
19       <filter-name>struts2</filter-name>
20       <!-- 过滤器类 -->
21       <filter-class>org.apache.struts2.dispatcher.ng.filter.StrutsPrepareAndExecuteFilter</filter-class>
22   </filter>
23   <filter-mapping>
24       <!-- 过滤器名称 -->
25       <filter-name>struts2</filter-name>
26       <!-- 过滤器映射 -->
27       <url-pattern>/*</url-pattern>
28   </filter-mapping>
29 </web-app>
此处插一句,配置过滤器的时候,filter-class里面的内容我是这样获取的,因为写法是死的,如图,仅供参考。
<filter-class>org.apache.struts2.dispatcher.ng.filter.StrutsPrepareAndExecuteFilter</filter-class>

双击点开之后,复制此句即可。

3. 开发action,此处习惯继承了ActionSupport.
1 2 3 4 5 6 7 8 9 10 11 12 13 14 15 16 17 18 19 20 21 22 23 24 | package com.bie;import com.opensymphony.xwork2.ActionSupport;/** * @author BieHongLi * @version 创建时间:2017年2月19日 下午3:08:53 * 开发action,处理请求*/public class HelloAction extends ActionSupport{ private static final long serialVersionUID = 1L; /** * 重写execute,处理请求的方法 */ @Override public String execute() throws Exception { System.out.println("访问到了action,正在 处理请求"); System.out.println("hello world!!! struts2"); return SUCCESS; } } |
4. 配置action --->src/struts.xml
1 2 3 4 5 6 7 8 9 10 11 12 13 14 15 | <?xml version="1.0" encoding="UTF-8" ?><!DOCTYPE struts PUBLIC "-//Apache Software Foundation//DTD Struts Configuration 2.0//EN" "http://struts.apache.org/dtds/struts-2.0.dtd"><struts> <!-- 生命包 --> <package name="helloWorld" extends="struts-default"> <!-- 定义action --> <action name="hello" class="com.bie.HelloAction" method="execute"> <!-- 显示成功的jsp页面 --> <result name="success">success.jsp</result> </action> </package></struts> |
配置struts.xml的时候使用下面的模板,在上面直接进行加工即可。
1 2 3 4 5 6 7 8 9 10 | <?xml version="1.0" encoding="UTF-8" ?><!DOCTYPE struts PUBLIC "-//Apache Software Foundation//DTD Struts Configuration 2.0//EN" "http://struts.apache.org/dtds/struts-2.0.dtd"><struts> </struts> |
最后了,当然直接运行就行了,结果如下所示:

这个是在浏览器运行的结果:


【推荐】国内首个AI IDE,深度理解中文开发场景,立即下载体验Trae
【推荐】编程新体验,更懂你的AI,立即体验豆包MarsCode编程助手
【推荐】抖音旗下AI助手豆包,你的智能百科全书,全免费不限次数
【推荐】轻量又高性能的 SSH 工具 IShell:AI 加持,快人一步
· 如何编写易于单元测试的代码
· 10年+ .NET Coder 心语,封装的思维:从隐藏、稳定开始理解其本质意义
· .NET Core 中如何实现缓存的预热?
· 从 HTTP 原因短语缺失研究 HTTP/2 和 HTTP/3 的设计差异
· AI与.NET技术实操系列:向量存储与相似性搜索在 .NET 中的实现
· 周边上新:园子的第一款马克杯温暖上架
· Open-Sora 2.0 重磅开源!
· 分享 3 个 .NET 开源的文件压缩处理库,助力快速实现文件压缩解压功能!
· Ollama——大语言模型本地部署的极速利器
· DeepSeek如何颠覆传统软件测试?测试工程师会被淘汰吗?