Struts2.0笔记二
Mvc与servlet
1.1 Servlet的优点
1、 是mvc的基础,其他的框架比如struts1,struts2,webwork都是从servlet基础上发展过来的。所以掌握servlet是掌握mvc的关键。
2、 Servlet把最底层的api暴漏给程序员,使程序员更能清楚的了解mvc的各个特点。
3、 程序员可以对servlet进行封装。Struts2就是从servlet中封装以后得到的结果。
4、 市场上任何一个mvc的框架都是servlet发展过来的,所以要想学好struts2这个框架,了解servlet的运行机制很关键。
1.2 Servlet的缺点
1、 每写一个servlet在web.xml中都要做相应的配置。如果有多很servlet,会
导致web.xml内容过于繁多。
2、 这样的结构不利于分组开发。
3、 在servlet中,doGet方法和doPost方法有HttpServletRequest和HttpServletResponse参数。这两个参数与容器相关,如果想在servlet中作单元测试,则必须初始化这两个参数。
4、 如果一个servlet中有很多个方法,则必须采用传递参数的形式,分解到每一个方法中。
重构servlet
针对servlet以上的特点,我们可以对servlet进行重构,使其开发起来更简单。更容易,更适合团队协作。
重构的目标:
1、 只写一个serlvet或者过滤器,我们这里选择过滤器。
2、 不用再写任何的servlet,这样在web.xml中写的代码就很少了。
3、 原来需要写serlvet,现在改写action。
4、 在action中把HttpServletRequest参数和HttpServletResponse参数传递过去。
5、 在过滤器中通过java的反射机制调用action。
6、 详细过程参照cn.itcast.action包中的内容
Struts2介绍
1、 struts2是apache组织发明的开源框架。是struts的第二代产品。
2、 struts2是在struts和webwork基础上整合的全新的框架。
3、 struts2的配置文件组织更合理,是企业开发很好的选择。
4、 struts2的拦截器为mvc框架注入了全新的概念。
Struts2入门
4.1 新建一个工程为struts2
4.2 修改工程的编码为utf-8
4.3 导入jar包
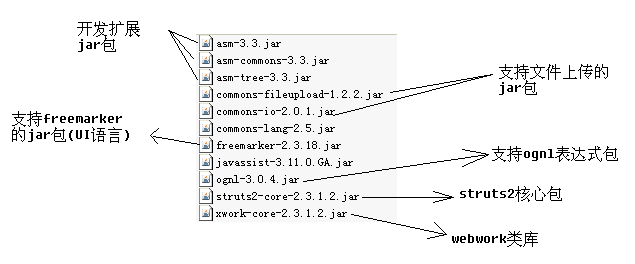
|
4.4 创建test.jsp文件

4.5 创建HelloWorldAction
package cn.itcast.struts2.action;
import com.opensymphony.xwork2.Action;
public class HelloWorldAction implements Action{
       public String execute() throws Exception {
              // TODO Auto-generated method stub
              System.out.println("hello world action");
              return "success";
       }
}
4.6 编写success.jsp文件
<body>
    This is my JSP page. <br>
           base命名空间下的HelloWorld运行完成!
</body>
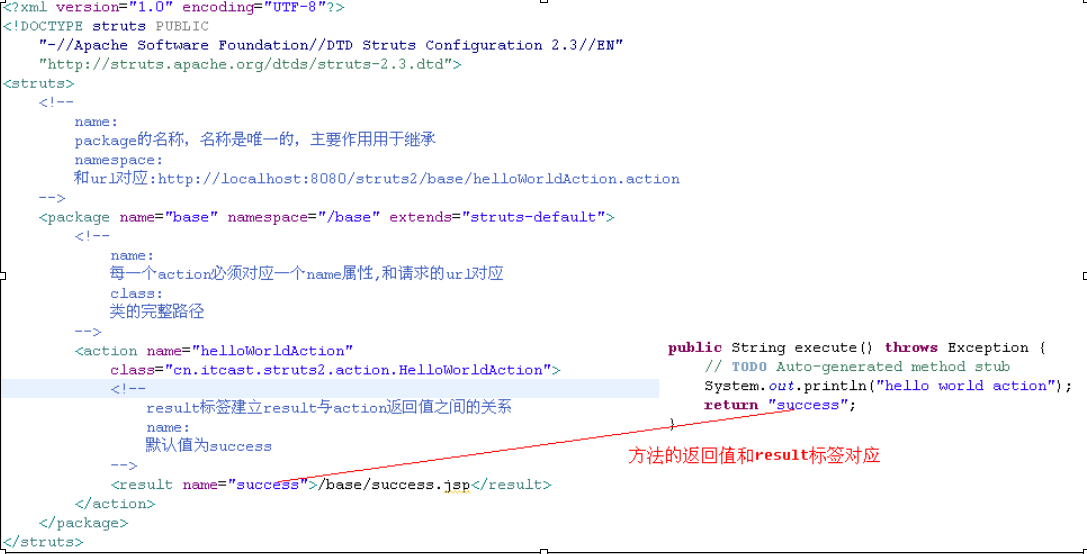
4.7 编写struts配置文件
该文件放在src下即可
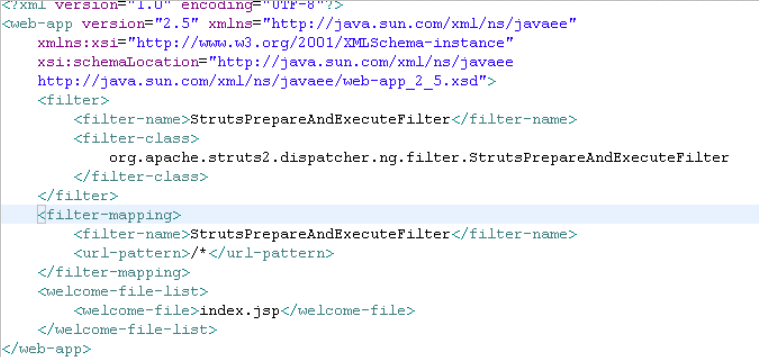
4.8 编写web.xml文件
4.9 运行结果
|
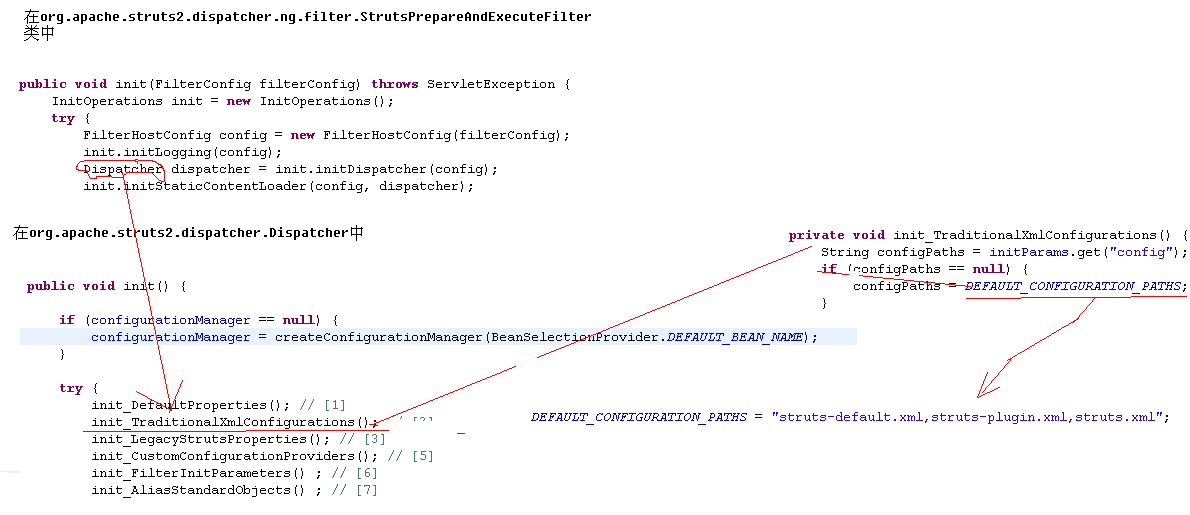
4.10 加载struts.xml过程
|
说明:
1、 在web服务器启动的时候,执行的是过滤器中的init方法。在这里回顾
一个问题:一个过滤器中的init方法在什么时候执行?总共执行几次?
2、 在启动服务器的时候,执行了过滤器中的init方法,加载了三个配置文件
struts-default.xml、struts-plugin.xml、struts.xml
3、 因为这三个文件的dtd约束是一样的,所以如果这三个文件有相同的项,后面覆盖前面的。因为先加载前面的,后加载后面的。
4、 struts.xml文件必须放在src下才能找到。
Struts2基本配置
5.1 Extends用法

|
说明:
1、 上述内容中,因为在struts.xml文件中,所有的包都继承了struts-default包(在struts-defult.xml文件中),所以程序员开发的action具有struts-default包中所有类的功能。
2、 而struts-default.xml文件在web服务器启动的时候就加载了。
3、 在struts-default.xml文件中,定义了struts2容器的核心内容。
4、 可以做这样的尝试:把extends=”struts-default”改为extends=””会怎么样呢?
5.1.1 例子
在struts.xml文件中
<package name="test" namespace="/test" extends="base"></package>
在上述的配置中,重新设置了一个包,名称为test,这个包继承了base。所以当访问http://localhost:8080/struts2/test/helloWorldAction.action时也能输出正确的结果,并且命名空间和base包中的命名空间没有任何关系了已经。
如果在struts2的配置文件中不写extens=”struts-default”会出现什么样的结构呢?
5.2 ActionSupprot
在struts框架中,准备了一个ActionSupport类
代码段一:
public class ActionSupport implements Action, Validateable, ValidationAware, TextProvider, LocaleProvider, Serializable {
代码段二:
/**
     * A default implementation that does nothing an returns "success".
     * <p/> ActionSupport是一个默认的Action实现,但是只返回了一个字符串success
     * Subclasses should override this method to provide their business logic.
     * <p/>子类需要重新覆盖整个方法,在这个方法中写相应的逻辑
     * See also {@link com.opensymphony.xwork2.Action#execute()}
     * @return returns {@link #SUCCESS}
     * @throws Exception can be thrown by subclasses
     */
    public String execute() throws Exception {
        return SUCCESS;
    }
代码段三:
       public static final String SUCCESS = "success";
说明:
1、 代码段一说明了ActionSupport也实现了Action接口(以前写的类实现了Action接口)
2、 代码段二说明如果程序员写自己的action继承了ActionSupport,需要重新覆盖execute方法即可。
3、 这个方法默认的返回的是success;
在配置文件中,还可以这么写:

<action name="actionSupprotAction">

       <result name="success">/baseconfig/successActionSupport.jsp</result>

</action>

可以看到action标签中没有class属性,在struts-default.xml中,

<default-class-ref class="com.opensymphony.xwork2.ActionSupport" />

说明:如果在action标签中没有写class属性。那么根据上述的配置文件,struts2会启用

ActionSupport这个类。所以action标签中的class属性可以不写。
5.3 include
在struts.xml中可以按照如下的形式引入别的struts的配置文件
<include file="cn/itcast/struts2/action/include/struts-include.xml"></include>
这样在加载struts.xml文件的时候,struts-include.xml文件也能被加载进来。实例见
Baseconfig/testInclude.jsp文件
5.4 命名空间
在说明extends用法的时候,我们引用了这样一个url:http://localhost:8080/struts2/base/helloWorld.action。如果我们把url改成这样:
http://localhost:8080/struts2/base/a/helloWorld.action。行吗?答案是可以的。再改成这样的url:http://localhost:8080/struts2/base/a/b/helloWorld.action ,行吗?答案也是可以的。如果这样呢http://localhost:8080/struts2/helloWorld.action可以吗?这样就不行了。为什么?
步骤:
1、 struts2会在当前的命名空间下查找相应的action
2、 如果找不到,则会在上级目录中查找,一直查找到根目录
3、 如果根目录也找不到,报错。
4、 如果直接访问的就是根目录,找不到,这样的情况就会直接报错。不会再去子目录中进行查找。
结果类型
6.1 说明
1、 每个action方法都返回一个String类型的值,struts一次请求返回什么值是由这个值确定的。
2、 在配置文件中,每一个action元素的配置都必须有result元素,每一个result对应一个action的返回值。
3、 Result有两个属性:
name:结果的名字,和action中的返回值一样,默认值为success;
type:响应结果类型,默认值为dispatcher.
6.2 类型列表
在struts-default.xml文件中,如下面所示:
|
说明:
1、 从上述可以看出总共10种类型
2、 默认类型为ServletDispatcherResult即转发。
3、 结果类型可以是这10种结果类型的任意一种。
6.2.1 Dispatcher类型
6.2.1.1 说明
Dispatcher类型是最常用的结果类型,也是struts框架默认的结果类型。
6.2.1.2 例子
页面参照:resulttype/testDispatcher.jsp
Action参照:DispatcherAction
配置文件:struts-resulttype.xml
在配置文件中,可以有两种写法:
第一种写法:
       <result name="success">/resulttype/successDispatcher.jsp</result>
第二种写法:
       <result name="success">
              <param name="location">/resulttype/successDispatcher.jsp</param>
</result>
下面的图说明了location的来历:

6.2.2 Redirect类型
6.2.2.1 说明
Redirect属于重定向。如果用redirect类型,则在reuqest作用域的值不能传递到前台。
6.2.2.2 例子
页面:resulttype/testRedirect.jsp
Action:RedirectAction
配置文件:struts-resulttype.xml
6.2.3 redirectAction类型
6.2.3.1 说明
1、 把结果类型重新定向到action
2、 可以接受两种参数
a) actionName: action的名字
b) namespace:命名空间
6.2.3.2例子
|
Action原型模式
7.1 回顾servlet
在servlet中,一个servlet只有一个对象,也就是说servlet是单例模式。如果把一个集合写在servlet属性中,则要考虑线程安全的问题。
7.2 Action多例模式
但是在struts2的框架中,并不存在这种情况,也就是说struts2中的action,只要访问一次就要实例化一个对象。这样不会存在数据共享的问题。这也是struts2框架的一个好处。
7.3 实验
可以写一个类,如下:
package cn.itcast.struts2.action.moreinstance;
import com.opensymphony.xwork2.ActionSupport;
@SuppressWarnings("serial")
public class MoreInstanceAction extends ActionSupport{
       public MoreInstanceAction(){
              System.out.println("create new action");
       }
       public String execute(){
              System.out.println("more instance action");
              return SUCCESS;
       }
}
配置文件为:
<struts>
       <package name="moreinstance" namespace="/moreinstance">
              <action name="moreinstanceAction"
                     class="cn.itcast.struts2.action.moreinstance.MoreInstanceAction">
              </action>
       </package>
</struts>
请求两次http://localhost:8080/struts2/moreinstance/moreinstanceAction.action路径,如果构造函数中的”create new action”输出两次,说明创建了两次对象。
通配符
8.1 Execute方法的弊端
假设有这样的需求:
1、 有一个action为PersonAction。
2、 在PersonAction中要实现增、删、改、查四个方法。
3、 但是在action中方法的入口只有一个execute方法
4、 所以要想完成这样的功能,有一种方法就是在url链接中加参数。
那么在action中的代码可能是这样的:
PatternAction
public class PatternAction extends ActionSupport{
       private String method;
       public String execute(){
              if(method.equals("add")){
                     //增加操作
              }else if(method.equals("update")){
                     //修改操作
              }else if(method.equals("delete")){
                     //删除操作
              }else{
                     //查询操作
              }
              return "";
       }
}
可以看出这样写结构并不是很好。而通配符的出现解决了这个问题。
8.2 method属性
|
说明:从上述代码可以看出只要配置文件中的method属性的值和方法名称一样就可以了。但是这种写法有弊端。如果aciton中需要5个方法。则在struts的配置文件中需要写5个配置,这样会导致配置文件的篇幅很大。而且重复性也很大
8.3 动态调用方法
在url中通过action名称!方法名称可以动态调用方法。
Pattern.jsp
动态调用PatternAction中的add方法:<br>
<a href="${pageContext.request.contextPath}/pattern/patternAction!add.action">测试</a>
struts-pattern.xml
<action name="patternAction"
       class="cn.itcast.struts2.action.pattern.PatternAction">
</action>
说明:这样的情况在配置文件中不需要method属性
8.4 通配符映射
8.4.1 映射一
|
8.4.2 映射二
|
Struts-pattern.xml
<action name="personAction_add" method="add" class="cn.itcast.struts2.action.pattern.PersonAction"></action>
<action name="studentAction_add" method="add" class="cn.itcast.struts2.action.pattern.StudentAction"></action>
改进如下:
<action name=”*_add” method=”add” class=” cn.itcast.struts2.action.pattern.{1}”/>
说明:*和{1}是相对应的关系。
8.4.3 映射三
|
全局结果类型
9.1 说明
当很多提交请求跳转到相同的页面,这个时候,这个页面就可以成为全局的页面。在struts2中提供了全局页面的配置方法。
9.2 例子
|
9.3 错误的统一处理
9.3.1 xml文件

9.3.2 Java文件
Struts2与serlvet接口
10.1 说明
通过前面的练习大家都知道,在action的方法中与servlet的所有的API是没有任何关系的。所以在struts2中做到了aciton与serlvet的松耦合,这点是非常强大的。但是如果没有HttpServletRequest,HttpServletSession,ServletContext有些功能是没有办法完成的。比如购物车程序,需要把购买的物品放入session中。所以就得找一些路径使得在struts2中和serlvet的API相结合。
10.2 实现一
Struts2中提供了ServletActionContext类访问servlet的api。
Servlet.jsp
通过SerlvetActionContext类访问servlet的API:<br>
<a href="${pageContext.request.contextPath}/servlet/servletAction_testServletAPI.action">测试struts2中访问servletAPI</a>
ServletAction
public String testServletAPI(){
              //访问request
              HttpServletRequest request = ServletActionContext.getRequest();
              //访问session  对session进行了二次封装
              Map sessionMap = ServletActionContext.getContext().getSession();
              //访问application
              ServletContext servletContext = ServletActionContext.getServletContext();
              return "";
       }
10.3
|
实现二
拦截器
假设有一种场景:
在action的一个方法中,要进行权限的控制。如果是admin用户登入,就执行该方法,如果不是admin用户登入,就不能执行该方法。
11.1 实现方案一
AccessAction
public String testAccess(){
       if(this.username.equals("admin")){
              //执行业务逻辑方法
              return SUCCESS;
       }else{
              //不执行
              return "failed"
       }
}
说明:
5、 这样做,程序的结构不是很好。原因是权限的判断和业务逻辑的方法紧密耦合在了一起。如果权限的判断很复杂或者是业务逻辑很复杂会造成后期维护的非常困难。所以结构不是很好
6、 这种形式只能控制一个action中的一个方法。如果很多action中的很多方法都需要这种控制。会导致大量的重复代码的编写。
11.2 实现方案二
动态代理可以实现。请参见cn.itcast.struts.jdkproxy包下的类。
11.3 实现方案三
在struts2中,用拦截器(interceptor)完美的实现了这一需求。在struts2中,
内置了很多拦截器,在struts-default.xml文件中可以看出。用户还可以自定义 自己的拦截器。自定义拦截器需要以下几点:
1、 在配置文件中:
包括两个部分:声明拦截器栈和使用拦截器栈
struts-interceptor.xml
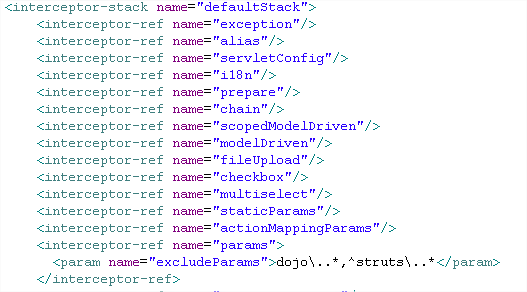
<!--声明拦截器--> <interceptors> <!--定义自己的拦截器--> <interceptor name="accessInterceptor" class="cn.itcast.struts2.action.interceptor.PrivilegeInterceptor"> </interceptor> <!-- 声明拦截器栈 --> <interceptor-stack name="accessInterceptorStack"> <!-- 引用自定义的拦截器 --> <interceptor-ref name="accessInterceptor"></interceptor-ref> <!-- 引用struts2内部的拦截器栈 --> <interceptor-ref name="defaultStack"></interceptor-ref> </interceptor-stack> </interceptors> 说明:红色部分是struts2内部的拦截器。可以从struts-default.xml文件中得到内容。自己定义的栈必须引入struts2默认的栈。因为我们在访问action时,属性的赋值等一些工作都是由内部的栈完成的。如果不怎么写,struts2的功能将发挥不出来。可以用debug进行调试也能得出结论。 <!-- 使用拦截器 --> <default-interceptor-ref name="accessInterceptorStack"></default-interceptor-ref> 说明:使用拦截器栈。从上面声明部分可以看出,accessInterceptorStack栈既包括了自定义的拦截器,又包括了struts2内部的拦截器栈。
2、 在拦截器类中
一个类如果是拦截器,必须实现Interceptor接口。
public class PrivilegeInterceptor implements Interceptor{
public void destroy() {
              // TODO Auto-generated method stub
       }
      public void init() {
              // TODO Auto-generated method stub
       }
       public String intercept(ActionInvocation invocation) throws Exception {
              // TODO Auto-generated method stub
              System.out.println("aaaa");
              //得到当前正在访问的action
              System.out.println(invocation.getAction().toString());
              //得到Ognl值栈
              System.out.println(invocation.getInvocationContext().getValueStack());
              //请求路径action的名称,包括方法
              System.out.println(invocation.getProxy().getActionName());
              //方法名称
              System.out.println(invocation.getProxy().getMethod());
              //命名空间
              System.out.println(invocation.getProxy().getNamespace());
              String method = invocation.invoke();
              return null;
       }
}

说明:
1、  这个类中init、intercept和destroy三个方法说明了一个拦截器的生命周期。
2、  在interceptor方法中的参数invocation是执行action的上下文,可以从
这里得到正在访问的action、Ognl值栈、请求路径、方法名称、命名空间
等信息。以帮助程序员在拦截器中做相应的处理工作。
3、  红色部分是关键部分,就是调用action的方法。这里可以成为目标类的
目标方法。
4、因为这里配置的拦截器是针对包的,所以只要是包的action都起作用。
验证
12.1 需求
验证用户名不能为空,密码也不能为空,并且长度不能小于6位数。
12.2 基本验证
|
|
12.3 框架验证
1、 编写xml文件,名字的输出规则为:
<ActionClassName>-<aliasName_methodName>-validation.xml
其中alias为配置文件中action元素name属性的值。
2、 在该文件中填写需要校验的内容
国际化
13.1 说明
一个系统的国际化就是根据操作系统的语言,页面上的表现形式发生相应的变化。比如如果操作系统是英文,页面的文字应该用英语,如果操作系统是中文,页面的语言应该是中文。
13.2 步骤
13.2.1 建立资源文件
资源文件的命名规则:
默认的命名为:
文件名前缀.properties
根据语言的命名为:
文件名前缀.语言种类.properties
例如:
中文:
resource_zh_CN.properties
内容:
item.username=用户名
item.password=密码
英文:
resource_en_US.properties
内容:
item.username=username_en
item.password=password_en
默认:
resource.properties
内容:
item.username=username
item.password=password
13.2.2 配置文件中
需要在配置文件中加入:
<constant name="struts.custom.i18n.resources" value="cn.itcast.struts2.action.i18n.resource">
</constant>
说明:
1、 这样struts2就会去找你写的资源文件
2、 name的值可以在org/apache/struts2/default.properties中找到。
3、 如果放置的资源文件在src下,则value的值可以直接写,如果在
包中则可以写成包名.resource。
4、 在这里resource是个基名,也就是说可以加载以resource开头的文件。
13.2.3 页面中
利用<s:text name=”item.username”/>就可以把资源文件中的内容输出来。
I18n/login.jsp
<s:form action="i18n/loginAction_login.action" method="post">
                  <table border="1">
                         <tr>
                                <td><s:text name="item.username"/></td>
                                <td><s:textfield name="username"/></td>
                         </tr>
                         <tr>
                                <td><s:text name="item.password"/></td>
                                <td><s:password name="password"/></td>
                         </tr>
                         <tr>
                                <td><s:submit name="submit" value="%{getText('item.username')}"/></td>
                         </tr>
                  </table>
           </s:form>
说明:
1、  标红色部分的是要从资源文件中找的内容。item.username和item.password代码key的值。
2、  也可以利用%{getText('item.username')}方式来获取资源。采取的是OGNL表达式的方式。
3、  getText的来源:
从源代码可以看出ActionSupport实现了TextProvider接口。
Provides access to {@link ResourceBundle}s and their underlying text messages.意思是说提供了访问资源文件的入口。而TextProvider中提供了getText方法,根据key可以得到value。
13.2.4 在action中
可以利用ActionSupport中的getText()方法获取资源文件的value值。
I18n/LoginAction
public class LoginAction extends ActionSupport{
       public String login(){
              String username = this.getText("item.username");
              System.out.println(username);
              String password = this.getText("item.password");
              System.out.println(password);
              return "";
       }
}
说明:通过this.getText()方法可以获取资源文件的值。
OGNL
14.1 介绍
OGNL表达式是(Object-Graph Navigation Language)是对象图形化导航语言。OGNL是一个开源的项目,struts2中默认使用OGNL表达式语言来显示数据。与serlvet中的el表达式的作用是一样的。OGNL表达式有下面以下特点:
1、 支持对象方法调用,例如:objName.methodName();
2、 支持类静态的方法调用和值访问,表达式的格式为
@[类全名(包括包路经)]
@[方法名 | 值名]
例如:
@java.lang.String@format('foo%s','bar')
@tutorial.MyConstant@APP_NAME;
3、 支持赋值操作和表达式串联,例如:
price=100, discount=0.8, calculatePrice(),这个表达式会返回80;
4、 访问OGNL上下文(OGNL context)和ActionContext
5、 操作集合对象
14.2 回顾el表达式
在servlet中学习的el表达式实际上有两步操作:
1、 把需要表现出来的数据放入到相应的作用域中(req,res,session,application)。
2、 利用el表达式把作用域的值表现在页面上
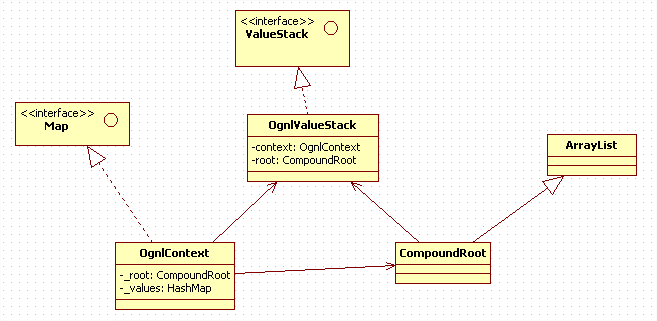
14.3 ognl类图
14.4 ValueStack
14.4.1 说明
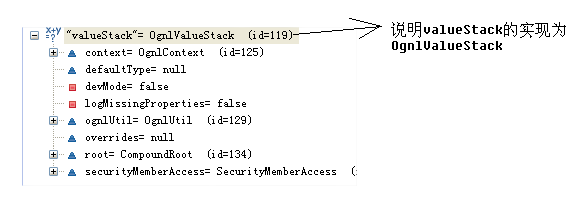
1、 ValueStack是一个接口,在struts2中使用OGNL表达式实际上是使用实现了ValueStack接口的类OgnlValueStack,这个类是OgnlValueStack的基础。
2、 ValueStack贯穿整个action的生命周期。每一个action实例都拥有一个ValueStack对象。其中保存了当前action对象和其他相关对象。
3、 Struts2把ValueStack对象保存中名为struts.valueStack的request域中。
14.4.2 ValueStack内存图
14.4.3 ValueStack的组织结构
从图上可以看出OgnlValueStack和我们有关的内容有两部分:即OgnlContext和CompoundRoot。所以把这两部分搞清楚很重要。
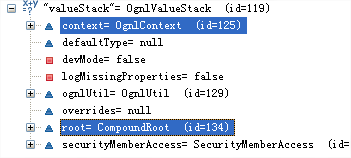
14.4.4 OgnlContext组织结构
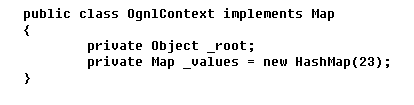
14.4.4.1 _values
从上述可以看出,OgnlContext实际上有一部分功能是Map。所以可以看出_values就是一个Map属性。而运行一下下面的代码就可以看到:
|
在_values的map中:
|
key |
value |
|
application |
ApplicationMap |
|
request |
RequestMap |
|
action |
自己写的action |
|
com.opensymphony.xwork2.ActionContext.session |
SessionMap |
而request中的值为:
|
可以看出在程序中存放在request作用域的值被放入到了_values的request域中。
而com.opensymphony.xwork2.ActionContext.session的值为:
{session_username=session_username, session_psw=session_psw}
从上图中可以看出在程序中被加入到session的值在_values中也体现出来。
14.4.4.2 _root

从图中可以看出_root实际上CompoundRoot类,从类的组织结构图中可以看出,这个类实际上是继承了ArrayList类,也就是说这个类具有集合的功能。而且在默认情况下,集合类的第一个为ValueStackAction,也就是我们自己写的action。
14.5 总图
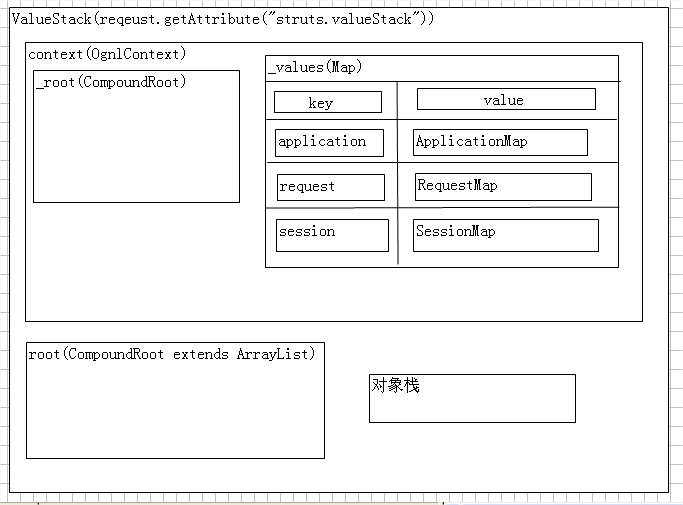
说明:
1、 上图是ognl完整的数据结构图,可以清晰得看出数据的组成。
2、 Context中的_root和ValueStack中的root(对象栈)里的数据结构和值是一样的。
3、 这就意味着我们只需要操作OgnlContext就可以完成对数据的存和取的操作。
4、 ValueStack内部有两个逻辑的组成部分:
a) ObjectStack
Struts会把动作和相关的对象压入到ObjectStack中。
b) ContextMap
Struts会把一些映射关系压入到ContextMap中
14.6 存数据
14.6.1 Map中存数据
14.6.1.1 方法1
//向map中存放数据
ServletActionContext.getRequest().setAttribute("req_username","req_username");
ServletActionContext.getRequest().setAttribute("req_psw", "req_psw");
ActionContext.getContext().getSession().put("session_username", "session_username");
ActionContext.getContext().getSession().put("session_psw", "session_psw");
上面的代码都是往ContextMap中存放数据。因为这些值都是具有映射关系的。
14.6.1.2 方法2
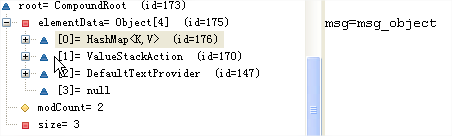
ActionContext.getContext().put("msg", "msg_object");
通过执行上述代码把”msg”和”msg_object”放入到了ContextMap中。
14.6.2 值栈中存数据
14.6.2.1 方法1
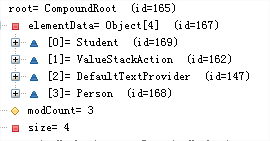
/*
 * 把对象放入到值栈中
 */
//方法一:先得到root,把一个对象压入到root中
ValueStack valueStack = ActionContext.getContext().getValueStack();
valueStack.getRoot().add(new Person());
valueStack.getRoot().add(new Student());
运行以后的值栈结构图:
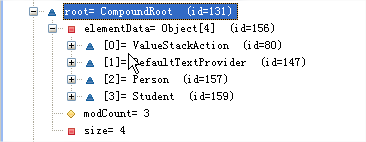
从内存图中可以看出最后被压入到list中的对象在最下面。

图为ArrayList中的add方法的解释:
追加的指定的元素放到集合的最下面。
14.6.2.2
|
方法2
运行后的结构图为:
从图中可以很明显看出新创建的Student对象被放到了第一个位置,因为
Index的值为0,所以是第一个位置。
14.6.2.3 方法3
把一个键值对存放在对象栈中,做法为:
/*
 * 方法三:
 *                把一个键值对存放在对象栈中
 */

ValueStack valueStack = ActionContext.getContext().getValueStack();
valueStack.set("msg","msg_object");
对象栈图为:
从图中可以看出上面的代码执行过程为:
1、 先把”msg”和”msg_object”两个字符串封装成Map
2、 再把封装以后的Map放入到对象栈中。
14.6.2.4 方法4
|
执行完push方法以后,对象栈的情况如下:

Push方法把新创建的Person对象放入到了对象栈的首个位置。
14.7 OGNL Context
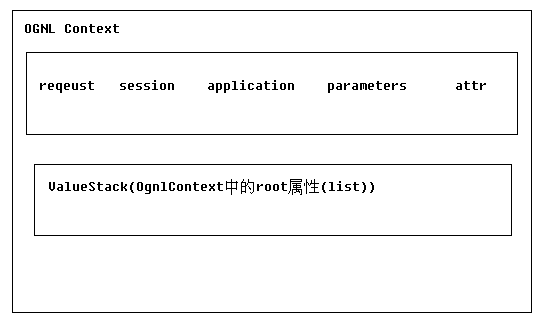
14.7.1 说明
1、 上图为OGNL Context的结构图
2、 当struts2接受一个请求时,会迅速创建ActionContext,ValueStack,action。然后把action压入到值栈中。所以action的实例变量可以被ognl访问。所以利用ognl表达式可以访问action。
14.8 ActionContext
|
14.8.1 说明
从上面的代码中可以看出来,struts2中的ActionContext的作用是提供了对ognl数
据的操作。并且可以通过ActionContext获取到经过struts2封装了的session等参数。
14.9 ServletActionContext
|
14.9.1 说明
1、 可以通过ServletActionContext得到servlet中的一些类,比如HttpServletRequest,ServletContext等
2、 可以通过ServletActionContext返回ActionContext
14.10 Ognl表达式
14.10.1 简述
从9.6到9.9讨论了ognl的结构、如何存数据。9.10重点讨论如何把ognl结构中的数据呈现在页面上。所以Ognl表达式的作用就是把OgnlContext中的数据输出到页面上。
14.10.2 el表达式例子
参照课堂演示例子
14.10.3 ognl表达式例子
14.10.3.1 用法1(#号用法)
说明:
1、 访问OGNL上下文和action上下文,#相当于ActionContext.getContext();
2、 如果访问的是map中的值而不是对象栈中的值,由于map中的数据不是根对象,所以在访问时需要添加#前缀。
|
名称 |
作用 |
例子 |
|
parameters |
包含当前HTTP请求的Map |
#parameters.id[0]=request.getParameter(“id”) |
|
request |
包含当前HttpServletRequest属性的Map |
#request.username=request.getAttribute(“username”); |
|
session |
包含当前HttpSession属性的Map |
#session.username=session.getAttribute(“username”); |
|
application |
包含当前ServletContext属性的Map |
#application.username=application.getAttribute(“username”); |
|
attr |
用于按照request>session>application顺序访问其属性 |
#attr.username相当于按照顺序在以上三个范围内读取username的属性,直到找到为止。 |
注:也可以写为#request[‘username’] #sesssion[‘username’] #application[‘username’]
主要步骤:
在action中
|
在页面中:
|
14.10.3.2 用法2
OGNL会设定一个对象(root对象),在struts2中根对象就是CompoundRoot,或者为OgnlValueStack中的root,通常被叫做ValueStack(值栈或者对象栈),如果要访问根对象的属性,则可以省略去#,直接访问对象的属性即可。在action中
public String testObjectValue(){
              //得到ognl的上下文
              ValueStack valueStack = ActionContext.getContext().getValueStack();
              valueStack.set("msg", "object_msg");
              return "ognl_objectstack";
       }
在页面中:
|
问题:如果把一个字符串push进对象栈,怎么样取?
在14.11.1中将解决这个问题。
14.10.3.3 用法3(深入理解对象栈)
有三个类:Person.java,Student.java,OgnlAction.java
|
从以前学过的OGNLContext结构可以看出,对象栈中的分布如图所示:
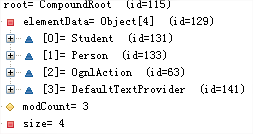
但是大家注意一个现象:在student对象中有comment属性,在person对象中
也有comment属性,在OgnlAction中还有comment属性,如果页面输出
Comment属性应该选择哪种呢?
结论:
对于对象栈中存放的属性,struts2会从最顶部开始寻找,如果找到则赋值,
如果找不到,则会依次往下寻找,直到找到为止。所以应该输出的是student
对象的comment的值。
14.10.3.4 用法4(构造map)
还可以利用ognl表达式构造Map,如#{‘foo1’:’bar1’,’foo2’:’bar2’};这种用法经常用
在给radio,checkbox等标签赋值上。
1、 在页面上可以这样输出:
|
2、 也可以这样使用:
|
14.10.3.5 用法5(%)
“%”符号的用途是在标签的属性值给理解为字符串类型时,执行环境%{}中添加的是OGNL表达式。
{}中用OGNL表达式
|
用{‘’}来表示字符串
|
14.10.3.6 用法6($)
$主要有两个用途:
用于在国际化资源文件中引用OGNL表达式
在struts2的配置文件中引用OGNL表达式
|
14.11 标签用法
14.11.1 Property标签
14.11.1.1 说明
用于输出指定的值
14.11.1.2 属性
1、 default:
可选属性,如果输出的值为null,则显示该属性指定的值。
2、 escape
可选属性,指定是否格式化为html代码
3、 value
可选属性,指定需要输出的属性值,如果没有指定该属性,则默认输出ValueStack栈顶的值。
14.11.1.3 例1(默认值)
|
14.11.1.4 例2(default和value)
|
14.11.1.5 例3(escape)
|
14.11.1.6 例4(输出栈顶String的值)
|
14.11.2 Debug标签
14.11.2.1 说明
利用debug标签可以输出OGNLContext所有的值
14.11.2.2 例子
|
14.11.3 Set标签
14.11.3.1 说明
用于将某个指定的值放入到指定的范围
14.11.3.2 属性
var:
变量的名字,name、id与var表达的含义是一样的。Var已经取代了name,id;
Scope:
指定变量被放置的范围。该属性可以接受application,session,request,page或
Action。如果没有设置该属性,则默认会放在action中。
Value:
赋值给变量的值。如果没有设置该属性,则将ValueStack栈顶的值赋给变量。
14.11.3.3 例1
|
14.11.4 Push标签
14.11.4.1 说明
把对象放入到栈顶,不能放入到其他的范围,当标签结束时,会从栈顶删除。
14.11.4.2 例子
|
14.11.5 Bean标签
14.11.5.1 说明
实例化一个符合javabean规范的class,标签体内可以包含几个param元素,可用于调用set方法,给class的属性赋值。
14.11.5.2 属性
Name:
要被实例化的class的名字,符合javabean规范。
Var:
赋值给变量的值。放置在request作用域中。如果没有设置该属性,对象被
设置到栈顶。
14.11.5.3 例子
|
|
14.11.6 Action标签
14.11.6.1 说明
通过指定命名空间和action的名称,可以直接调用后台的action.
14.11.6.2 属性
Name:
Aciton的名字
Namespace:
Action所在的命名空间(action的名称后不加.action)
executeResult:
Action的result是否需要被执行,默认值为false,不执行
14.11.6.3 例子
|
14.11.7 Iterator标签
14.11.7.1 说明
该标签用于对集合进行迭代。这里的集合包括:list,set和数组
14.11.7.2 属性
Value:
可选属性,指定被迭代的集合。如果没有设置该属性,则使用对象栈顶的集合。
Var:
可选属性,引用变量的名称
Status:
可选属性,该属性指定迭代时的IteratorStatus实例。该实例包含如下的方法:
int getCount() 返回当前迭代的元素个数
int getIndex() 返回当前迭代元素的索引
boolean isEven() 返回当前迭代元素的索引是否是偶数
boolean isOdd() 返回当前迭代元素的索引是否是奇数
boolean isFirst() 返回当前迭代元素是否为第一个元素
boolean isLast() 返回当前迭代元素是否为最后一个元素
14.11.7.3 例1(push)
|
|
14.11.7.4 例2(action属性)
|
14.11.7.5 例3(Map中)
|
14.11.7.6 例4(begin,end,step)
|
14.11.7.7 例5(status)
|
|
14.11.7.8 例6(奇偶行变色)
|
14.11.8 If/elseif/else标签
14.11.8.1 说明
基本的流程控制标签。If标签可以单独使用,也可以结合elseif或else标签使用。
14.11.8.2 属性
test:后面跟判断表达式。
14.11.8.3 例子
|
14.11.9 url标签
14.11.9.1 说明
该标签用于创建url,可以通过”param”标签提供request参数。
14.11.9.2 属性
Value:
如果没有值,就用当前的action,使用value后必须加.action.
Action:
用来生成url的action.如果没有使用则用value;
Namespace:
命名空间
Var:
引用变量的名称。
14.11.9.3 例子
|
|
14.11.10 Ognl操作集合
|
Java代码 |
OGNL表达式 |
|
list.get(0) |
List[0] |
|
array[0] |
array[0] |
|
((User)list.get(0)).getName() |
list[0].name |
|
Array.length |
Array.length |
|
List.size() |
List.size |
|
List.isEmpty() |
List.isEmpty |
14.11.11 Ognl操作Map
|
Java代码 |
Ognl表达式 |
|
map.get(“foo”) |
Map[‘foo’] |
|
Map.get(new Integer(1)); |
Map[1] |
|
User user = (User)map.get(“user”); Return user.getName() |
Map[‘user’].name |
|
Map.size() |
Map.size |
|
Map.isEmpty() |
Map.isEmpty |
|
Map.get(“foo”) |
Map.foo |
|
Java代码 |
Ognl表达式 |
|
Map map = new HashMap(); Map.put(“foo”,”bar”); Map.put(“1”,”2”); Return map; |
#{“foo”:”bar”,”1”:”2”} |
|
Map map = new HashMap(); Map.put(new Integer(1),”a”); Map.put(new Integer(2),”b”); Map.put(new Integer(3),”c”); |
#{1:”a”,2:”b”,3:”c”} |
|
UI标签
15.1 说明
1、 UI标签在html文件中表现为一个表单元素。
2、 使用struts2的ui标签有如下好处:
1、 可以进行表单的回显
2、 对页面进行布局和排版
3、 标签的属性可以被赋值为一个静态的值,或者一个OGNL表达式。
15.2 Form标签
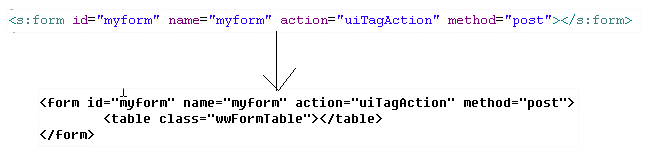
15.2.1 说明
1、 id属性为s:form的唯一标识。可以用document.getElementById()获取。
2、 name属性为s:form的名字,可以用document.getElementsById()获取。
3、 在默认情况下,s:form将显示表格的形式。
15.3 Textfield标签

15.3.1 说明
实际上相当于在表格中多了一行,在这行中多了两列。其变化从上述图中可以很明显的看出。
15.4 Password标签
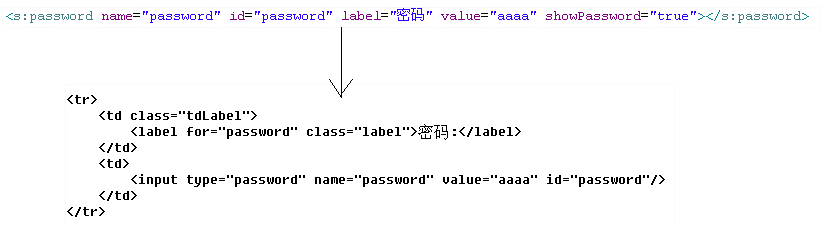
15.4.1 说明
如果不加showPassword属性,则密码不会显示,把showPassword属性的值设置为true,就能显示密码。
15.5 Hidden标签
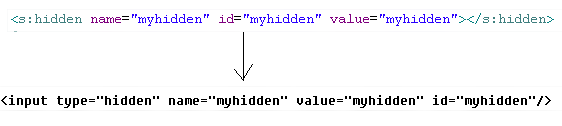
15.5.1 说明
Hidden标签并没有加tr和td
15.6 Submit标签
15.6.1 情况一
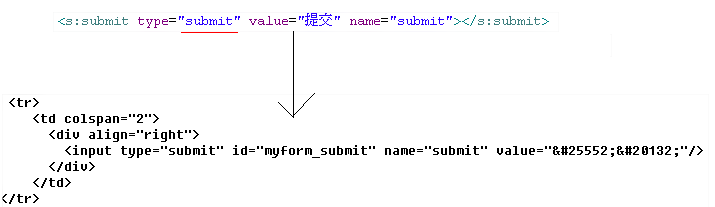
15.6.2 说明一
这种情况为submit的type属性为submit类型。
15.6.3 情况二:
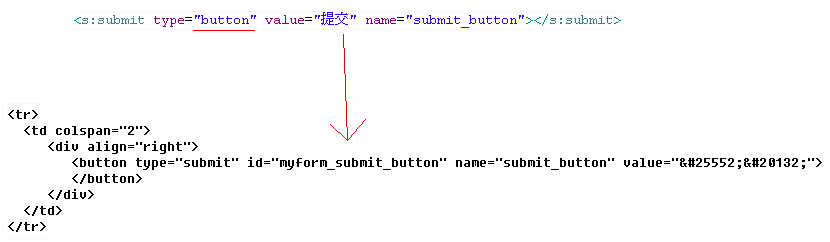
15.6.4 说明二
这种情况submit的type属性为button.
15.6.5 情况三
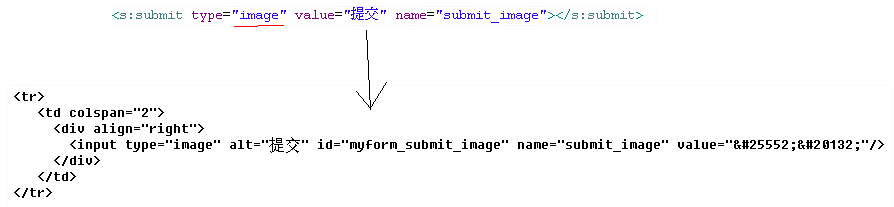
15.6.6 说明三
该type类型为image。
15.6.7 综合
以上三种情况说明,当type为submit、button、image都能完成提交。
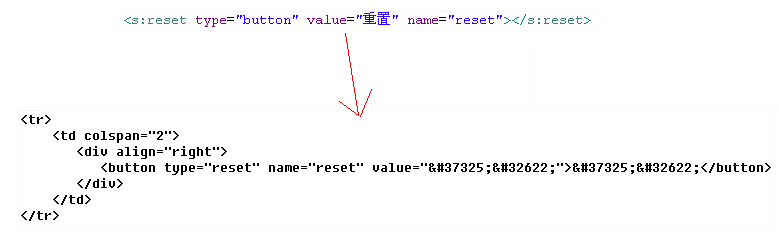
15.7 Reset标签

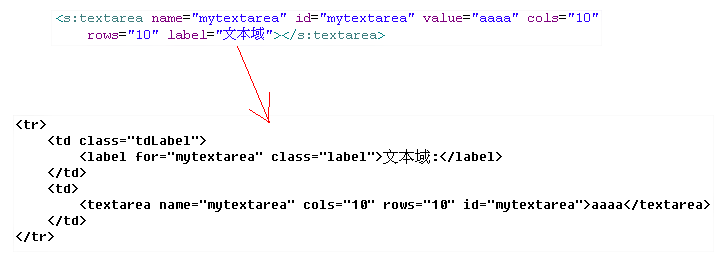
15.8 Textarea标签
15.9 Checkbox标签
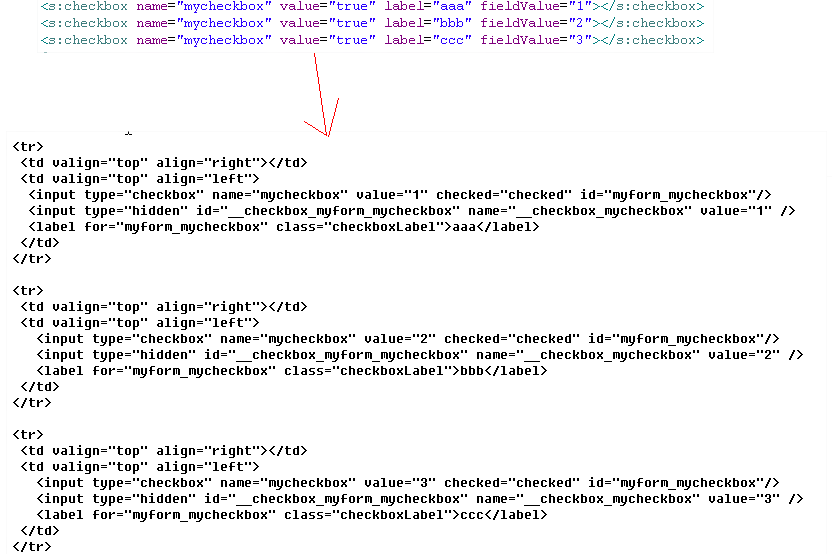
15.10 Checkboxlist标签
15.10.1 集合为list

15.10.2 集合为map
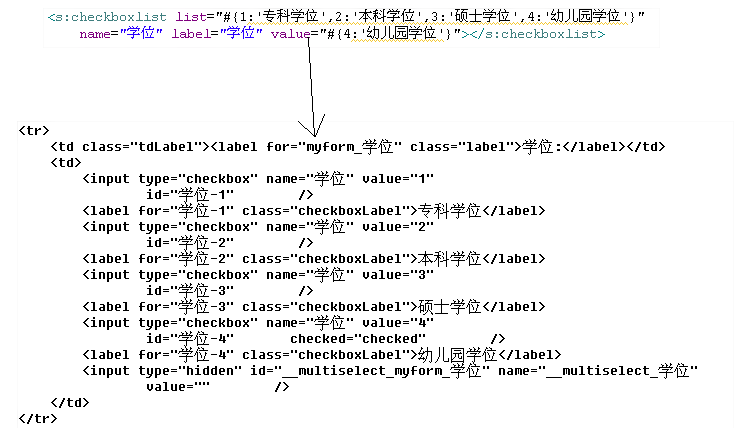
上述的checkboxlist标签也可以表示为:

listKey相当于<input type=”checkbox”>中的value,listValue相当于label的显示值。
15.10.3 List中是javabean
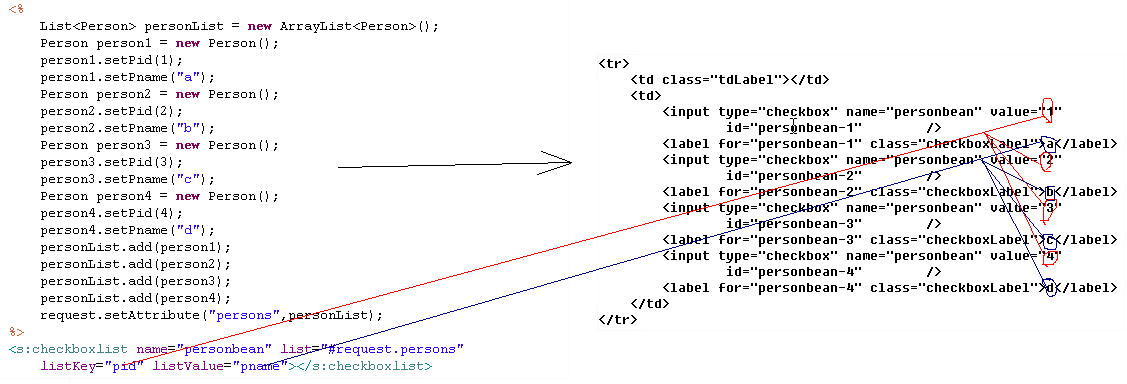
从图中可以看出:listKey的值对应<input type=”checkbox”>中的value;
而listValue的值对应label的内容。
s:select,s:radio的应用与checkbox相同。
15.11 标签回显
|
|
属性驱动
16.1 说明
在servlet中获取页面传递过来的数据的方式是:request.getParameter(“username”);这个代码可以获取到页面的username的数据。在action中可以通过属性驱动的方式来获取页面的值。
16.2 例子
|
|
16.3 原理
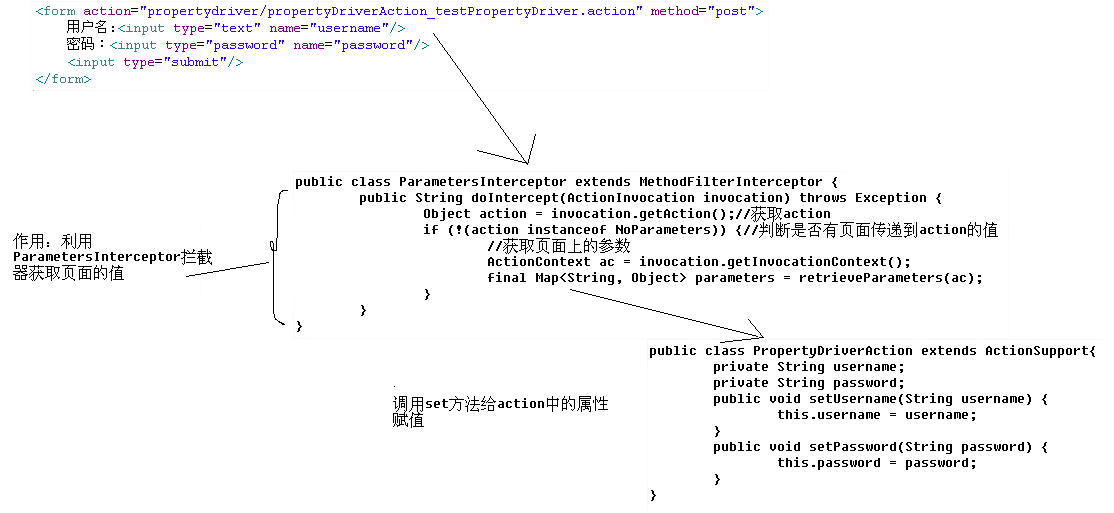
1、  当执行所有的拦截器的时候,当前请求的action已经放在了栈顶。

2、  放在对象栈的对象的特点是其属性能够直接访问。

3、  也就是说当执行ParameterInterceptor拦截器的时候,action的所有的属性在栈顶。

4、  所以只需要给栈顶的action的属性赋值就可以了。

5、  而ParameterInterceptor拦截器正好完成了此功能。如果属性中要求接受的不是String类型,而是其他类型呢?struts2将做自动的转化。
类型转化
17.1 问题
|
17.2 解决方案
17.2.1 DateConverter类
|
说明:
6、 这个类必须继承DefaultTypeConverter或者实现TypeConverter接口。
7、 在TypeConverter接口中,声明的方法是这样的:
public Object convertValue(Map context, Object target,
Member member, String propertyName,
Object value, Class toType);
可以看出里面实际上有六个参数。
但是这个类中,只有三个参数。
在DefaultTypeConverter类中:
|
可以看出在实现了converValue的方法中调用了convertValue有三个参数的方法,所以能够执行。这样做的好处是程序员即可以用三个参数的方法,也可以用6个参数的方法。
8、 在convertType方法中:
value为从页面上传递过来的值
toType为转换以后的类型
17.2.2 properties文件
做完17.2.1以后,DateConverter类仅仅是一般的类,struts2框架不能把这个类看作为数据结构的转换类。所以需要把DateConverter类用配置文件进行注册。
注意事项:
1、 这个文件必须和相应的action类放在同一个目录下。
2、 文件的名称为:类名-conversion.properties。
3、 配置文件中的内容为:
action中的属性名称=DateConverter全名
4、 在执行的时候,一定要让浏览器的环境是中文的执行环境。在默认情况下,yyyy-MM-dd只有在中文的浏览器环境下才能识别,如果是英文识别不了。
可以参照XWorkBasicConverter这个类说明问题。
17.2.3 全局properties文件
除了17.2.2的做法,还可以考虑全局的配置文件。
步骤:
1、 在src下新建一个properties文件,为xwork-conversion.properties。
2、 在文件中键值对是这样的:
java.util.Date= cn.itcast.struts2.action.converter.DateConverter
这样配置,只要是java.util.Date类型都会通过DateConverter这个类进行转化。适合于所有的action中的属性。
模型驱动
18.1 说明
假设你正在完成一个网站的注册功能。在后台需要得到20多个属性,才能完成注册。如果用action中的属性获取值,就是这样的情况:
1、 在action中会写20个属性
2、 这20个属性添加set和get方法。
这样会导致action中的代码结构不是很好。模型驱动很好的解决了这个问题。
18.2 例子
|
18.3 原理

过程为:当浏览器提交modelDriverAction_modeldriver.action请求时,先经过拦截器。其中有一个拦截器为ModelDrivenInterceptor,从这个源代码可以看出,这个拦截器的作用就是获取实现了ModelDriver接口的action的模型驱动。在这里为user。然后把模型驱动利用push方法压入到栈顶。这样我们就能直接通过属性进行回显和赋值了。
通过这个图也可以看出模型驱动的拦截器在参数拦截器前面,也就是先把模型驱动压入栈顶,再进行赋值。
文件上传
struts2对文件上传做了更进一步的封装,使得开发更加简单。
19.1 页面
|
19.2 UploadAction中
|
19.3 多文件上传
|
高级部分


1 1、struts2是一个mvc框架,是struts1与xwork的结合体 2 2、struts2的配置文件 3 1、文件类型 4 最常用的配置文件有 5 default.properties 6 struts.i18n.encoding=UTF-8 设置默认的编码字符集 7 struts.multipart.maxSize=2097152 默认文件上传的大小 8 struts.action.extension=action 默认的扩展名 9 struts.devMode = false 是否是开发模式 10 struts.ui.theme = simple 配置struts2的简单样式 11 struts.custom.i18n.resources 自定义资源文件 12 struts-default.xml 13 bean的配置用于静态注入 14 package 15 resulttype 16 interceptor 17 struts-plugin.xml 18 19 struts.xml 20 用户最常用的配置文件 21 2、详细描述 22 1、配置文件中package的机制 23 1、继承 24 在配置文件中,package元素有一个属性为name,name的值是唯一的,是包的名称 25 现在有如下的配置 26 <package name="a" extends="struts-default"> 27 </package> 28 <package name="b" extends="a"></package> 29 这样包b中就有了包a的内容 30 所以这样也可以推出: 31 包a拥有struts-default包中的内容 32 2、命名空间 33 在package中有一个属性为namespace 34 <package name="c" namespace="/user" extends="struts-default"> 35 <action name="userAction_*"> 36 </package> 37 这个时候在浏览器发出的请求: 38 http://localhost:8080/struts2/user/userAction_a.action可以找到action 39 http://localhost:8080/struts2/user/a/b/userAction_b.action可以找到action 40 http://localhost:8080/struts2/userAction_c.action不能够找到action 41 struts2容器在找action时,会采用这样的策略: 42 第一个URL正好和命名空间匹配,所以能够找到 43 第二个URL,当查找user/a/b时,并没有找到相应的action,则会查找user/a,如果找不到则会找user,这样就能找到了 44 第三个URL,当查找userAction时,并没有找到,因为userAction最低层的路径是user 45 2、action的配置 46 在action中,可以采用通配符的配置方式进行 47 <action name="userAction_*" method="{1}" class=".....UserAction"> 48 <action name="*_*" method="{2}" class="cn.ithema03.struts.{1}"> 49 3、result的配置 50 1、每一个result代表一个结果集,result中属性name的值和action中方法的返回值保持一致 51 2、struts2中最常用的结果集是dispatcher,redirect,redirectAction(见struts-default.xml内容) 52 3、result元素中type属性的值为结果集类型 53 4、在action的配置中,class属性可以不写,如果不写默认执行ActionSupport中execute中的内容,从struts-default.xml文件中可以看出 54 <default-class-ref class="com.opensymphony.xwork2.ActionSupport" /> 55 5、拦截器的配置 56 1、interceptor只能配置在package中,所以不能配置全局的拦截器 57 2、struts2中关于interceptor有两个概念:interceptor,interceptors 58 这两个内容的声明都放在interceptors标签中 59 <interceptors> 60 //声明一个interceptor 61 <interceptor name="imageInterceptor" class="cn.itheima03.struts2.interceptor.MyInterceptor"></interceptor> 62 //声明一个interceptor stack 63 <interceptor-stack name="myInterceptor"> 64 //自定义的interceptor 65 <interceptor-ref name="imageInterceptor"></interceptor-ref> 66 //struts2默认的执行的interceptor stack 67 <interceptor-ref name="defaultStack"></interceptor-ref> 68 </interceptor-stack> 69 </interceptors> 70 //引用myInterceptor的interceptor stack 71 <default-interceptor-ref name="myInterceptor"></default-interceptor-ref> 72 3、从上述的配置可以说明: 73 1、在struts2内部有默认的执行的interceptor stack 74 <default-interceptor-ref name="defaultStack"/> 75 如果一个interceptor不在这个interceptor stack中,那么将不执行该interceptor 76 2、可以把默认的interceptor stack变成自己的interceptor stack 77 3、在interceptor stack中可以指向(ref)一个interceptor,也可以指向(ref)一个interceptor stack 78 4、如果一个package要用到另外一个package中的interceptor,只需要通过package的继承机制就可以了 79 3、属性驱动 80 1、概念 81 可以利用属性驱动获取页面表单元素的内容 82 2、步骤 83 1、在action中声明属性,属性的名称和页面元素中name属性的值保持一致 84 2、action中的属性必须有set和get方法 85 4、模型驱动 86 1、如果页面上元素内容太多,用属性驱动实现,action中代码就会很庞大,这个时候可以考虑用模型驱动来实现 87 2、步骤 88 1、action实现一个接口ModelDriver 89 2、在action中声明一个属性,该属性会封装页面中的数据,并且用new的方法给该属性创建对象 90 3、填充接口中的方法getModel,返回该属性的值 91 92 public class UserAction implements ModelDriver<User>{ 93 private User model = new User(); 94 public User getModel(){ 95 return this.model; 96 } 97 } 98 99 5、关于action的说明 100 1、action是多实例的 101 2、action的方法如果以get开头,会带来安全性的隐患 102 6、valueStack 103 1、valueStack是struts2中存放数据的一种数据结构 104 2、valueStack分为两种内存结构:对象栈、map栈 105 3、可以通过以下几种方法获取valueStack 106 1、ValueStack valueStack = ActionContext.getContext().getValueStack(); 107 2、ValueStack valueStack2 = ServletActionContext.getValueStack(ServletActionContext.getRequest()); 108 3、ValueStack valueStack3 = (ValueStack)ServletActionContext.getRequest().getAttribute("struts.valueStack"); 109 以上三种方法获取的valueStack都是同一个对象 110 4、对map栈的操作 111 1、request,response,parameters,application等都在map栈中,分别的数据结构为 112 {"request",RequestMap} {"session",SessionMap} {"application",ApplicationMap} 113 2、可以通过如下方法把数据存放在request,session,application域中 114 ServletActionContext.getRequest().setAttribute("msg_request", "msg_request"); 115 ServletActionContext.getServletContext().setAttribute("msg_application", "msg_application"); 116 ServletActionContext.getRequest().getSession().setAttribute("msg_session", "msg_session"); 117 3、可以通过如下方法吧数据直接存放在map栈中 118 ActionContext.getContext().put("aaaa", "aaaaa"); 119 valueStack.getContext().put("bbb", "bbb"); 120 5、对对象栈的操作 121 1、把一个数据存放在对象栈的尾部 122 valueStack.getRoot().add("aaaaa"); 123 2、把一个数据存放在对象栈的栈顶 124 valueStack.getRoot().add(0,"adsf"); 125 valueStack.push("rtrt"); 126 3、把一个数据封装成map,把map放入到栈顶 127 valueStack.set("aaasdf", "asfd"); 128 4、获取对象栈栈顶的元素 129 valueStack.peek(); 130 valueStack.getRoot().get(0); 131 5、移除对象栈栈顶的元素 132 valueStack.getRoot().remove(0); 133 valueStack.pop(); 134 7、ognl表达式 135 1、把一个数据放入到valueStack中,在页面上可以利用ognl表达式把该数据提取出来 136 2、ognl表达式总体的规则:如果一个数据存放在map栈中,则加#访问,如果一个数据在对象栈中,则不用加#访问 137 3、详细说明 138 1、s:property标签 139 1、如果没有value属性,则默认输出对象栈的栈顶的元素 140 2、<s:property value="#session.aa">输出map栈中session域中aa的值 141 2、s:iterator标签 142 1、迭代遍历集合 143 1、集合的类型:List,Set,Map,Object[] 144 2、value属性的值能直接跟ognl表达式 145 3、当前正在迭代的元素在栈顶存放 146 4、要熟练使用该标签迭代二重或者三重集合 147 2、属性var="a"表示当前正在迭代的元素在map栈中存放一份,key值为"a" 148 3、当迭代map的时候,当前正在迭代的元素是Entry 149 <s:iterator value="#map"> 150 <s:property value="key"/>,<s:property value="value.pid"/> 151 <s:property value="key"/>,<s:property value="value.username"/> 152 </s:iterator> 153 4、属性status,代表当前迭代元素的一些性质 154 int getCount() 返回当前迭代的元素个数 155 int getIndex() 返回当前迭代元素的索引 156 boolean isEven() 返回当前迭代元素的索引是否是偶数 157 boolean isOdd() 返回当前迭代元素的索引是否是奇数 158 boolean isFirst() 返回当前迭代元素是否为第一个元素 159 boolean isLast() 返回当前迭代元素是否为最后一个元素 160 3、s:debug标签可以输出valueStack的内存快照 161 8、struts2的校验机制 162 struts2提供了两种校验机制 163 代码校验 164 步骤: 165 1、在页面上 166 <s:textfield name="username" label="用户名"></s:textfield> 167 <s:textfield name="password" label="密码"></s:textfield> 168 <s:fielderror fieldName="username"></s:fielderror> 169 170 说明: 171 <s:fielderror fieldName="username"></s:fielderror> 172 在这里fileldName="username"会把后台username的报错信息显示到前台 173 <s:fielderror></s:fielderror> 174 把所有的字段的错误信息显示到前台的页面中 175 2、在action中(action必须继承ActionSupport类,该类实现了Validateable接口),可以有两种写法 176 1、重写validate方法就可以了 177 public void validate() { 178 /** 179 * 验证用户名和密码是否为空 180 */ 181 if("".equals(this.getUsername())){ 182 this.addFieldError("username", "用户名不能为空"); 183 } 184 if("".equals(this.getPassword())){ 185 this.addFieldError("password", "密码不能为空"); 186 } 187 } 188 2、如果action中的几个方法都需要校验,在action中必须写这样的方法 189 例如:对如下方法进行校验 190 public String testValidate(){ 191 192 } 193 那么校验方法为:(validate+被校验的方法名称(方法的第一个字母大写)) 194 public void validateTestValidate(){ 195 //校验逻辑 196 } 197 说明: 198 this.addFieldError("username", "用户名不能为空");该方法中username和页面上的fieldName字段对应,而value的值就是报错信息 199 3、在struts2的配置文件中 200 如果校验没有通过,则指向input所指向的页面 201 <result name="input">validate/validate.jsp</result> 202 而在这个页面中,<s:fielderror fieldName="username"></s:fielderror>该标签将显示 203 this.addFieldError("username", "用户名不能为空");的错误信息 204 xml校验 205 步骤 206 1、在页面上 207 <s:textfield name="username" label="用户名"></s:textfield> 208 <s:textfield name="password" label="密码"></s:textfield> 209 <s:fielderror fieldName="username"></s:fielderror> 210 211 说明: 212 <s:fielderror fieldName="username"></s:fielderror> 213 在这里fileldName="username"会把后台username的报错信息显示到前台 214 <s:fielderror></s:fielderror> 215 把所有的字段的错误信息显示到前台的页面中 216 2、编写xml文件 217 xml文件的名称的命名规则为: 218 <ActionClassName>-<aliasName_methodName>-validation.xml 219 其中alias为配置文件中action元素name属性的值 220 例如: 221 1、在com.itheima.struts2.validate.action包中写了一个类ValidateAction 222 2、在配置文件中作为如下的配置 223 <action name="validateAction_*" method="{1}" class="cn.itheima03.struts2.validate.action.ValidateAction"> 224 <result name="success">validate/success.jsp</result> 225 <result name="input">validate/validate.jsp</result> 226 </action> 227 3、在该类的相同路径下,写一个xml文件 228 ValidateAction-validateAction_testXMLValidate-validation.xml 229 该xml文件和类在同一个路径下 230 4、在该xml文件中,就可以进行属性的校验了 231 <validators> 232 //要验证的属性,和页面上name的属性的值对应 233 <field name="username"> 234 //type为校验器,是struts2内置的 235 <field-validator type="requiredstring"> 236 <param name="trim">true</param> 237 //如果验证不成功,则输出的内容 238 <message><![CDATA[用户名不能为空]]></message> 239 </field-validator> 240 </field> 241 <field name="password"> 242 <field-validator type="requiredstring"> 243 <param name="trim">true</param> 244 <message><![CDATA[密码不能为空]]></message> 245 </field-validator> 246 //正则表达式验证 247 <field-validator type="regex"> 248 <param name="trim">true</param> 249 <param name="expression"><![CDATA[^[a-zA-Z0-9]{6,12}$]]></param> 250 <message><![CDATA[密码长度应该在6到12之间]]></message> 251 </field-validator> 252 </field> 253 </validators> 254 3、在struts2的配置文件中 255 input所指向的页面就是验证不成功,输出的验证信息的页面 256 <result name="input">validate/validate.jsp</result> 257 9、防止表单重复提交 258 1、原理 259 利用了struts2内置的拦截器token实现的 260 <interceptor name="token" class="org.apache.struts2.interceptor.TokenInterceptor"/> 261 2、步骤 262 1、在要提交的表单页面上,要写一个struts2自定义的标签: 263 <s:form action="../tokenAction_token.action"> 264 <s:token></s:token>//生成一大堆字符串,用于往session中存放 265 用户名:<s:textfield name="username"></s:textfield> 266 密码:<s:password name="password"></s:password> 267 <s:submit></s:submit> 268 </s:form> 269 2、在配置文件中,由于在defaultStack中没有把token包括进来,所以 270 <interceptors> 271 <interceptor-stack name="tokenInterceptor"> 272 <interceptor-ref name="token"> 273 //哪些方法可以防止重复提交,如果有很多方法,则用,隔开 274 <param name="includeMethods">token</param> 275 </interceptor-ref> 276 <interceptor-ref name="defaultStack"></interceptor-ref> 277 </interceptor-stack> 278 </interceptors> 279 <default-interceptor-ref name="tokenInterceptor"></default-interceptor-ref> 280 说明: 281 1、上面的配置新定义了一个拦截器栈 282 2、在拦截器栈中把默认的拦截器栈加了进来 283 <interceptor-ref name="defaultStack"></interceptor-ref> 284 3、在这个拦截器栈中把token也加了进来,并且指明了哪些方法需要用到防止重复提交 285 <interceptor-ref name="token"> 286 //哪些方法可以防止重复提交,如果有很多方法,则用,隔开 287 <param name="includeMethods">token</param> 288 </interceptor-ref> 289 4、把新定义的拦截器栈tokenInterceptor成了默认的拦截器栈 290 3、如果表单重复提交了,将指向invalid.token的错误页面 291 <result name="invalid.token">token/error.jsp</result> 292 4、如果只执行了上述的内容,报错信息将是一个英文信息, 变成中文信息,步骤如下: 293 1、 在struts2的配置文件中,加入自定义资源文件的配置 294 <constant name="struts.custom.i18n.resources" value="com.itheima.struts2.resource.token"></constant> 295 说明:引入了一个资源文件:为com/itheima/struts2/resource/token.properties 296 2、在该资源文件中 297 struts.messages.invalid.token=\u4E0D\u80FD\u91CD\u590D\u63D0\u4EA4\u8868\u5355 298 说明:key值保持不变,value是输出的错误信息 299 10、文件的上传 300 1、原理: 301 在struts2中,利用拦截器fileUpload实现了文件上传 302 2、实现步骤 303 1、在页面上 304 <s:form action="uploadAction_upload.action" enctype="multipart/form-data"> 305 <s:file name="resource"></s:file> 306 <s:submit></s:submit> 307 </s:form> 308 说明:enctype="multipart/form-data"是必须的,说明要上传的文件是以二进制流的形式传递的 309 2、在文件上传的action中,要有一个属性resource,属性的类型为File 310 public class UploadFileAction{ 311 private File resource; 312 //set和get方法 313 } 314 3、写一个帮助类,可以把resource文件上传到服务器上的某一个地方 315 4、详情: 316 1、可以控制文件上传的大小 317 1、在default.properties文件中,有这样一个配置 318 struts.multipart.maxSize=2097152 319 说明文件上传的默认的最大的值为2M 320 2、如果要改变其默认值,在配置文件中,设置如下的配置 321 <constant name="struts.multipart.maxSize" value="8097152"></constant> 322 把文件上传的最大值改为8M 323 2、可以控制文件的类型和扩展名 324 1、在action中,可以显示文件的类型和扩展名 325 1、在action中可以设置如下的属性 326 resourceContentType 该属性的名称的组成为{name}ContentType 327 2、在action中可以设置如下的属性 328 resourceFileName 该属性的名称的组成为{name}FileName 329 2、在配置文件中 330 引入拦截器fileUpload 331 <interceptor-ref name="defaultStack"> 332 <!-- 333 允许上传的文件的最大size 334 --> 335 <param name="fileUpload.maximumSize">8097152</param> 336 <!-- 337 允许上传文件的扩展名 338 --> 339 <param name="fileUpload.allowedExtensions">txt,doc,pdf,jpg</param> 340 <!-- 341 允许上传文件的类型 342 --> 343 <param name="fileUpload.allowedTypes">application/msword</param> 344 </interceptor-ref> 345 说明: 346 1、因为拦截器在默认的栈中,所以只需要引入默认的栈就可以了 347 2、在这里可以通过param给默认栈的fileUpload拦截器的属性赋值 348 所以maximumSize,allowedExtensions,allowedTypes都是拦截器fileUpload的属性 349 3、如果大小、后缀名、扩展名不符合要求,则会报错,系统会跳转到input指向的页面 350 <result name="input">error.jsp</result>,在error.jsp中编写<s:fielderror></s:fielderror>,就可以看到错误信息 351 但是,报错的信息是英文的信息,如上传的时候类型错误的信息: 352 Content-Type not allowed: upload "xwork-2.1.6-src.zip" "upload_6fff0830_13174e12471__8000_00000000.tmp" application/x-zip-compressed 353 该信息的组成(org.apache.struts2):struts-messages.properties 354 struts.messages.error.file.too.large=File too large: {0} "{1}" "{2}" {3} 355 struts.messages.error.content.type.not.allowed=Content-Type not allowed: {0} "{1}" "{2}" {3} 356 struts.messages.error.file.extension.not.allowed=File extension not allowed: {0} "{1}" "{2}" {3} 357 {0}:代表页面上<input name="upload" type="file"/>中的name的值 358 {1}:代表文件上传的名称 359 {2}:文件保存在临时目录的名称。临时目录为work\Catalina\localhost\struts2 360 {3}:代表文件上传类型,或者文件上传大小。上面的错误代表文件上传类型。如果报第一个错误,则代表文件上传大小。 361 怎么样变成中文的信息呢? 362 步骤: 363 1、 建立一个properties文件。这个文件的名称可以任意取。 364 2、 在这个配置文件中,添入如下的内容: 365 struts.messages.error.file.too.large=文件超过了规定的大小: {0} "{1}" "{2}" {3} 366 struts.messages.error.content.type.not.allowed=该类型不允许被上传: {0} "{1}" "{2}" {3} 367 struts.messages.error.file.extension.not.allowed=不能上传该扩展名类型的文件: {0} "{1}" "{2}" {3} 368 3、 在struts-upload.xml中,指定配置文件的位置 369 <constant name="struts.custom.i18n.resources" value="com.itheima.struts2.action.upload.fileuploadmessage"></constant> 370 如果配置文件放在src下,则这样指定: 371 <constant name="struts.custom.i18n.resources" value="fileuploadmessage"></constant> 372 11、类型转化 373 1、应用场景 374 在实际的开发中有可能存在这样的情况,例如:在页面上选择自己的爱好,是一个多选,在action中获取选择的爱好,而获取选择爱好的属性为List, 375 一般情况下,页面表单的元素在后台用list是获取不到值的,这个时候需要类型转化 376 2、步骤 377 1、在页面上 378 <s:form action="../converterAction_aihaoss.action"> 379 <s:checkboxlist list="{'aa','bb','cc','dd'}" name="aihaos"></s:checkboxlist> 380 <s:submit></s:submit> 381 </s:form> 382 2、在action中,用List接受数据 383 public class ConverterAction extends ActionSupport{ 384 private List<String> aihaos; 385 } 386 3、建立一个转化器类ListConverter 387 //把页面上的选择的内容填充到List<String>中 388 public Object convertFromString(Map context, String[] values, Class toClass) { 389 List<String> aihaos = new ArrayList<String>(); 390 for(String s:values){ 391 aihaos.add(s); 392 } 393 return aihaos; 394 } 395 4、建立一个配置文件xwork-conversion.properties,该配置文件放在src下 396 java.util.List=cn.itheima03.struts2.converter.action.ListConverter 397 key值为转化后的类型,value值为转化器 398
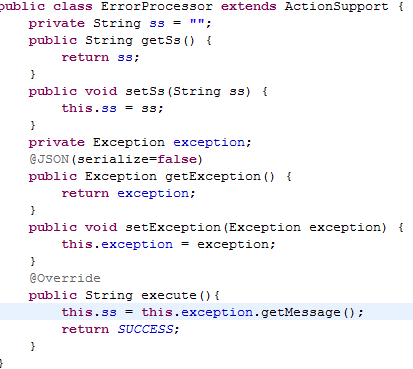
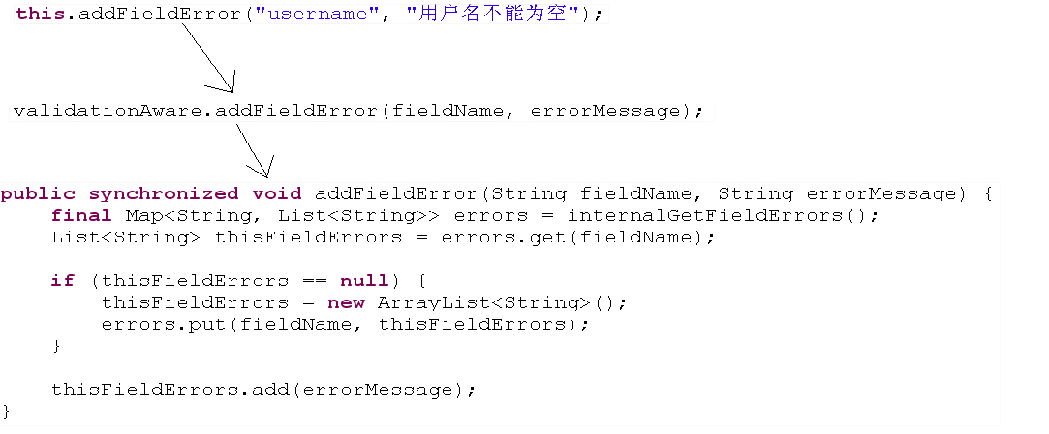
 1 1、struts2的错误处理
 2     1、java的错误处理
 3         如果方法有异常,两种解决方案
 4             try
 5             抛出异常
 6     2、UserAction(saveUser throws Exception)--->DefaultActionInvocation(invoke)--->DefaultActionProxy(execute)
 7        ---->Dispatcher(serviceAction)
 8     3、在serviceAction方法中:
 9         if (devMode) {
10             catch (ConfigurationException e) {
11                 // WW-2874 Only log error if in devMode
12                 if(devMode) {
13                     LOG.error("Could not find action or result", e);
14                 }
15                 else {
16                     LOG.warn("Could not find action or result", e);
17                 }
18                 sendError(request, response, context, HttpServletResponse.SC_NOT_FOUND, e);
19             } catch (Exception e) {
20                 sendError(request, response, context, HttpServletResponse.SC_INTERNAL_SERVER_ERROR, e);
21             } finally {
22                 UtilTimerStack.pop(timerKey);
23             }
24         }
25         如果devMode为true(<constant name="struts.devMode" value="true"/>)
26             如果抛出的异常是ConfigurationException或者及子类,第一个catch就可以捕捉到,如果是其他的异常类,第二个catch可以捕获到,
27             从上述的代码可以看出:struts2处理异常的方法为sendError方法
28
29             在sendError方法中准备了一个模板页面:/org/apache/struts2/dispatcher/error.ftl
30                 需要把错误信息的值填充到里面
31         如果devMode为false,不会跳转到错误模板页面
32
33         4、全局的错误处理
34         在struts2的配置文件中:
35             <global-results>
36             <result name="errHandler" type="chain">
37                 <param name="actionName">errorProcessor</param>
38             </result>
39             </global-results>
40             <global-exception-mappings>
41                 <exception-mapping exception="java.lang.Exception"
42                     result="errHandler" />
43             </global-exception-mappings>
44
45             <action name="errorProcessor" class="com.itheima03.oa.exception.ErrorPrcessor">
46                 <result>error.jsp</result>
47             </action>
48         说明:
49             1、所有的action请求都会执行默认的拦截器栈defaultStack,而在默认的拦截器栈中有一个拦截器为exception
50             2、当执行action的时候,该拦截器会执行两次
51             3、在该exception拦截器中
52                 try {
53                     //执行拦截器或者action
54                     result = invocation.invoke();
55                 } catch (Exception e) {//捕获异常
56                     if (isLogEnabled()) {
57                     handleLogging(e);
58                     }
59                     //把global-exception-mappings的值获取到了
60                     List<ExceptionMappingConfig> exceptionMappings = invocation.getProxy().getConfig().getExceptionMappings();
61                     //获取到exception-mapping中的result属性
62                     String mappedResult = this.findResultFromExceptions(exceptionMappings, e);
63                     if (mappedResult != null) {
64                     result = mappedResult;
65                     //把捕获到的错误的信息存放在栈顶
66                     publishException(invocation, new ExceptionHolder(e));
67                     } else {
68                     throw e;
69                     }
70                 }
71
72                 return result;//代表的是error.jsp
73             4、在error.jsp中可以输出栈顶元素的值即报错信息
74     5、struts2的错误处理在整个过程中没有添加错误的状态码
 1 struts2与json的整合
 2     1、步骤
 3         1、导入jar包
 4             struts2-json-plugin-2.1.8.1
 5             该jar包的根目录有一个struts-plugin.xml文件
 6                     <package name="json-default" extends="struts-default">
 7                         <result-types>
 8                             <result-type name="json" class="org.apache.struts2.json.JSONResult"/>
 9                         </result-types>
10                         <interceptors>
11                             <interceptor name="json" class="org.apache.struts2.json.JSONInterceptor"/>
12                         </interceptors>
13                     </package>
14             从该配置文件可以看出:
15                 1、自定义了一个结果集json-default
16                 2、有一个拦截器json
17         2、在struts2的配置文件中
18             <result type="json"></result>
19             注意:
20                 1、结果集的类型是json
21                 2、因为是ajax请求,所以不需要返回任何页面,所以result中间没有内容
22         3、在action中,声明一个属性,该属性有get方法,属性有返回值,例如:
23              public String getXxx(){
24                 return "aaa";
25              }
26              那么将以如下的值返回到客户端:'xxx':'aaa'
27         4、在action中,如果不需要返回客户端值,那么方法最好别以get方法开头
28         5、在客户端就能接收到服务器端返回的数据
案例1:文件上传:
 1 package com.itheima09.struts.action;
 2
 3 import java.io.File;
 4
 5 import org.apache.struts2.interceptor.FileUploadInterceptor;
 6
 7 import com.itheima09.struts.utils.UploadUtils;
 8 import com.opensymphony.xwork2.ActionSupport;
 9
10 public class UploadAction extends ActionSupport{
11     private File resource;
12     private String resourceContentType;//类型
13     private String resourceFileName;//文件的名称
14
15
16     public String getResourceContentType() {
17         return resourceContentType;
18     }
19
20     public void setResourceContentType(String resourceContentType) {
21         this.resourceContentType = resourceContentType;
22     }
23
24     public String getResourceFileName() {
25         return resourceFileName;
26     }
27
28     public void setResourceFileName(String resourceFileName) {
29         this.resourceFileName = resourceFileName;
30     }
31
32     public File getResource() {
33         return resource;
34     }
35
36     public void setResource(File resource) {
37         this.resource = resource;
38     }
39
40     public String testUpload(){
41         System.out.println(this.resourceContentType);
42         System.out.println(this.resourceFileName);
43         String path = UploadUtils.saveUploadFile(resource);
44         System.out.println(path);
45         return INPUT;
46     }
47 }
1 struts.messages.error.file.too.large=\u6587\u4EF6\u8D85\u8FC7\u4E86\u89C4\u5B9A\u7684\u5927\u5C0F\: {0} "{1}" "{2}" {3}
2 struts.messages.error.content.type.not.allowed=\u8BE5\u7C7B\u578B\u4E0D\u5141\u8BB8\u88AB\u4E0A\u4F20\: {0} "{1}" "{2}" {3}
3 struts.messages.error.file.extension.not.allowed=\u4E0D\u80FD\u4E0A\u4F20\u8BE5\u6269\u5C55\u540D\u7C7B\u578B\u7684\u6587\u4EF6\: {0} "{1}" "{2}" {3}
 1 package com.itheima09.struts.utils;
 2
 3 import java.io.File;
 4 import java.text.SimpleDateFormat;
 5 import java.util.Date;
 6 import java.util.UUID;
 7
 8 import org.apache.struts2.ServletActionContext;
 9
10 public class UploadUtils {
11
12     public static String saveUploadFile(File upload){
13         //把日期格式化成字符串的一个帮助类
14         SimpleDateFormat sdf = new SimpleDateFormat("/yyyy/MM/dd/");
15         /*
16          * 得到upload文件夹的绝对路径
17          * ServletActionContext.getServletContext()
18          * =
19          * C:\Program Files\Apache Software Foundation\Tomcat 6.0\webapps\itcastoa823\WEB-INF/upload/2012\02\16\aaaaadfasdf
20          */
21         String basePath = ServletActionContext.getServletContext().getRealPath("/WEB-INF/upload");
22         //把日期类型格式化为"/yyyy/MM/dd/"这种形式的字符串
23         String subPath = sdf.format(new Date());
24         //如果文件夹不存在,就创建文件夹
25         File dir = new File(basePath+subPath);
26         if(!dir.exists()){
27             dir.mkdirs();
28         }
29         //String path = basePath+"/"+this.uploadFileName;
30         //UUID.randomUUID().toString()能够保证名字的唯一性
31         String path = basePath+subPath+UUID.randomUUID().toString();
32         //String path = basePath+subPath + fileName;
33         File dest = new File(path);
34         //把文件移动到dest处
35         upload.renameTo(dest);
36         return  path;  //路径不包括文件的名字
37         //return path  路径包括文件的名字
38     }
39 }
 1 <%@ page language="java" import="java.util.*" pageEncoding="utf-8"%>
 2 <%@ taglib prefix="s" uri="/struts-tags" %>
 3 <%
 4 String path = request.getContextPath();
 5 String basePath = request.getScheme()+"://"+request.getServerName()+":"+request.getServerPort()+path+"/";
 6 %>
 7
 8 <!DOCTYPE HTML PUBLIC "-//W3C//DTD HTML 4.01 Transitional//EN">
 9 <html>
10   <head>
11     <base href="<%=basePath%>">
12
13     <title>My JSP 'index.jsp' starting page</title>
14     <meta http-equiv="pragma" content="no-cache">
15     <meta http-equiv="cache-control" content="no-cache">
16     <meta http-equiv="expires" content="0">
17     <meta http-equiv="keywords" content="keyword1,keyword2,keyword3">
18     <meta http-equiv="description" content="This is my page">
19     <!--
20     <link rel="stylesheet" type="text/css" href="styles.css">
21     -->
22   </head>
23
24   <body>
25               <s:fielderror></s:fielderror>
26   </body>
27 </html>
 1 <%@ page language="java" import="java.util.*" pageEncoding="utf-8"%>
 2 <%@ taglib prefix="s" uri="/struts-tags" %>
 3 <%
 4 String path = request.getContextPath();
 5 String basePath = request.getScheme()+"://"+request.getServerName()+":"+request.getServerPort()+path+"/";
 6 %>
 7
 8 <!DOCTYPE HTML PUBLIC "-//W3C//DTD HTML 4.01 Transitional//EN">
 9 <html>
10   <head>
11     <base href="<%=basePath%>">
12
13     <title>My JSP 'index.jsp' starting page</title>
14     <meta http-equiv="pragma" content="no-cache">
15     <meta http-equiv="cache-control" content="no-cache">
16     <meta http-equiv="expires" content="0">
17     <meta http-equiv="keywords" content="keyword1,keyword2,keyword3">
18     <meta http-equiv="description" content="This is my page">
19     <!--
20     <link rel="stylesheet" type="text/css" href="styles.css">
21     -->
22   </head>
23
24   <body>
25       <s:form action="uploadAction_testUpload.action" enctype="multipart/form-data">
26         <table>
27             <tr>
28                 <td>选择要上传的文件</td>
29                 <td><s:file name="resource"/></td>
30             </tr>
31             <tr>
32                 <td></td>
33                 <td><s:submit/></td>
34             </tr>
35         </table>
36     </s:form>
37   </body>
38 </html>
 1 <?xml version="1.0" encoding="UTF-8"?>
 2 <web-app xmlns:xsi="http://www.w3.org/2001/XMLSchema-instance" xmlns="http://java.sun.com/xml/ns/javaee" xmlns:web="http://java.sun.com/xml/ns/javaee/web-app_2_5.xsd" xsi:schemaLocation="http://java.sun.com/xml/ns/javaee http://java.sun.com/xml/ns/javaee/web-app_3_0.xsd" id="WebApp_ID" version="3.0">
 3   <display-name>day01-02-itheima09_struts2_helloworld</display-name>
 4   <filter>
 5     <filter-name>struts2</filter-name>
 6     <filter-class>org.apache.struts2.dispatcher.ng.filter.StrutsPrepareAndExecuteFilter</filter-class>
 7   </filter>
 8   <filter-mapping>
 9     <filter-name>struts2</filter-name>
10     <url-pattern>/*</url-pattern>
11   </filter-mapping>
12   <welcome-file-list>
13     <welcome-file>index.html</welcome-file>
14     <welcome-file>index.htm</welcome-file>
15     <welcome-file>index.jsp</welcome-file>
16     <welcome-file>default.html</welcome-file>
17     <welcome-file>default.htm</welcome-file>
18     <welcome-file>default.jsp</welcome-file>
19   </welcome-file-list>
20 </web-app>
 1 <?xml version="1.0" encoding="UTF-8" ?>
 2 <!DOCTYPE struts PUBLIC
 3     "-//Apache Software Foundation//DTD Struts Configuration 2.0//EN"
 4     "http://struts.apache.org/dtds/struts-2.0.dtd">
 5 <struts>
 6     <!--
 7         常量
 8            用来改变default.properties文件中的常量的设置
 9      -->
10     <constant name="struts.ui.theme" value="simple"></constant>
11     <!--
12         一般在开发的情况下,设置struts.devMode为true,这样修改完xml文件以后不用重新启动了
13      -->
14     <constant name="struts.devMode" value="true"/>
15     <include file="struts-upload.xml"></include>
16 </struts>
 1 <?xml version="1.0" encoding="UTF-8" ?>
 2 <!DOCTYPE struts PUBLIC
 3     "-//Apache Software Foundation//DTD Struts Configuration 2.0//EN"
 4     "http://struts.apache.org/dtds/struts-2.0.dtd">
 5 <struts>
 6     <constant name="struts.custom.i18n.resources" value="com.itheima09.struts.action.uploadmessage"></constant>
 7     <package name="upload" namespace="/" extends="struts-default">
 8         <action name="uploadAction_*" method="{1}" class="com.itheima09.struts.action.UploadAction">
 9                     <interceptor-ref name="defaultStack">
10                         <!--
11                             允许上传的文件的最大size
12                          -->
13                         <param name="fileUpload.maximumSize">8097152</param>
14                         <!--
15                             允许上传文件的扩展名
16                          -->
17                         <param name="fileUpload.allowedExtensions">txt,doc,pdf,jpg</param>
18                         <!--
19                             允许上传文件的类型
20                          -->
21                         <param name="fileUpload.allowedTypes">application/msword</param>
22                     </interceptor-ref>
23                 <result name="input">error.jsp</result>
24         </action>
25     </package>
26 </struts>
