Travis CI Build Continuous Integration
什么是持续集成
持续集成(Continuous Integration)是经常合并小的代码更改的实践,而不是在开发周期结束时合并大的更改。目的是通过以较小的增量开发和测试来构建更健康的软件。这就是Travis CI出现的地方。
作为一个持续集成平台,Travis CI通过自动构建和测试代码更改来支持您的开发过程,并提供有关更改成功的即时反馈。Travis CI还可以通过管理部署和通知来自动化开发过程的其他部分。
Travis CI 介绍
Travis CI 提供的是持续集成服务(Continuous Integration,简称 CI)。它绑定 Github 上面的项目,只要有新的代码,就会自动抓取。然后,提供一个运行环境,执行测试,完成构建,还能部署到服务器。

持续集成指的是只要代码有变更,就自动运行构建和测试,反馈运行结果。确保符合预期以后,再将新代码"集成"到主干。

持续集成的好处在于,每次代码的小幅变更,就能看到运行结果,从而不断累积小的变更,而不是在开发周期结束时,一下子合并一大块代码。
CI构建和自动化:构建,测试,部署
运行构建时,Travis CI将GitHub存储库克隆到全新的虚拟环境中,并执行一系列任务来构建和测试代码。如果这些任务中的一项或多项失败,则将构建视为已 损坏。
如果所有任务均未失败,则认为构建已通过,并且Travis CI可以将您的代码部署到Web服务器或应用程序主机。
CI版本也可以自动化交付工作流程的其他部分。这意味着您可以通过Build Stages,设置通知,在构建后准备 部署以及许多其他任务来使工作相互依赖。
Travis CI 使用
使用前准备
操作系统:ubuntu 18.04
node: v10.16.0
travis version: 1.8.9
转到Travis-ci.com/Travis-ci.org并使用GitHub注册

接受Travis CI的授权。您将被重定向到GitHub。

单击Travis仪表板右上角的个人资料图片,单击绿色的Activate按钮,然后选择要用于Travis CI的存储库。
为命令行创建个人访问令牌
You can create a personal access token and use it in place of a password when performing Git operations over HTTPS with Git on the command line or the API.
A personal access token is required to authenticate to GitHub in the following situations:
- When you're using two-factor authentication
- To access protected content in an organization that uses SAML single sign-on (SSO). Tokens used with organizations that use SAML SSO must be authorized.
As a security precaution, GitHub automatically removes personal access tokens that haven't been used in a year.
Creating a token
-
Verify your email address, if it hasn't been verified yet.
-
In the upper-right corner of any page, click your profile photo, then click Settings.

-
In the left sidebar, click Developer settings.

-
In the left sidebar, click Personal access tokens.

-
Click Generate new token.

-
Give your token a descriptive name.

-
Select the scopes, or permissions, you'd like to grant this token. To use your token to access repositories from the command line, select repo.

-
Click Generate token.

-
Click to copy the token to your clipboard. For security reasons, after you navigate off the page, you will not be able to see the token again.

Warning: Treat your tokens like passwords and keep them secret. When working with the API, use tokens as environment variables instead of hardcoding them into your programs.
-
To use your token to authenticate to an organization that uses SAML SSO, authorize the token for use with a SAML single-sign-on organization.
Using a token on the command line
Once you have a token, you can enter it instead of your password when performing Git operations over HTTPS.
For example, on the command line you would enter the following:
$ git clone https://github.com/username/repo.git
Username: your_username
Password: your_token
Personal access tokens can only be used for HTTPS Git operations. If your repository uses an SSH remote URL, you will need to switch the remote from SSH to HTTPS.
If you are not prompted for your username and password, your credentials may be cached on your computer. You can update your credentials in the Keychain to replace your old password with the token.
安装 travis
安装rvm: curl -L get.rvm.io | bash -s stable

安装ruby: rvm install ruby-2.4.1

安装travis: gem install travis

查看版本: travis --version
开始使用 Travis CI
1.travis.yml文件
创建文件
travis init
编写travis文件
language: node_js
node_js:
  - 10.16.0
branches:
  only:
    - master
install:
  - npm install
script:
  - npm run build
addons:
  ssh_known_hosts:
    - $IP
after_success:
  - chmod 600 ~/.ssh/id_rsa
  - ssh root@$IP -o StrictHostKeyChecking=no 'cd /root/blogs/ && git pull
    && npm install && npm run build'
2.ssh免密登入
1.生成密钥
ssh-keygen
2.上传到自己的服务器
ssh-copy-id -i ~/.ssh/id_rsa.pub root@47.106.210.183
3.测试免密登入
ssh root@47.106.210.183
3.对私钥加密
1.登入
travis login --org
2.对私钥加密(记得将id_rsa.enc加入git)
travis encrypt-file ~/.ssh/id_rsa --add --org
mikey@localhost:~/DATA/MIKEY/WebStromWorkSpace/innovate-admin-vue$ travis login --help
Authenticates against the API and stores the token.
Usage: travis login [OPTIONS]
    -h, --help                       Display help
    -i, --[no-]interactive           be interactive and colorful
    -E, --[no-]explode               don't rescue exceptions
        --skip-version-check         don't check if travis client is up to date
        --skip-completion-check      don't check if auto-completion is set up
    -e, --api-endpoint URL           Travis API server to talk to
    -I, --[no-]insecure              do not verify SSL certificate of API endpoint
        --pro                        short-cut for --api-endpoint 'https://api.travis-ci.com/'
        --com                        short-cut for --api-endpoint 'https://api.travis-ci.com/'
        --org                        short-cut for --api-endpoint 'https://api.travis-ci.org/'
        --staging                    talks to staging system
    -t, --token [ACCESS_TOKEN]       access token to use
        --debug                      show API requests
        --debug-http                 show HTTP(S) exchange
    -X, --enterprise [NAME]          use enterprise setup (optionally takes name for multiple setups)
        --adapter ADAPTER            Faraday adapter to use for HTTP requests
    -g, --github-token TOKEN         identify by GitHub token
    -T, --auto-token                 try to figure out who you are automatically (might send another apps token to Travis, token will not be stored)
    -p, --auto-password              try to load password from OSX keychain (will not be stored)
    -a, --auto                       shorthand for --auto-token --auto-password
    -u, --user LOGIN                 user to log in as
    -M, --no-manual                  do not use interactive login
        --list-github-token          instead of actually logging in, list found GitHub tokens
        --skip-token-check           don't verify the token with github
其在travis生成如下内容(如果出现~\/.ssh/id_rs就将反斜杠去掉)
before_install:
- openssl aes-256-cbc -K $encrypted_bd16792238cd_key -iv $encrypted_bd16792238cd_iv
  -in id_rsa.enc -out ~/.ssh/id_rsa -d
4.配置变量
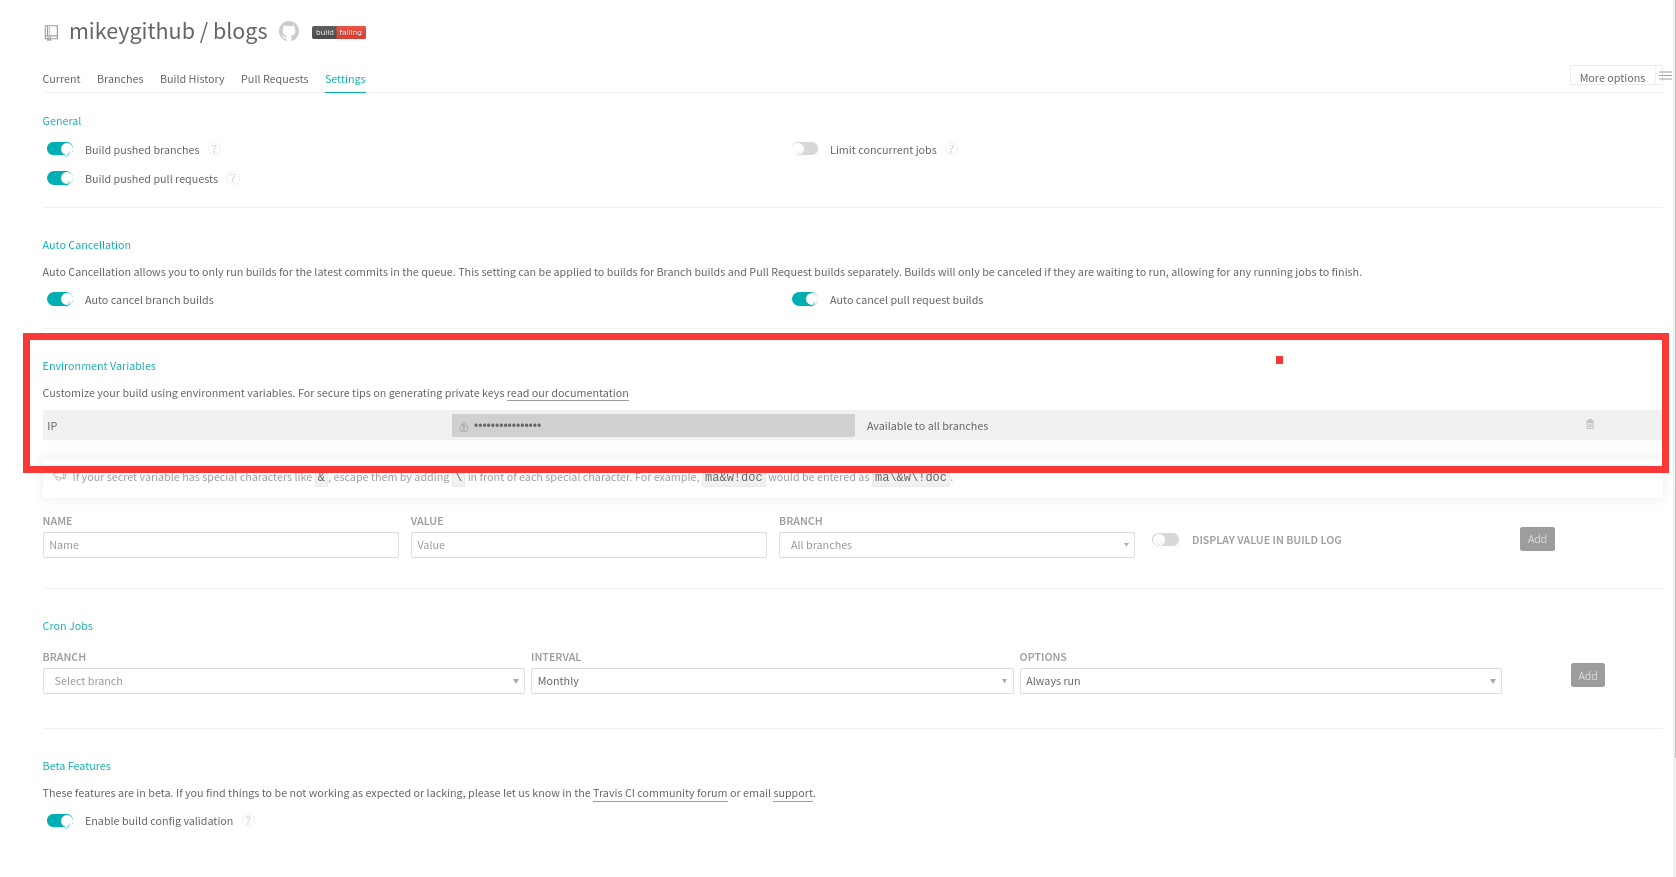
5.完整的travis文件
language: node_js
node_js:
- 10.16.0
branches:
  only:
  - master
install:
- npm install
script:
- npm run build
addons:
  ssh_known_hosts:
  - $IP
before_install:
- openssl aes-256-cbc -K $encrypted_bd16792238cd_key -iv $encrypted_bd16792238cd_iv
  -in id_rsa.enc -out ~/.ssh/id_rsa -d
- chmod 600 ~/.ssh/id_rsa
- echo -e "Host $IP\n\tStrictHostKeyChecking no\n" >> ~/.ssh/config
after_success:
  - chmod 600 ~/.ssh/id_rsa
  - rsync -az --delete ./dist/* root@$IP:/usr/share/nginx/html/blogs
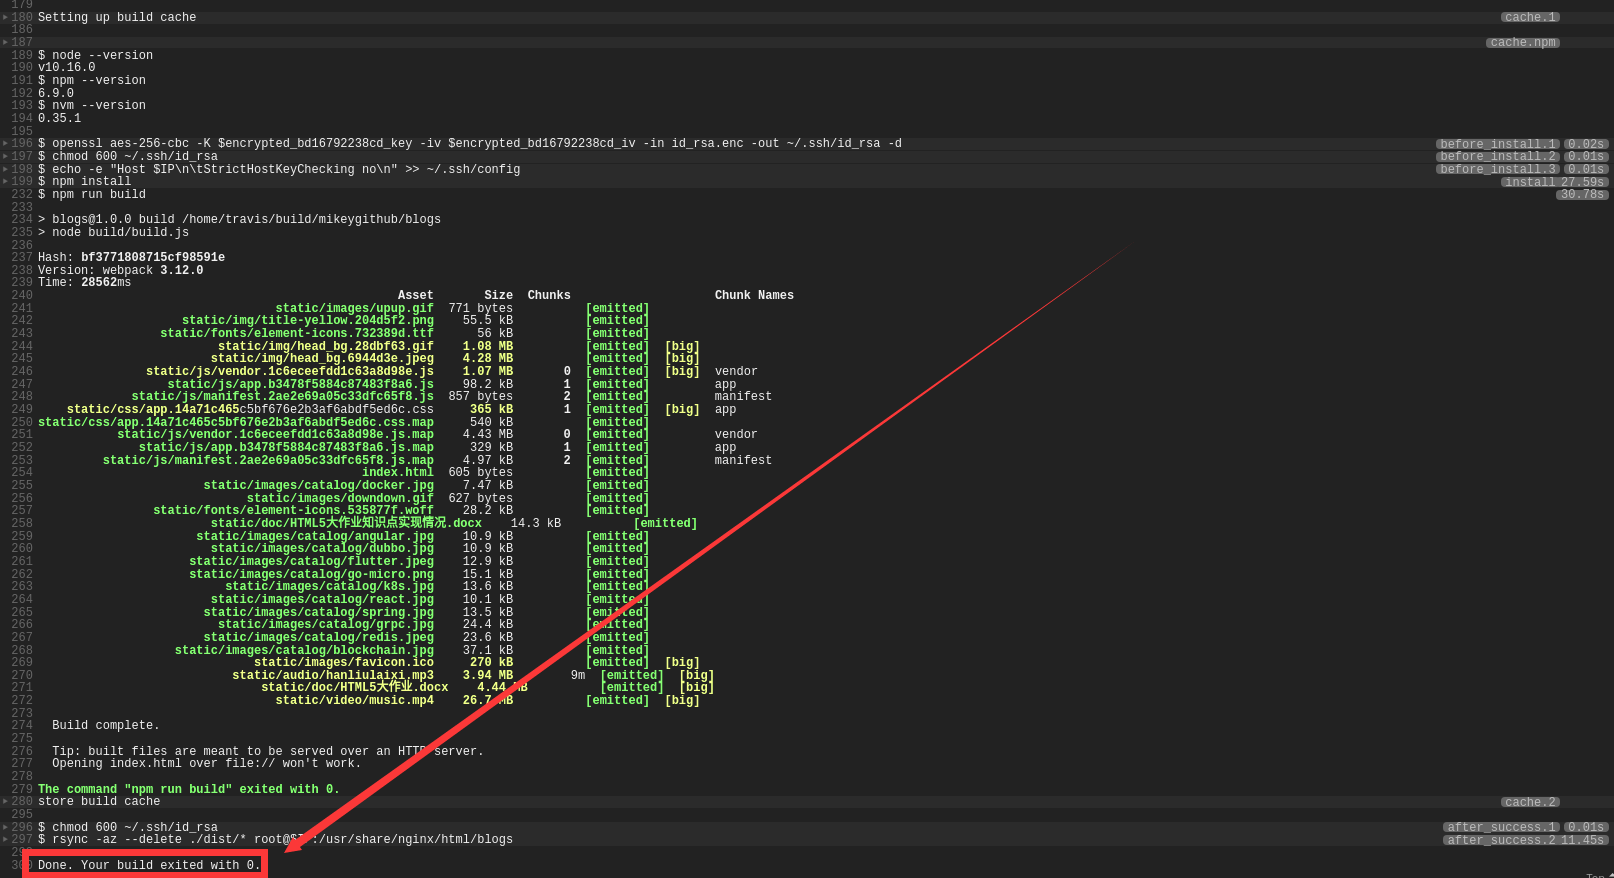
6.推代码到仓库
CI成功:
搭建Docker项目
1.dockerfile + docker-compose 来构建docker容器
2.travis-ci + github 来hook repo 的变动
3.travis-ci 调用 dockerfile 打包 docker image 并push到 dockerhub
4.travis-ci ssh 登录到目标机器,copy docker-compose 并执行来完成部署

服务器提前装好docker-compose
1.Dockerfile (结合自己项目修改)
#基础镜像
FROM tomcat
#Message
MAINTAINER mikey<biaogejiushibiao@outlook.com>
#构建日期
ENV REFRESHED_AT 2019-11-11
#切换镜像目录,进入/usr目录
WORKDIR /usr/local/tomcat/webapps
#复制编译后的文件
COPY target/Attendance.war   /usr/local/tomcat/webapps/Attendance_war.war
#公开端口
EXPOSE 8080
#设置启动命令
ENTRYPOINT ["/usr/local/tomcat/bin/catalina.sh","run"]
2.docker-compose.yml
version: '2'
services:
  attendance:
    build: .
    image: mikeyboom/attendance
    ports:
      - "8004:8080"
    container_name: attendance
3.travis.yml
#环境语言
language: java
#所选服务
services:
- docker
#权限
sudo: required
#分支
branches:
  only:
  - master
#执行脚本
script:
- mvn install -DskipTests=true -Dmaven.javadoc.skip=true -B -V
- docker build . -t "mikeyboom/attendance:latest"
#安装之前执行脚本
before_install:
- openssl aes-256-cbc -K $encrypted_71a1e6d76d99_key -iv $encrypted_71a1e6d76d99_iv
-in id_rsa.enc -out ~/.ssh/id_rsa -d
- chmod 600 ~/.ssh/id_rsa
- echo -e "Host $ip\n\tStrictHostKeyChecking no\n" >> ~/.ssh/config
#成功之后执行的脚本
after_success:
- docker login -u=$dockername -p="$dockerpassword"
- docker push mikeyboom/attendance:latest
- chmod 600 id_rsa
- rsync -az --delete ./docker-compose.yml root@$ip:/home/mikey/Attendance/
- ssh -o "StrictHostKeyChecking no" -i id_rsa root@$ip "cd /home/mikey/Attendance/;sudo
  docker-compose -f docker-compose.yml pull;sudo docker-compose -f docker-compose.yml
  up -d;exit"
4.记得对私钥进行加密
travis encrypt-file ~/.ssh/id_rsa --add
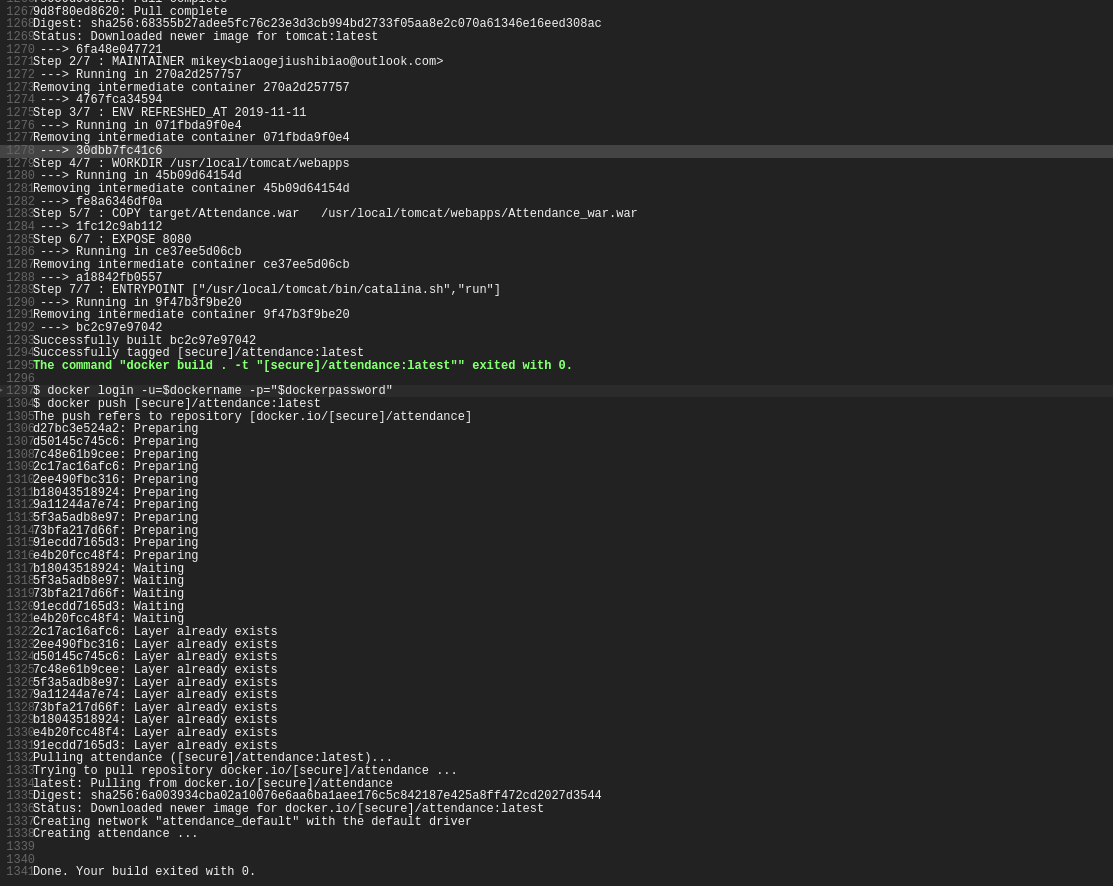
5.配置好变量
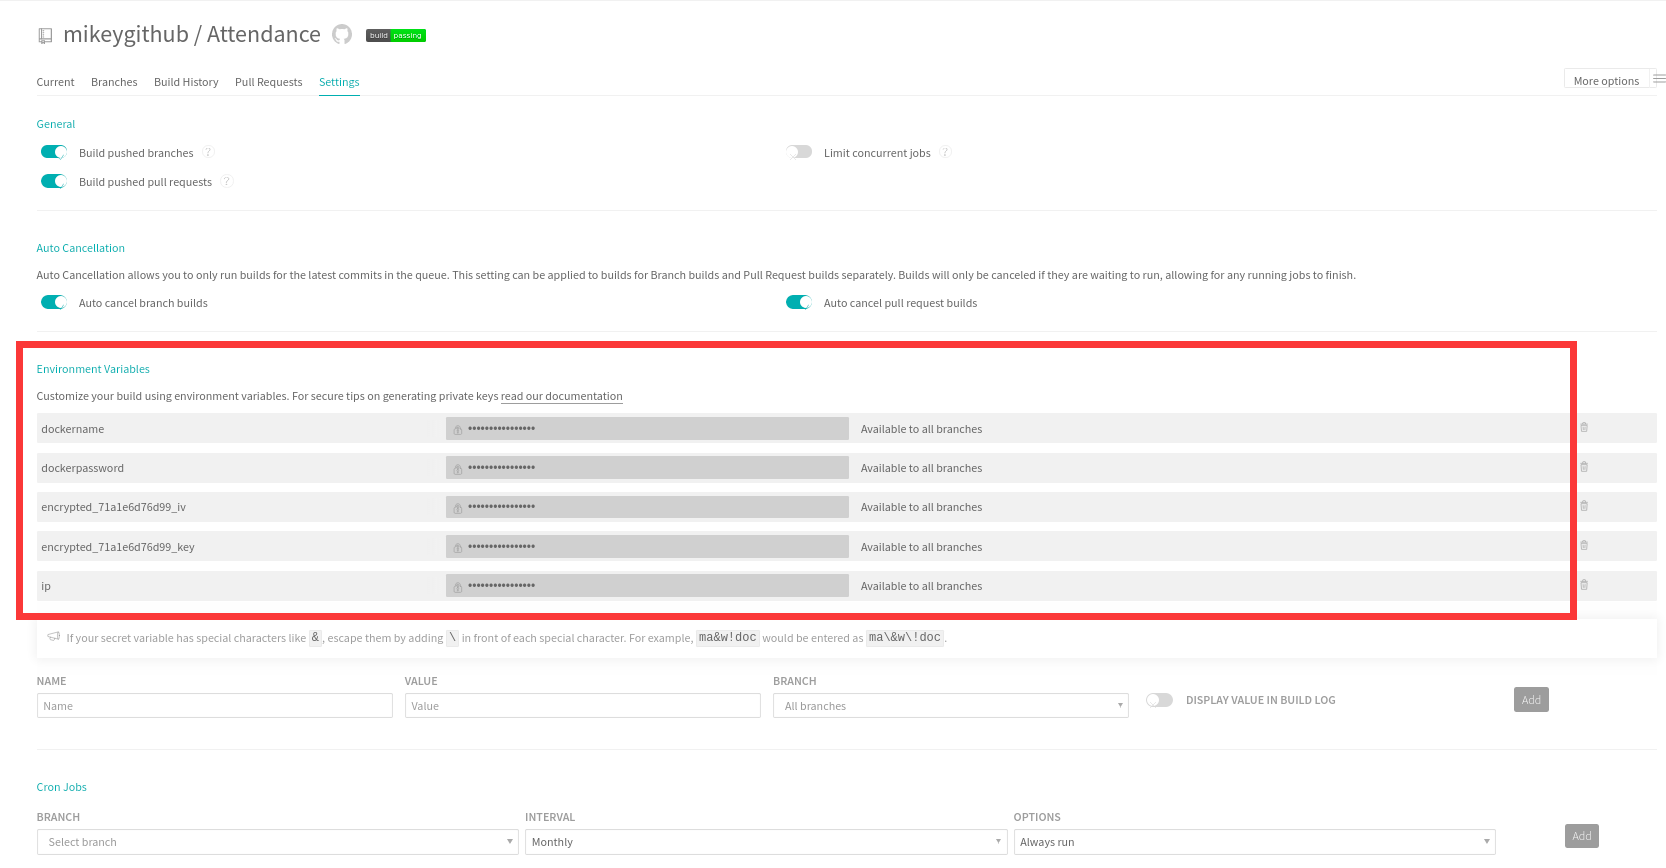
成功
参考资料
官方文档:
https://github.com/travis-ci/docs-travis-ci-com
相关博文:
https://www.cnblogs.com/homehtml/p/11796836.html
https://www.jianshu.com/p/631fc28202dc
https://docs.travis-ci.com/user/tutorial/
http://www.ruanyifeng.com/blog/2017/12/travis_ci_tutorial.html

 浙公网安备 33010602011771号