Django之view
视图函数view
一个视图函数(类),简称视图,是一个简单的Python 函数(类),它接受Web请求并且返回Web响应。
响应可以是一张网页的HTML内容,一个重定向,一个404错误,一个XML文档,或者一张图片。
无论视图本身包含什么逻辑,都要返回响应。代码写在哪里也无所谓,只要它在你当前项目目录下面。除此之外没有更多的要求了——可以说“没有什么神奇的地方”。为了将代码放在某处,大家约定成俗将视图放置在项目(project)或应用程序(app)目录中的名为views.py的文件中。
CBV和FBV
FBV(function base views) 就是在视图里使用函数处理请求。
CBV(class base views) 就是在视图里使用类处理请求。
Python是一个面向对象的编程语言,如果只用函数来开发,有很多面向对象的优点就错失了(继承、封装、多态)。所以Django在后来加入了Class-Based-View。可以让我们用类写View。这样做的优点主要下面两种:
- 提高了代码的复用性,可以使用面向对象的技术,比如Mixin(多继承)
- 可以用不同的函数针对不同的HTTP方法处理,而不是通过很多if判断,提高代码可读性


from django.shortcuts import render, HttpResponse

def index(request):
    # 判断请求方式,如果是GET返回index页面
    if request.method == "GET":
        return render(request, "index.html")
    # 非GET在这里也就是POST,验证表单,成功返回success页面
    else:
        username = request.POST.get("username")
        password = request.POST.get("password")
        if username == "wubiao" and password == "123456":
            # 返回success页面并且替换之前name对应信息(和jinja2类似但不是)
            return render(request, "success.html", {"name": username})
        else:
            return HttpResponse("错了!!!")
from django.views import View


class MyView(View):
    # 重写dispatch方法的写法
    def dispatch(self, request, *args, **kwargs):
        # 执行父类的dispatch方法
        ret = super().dispatch(request, *args, **kwargs)
        # 别忘了return值
        return ret

    def get(self, request):
        return render(request, "index.html")

    def post(self, request):
        username = request.POST.get("username")
        password = request.POST.get("password")
        if username == "wubiao" and password == "123456":
            return render(request, "success.html", {"name": username})
        else:
            return HttpResponse("错了!!!")
Django的url是将一个请求分配给可调用的函数的,而不是一个class。针对这个问题,class-based view提供了一个
as_view()静态方法(也就是类方法),调用这个方法,会创建一个类的实例,然后通过实例调用dispatch()方法,dispatch()方法会根据request的method的不同调用相应的方法来处理request(如get(),post()等)。到这里,这些方法和function-based view差不多了,要接收request,得到一个response返回。如果方法没有定义,会抛出HttpResponseNotAllowed异常。
注意:使用CBV时,urls.py中也做对应的修改:
from django.conf.urls import url
from app01.views import MyView

urlpatterns = [
    # url(r'^admin/', admin.site.urls), # 这个不用管,注释掉
    url(r'^index/', MyView.as_view()),
]
CBV传参,和FBV类似,有名分组,无名分组
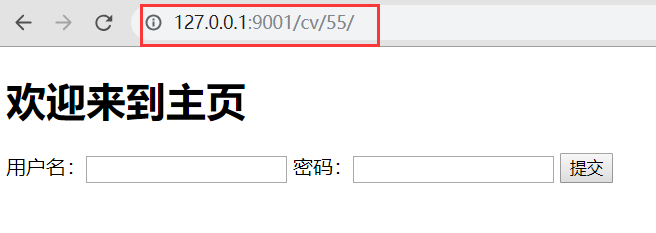
from django.conf.urls import url
from django.contrib import admin
from app01.views import MyView

urlpatterns = [
    # url(r'^admin/', admin.site.urls), # 这个不用管,注释掉
    # url(r'^index/', MyView.as_view()),
    url(r'^cv/(\d{2})/', MyView.as_view(),name="cv"),
]
from django.shortcuts import render, HttpResponse
from django.views import View

class MyView(View):
    name = "sb"

    def get(self, request, n):
        print("get方法被执行了")
        print(">>>", n)
        return render(request, "index.html", {"name": self.name})

    def post(self, request,n):
        print("post方法被执行了")
        return HttpResponse("post")

添加类的属性可以通过两种方法设置,第一种是常见的Python的方法,可以被子类覆盖。
from django.shortcuts import render, HttpResponse
from django.views import View

class GreetingView(View):
    name = "yuan"

    def get(self, request):
        return HttpResponse(self.name)


class MorningGreetingView(GreetingView):
    name = "alex"
第二种方法,你也可以在url中指定类的属性:
from django.conf.urls import url
from app01.views import GreetingView

urlpatterns = [
    # url(r'^admin/', admin.site.urls), # 这个不用管,注释掉
    # url(r'^index/', MyView.as_view()),
    url(r'^index/', GreetingView.as_view(name="egon")),
]
给视图加装饰器
使用装饰器装饰FBV
FBV本身就是一个函数,所以和给普通的函数加装饰器无差:
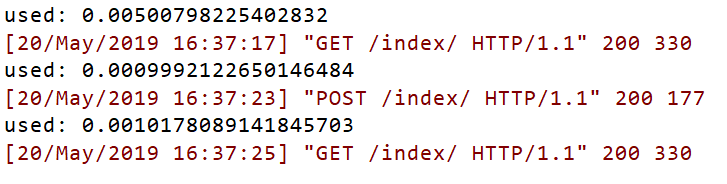
import time
from django.shortcuts import render, HttpResponse

def wrapper(func):
    def inner(*args, **kwargs):
        start_time = time.time()
        ret = func(*args, **kwargs)
        end_time = time.time()
        print("used:", end_time - start_time)
        return ret

    return inner

@wrapper
def index(request):
    # 判断请求方式,如果是GET返回index页面
    if request.method == "GET":
        return render(request, "index.html")
    # 非GET在这里也就是POST,验证表单,成功返回success页面
    else:
        username = request.POST.get("username")
        password = request.POST.get("password")
        if username == "wubiao" and password == "123456":
            # 返回success页面并且替换之前name对应信息(和jinja2类似但不是)
            return render(request, "success.html", {"name": username})
        else:
            return HttpResponse("错了!!!")
使用装饰器装饰CBV
类中的方法与独立函数不完全相同,因此不能直接将函数装饰器应用于类中的方法 ,我们需要先将其转换为方法装饰器。
Django中提供了method_decorator装饰器用于将函数装饰器转换为方法装饰器。
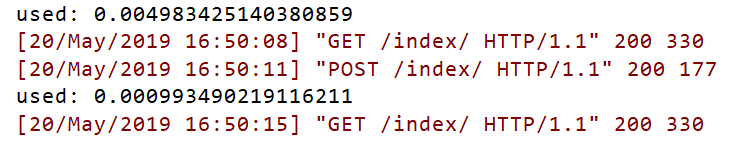
import time
from django.shortcuts import render, HttpResponse
from django.views import View
from django.utils.decorators import method_decorator

def wrapper(func):
    def inner(*args, **kwargs):
        start_time = time.time()
        ret = func(*args, **kwargs)
        end_time = time.time()
        print("used:", end_time - start_time)
        return ret

    return inner

class MyView(View):
    @method_decorator(wrapper)
    def get(self, request):
        return render(request, "index.html")

    def post(self, request):
        username = request.POST.get("username")
        password = request.POST.get("password")
        if username == "wubiao" and password == "123456":
            return render(request, "success.html", {"name": username})
        else:
            return HttpResponse("错了!!!")
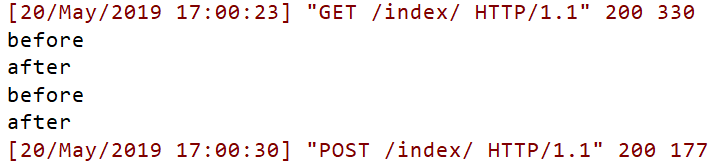
# 使用CBV时要注意,请求过来后会先执行dispatch()这个方法,如果需要批量对具体的请求处理方法,如get,post等做一些操作的时候,这里我们可以手动改写dispatch方法,这个dispatch方法就和在FBV上加装饰器的效果一样。

from django.shortcuts import render, HttpResponse
from django.views import View

class MyView(View):
    def dispatch(self, request, *args, **kwargs):
        print("before")
        ret = super().dispatch(request, *args, **kwargs)
        print("after")
        return ret

    def get(self, request):
        return render(request, "index.html")

    def post(self, request):
        username = request.POST.get("username")
        password = request.POST.get("password")
        if username == "wubiao" and password == "123456":
            return render(request, "success.html", {"name": username})
        else:
            return HttpResponse("错了!!!")
添加装饰器的三张方法:
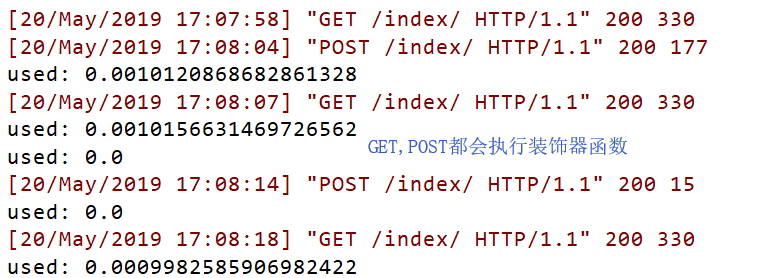
- 直接添加在dispatch里面,这样每个函数都会执行
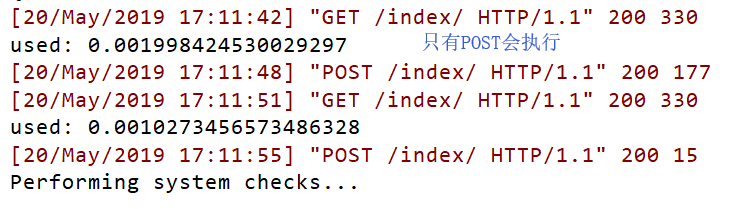
- 添加在每一个函数中
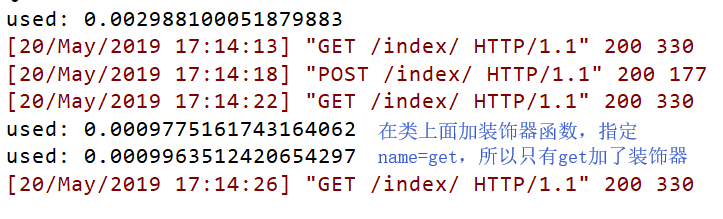
- 直接添加在类上,后面的name表示只给get添加装饰器
import time
from django.shortcuts import render, HttpResponse
from django.views import View
from django.utils.decorators import method_decorator

def wrapper(func):
    def inner(*args, **kwargs):
        start_time = time.time()
        ret = func(*args, **kwargs)
        end_time = time.time()
        print("used:", end_time - start_time)
        return ret

    return inner

class MyView(View):
    @method_decorator(wrapper)
    def dispatch(self, request, *args, **kwargs):
        ret = super().dispatch(request, *args, **kwargs)
        return ret

    def get(self, request):
        return render(request, "index.html")

    def post(self, request):
        username = request.POST.get("username")
        password = request.POST.get("password")
        if username == "wubiao" and password == "123456":
            return render(request, "success.html", {"name": username})
        else:
            return HttpResponse("错了!!!")
import time
from django.shortcuts import render, HttpResponse
from django.views import View
from django.utils.decorators import method_decorator

def wrapper(func):
    def inner(*args, **kwargs):
        start_time = time.time()
        ret = func(*args, **kwargs)
        end_time = time.time()
        print("used:", end_time - start_time)
        return ret

    return inner

class MyView(View):

    def dispatch(self, request, *args, **kwargs):
        ret = super().dispatch(request, *args, **kwargs)
        return ret

    def get(self, request):
        return render(request, "index.html")

    @method_decorator(wrapper)
    def post(self, request):
        username = request.POST.get("username")
        password = request.POST.get("password")
        if username == "wubiao" and password == "123456":
            return render(request, "success.html", {"name": username})
        else:
            return HttpResponse("错了!!!")
import time
from django.shortcuts import render, HttpResponse
from django.views import View
from django.utils.decorators import method_decorator

def wrapper(func):
    def inner(*args, **kwargs):
        start_time = time.time()
        ret = func(*args, **kwargs)
        end_time = time.time()
        print("used:", end_time - start_time)
        return ret

    return inner

@method_decorator(wrapper,name='get')
class MyView(View):

    def dispatch(self, request, *args, **kwargs):
        ret = super().dispatch(request, *args, **kwargs)
        return ret

    def get(self, request):
        return render(request, "index.html")

    def post(self, request):
        username = request.POST.get("username")
        password = request.POST.get("password")
        if username == "wubiao" and password == "123456":
            return render(request, "success.html", {"name": username})
        else:
            return HttpResponse("错了!!!")
注意事项:
- 添加装饰器前必须导入from django.utils.decorators import method_decorator
- 添加装饰器的格式必须为@method_decorator(),括号里面为装饰器的函数名
- 给类添加是必须声明name
- 注意csrf-token装饰器的特殊性,在CBV模式下它只能加在dispatch上面
补充:
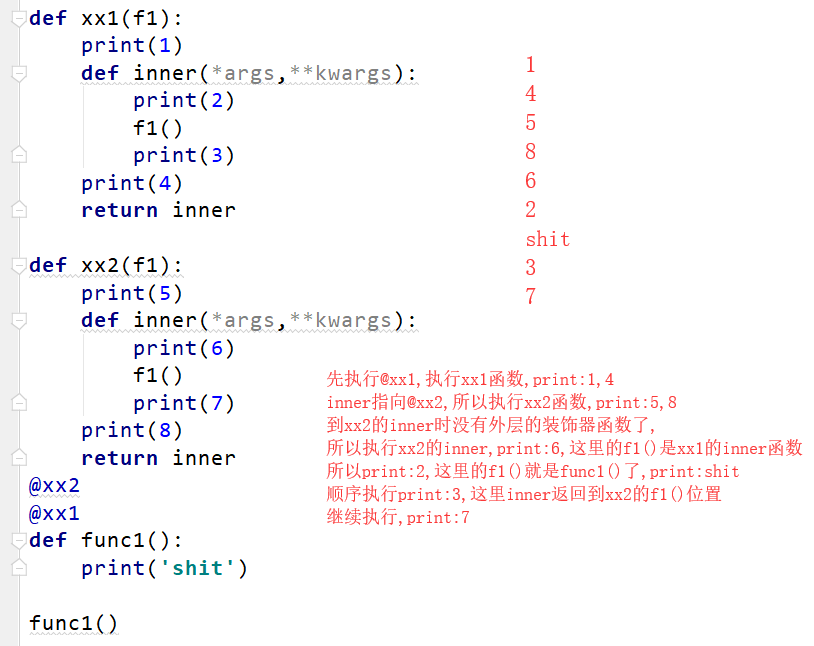
def xx1(f1):
    print(1)
    def inner(*args,**kwargs):
        print(2)
        f1()
        print(3)
    print(4)
    return inner

def xx2(f1):
    print(5)
    def inner(*args,**kwargs):
        print(6)
        f1()
        print(7)
    print(8)
    return inner
@xx2
@xx1
def func1():
    print('shit')

func1()
request对象
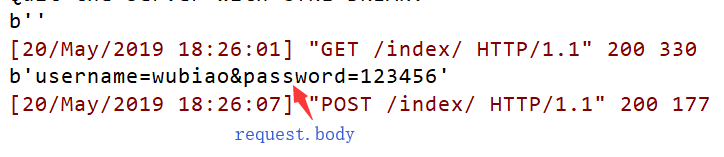
request.body:请求体,byte类型 request.POST的数据就是从body里面提取到的
request.GET:包含所有HTTP GET参数的类字典对象
request.POST:包含所有HTTP POST参数的类字典对象
request.method 获取请求方法
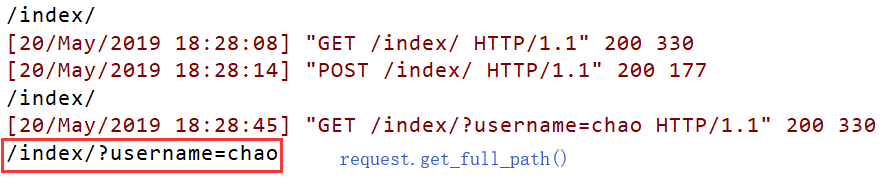
request.path_info 获取用户请求路径
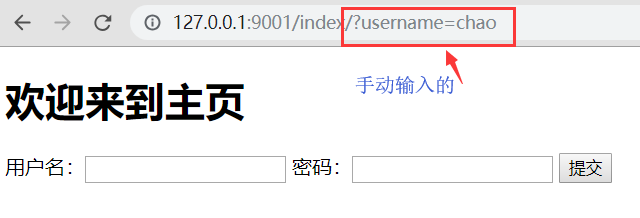
request.get_full_path() 获取除域名之外的全路径,包括请求参数
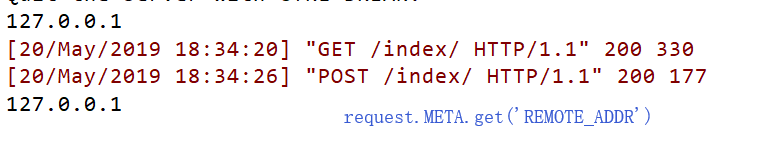
request.META 获取请求头的元信息
def index(request):
    print(request.method)
    print(request.POST)
    print(request.GET)
    print(request.body) #b'username=asdf'
    print(request.path_info) #/index/  路径
    print(request.get_full_path()) #/index/?username=chao 路径
    print(request.META.get('HTTP_USER_AGENT')) #META请求头元信息
    print(request.META.get('REMOTE_ADDR'))  #客户端IP地址


    return HttpResponse('ok')

    # return redirect('/login/') #重定向

    # return render(request,'index.html')


属性
所有的属性应该被认为是只读的,除非另有说明。
属性:
  django将请求报文中的请求行、头部信息、内容主体封装成 HttpRequest 类中的属性。
   除了特殊说明的之外,其他均为只读的。


0.HttpRequest.scheme(后面再学)
   表示请求方案的字符串(通常为http或https)

1.HttpRequest.body(后面再学)

  一个字符串,代表请求报文的主体。在处理非 HTTP 形式的报文时非常有用,例如:二进制图片、XML,Json等。

  但是,如果要处理表单数据的时候,推荐还是使用 HttpRequest.POST 。

  另外,我们还可以用 python 的类文件方法去操作它,详情参考 HttpRequest.read() 。


2.HttpRequest.path

  一个字符串,表示请求的路径组件(不含域名)。

  例如:"/music/bands/the_beatles/"


3.HttpRequest.method

  一个字符串,表示请求使用的HTTP 方法。必须使用大写。

  例如:"GET"、"POST"


4.HttpRequest.encoding

  一个字符串,表示提交的数据的编码方式(如果为 None 则表示使用 DEFAULT_CHARSET 的设置,默认为 'utf-8')。
   这个属性是可写的,你可以修改它来修改访问表单数据使用的编码。
   接下来对属性的任何访问(例如从 GET 或 POST 中读取数据)将使用新的 encoding 值。
   如果你知道表单数据的编码不是 DEFAULT_CHARSET ,则使用它。


5.HttpRequest.GET

  一个类似于字典的对象,包含 HTTP GET 的所有参数。详情请参考 QueryDict 对象。


6.HttpRequest.POST

  一个类似于字典的对象,如果请求中包含表单数据,则将这些数据封装成 QueryDict 对象。

  POST 请求可以带有空的 POST 字典 —— 如果通过 HTTP POST 方法发送一个表单,但是表单中没有任何的数据,QueryDict 对象依然会被创建。
   因此,不应该使用 if request.POST  来检查使用的是否是POST 方法;应该使用 if request.method == "POST"

  另外:如果使用 POST 上传文件的话,文件信息将包含在 FILES 属性中。

 7.HttpRequest.COOKIES

  一个标准的Python 字典,包含所有的cookie。键和值都为字符串。


8.HttpRequest.FILES

  一个类似于字典的对象,包含所有的上传文件信息。
   FILES 中的每个键为<input type="file" name="" /> 中的name,值则为对应的数据。

  注意,FILES 只有在请求的方法为POST 且提交的<form> 带有enctype="multipart/form-data" 的情况下才会
   包含数据。否则,FILES 将为一个空的类似于字典的对象。


9.HttpRequest.META

   一个标准的Python 字典,包含所有的HTTP 首部(请求头信息)。具体的头部信息取决于客户端和服务器,下面是一些示例:

    CONTENT_LENGTH —— 请求的正文的长度(是一个字符串)。
    CONTENT_TYPE —— 请求的正文的MIME 类型。
    HTTP_ACCEPT —— 响应可接收的Content-Type。
    HTTP_ACCEPT_ENCODING —— 响应可接收的编码。
    HTTP_ACCEPT_LANGUAGE —— 响应可接收的语言。
    HTTP_HOST —— 客服端发送的HTTP Host 头部。
    HTTP_REFERER —— Referring 页面。
    HTTP_USER_AGENT —— 客户端的user-agent 字符串。
    QUERY_STRING —— 单个字符串形式的查询字符串(未解析过的形式)。
    REMOTE_ADDR —— 客户端的IP 地址。
    REMOTE_HOST —— 客户端的主机名。
    REMOTE_USER —— 服务器认证后的用户。
    REQUEST_METHOD —— 一个字符串,例如"GET" 或"POST"。
    SERVER_NAME —— 服务器的主机名。
    SERVER_PORT —— 服务器的端口(是一个字符串)。
   从上面可以看到,除 CONTENT_LENGTH 和 CONTENT_TYPE 之外,请求中的任何 HTTP 首部转换为 META 的键时,
    都会将所有字母大写并将连接符替换为下划线最后加上 HTTP_  前缀。
    所以,一个叫做 X-Bender 的头部将转换成 META 中的 HTTP_X_BENDER 键。


10.HttpRequest.user

  一个 AUTH_USER_MODEL 类型的对象,表示当前登录的用户。

  如果用户当前没有登录,user 将设置为 django.contrib.auth.models.AnonymousUser 的一个实例。你可以通过 is_authenticated() 区分它们。

    例如:

    if request.user.is_authenticated():
        # Do something for logged-in users.
    else:
        # Do something for anonymous users.


       user 只有当Django 启用 AuthenticationMiddleware 中间件时才可用。

     -------------------------------------------------------------------------------------

    匿名用户
    class models.AnonymousUser

    django.contrib.auth.models.AnonymousUser 类实现了django.contrib.auth.models.User 接口,但具有下面几个不同点:

    id 永远为None。
    username 永远为空字符串。
    get_username() 永远返回空字符串。
    is_staff 和 is_superuser 永远为False。
    is_active 永远为 False。
    groups 和 user_permissions 永远为空。
    is_anonymous() 返回True 而不是False。
    is_authenticated() 返回False 而不是True。
    set_password()、check_password()、save() 和delete() 引发 NotImplementedError。
    New in Django 1.8:
    新增 AnonymousUser.get_username() 以更好地模拟 django.contrib.auth.models.User。


11.HttpRequest.session

   一个既可读又可写的类似于字典的对象,表示当前的会话。只有当Django 启用会话的支持时才可用。
    完整的细节参见会话的文档。
方法
1.HttpRequest.get_host()

  根据从HTTP_X_FORWARDED_HOST(如果打开 USE_X_FORWARDED_HOST,默认为False)和 HTTP_HOST 头部信息返回请求的原始主机。
   如果这两个头部没有提供相应的值,则使用SERVER_NAME 和SERVER_PORT,在PEP 3333 中有详细描述。

  USE_X_FORWARDED_HOST:一个布尔值,用于指定是否优先使用 X-Forwarded-Host 首部,仅在代理设置了该首部的情况下,才可以被使用。

  例如:"127.0.0.1:8000"

  注意:当主机位于多个代理后面时,get_host() 方法将会失败。除非使用中间件重写代理的首部。


2.HttpRequest.get_full_path()

  返回 path,如果可以将加上查询字符串。

  例如:"/music/bands/the_beatles/?print=true"


3.HttpRequest.get_signed_cookie(key, default=RAISE_ERROR, salt='', max_age=None)

  返回签名过的Cookie 对应的值,如果签名不再合法则返回django.core.signing.BadSignature。

  如果提供 default 参数,将不会引发异常并返回 default 的值。

  可选参数salt 可以用来对安全密钥强力攻击提供额外的保护。max_age 参数用于检查Cookie 对应的时间戳以确保Cookie 的时间不会超过max_age 秒。

        复制代码
        >>> request.get_signed_cookie('name')
        'Tony'
        >>> request.get_signed_cookie('name', salt='name-salt')
        'Tony' # 假设在设置cookie的时候使用的是相同的salt
        >>> request.get_signed_cookie('non-existing-cookie')
        ...
        KeyError: 'non-existing-cookie'    # 没有相应的键时触发异常
        >>> request.get_signed_cookie('non-existing-cookie', False)
        False
        >>> request.get_signed_cookie('cookie-that-was-tampered-with')
        ...
        BadSignature: ...
        >>> request.get_signed_cookie('name', max_age=60)
        ...
        SignatureExpired: Signature age 1677.3839159 > 60 seconds
        >>> request.get_signed_cookie('name', False, max_age=60)
        False
        复制代码


4.HttpRequest.is_secure()

  如果请求时是安全的,则返回True;即请求通是过 HTTPS 发起的。


5.HttpRequest.is_ajax()

  如果请求是通过XMLHttpRequest 发起的,则返回True,方法是检查 HTTP_X_REQUESTED_WITH 相应的首部是否是字符串'XMLHttpRequest'。

  大部分现代的 JavaScript 库都会发送这个头部。如果你编写自己的 XMLHttpRequest 调用(在浏览器端),你必须手工设置这个值来让 is_ajax() 可以工作。

  如果一个响应需要根据请求是否是通过AJAX 发起的,并且你正在使用某种形式的缓存例如Django 的 cache middleware,
   你应该使用 vary_on_headers('HTTP_X_REQUESTED_WITH') 装饰你的视图以让响应能够正确地缓存。
response对象
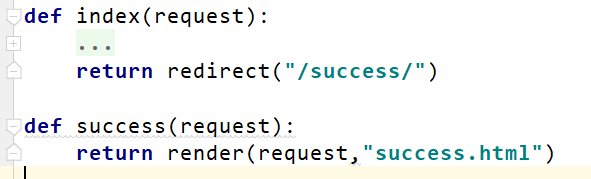
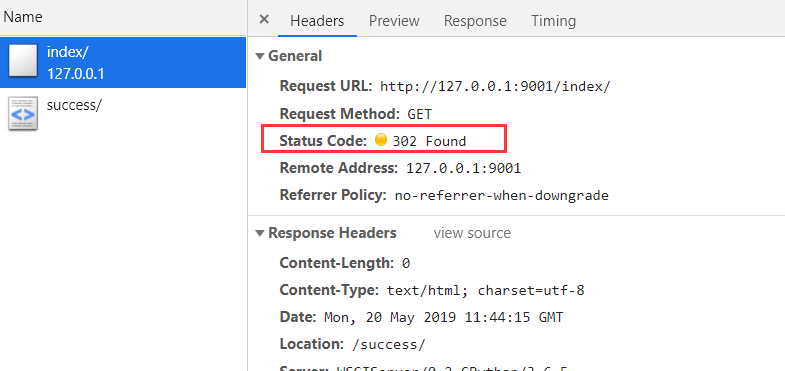
三个方法
HttpResponse('xxx')  返回一个字符串
render(request,'index.html',{'name':'chao'})  index.html  {{ name }}--chao
redirect('/login/') -- 给浏览器发送了一个重定向的请求,浏览器拿到你要重定向的url,然后自动发送了一个ip+端口+路径/login/,的一个请求,后端在配置对应的url('^login/',views.login)
举例说明redirect重定向:


 浙公网安备 33010602011771号