

Spring 使用 JPA
导GAV先:
<dependency>
            <groupId>junit</groupId>
            <artifactId>junit</artifactId>
            <version>4.12</version>
            <scope>test</scope>
        </dependency>

<!--   Spring     -->
        <dependency>
            <groupId>org.springframework</groupId>
            <artifactId>spring-core</artifactId>
            <version>5.0.5.RELEASE</version>
        </dependency>

        <!-- hibernate start -->
        <!-- spring data jpa  -->
        <dependency>
            <groupId>org.springframework.data</groupId>
            <artifactId>spring-data-jpa</artifactId>
            <version>2.5.0</version>
        </dependency>
        <!-- hibernate  -->
        <dependency>
            <groupId>org.hibernate</groupId>
            <artifactId>hibernate-core</artifactId>
            <version>5.4.0.Final</version>
        </dependency>

        <!--   MySql     -->
        <dependency>
            <groupId>mysql</groupId>
            <artifactId>mysql-connector-java</artifactId>
            <version>5.1.38</version>
        </dependency>

        <!-- log日志 -->
        <dependency>
            <groupId>log4j</groupId>
            <artifactId>log4j</artifactId>
            <version>1.2.17</version>
        </dependency>
然后创建JPA的配置文件xml :
<?xml version="1.0" encoding="UTF-8"?>
<persistence xmlns="http://java.sun.com/xml/ns/persistence"
             xmlns:xsi="http://www.w3.org/2001/XMLSchema-instance"
             xsi:schemaLocation="http://java.sun.com/xml/ns/persistence
    http://java.sun.com/xml/ns/persistence/persistence_2_0.xsd"
             version="2.0">
    <!--配置持久化单元
        name:持久化单元名称
        transaction-type:事务类型
             RESOURCE_LOCAL:本地事务管理
             JTA:分布式事务管理 -->
    <persistence-unit name="myJpa" transaction-type="RESOURCE_LOCAL">
        <!--配置JPA规范的服务提供商 -->
        <provider>org.hibernate.jpa.HibernatePersistenceProvider</provider>
        <properties>
            <!-- 数据库驱动 -->
            <property name="javax.persistence.jdbc.driver" value="com.mysql.jdbc.Driver" />
            <!-- 数据库地址 -->
            <property name="javax.persistence.jdbc.url" value="jdbc:mysql://localhost:3306/jpa" />
            <!-- 数据库用户名 -->
            <property name="javax.persistence.jdbc.user" value="root" />
            <!-- 数据库密码 -->
            <property name="javax.persistence.jdbc.password" value="root" />

            <!--jpa提供者的可选配置:我们的JPA规范的提供者为hibernate,所以jpa的核心配置中兼容hibernate的配 -->
            <property name="hibernate.show_sql" value="true" />
            <property name="hibernate.format_sql" value="true" />
            <property name="hibernate.hbm2ddl.auto" value="create" />
        </properties>
    </persistence-unit>
</persistence>
因为实际提供者是 hibernate 所以这里也配了一下 hibernate的配置。
这么文件名字一定要是 persistence.xml 而且 一定要放在 resource 下面的 META-INF 文件夹下 不然会找不到报错!!!

第三步:创建对应的 Bena ,并且 把Bean中的字段映射到 数据库表中:
package com.sze.jpa.bean;

import javax.persistence.*;

/**
 *@Entity 声明实体类
 * @Table 配置实体类和表的映射关系 name是映射表名字
 */
@Entity
@Table(name = "cst_customer")

/**
 *  @Id 主键
 *  @GeneratedValue(strategy = GenerationType.IDENTITY) 设置自增长
 *  @Column 映射表字段名
 */
public class Customer {
    @Id
    @GeneratedValue(strategy = GenerationType.IDENTITY)
    @Column(name = "cust_id")
    private Long custId;    //ID

    @Column(name = "cust_name")
    private String custName;    //名字

    @Column(name = "cust_source")
    private String custSource;  //来源

    @Column(name = "cust_industry")
    private String custIndustry;    //所属行业

    @Column(name = "cust_level")
    private String custLevel;       //级别

    @Column(name = "cust_address")
    private String custAddress;     //地址

    @Column(name = "cust_phone")
    private String custPhone;       //联系方式

    public Customer() {
    }

    public Customer(Long custId, String custName, String custSource, String custIndustry, String custLevel, String custAddress, String custPhone) {
        this.custId = custId;
        this.custName = custName;
        this.custSource = custSource;
        this.custIndustry = custIndustry;
        this.custLevel = custLevel;
        this.custAddress = custAddress;
        this.custPhone = custPhone;
    }

    public Long getCustId() {
        return custId;
    }

    public void setCustId(Long custId) {
        this.custId = custId;
    }

    public String getCustName() {
        return custName;
    }

    public void setCustName(String custName) {
        this.custName = custName;
    }

    public String getCustSource() {
        return custSource;
    }

    public void setCustSource(String custSource) {
        this.custSource = custSource;
    }

    public String getCustIndustry() {
        return custIndustry;
    }

    public void setCustIndustry(String custIndustry) {
        this.custIndustry = custIndustry;
    }

    public String getCustLevel() {
        return custLevel;
    }

    public void setCustLevel(String custLevel) {
        this.custLevel = custLevel;
    }

    public String getCustAddress() {
        return custAddress;
    }

    public void setCustAddress(String custAddress) {
        this.custAddress = custAddress;
    }

    public String getCustPhone() {
        return custPhone;
    }

    public void setCustPhone(String custPhone) {
        this.custPhone = custPhone;
    }

    @Override
    public String toString() {
        return "Customer{" +
                "custId=" + custId +
                ", custName='" + custName + '\'' +
                ", custSource='" + custSource + '\'' +
                ", custIndustry='" + custIndustry + '\'' +
                ", custLevel='" + custLevel + '\'' +
                ", custAddress='" + custAddress + '\'' +
                ", custPhone='" + custPhone + '\'' +
                '}';
    }
}
【注解一定得是JPA的规范提供的注解一定要导入javax.persistence下的 包】里面的注解也有解释,认真看看即可。下面是常用的注解:
     @Entity
            作用:指定当前类是实体类。
        @Table
            作用:指定实体类和表之间的对应关系。
            属性:
                name:指定数据库表的名称
        @Id
            作用:指定当前字段是主键。
        @GeneratedValue
            作用:指定主键的生成方式。。
            属性:
                strategy :指定主键生成策略。
        @Column
            作用:指定实体类属性和数据库表之间的对应关系
            属性:
                name:指定数据库表的列名称。
                unique:是否唯一
                nullable:是否可以为空
                inserttable:是否可以插入
                updateable:是否可以更新
                columnDefinition: 定义建表时创建此列的DDL
                secondaryTable: 从表名。如果此列不建在主表上(默认建在主表),该属性定义该列所在从表的名字搭建开发环境[重点]
下面我们做一个插入一条数据测试:
package com.sze.jpa;

import com.sze.jpa.bean.Customer;
import org.junit.Test;

import javax.persistence.EntityManager;
import javax.persistence.EntityManagerFactory;
import javax.persistence.EntityTransaction;
import javax.persistence.Persistence;

public class TestJpa {

    @Test
    public void testSave(){
        //实体管理类工厂,借助Persistence的静态方法获取 其中传递的参数为持久化单元名称,需要jpa配置文件中指定
        EntityManagerFactory factory = Persistence.createEntityManagerFactory("myJpa");
        //创建实体管理类
        EntityManager entityManager = factory.createEntityManager();
        //获取事务对象
        EntityTransaction transaction = entityManager.getTransaction();
        //开启事务
        transaction.begin();
        //创建一个对象
        Customer customer = new Customer();
        customer.setCustName("XianYu");
        customer.setCustAddress("School");
        //保存操作(插入)
        entityManager.persist(customer);
        //提交事务
        transaction.commit();
        //释放资源
        entityManager.close();
        factory.close();
    }
}
这只是简单使用JPA的实例
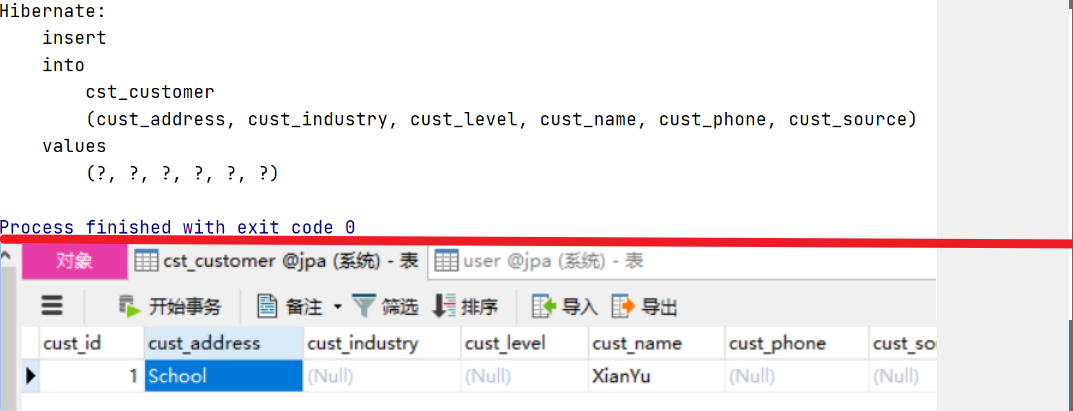
结果:
本文来自博客园,作者:咸瑜,转载请注明原文链接:https://www.cnblogs.com/bi-hu/p/15503112.html
