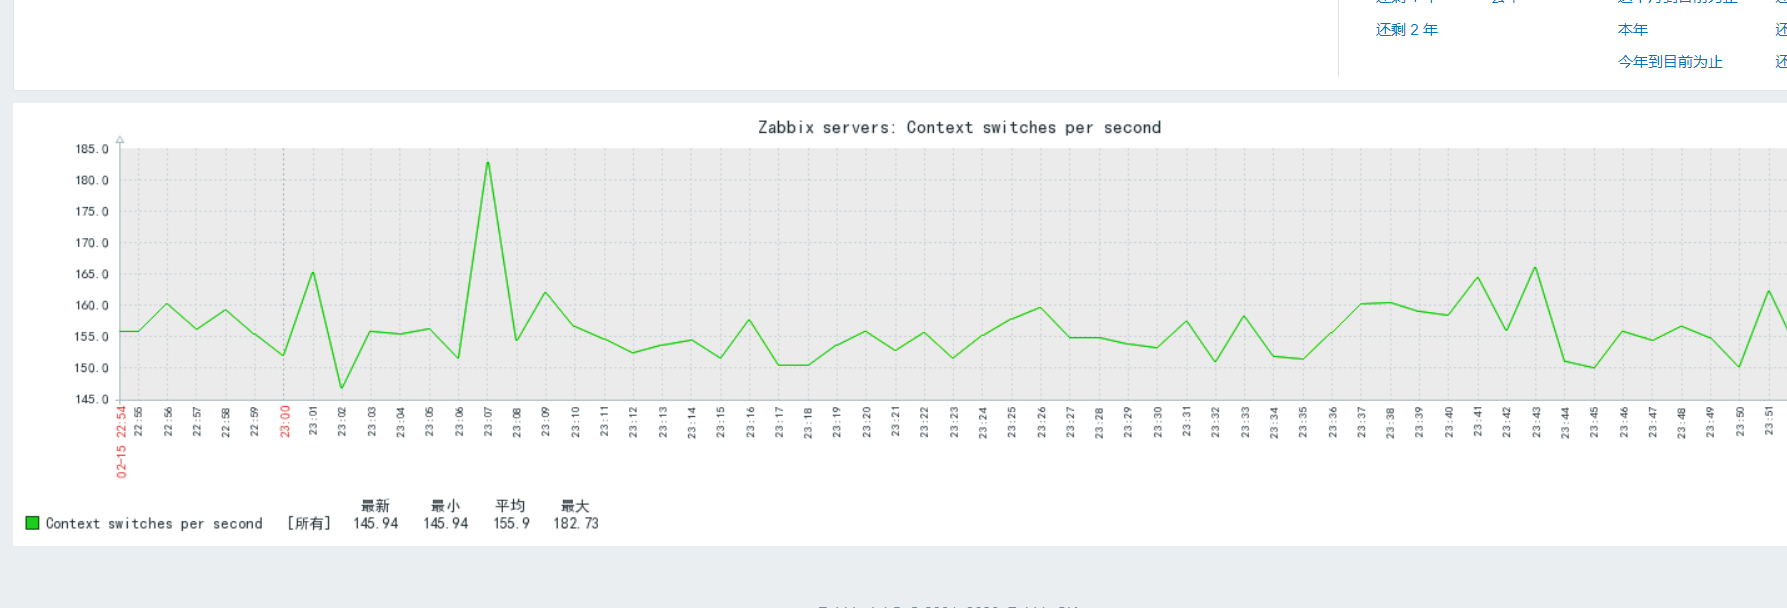
毕业设计之zabbix集合
lnmp环境请查看https://www.cnblogs.com/betterquan/p/12285956.html
但是!!!注意php的编译:
https://www.zabbix.com/documentation/4.0/zh/manual/installation/requirements 官方文档的环境要求

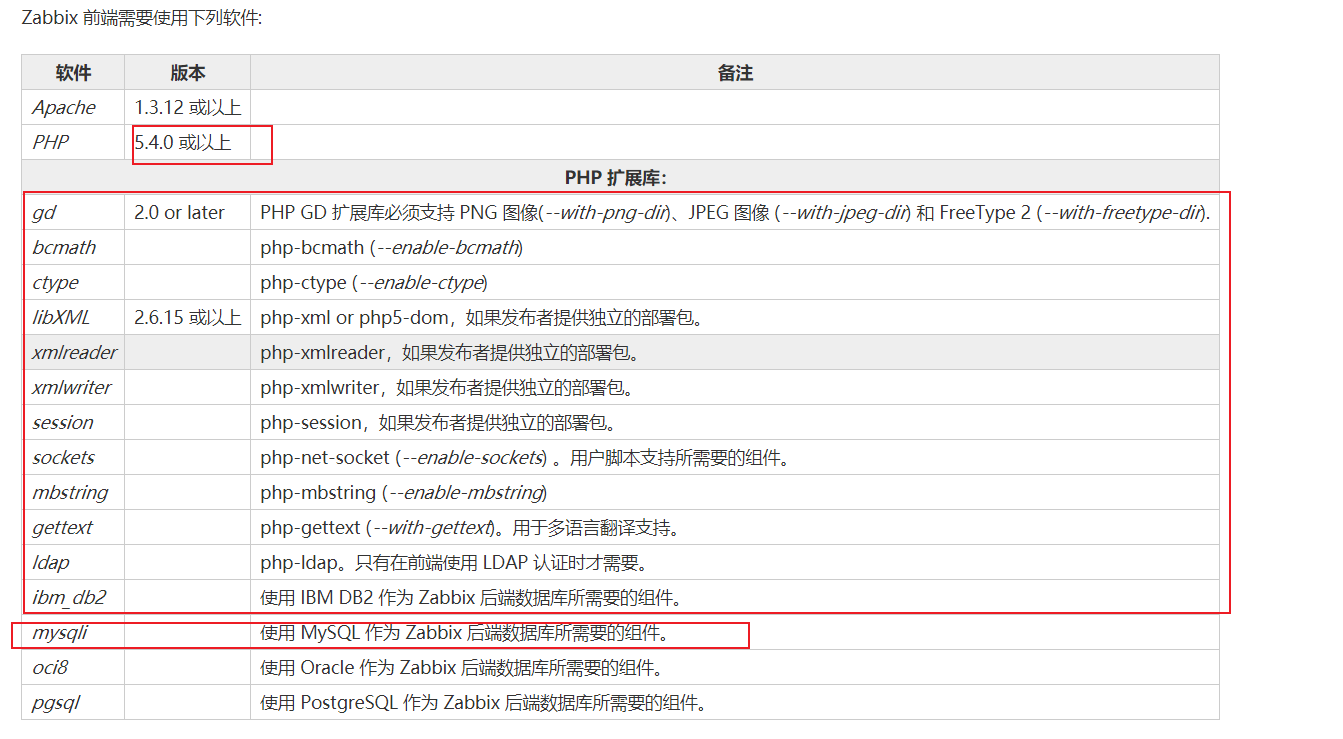
注意编译的时候一定要注意扩展库的启用,,有可能启动方式不一样,去php官网找与版本匹配的启动参数https://www.php.net/manual/zh/configure.about.php
环境介绍
|
软件 |
版本 |
|
nginx |
https://nginx.org/download/nginx-1.16.1.tar.gz |
|
php |
https://www.php.net/distributions/php-7.3.14.tar.gz |
|
mysql |
https://cdn.mysql.com//Downloads/MySQL-5.7/mysql-boost-5.7.29.tar.gz |
|
zabbix |
https://nchc.dl.sourceforge.net/project/zabbix/ZABBIX%20Latest%20Stable/4.4.5/zabbix-4.4.5.tar.gz |
https://www.zabbix.com/documentation/4.0/zh/manual/installation/install官方zabbix 源码安装
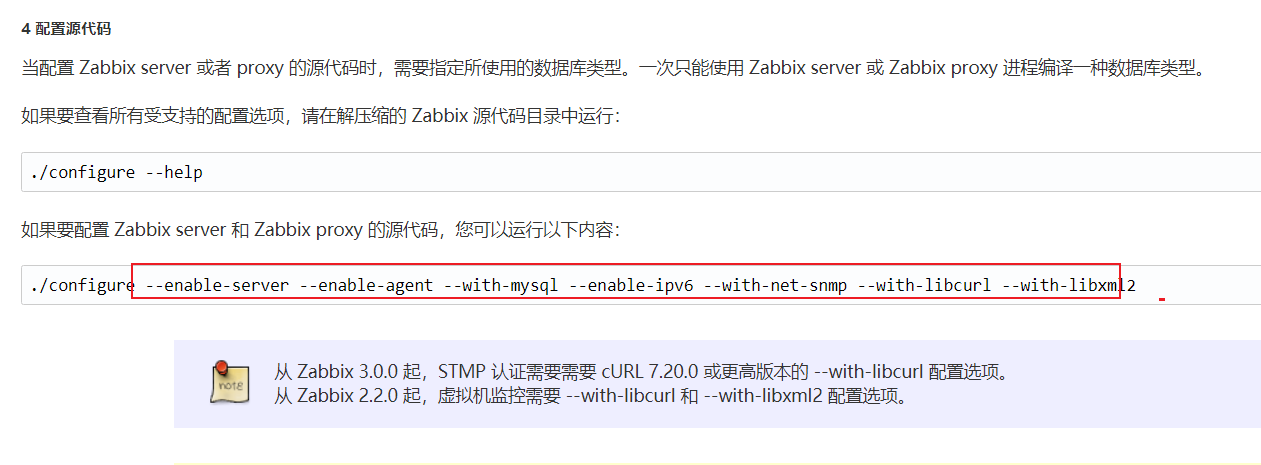
具体过程关于zabbix
[root@ansz.quan.bbs packages]useradd zabbix
[root@ansz.quan.bbs packages]$tar -xvzf zabbix-4.4.5.tar.gz
登陆数据库操作
mysql> create database zabbix character set=utf8;
Query OK, 1 row affected (0.00 sec)
mysql> create user 'zabbix'@'localhost' identified by 'zabbix2004';
Query OK, 0 rows affected (0.00 sec)
mysql> grant all privileges on zabbix.* to 'zabbix'@'localhost' with grant option;
Query OK, 0 rows affected (0.00 sec)
mysql> flush privileges;
Query OK, 0 rows affected (0.01 sec)

编译:
./configure --prefix=/usr/local/zabbix4.4.5 --enable-server --enable-agent --with-mysql=/usr/local/mysql/bin/mysql_config  --with-net-snmp --with-libcurl

编译成功后make && make install
编译可能出现的问题:
1111问题:
checking for net-snmp-config... /usr/bin/net-snmp-config
checking for main in -lnetsnmp... yes
checking for localname in struct snmp_session... yes
checking for zlib support... yes
checking for process shared libpthread support... checking for pthread.h... (cached) yes
yes
checking for libevent support... no
configure: error: Unable to use libevent (libevent check failed)
解决:
[root@ansz.quan.bbs zabbix-4.4.5]$yum install libevent libevent-devel -y
2222问题
configure: error: Invalid Net-SNMP directory - unable to find net-snmp-config
解决
yum install -y net-snmp-devel
安装成功,建立软连接:
[root@ansz.quan.bbs extra]$ln -s /usr/local/zabbix4.4.5/ /usr/local/zabbix
[root@ansz.quan.bbs init.d]$ln -s /usr/local/zabbix/sbin/* /usr/local/sbin/
导入初始数据:
[root@ansz.quan.bbs extra]$mysql -uroot -p2004 zabbix </data/packages/zabbix-4.4.5/database/mysql/schema.sql
[root@ansz.quan.bbs extra]$mysql -uroot -p2004 zabbix </data/packages/zabbix-4.4.5/database/mysql/images.sql
[root@ansz.quan.bbs extra]$mysql -uroot -p2004 zabbix </data/packages/zabbix-4.4.5/database/mysql/data.sql
修改nginx虚拟主机配置文件:
主文件:
#user  nobody;
worker_processes  1;

#error_log  logs/error.log;
#error_log  logs/error.log  notice;
#error_log  logs/error.log  info;

#pid        logs/nginx.pid;


events {
    worker_connections  1024;
}


http {
    include       mime.types;
    default_type  application/octet-stream;

    log_format  main  '$remote_addr - $remote_user [$time_local] "$request" '
                      '$status $body_bytes_sent "$http_referer" '
                      '"$http_user_agent" "$http_x_forwarded_for"';

    access_log  logs/access.log  main;

    sendfile        on;
    #tcp_nopush     on;

    #keepalive_timeout  0;
    keepalive_timeout  65;

    #gzip  on;
include extra/*.conf;
#    server {
#        listen       80;
#        server_name  localhost;
#
#        #charset koi8-r;
#
#        #access_log  logs/host.access.log  main;
#
#        location / {
#            root   html;
#            index  index.html index.htm;
#        }
#
#        #error_page  404              /404.html;
#
#        # redirect server error pages to the static page /50x.html
#        #
#        error_page   500 502 503 504  /50x.html;
#        location = /50x.html {
#            root   html;
#        }
#
#        # proxy the PHP scripts to Apache listening on 127.0.0.1:80
#        #
#        #location ~ \.php$ {
#        #    proxy_pass   http://127.0.0.1;
#        #}
#
#        # pass the PHP scripts to FastCGI server listening on 127.0.0.1:9000
#        #
#        #location ~ \.php$ {
#        #    root           html;
#        #    fastcgi_pass   127.0.0.1:9000;
#        #    fastcgi_index  index.php;
#        #    fastcgi_param  SCRIPT_FILENAME  /scripts$fastcgi_script_name;
#        #    include        fastcgi_params;
#        #}
#
#        # deny access to .htaccess files, if Apache's document root
#        # concurs with nginx's one
#        #
#        #location ~ /\.ht {
#        #    deny  all;
#        #}
#    }
#
#
    # another virtual host using mix of IP-, name-, and port-based configuration
    #
    #server {
    #    listen       8000;
    #    listen       somename:8080;
    #    server_name  somename  alias  another.alias;

    #    location / {
    #        root   html;
    #        index  index.html index.htm;
    #    }
    #}


    # HTTPS server
    #
    #server {
    #    listen       443 ssl;
    #    server_name  localhost;

    #    ssl_certificate      cert.pem;
    #    ssl_certificate_key  cert.key;

    #    ssl_session_cache    shared:SSL:1m;
    #    ssl_session_timeout  5m;

    #    ssl_ciphers  HIGH:!aNULL:!MD5;
    #    ssl_prefer_server_ciphers  on;

    #    location / {
    #        root   html;
    #        index  index.html index.htm;
    #    }
    #}

}
注意:主要是加入自己配置的自配置文件目录和注释所有的server主机
编写zabbix网页配置文件
[root@ansz.quan.bbs extra]$pwd
/usr/local/nginx/conf/extra
[root@ansz.quan.bbs conf]$mkdir extra
[root@ansz.quan.bbs conf]$ls
extra                 fastcgi_params.default  mime.types.default  scgi_params.default
fastcgi.conf          koi-utf                 nginx.conf          uwsgi_params
fastcgi.conf.default  koi-win                 nginx.conf.default  uwsgi_params.default
fastcgi_params        mime.types              scgi_params         win-utf
[root@ansz.quan.bbs conf]$cd extra/
[root@ansz.quan.bbs extra]$vim zabbix.conf

server {
listen 8027;
server_name zabbix.quan.com;
access_log /data/zabbix/logs/zabbix.quan.com.access.log main;
index index.html index.php index.html;
root /usr/local/nginx/html/;#网页主目录

location /{
       try_files $uri $uri/ /index.php?$args;
}
location ~ ^(.+.php)(.*)$ {
       fastcgi_split_path_info ^(.+.php)(.*)$;
       include fastcgi.conf;
       fastcgi_pass 127.0.0.1:9000;
       fastcgi_index index.php;
       fastcgi_param PATH_INFO $fastcgi_path_info;
}
}
复制网页程序到网页主目录:
[root@ansz.quan.bbs extra]$cp -rp /data/packages/zabbix-4.4.5/frontends/php/* /usr/local/nginx/html/
[root@ansz.quan.bbs extra]$chown nginx:nginx /usr/local/nginx/html/*
修改zabbix配置文件
[root@ansz.quan.bbs etc]$vim zabbix_server.conf
主要的修改有:
ListenPort=8000
LogFile=/data/zabbix/logs/zabbix_server.log
DBHost=localhost
DBName=zabbix
DBPassword=zabbix2004
DBSocket=/data/mysql/data/mysql.sock
加入开机自启动
[root@ansz.quan.bbs tru64]$cp /data/packages/zabbix-4.4.5/misc/init.d/tru64/zabbix_server /etc/init.d/zabbix_server
[root@ansz.quan.bbs tru64]$chmod +x /etc/init.d/zabbix_server
[root@ansz.quan.bbs init.d]$vim /etc/init.d/zabbix_server
在第二行加入:
#chkconfig: 2345 10 90
[root@ansz.quan.bbs init.d]$chkconfig --add zabbix_server
[root@ansz.quan.bbs init.d]$chkconfig zabbix_server on

agent也是这样,这里就不演示了
启动可能报错的原因:
启动成功后网页访问IP:8000
可能会遇到:
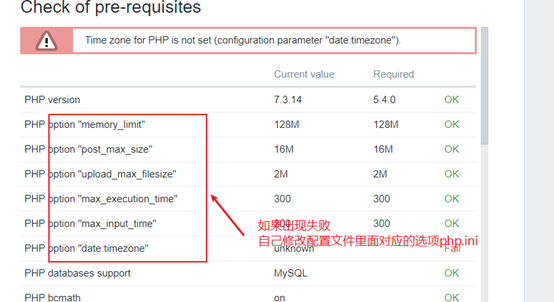
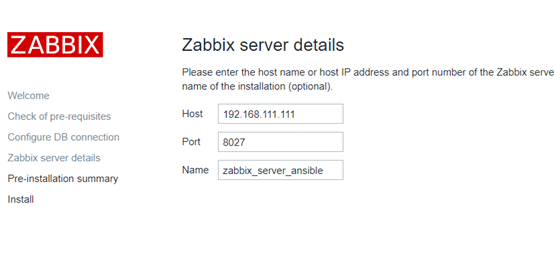
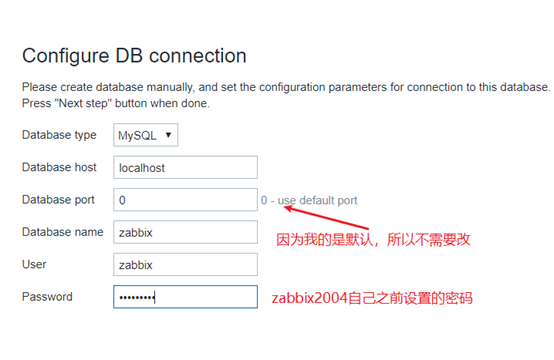
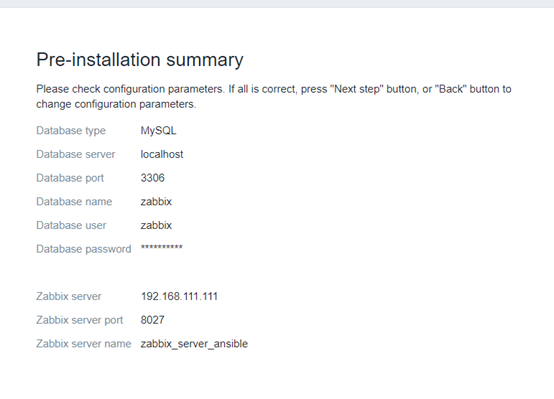
最后成功: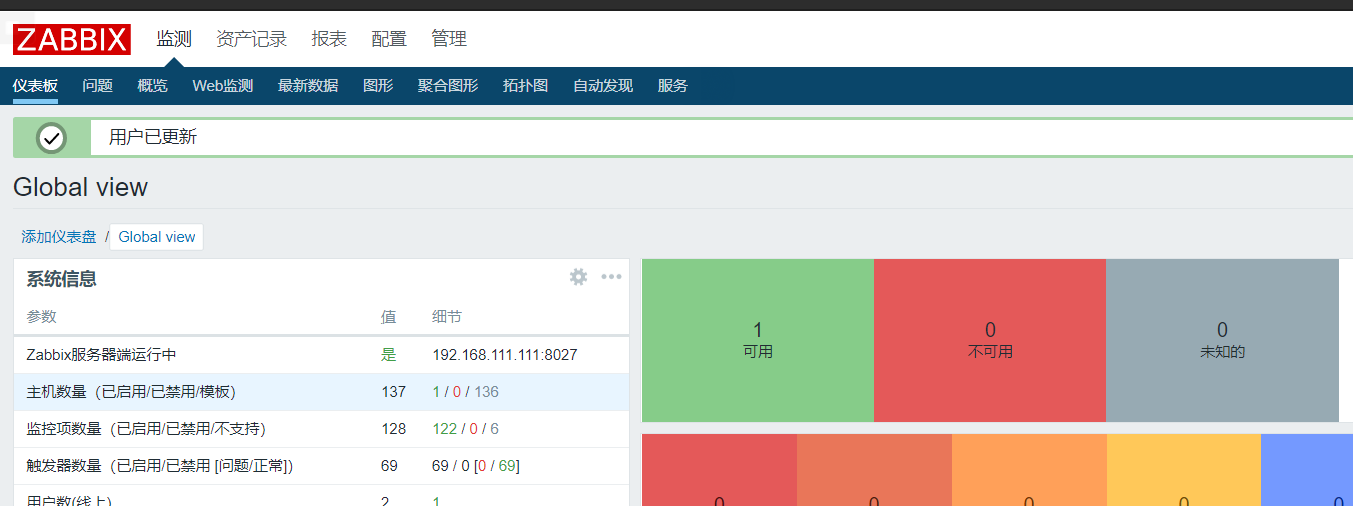
可能遇到的问题:
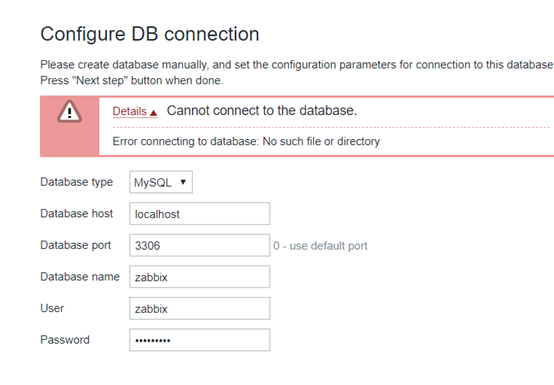
先查看日志文件是上面原因先
[root@ansz.quan.bbs zabbix]$tail  /data/zabbix/logs/zabbix_server.log.old
 24924:20200211:115314.349 [Z3001] connection to database 'zabbix' failed: [2002] Can't connect to local MySQL server through socket '/data/mysql/mysql.sock' (2)
 24924:20200211:115314.349 database is down: reconnecting in 10 seconds
 24924:20200211:115324.350 [Z3001] connection to database 'zabbix' failed: [2002] Can't connect to local MySQL server through socket '/data/mysql/mysql.sock' (2)
 24924:20200211:115324.350 database is down: reconnecting in 10 seconds
 24924:20200211:115334.351 [Z3001] connection to database 'zabbix' failed: [2002] Can't connect to local MySQL server through socket '/data/mysql/mysql.sock' (2)
 24924:20200211:115334.351 database is down: reconnecting in 10 seconds
 24924:20200211:115344.351 [Z3001] connection to database 'zabbix' failed: [2002] Can't connect to local MySQL server through socket '/data/mysql/mysql.sock' (2)
 24924:20200211:115344.351 database is down: reconnecting in 10 seconds
 24924:20200211:115354.352 [Z3001] connection to database 'zabbix' failed: [2002] Can't connect to local MySQL server through socket '/data/mysql/mysql.sock' (2)
 24924:20200211:115354.352 database is down: reconnecting in 10 seconds
找不到mysql的socket所以才configure不了
解决:
修改配置文件里面的DBSocket=/var/lib/mysql/mysql.sock #,用户连接数据库所用的sock位置
自己安装自己知道,不知道就用命令去查看:
ps aux|grep


[root@ansz.quan.bbs zabbix]$ps aux |grep mysql
root       1301  0.0  0.1 108320  1688 ?        S    Feb14   0:00 /bin/sh /usr/local/mysql/bin/mysqld_safe --datadir=/data/mysql/data --pid-file=/data/mysql/pids/mysql.pid
mysql      2891  0.3 16.7 944124 167784 ?       Sl   Feb14  13:21 /usr/local/mysql/bin/mysqld --basedir=/usr/local/mysql --datadir=/data/mysql/data
--plugin-dir=/usr/local/mysql/lib/plugin --user=mysql --log-error=/data/mysql/logs/mysql-error.log --open-files-limit=65535 --pid-file=/data/mysql/pids/mysql.pid
--socket=/data/mysql/data/mysql.sock --port=3306
root      52667  0.0  0.0 103328   896 pts/0    S+   10:10   0:00 grep mysql
将变量修改为上面红色部分的sock即可
如果还是不行,那就修改php配置文件:
[root@ansz.quan.bbs zabbix]$vim /usr/local/php/lib/php.ini
mysqli.default_socket =/data/mysql/data/mysql.sock  #改成自己环境下的mysql sock

注意:因为我编译安装php的时候,是使用mysqli参数的,所以修改的变量是mysqlI.default_socker
重启php即可
成功之后可能遇到的问题:
zabbix-server报错zabbix server is not running
zabbix本机并没有连接上
查看端口是否开启,修改zabbix_server的默认端口,与其他端口不冲突就行
注意(这里是成功之后的了),此端口和nginx开放管理zabbix_server的端口是不一样的,所以注意查看
[root@ansz.quan.bbs zabbix]$netstat -tunlp
Active Internet connections (only servers)
Proto Recv-Q Send-Q Local Address               Foreign Address             State       PID/Program name
tcp        0      0 0.0.0.0:8000                0.0.0.0:*                   LISTEN      10625/nginx
tcp        0      0 0.0.0.0:10050               0.0.0.0:*                   LISTEN      3305/zabbix_agentd
tcp        0      0 127.0.0.1:9000              0.0.0.0:*                   LISTEN      1256/php-fpm
tcp        0      0 0.0.0.0:3306                0.0.0.0:*                   LISTEN      2891/mysqld
tcp        0      0 0.0.0.0:20042               0.0.0.0:*                   LISTEN      1274/sshd
tcp        0      0 0.0.0.0:8027                0.0.0.0:*                   LISTEN      39319/zabbix_server
tcp        0      0 :::20042                    :::*                        LISTEN      1274/sshd
问题:
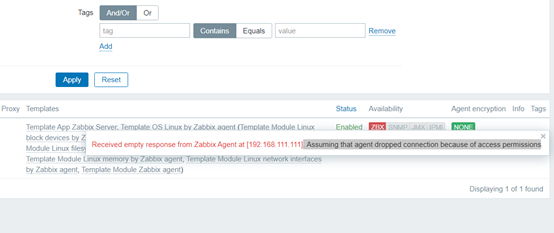
修改agent配置文件;
[root@ansz.quan.bbs zabbix]$vim /usr/local/zabbix/etc/zabbix_agentd.conf
主要修改的内容:
LogFile=/data/zabbix/logs/zabbix_agentd.log
Server=127.0.0.1  #zabbix server主机IP
ServerActive=127.0.0.1
Hostname=ansz.quan.bbs  #用于zabbix网页配置主机中主机名的选项相对应
注意查看主机名与网页端是否一致:
主机名称(这个主机名称需要和zabbix_agentd.conf中配置的Hostname相同)
可见的名称,可以使用中文,用于显示在zabbix监控主机列表中
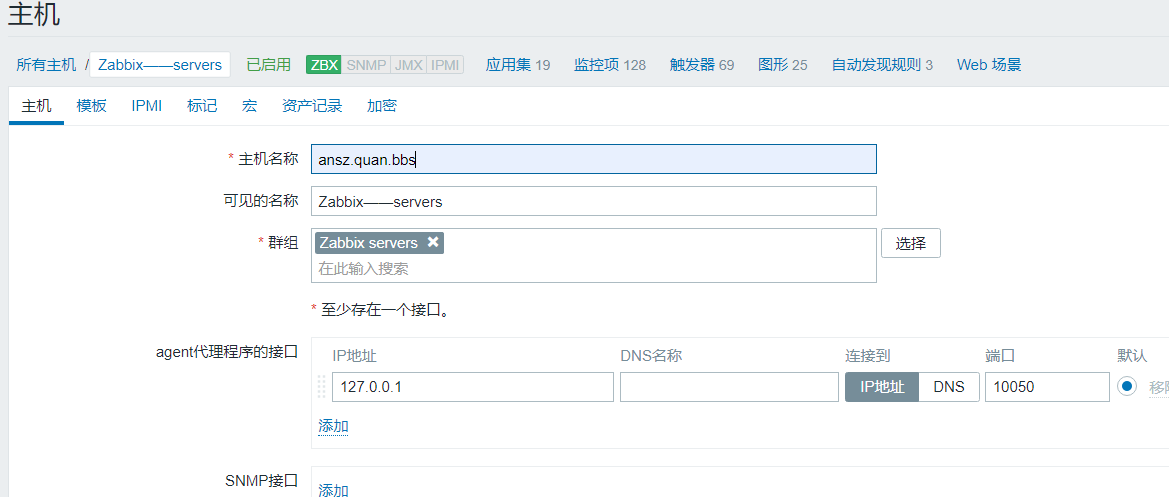
重启即可
[root@ansz.quan.bbs logs]$service zabbix_agentd start
Zabbix agent started.
#这里附上zabbix配置文件的主要含义:
1.zabbix_server的配置文件:

 NodeID=0 #分布式节点id号,0代表是独立服务器,默认是被注释掉的
ListenPort=10051 #zabbix server的端口,默认是10051
SourceIP= #连接的源ip地址,默认为空,默认即可
LogFile=/tmp/zabbix_server.log #日志文件的存放位置
LogFileSize=1 #日志文件的大小,单位为MB,当设置为0时,表示不仅行日志轮询, 默认设置为1,默认即可
DebugLevel=3 #指定调试级别,默认即可
PidFile=/tmp/zabbix_server.pid #pid文件的存放位置
DBHost=localhost #数据库主机名,当设置为localhost时,连接mysql通过sock
DBName=zabbix #指定存放zabbix数据数据库的名字 (必须要配置)
DBUser=zabbix #指定连接数据库的用户名 (必须要配置)
DBPassword=zabbix #用户连接数据库需要的密码 (必须要配置)
DBSocket=/var/lib/mysql/mysql.sock #前文主机设置为localhost,用户连接数据库所用的sock位置,
DBPort=3306 #数据库的端口号,当用sock连接时,无关紧要,当通过网络连接时需设置
StartPollers=5 #默认即可
StartIPMIPollers=0 #使用IPMI协议时,用到的参数
StartTrappers=5 #打开的进程数
StartPingers=1
StartDiscoverers=1
StartHTTPPollers=1
StartHTTPPollers=1
JavaGateway=127.0.0.1 #JavaGateway的ip地址或主机名
JavaGatewayPort=10052 #JavaGateway的端口号
StartJavaPollers=5 #开启连接javagatey的进程数
SNMPTrapperFile=/tmp/zabbix_traps.tmp
StartSNMPTrapper=0 #如果设置为1,snmp trapper进程就会开启
ListenIP=0.0.0.0 #监听来自trapper的ip地址
ListenIP=127.0.0.1
HousekeepingFrequency=1 #zabbix执行Housekeeping的频率,单位为hours
MaxHousekeeperDelete=500 #每次最多删除历史数据的行
SenderFrequency=30 #zabbix试图发送未发送的警报的时间,单位为秒
CacheSize=8M #缓存的大小
CacheUpdateFrequency=60#执行更新缓存配置的时间,单位为秒数
StartDBSyncers=4
HistoryCacheSize=8M
TrendCacheSize=4M
HistoryTextCacheSize=16M
NodeNoEvents=0
NodeNoHistory=0
Timeout=3  #超时时间,自定义键值时如果执行时间较长需要调整此参数
TrapperTimeout=300
UnreachablePeriod=45
UnavailableDelay=60
UnreachableDelay=15
AlertScriptsPath=/usr/local/zabbix/shell #脚本的存放路径
FpingLocation=/usr/local/sbin/fping #fping指令的绝对路径
SSHKeyLocation=
LogSlowQueries=0
TmpDir=/tmp
Include=/usr/local/etc/zabbix_server.general.conf
Include=/usr/local/etc/zabbix_server.conf.d/ #子配置文件路径
StartProxyPollers=1 #在zabbix proxy被动模式下用此参数
ProxyConfigFrequency=3600
ProxyDataFrequency=1


2.zabbix_agentd的配置文件

PidFile=/tmp/zabbix_agentd.pid #pid文件的存放位置
LogFile=/tmp/zabbix_agentd.log #日志文件的位置
LogFileSize=10 #当日志文件达到多大时进行轮询操作
DebugLevel=3 #日志信息级别
SourceIP= #连接的源ip地址,默认为空
EnableRemoteCommands=0 #是否允许zabbix server端的远程指令, 0表示不允许, 1表示允许
LogRemoteCommands=0 #是否开启日志记录shell命令作为警告 0表示不允许,1表示允许
Server=127.0.0.1 #zabbix server的ip地址或主机名,可同时列出多个,需要用逗号隔开
ListenPort=10050 #zabbix agent监听的端口
ListenIP=0.0.0.0 #zabbix agent监听的ip地址
StartAgents=3 #zabbix agent开启进程数
ServerActive=127.0.0.1 #开启主动检查
Hostname=Zabbix server #在zabbix server前端配置时指定的主机名要相同,最重要的配置
RefreshActiveChecks=120 #主动检查刷新的时间,单位为秒数
BufferSend=5 #数据缓冲的时间
BufferSize=100 #zabbix agent数据缓冲区的大小,当达到该值便会发送所有的数据到zabbix server
MaxLinesPerSecond=100 #zabbix agent发送给zabbix server最大的数据行
AllowRoot=0 #是否允许zabbix agent 以root用户运行
Timeout=3 #设定处理超时的时间
Include=/usr/local/etc/zabbix_agentd.userparams.conf
Include=/usr/local/etc/zabbix_agentd.conf.d/ #包含子配置文件的路径
UnsafeUserParameters=0 #是否允许所有字符参数的传递
UserParameter= #指定用户自定义参数


3.zabbix_proxy的配置文件

Server=192.168.100.100 #指定zabbix server的ip地址或主机名
Hostname=zabbix-proxy-1.35 #定义监控代理的主机名,需和zabbix server前端配置时指定的节点名相同
LogFile=/tmp/zabbix_proxy.log #指定日志文件的位置
PidFile=/tmp/zabbix_proxy.pid #pid文件的位置
DBName=zabbix_proxy #数据库名
DBUser=zabbix #连接数据库的用户
DBPassword=zabbix#连接数据库用户的密码
ConfigFrequency=60 #zabbix proxy从zabbix server取得配置数据的频率
DataSenderFrequency=60 #zabbix proxy发送监控到的数据给zabbix server的频率
zabbix4.4.5彻底汉化
如果只是简单的在管理页面进行汉化,

在图形显示的时候会出现乱码:
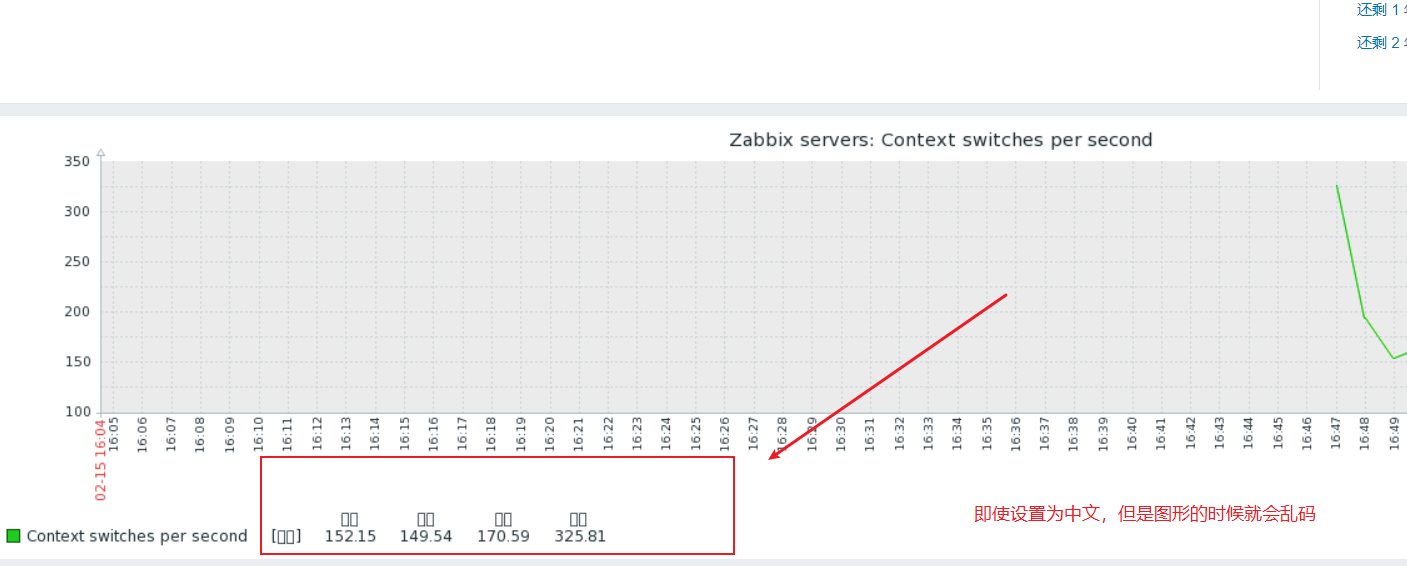
必须通过下面方式进行修改:
zabbix4.4.5的路径和3.X的路径是不一样的了,
4.4.5的路径是在web设置目录下的assets/fonts下
在这里我是的字体存放路径是
/usr/local/nginx/html/assets/fonts
[root@ansz.quan.bbs fonts]$cd /usr/local/nginx/html/assets/fonts
[root@ansz.quan.bbs fonts]$ls
DejaVuSans.ttf
默认只有这个字体,我们需要在我们的windows电脑上传字体

[root@ansz.quan.bbs fonts]$ls
DejaVuSans.ttf  simhei.ttf
最好选后缀为ttf的上传,因为默认的也ttf后缀
记得修改权限:
[root@ansz.quan.bbs html]$chown -R nginx:nginx fronts
修改环境php文件
[root@ansz.quan.bbs include]$cd /usr/local/nginx/html/include/
[root@ansz.quan.bbs include]$vim locales.inc.php

修改的地方是,将下面的cs_CZ对应的display改为true
function getLocales() {
        return [
                'en_GB' => ['name' => _('English (en_GB)'),     'display' => true],
                'en_US' => ['name' => _('English (en_US)'),     'display' => true],
                'bg_BG' => ['name' => _('Bulgarian (bg_BG)'),   'display' => false],
                'ca_ES' => ['name' => _('Catalan (ca_ES)'),     'display' => false],
                'zh_CN' => ['name' => _('Chinese (zh_CN)'),     'display' => true],
                'zh_TW' => ['name' => _('Chinese (zh_TW)'),     'display' => false],
                'cs_CZ' => ['name' => _('Czech (cs_CZ)'),       'display' => true],
[root@ansz.quan.bbs include]$vim defines.inc.php

修改的地方:
11111
define('ZBX_GRAPH_FONT_NAME',           'simhei'); // font file name

22222
define('ZBX_FONT_NAME', 'simhei');

上面simhei就是我上传的字体的不带后缀的名字,
重启生效即可
如图
