CentOS7远程连接及无法连接互联网问题解决
问题描述
在 VMware 中安装了 CentOS7 后,出现以下问题:
- 无 eth0 网卡信息:通过
ifconfig命令查看网卡信息,只看到ens33和lo两个网卡,没有教程中的eth0网卡;
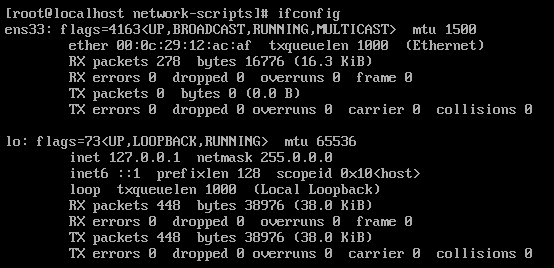
- ens33 网卡无 IP 地址:通过
ifconfig命令看到的网卡信息中,ens33 网卡没有显示 IP 地址信息; - 无法通过远程工具连接虚拟机:IP地址都不知道,不知道怎么去连接。
- 无法连接互联网:通过
ping www.baidu.com和ping 14.215.177.38(百度的 ip 地址)命令无法 ping 通百度

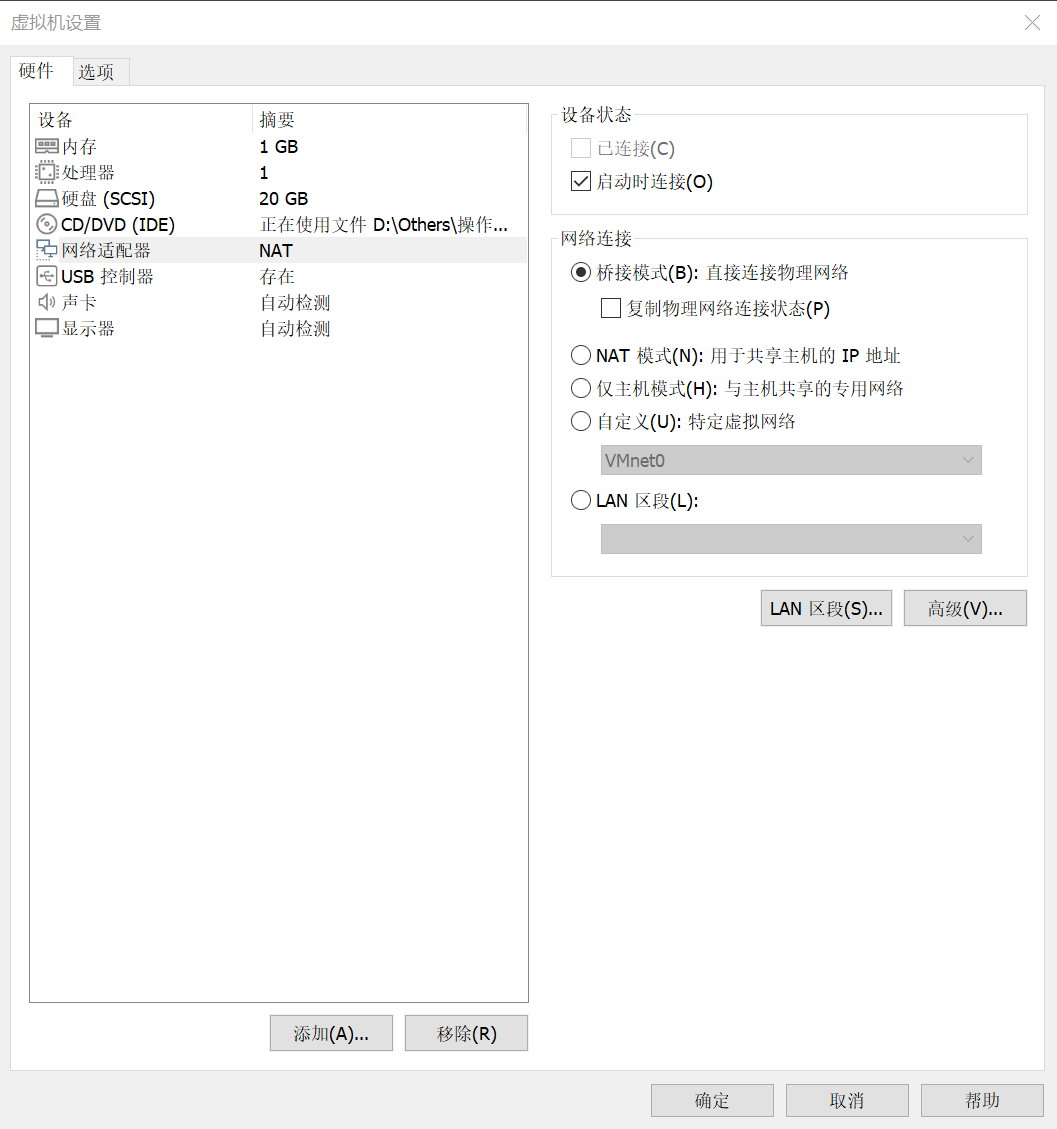
在虚拟机设置中,可以看到,我使用的是【桥接模式】。
问题原因
目前的主流网卡为使用以太网络协定所开发出来的以太网卡 (Ethernet),因此我们 Linux 就称呼这种网络接口为 ethN( N 为数字)。举例来说,主机上面有一张以太网卡,因此主机的网络接口就是 eth0 (第一张为 0 号开始)。
新的 CentOS 7 开始对于网卡的编号有另一套规则,网卡的界面代号与网卡的来源有关,网卡名称会是这样分类的:
eno1:代表由主板 BIOS 内置的网卡ens1:代表由主板 BIOS 内置的 PCI-E 界面的网卡enp2s0:代表 PCI-E 界面的独立网卡,可能有多个插孔,因此会有 s0, s1... 的编号eth0:如果上述的名称都不适用,就回到原本的默认网卡编号
为什么不显示 ip,不能连接互联网呢?文章没有说清楚,我目前也不知道。
解决方案
通过修改网卡配置文件及 GRUB 配置,步骤如下:
编辑网卡配置文件
修改 /etc/sysconfig/network-scripts/ 目录下的 ifcfg-ens33 文件
[root@localhost ~]# vi /etc/sysconfig/network-scripts/ifcfg-ens33
修改前内容为
TYPE=Ethernet
PROXY_METHOD=none
BROWSER_ONLY=no
BOOTPROTO=dhcp
DEFROUTE=yes
IPV4_FAILURE_FATAL=no
IPV6INIT=yes
IPV6_AUTOCONF=yes
IPV6_DEFROUTE=yes
IPV6_FAILURE_FATAL=no
IPV6_ADDR_GEN_MODE=stable-privacy
NAME=ens33
UUID=669ea781-3dd9-46de-a539-83c14e63e9c1
DEVICE=ens33
ONBOOT=no
将 NAME=ens33 修改为 NAME=eth0
将 DEVICE=ens33 修改为 DEVICE=eth0
将 ONBOOT=no 修改为 ONBOOT=yes
修改后的内容为:
TYPE=Ethernet
PROXY_METHOD=none
BROWSER_ONLY=no
BOOTPROTO=dhcp
DEFROUTE=yes
IPV4_FAILURE_FATAL=no
IPV6INIT=yes
IPV6_AUTOCONF=yes
IPV6_DEFROUTE=yes
IPV6_FAILURE_FATAL=no
IPV6_ADDR_GEN_MODE=stable-privacy
NAME=eth0    # 从ens33修改为eth0
UUID=669ea781-3dd9-46de-a539-83c14e63e9c1
DEVICE=eth0    # 从ens33修改为eth0
ONBOOT=yes    # 从no修改为yes
重命名网卡配置文件
将配置文件 ifcfg-ens33 重命名为 ifcfg-eth0
[root@localhost ~]# cd /etc/sysconfig/network-scripts/
[root@localhost network-scripts]# mv ifcfg-ens33 ifcfg-eth0
编辑/etc/default/grub
[root@localhost network-scripts]# vi /etc/default/grub
编辑前内容为:
GRUB_TIMEOUT=5
GRUB_DISTRIBUTOR="$(sed 's, release .*$,,g' /etc/system-release)"
GRUB_DEFAULT=saved
GRUB_DISABLE_SUBMENU=true
GRUB_TERMINAL_OUTPUT="console"
GRUB_CMDLINE_LINUX="crashkernel=auto rd.lvm.lv=centos/root rd.lvm.lv=centos/swap rhgb quiet"
GRUB_DISABLE_RECOVERY="true"
在 GRUB_CMDLINE_LINUX 中加入 net.ifnames=0 biosdevname=0
编辑后内容为:
GRUB_TIMEOUT=5
GRUB_DISTRIBUTOR="$(sed 's, release .*$,,g' /etc/system-release)"
GRUB_DEFAULT=saved
GRUB_DISABLE_SUBMENU=true
GRUB_TERMINAL_OUTPUT="console"
# 在 `GRUB_CMDLINE_LINUX` 中加入 `net.ifnames=0 biosdevname=0`
GRUB_CMDLINE_LINUX="crashkernel=auto net.ifnames=0 biosdevname=0 rd.lvm.lv=centos/root rd.lvm.lv=centos/swap rhgb quiet"
GRUB_DISABLE_RECOVERY="true"
重新生成 GRUB 配置并更新内核参数
运行命令 grub2-mkconfig -o /boot/grub2/grub.cfg 来重新生成GRUB配置并更新内核参数。
[root@localhost default]# grub2-mkconfig -o /boot/grub2/grub.cfg
Generating grub configuration file ...
Found linux image: /boot/vmlinuz-3.10.0-1160.el7.x86_64
Found initrd image: /boot/initramfs-3.10.0-1160.el7.x86_64.img
Found linux image: /boot/vmlinuz-0-rescue-8414451e7d30406e8755042a0008c984
Found initrd image: /boot/initramfs-0-rescue-8414451e7d30406e8755042a0008c984.img
done
重启系统
检查配置
通过 ifconfig 查看网卡信息:
[root@localhost ~]# ifconfig
eth0: flags=4163<UP,BROADCAST,RUNNING,MULTICAST>  mtu 1500
        inet 192.168.2.103  netmask 255.255.255.0  broadcast 192.168.2.255
        inet6 fe80::ac41:e519:7a7a:40d8  prefixlen 64  scopeid 0x20<link>
        ether 00:0c:29:12:ac:af  txqueuelen 1000  (Ethernet)
        RX packets 197  bytes 18805 (18.3 KiB)
        RX errors 0  dropped 0  overruns 0  frame 0
        TX packets 106  bytes 16380 (15.9 KiB)
        TX errors 0  dropped 0 overruns 0  carrier 0  collisions 0

lo: flags=73<UP,LOOPBACK,RUNNING>  mtu 65536
        inet 127.0.0.1  netmask 255.0.0.0
        inet6 ::1  prefixlen 128  scopeid 0x10<host>
        loop  txqueuelen 1000  (Local Loopback)
        RX packets 64  bytes 5568 (5.4 KiB)
        RX errors 0  dropped 0  overruns 0  frame 0
        TX packets 64  bytes 5568 (5.4 KiB)
        TX errors 0  dropped 0 overruns 0  carrier 0  collisions 0
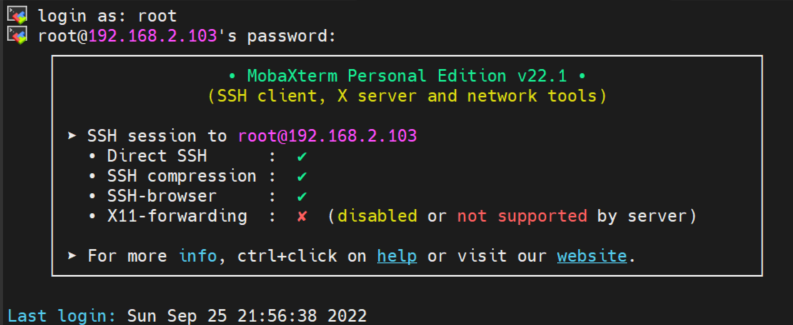
通过 Mobaxterm 远程连接虚拟机
连接互联网测试:
[root@localhost ~]# ping www.baidu.com
PING www.a.shifen.com (14.215.177.39) 56(84) bytes of data.
64 bytes from 14.215.177.39 (14.215.177.39): icmp_seq=1 ttl=54 time=41.3 ms
64 bytes from 14.215.177.39 (14.215.177.39): icmp_seq=2 ttl=54 time=38.2 ms
64 bytes from 14.215.177.39 (14.215.177.39): icmp_seq=3 ttl=54 time=54.6 ms
64 bytes from 14.215.177.39 (14.215.177.39): icmp_seq=4 ttl=54 time=42.0 ms
64 bytes from 14.215.177.39 (14.215.177.39): icmp_seq=5 ttl=54 time=33.0 ms
参考资料:

 浙公网安备 33010602011771号