springboot默认提供的ThreadPoolTaskExecutor
1、了解与使用
ThreadPoolTaskExecutor是springboot提供的默认线程池 。也就是说如果没有自定义线程池,那么会自动装配这个默认的。
In the absence of an Executor bean in the context, Spring Boot auto-configures a ThreadPoolTaskExecutor with sensible defaults that can be automatically associated to asynchronous task execution (@EnableAsync) and Spring MVC asynchronous request processing.
在springboot当中,根据 官方文档的说明,如果没有配置线程池的话,springboot会自动配置一个ThreadPoolTaskExecutor 线程池到bean当中,我们只需要按照他的方式调用就可以了!!
PS:
ThreadPoolExecutor:这个是JAVA自己实现的线程池执行类,基本上创建线程池都是通过这个类进行的创建!
ThreadPoolTaskExecutor :这个是springboot基于ThreadPoolExecutor实现的一个线程池执行类。
这是默认提供的几个配置参数看一下
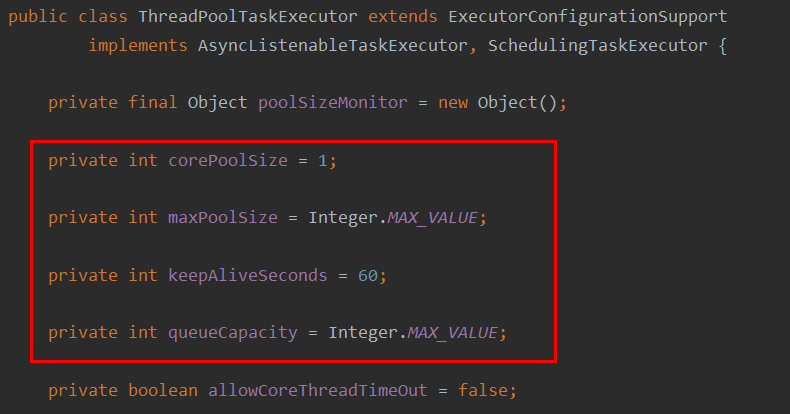
拒绝策略默认是超出后抛出RejectedExecutionException异常并直接丢弃。
可通过配置文件修改默认配置

# 核心线程数
spring.task.execution.pool.core-size=8
# 最大线程数
spring.task.execution.pool.max-size=16
# 空闲线程存活时间
spring.task.execution.pool.keep-alive=60s
# 是否允许核心线程超时
spring.task.execution.pool.allow-core-thread-timeout=true
# 线程队列数量
spring.task.execution.pool.queue-capacity=100
# 线程关闭等待
spring.task.execution.shutdown.await-termination=false
spring.task.execution.shutdown.await-termination-period=
# 线程名称前缀
spring.task.execution.thread-name-prefix=task-
package com.xiaotong.cleandata.config;

import org.springframework.beans.factory.annotation.Value;
import org.springframework.boot.context.properties.ConfigurationProperties;
import org.springframework.context.annotation.Bean;
import org.springframework.context.annotation.Configuration;
import org.springframework.scheduling.concurrent.ThreadPoolTaskExecutor;

/**
 * 自定义线程池配置
 * @date 2021年2月21日14:28:26
 * @author Lvshiyang
 */
@Configuration
@ConfigurationProperties(prefix = "spring.task.execution")
public class ThreadPoolConfiguration {

    @Value("${pool.core-size}")
    private int corePoolSize;

    @Value("${pool.max-size}")
    private int maxPoolSize;

    @Value("${pool.queue-capacity}")
    private int queueCapacity;

    @Value("${pool.keep-alive}")
    private int keepAliveSeconds;

    @Value("${thread-name-prefix}")
    private String threadNamePrefix;

    @Bean(name = "threadPoolTaskExecutor")
    public ThreadPoolTaskExecutor threadPoolTaskExecutor() {
        ThreadPoolTaskExecutor pool = new ThreadPoolTaskExecutor();
        pool.setCorePoolSize(corePoolSize);//核心线程池数
        pool.setMaxPoolSize(maxPoolSize); // 最大线程数
        pool.setQueueCapacity(queueCapacity);//队列容量,当核心线程数达到最大时,新任务会放在队列中排队等待执行
        pool.setKeepAliveSeconds(keepAliveSeconds);//线程空闲时间
        pool.setAllowCoreThreadTimeOut(false);//核心线程会一直存活,即使没有任务需要执行。(默认false)时,核心线程会超时关闭
        pool.setThreadNamePrefix(threadNamePrefix);//线程前缀名称
        //默认:AbortPolicy 丢弃任务,抛运行时异常
        //CallerRunsPolicy由调用线程处理该任务
        pool.setRejectedExecutionHandler(new java.util.concurrent.ThreadPoolExecutor.CallerRunsPolicy());

        return pool;
   }
}
使用方式:
@Resource(name="threadPoolTaskExecutor")
ThreadPoolTaskExecutor threadPoolTaskExecutor;

threadPoolTaskExecutor.execute(() -> {
    //业务代码
});
如果想知道什么时候执行完可搭配CountDownLatch,主线程countDownLatch.await()等待即可。也可以使用待返回参数的Fulture.get()处理。
2、深入springboot默认的线程池
根据官方文档的说明,Spring Boot auto-configures a ThreadPoolTaskExecutor 。最终找到springboot的线程池自动装配类:TaskExecutionAutoConfiguration
    @Bean
    @ConditionalOnMissingBean
    public TaskExecutorBuilder taskExecutorBuilder(TaskExecutionProperties properties, ObjectProvider<TaskExecutorCustomizer> taskExecutorCustomizers, ObjectProvider<TaskDecorator> taskDecorator) {
        Pool pool = properties.getPool();
        TaskExecutorBuilder builder = new TaskExecutorBuilder();
        builder = builder.queueCapacity(pool.getQueueCapacity());
        builder = builder.corePoolSize(pool.getCoreSize());
        builder = builder.maxPoolSize(pool.getMaxSize());
        builder = builder.allowCoreThreadTimeOut(pool.isAllowCoreThreadTimeout());
        builder = builder.keepAlive(pool.getKeepAlive());
        Shutdown shutdown = properties.getShutdown();
        builder = builder.awaitTermination(shutdown.isAwaitTermination());
        builder = builder.awaitTerminationPeriod(shutdown.getAwaitTerminationPeriod());
        builder = builder.threadNamePrefix(properties.getThreadNamePrefix());
        Stream var10001 = taskExecutorCustomizers.orderedStream();
        var10001.getClass();
        builder = builder.customizers(var10001::iterator);
        builder = builder.taskDecorator((TaskDecorator)taskDecorator.getIfUnique());
        return builder;
    }
同时在ThreadPoolTaskExecutor源码当中可以看到线程池的初始化方式是直接调用的ThreadPoolExecutor进行的初始化。
 protected ExecutorService initializeExecutor(ThreadFactory threadFactory, RejectedExecutionHandler rejectedExecutionHandler) {
        BlockingQueue<Runnable> queue = this.createQueue(this.queueCapacity);
        ThreadPoolExecutor executor;
        if (this.taskDecorator != null) {
            executor = new ThreadPoolExecutor(this.corePoolSize, this.maxPoolSize, (long)this.keepAliveSeconds, TimeUnit.SECONDS, queue, threadFactory, rejectedExecutionHandler) {
                public void execute(Runnable command) {
                    Runnable decorated = ThreadPoolTaskExecutor.this.taskDecorator.decorate(command);
                    if (decorated != command) {
                        ThreadPoolTaskExecutor.this.decoratedTaskMap.put(decorated, command);
                    }

                    super.execute(decorated);
                }
            };
        } else {
            executor = new ThreadPoolExecutor(this.corePoolSize, this.maxPoolSize, (long)this.keepAliveSeconds, TimeUnit.SECONDS, queue, threadFactory, rejectedExecutionHandler);
        }

        if (this.allowCoreThreadTimeOut) {
            executor.allowCoreThreadTimeOut(true);
        }

        this.threadPoolExecutor = executor;
        return executor;
    }
同时会发现默认的线程池拒绝策略是: AbortPolicy 直接抛出异常!!!
private RejectedExecutionHandler rejectedExecutionHandler = new AbortPolicy();
3、使用自定义的线程池
在默认配置信息里面是没有线程池的拒绝策略设置的方法的,如果需要更换拒绝策略就需要自定义线程池,并且如果项目当中需要多个自定义的线程池,又要如何进行管理呢?
自定义Configuration
第一步:创建一个ThreadPoolConfig 先只配置一个线程池,并设置拒绝策略为CallerRunsPolicy
@Configuration
public class ThreadPoolConfig {

    @Bean("taskExecutor")
    public Executor taskExecutor() {
        ThreadPoolTaskExecutor taskExecutor = new ThreadPoolTaskExecutor();
        //设置线程池参数信息
        taskExecutor.setCorePoolSize(10);
        taskExecutor.setMaxPoolSize(50);
        taskExecutor.setQueueCapacity(200);
        taskExecutor.setKeepAliveSeconds(60);
        taskExecutor.setThreadNamePrefix("myExecutor--");
        taskExecutor.setWaitForTasksToCompleteOnShutdown(true);
        //线程池中任务等待时间,超过等待时间直接销毁
        taskExecutor.setAwaitTerminationSeconds(60);
        //修改拒绝策略为使用当前线程执行
        taskExecutor.setRejectedExecutionHandler(new ThreadPoolExecutor.CallerRunsPolicy());
        //初始化线程池
        taskExecutor.initialize();
        return taskExecutor;
    }
}
4、配置多个自定义线程池
/**
 * @author shf
 * @date 2022-03-14 11:46
 */
@Configuration
public class ThreadPoolConfig {
    /**
     * 核心线程数 默认的核心线程数为1
     */
    private static final int CORE_POOL_SIZE = 2;
    /**
     * 最大线程数 默认的最大线程数是Integer.MAX_VALUE
     */
    private static final int MAX_POOL_SIZE = 20;
    /**
     * 缓冲队列数 默认的缓冲队列数是Integer.MAX_VALUE
     */
    private static final int QUEUE_CAPACITY = 50;
    /**
     * 允许线程空闲时间 默认的线程空闲时间为60秒
     */
    private static final int KEEP_ALIVE_SECONDS = 30;

    @Bean("destroyResource")
    public AsyncTaskExecutor destroyImGroupTaskExecutor() {
        return getAsyncTaskExecutor("del-resource-td-", MAX_POOL_SIZE, QUEUE_CAPACITY);
    }

    @Bean("statisticsData")
    public AsyncTaskExecutor statisticsDataExecutor() {
        return getAsyncTaskExecutor("save-data-td-", MAX_POOL_SIZE, QUEUE_CAPACITY);
    }

    @Bean("commonTaskExecutor")
    public AsyncTaskExecutor get() {
        return getAsyncTaskExecutor("common-ex-td-", MAX_POOL_SIZE, QUEUE_CAPACITY);
    }

    private AsyncTaskExecutor getAsyncTaskExecutor(String threadNamePrefix
        , int MAX_POOL_SIZE, int QUEUE_CAPACITY) {
        ThreadPoolTaskExecutor taskExecutor = new ThreadPoolTaskExecutor();
        taskExecutor.setCorePoolSize(CORE_POOL_SIZE);
        taskExecutor.setMaxPoolSize(MAX_POOL_SIZE);
        taskExecutor.setQueueCapacity(QUEUE_CAPACITY);
        taskExecutor.setKeepAliveSeconds(KEEP_ALIVE_SECONDS);
        taskExecutor.setThreadNamePrefix(threadNamePrefix);
        taskExecutor.setRejectedExecutionHandler(new ThreadPoolExecutor.CallerRunsPolicy());
        return taskExecutor;
    }
}
使用:
@Autowired
ThreadPoolTaskExecutor commonTaskExecutor; //会去匹配 @Bean("commonTaskExecutor") 这个线程池
如果是使用的@Async注解,只需要在注解里面指定bean的名称就可以切换到对应的线程池去了。如下所示:
@Async("commonTaskExecutor")
public void hello(String name){
    logger.info("异步线程启动 started."+name);
}
5、使用异步注解@Async注意事项
总结@Async可能失效的原因
1.@SpringBootApplication启动类当中没有添加@EnableAsync注解。
2.异步方法使用注解@Async的返回值只能为void或者Future。
3.没有走Spring的代理类。因为@Transactional和@Async注解的实现都是基于Spring的AOP,而AOP的实现是基于动态代理模式实现的。那么注解失效的原因就很明显了,有可能因为调用方法的是对象本身而不是代理对象,因为没有经过Spring容器管理。
解决方法:
这里具体说一下第三种情况的解决方法。
1、注解的方法必须是public方法。
2、注解的方法不要定义为static
3、方法一定要从另一个类中调用,也就是从类的外部调用,类的内部调用是无效的。
4、如果需要从类的内部调用,需要先获取其代理类。
参考文章:
https://blog.csdn.net/ycf921244819/article/details/106108904


【推荐】国内首个AI IDE,深度理解中文开发场景,立即下载体验Trae
【推荐】编程新体验,更懂你的AI,立即体验豆包MarsCode编程助手
【推荐】抖音旗下AI助手豆包,你的智能百科全书,全免费不限次数
【推荐】轻量又高性能的 SSH 工具 IShell:AI 加持,快人一步
· Linux系列:如何用 C#调用 C方法造成内存泄露
· AI与.NET技术实操系列(二):开始使用ML.NET
· 记一次.NET内存居高不下排查解决与启示
· 探究高空视频全景AR技术的实现原理
· 理解Rust引用及其生命周期标识(上)
· 物流快递公司核心技术能力-地址解析分单基础技术分享
· .NET 10首个预览版发布:重大改进与新特性概览!
· AI与.NET技术实操系列(二):开始使用ML.NET
· 单线程的Redis速度为什么快?
· Pantheons:用 TypeScript 打造主流大模型对话的一站式集成库
2018-07-09 数据库事务的四大特性以及事务的隔离级别
2018-07-09 订单系统中并发问题和锁机制的探讨