Dokcer
1 简介
前言
容器可以算是当下最流行的技术之一了,那么究竟什么是容器呢?统称来说,容器是一种工具,指的是可以装下其它物品的工具,以方便人类归 纳放置物品、存储和异地运输,具体来说比如人类使用的衣柜、行李箱、背包等都可以成为容器,但今天我们所说的容器是一种 IT 技术。
1.1 docker 简介
1.1.1 docker入门
在前言中提到过容器的概念,接下来要了解的docker技术则是容器的一种实现。Docker 是一个在 2013 年开源的应用程序并且是一个基于 go 语言编写是 一个开源的 PAAS 服务(Platform as a Service,平台即服务的缩写)。用于开发应用、交付(shipping)应用、运行应用。 Docker允许用户将基础设施(Infrastructure)中的应用单独分割出来,形成更小的颗粒(容器),从而提高交付软件的速度。其功能简单点来说就是允许用户将程序及其运行环境打包成镜像,运行在各个版本的操作系统之上。
Docker最早采用 LXC 技术(LinuX Container 的简写,LXC 是 Linux 原生支持的 容器技术,可以提供轻量级的虚拟化,可以说 docker 就是基于 LXC 发展起来 的,提供 LXC 的高级封装,发展标准的配置方法),而虚拟化技术 KVM(Kernelbased Virtual Machine) 基于模块实现,Docker 后改为自己研发并开源的 runc 技 术运行容器。
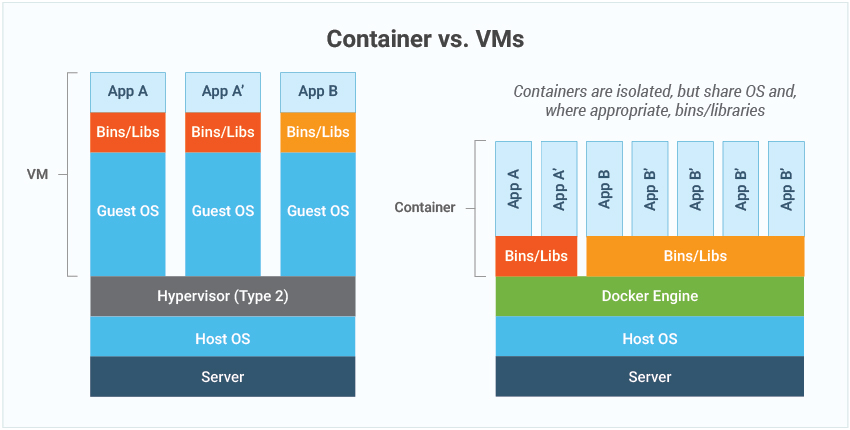
Docker对比虚拟机
-
资源利用率更高:一台物理机可以运行数百个容器,但是一般只能运行数十个 虚拟机。
-
开销更小:不需要启动单独的虚拟机占用硬件资源(空运行的虚拟机占用物理机 6-8%性能)。
-
启动速度更快:可以在数秒内完成启动。
1.1.2 Docker的架构
官方给出的架构图如下
- Docker 主机(Host):一个物理机或虚拟机,用于运行 Docker 服务进程和容器。
- Docker 服务端(Server):Docker 守护进程,运行 docker 容器。
- Docker 客户端(Client):客户端使用 docker 命令或其他工具调用docker API。
- Docker 仓库(Registry): 保存镜像的仓库,类似于git或svn这样的版本控制系
- Docker 镜像(Images):镜像可以理解为创建实例使用的模板。
- Docker 容器(Container): 容器是从镜像生成对外提供服务的一个或一组服务。
当一台宿主机运行了多个容器时,也会带来一些问题,例如:
- 怎么样保证每个容器都有不同的文件系统并且能互不影响?
- 一个 docker 主进程内的各个容器都是其子进程,那么实现同一个主进程下不同类型的子进程?各个进程间通信能相互访问(内存数据)吗?
- 每个容器怎么解决 IP及端口分配的问题?
- 多个容器的主机名能一样吗?
- 每个容器都要不要有 root 用户?怎么解决账户重名问题?
可见要想实现容器并不是一件简单的事情,还有很多问题需要考虑到,下面一起来看看docker是如何解决这些问题的
1.1.3 Linux Namespace 技术
Docker使用了一种名叫 namespaces
技术来实现容器(container)的隔离,当运行容器的时候, Docker 会为容器创建一系列 namespaces.
namespace是 Linux 系统的底层概念,在内核层实现,不同类型的命名空间可以实现不通类型的隔离功能。
MNT Namespace
调用clone()的CLONE_NEWNS参数,容器子进程将放置于新的挂载命名空间(使用chroot 技术把容器锁定到一个指定的运行目录里面),这样容器内不能访问到宿主机的资源。
IPC Namespace
一个容器内的进程间通信,允许一个容器内的不同进程的(内存、缓存等)数据访 问,但是不能夸容器访问其他容器的数据。
UTS Namespace
UTS namespace(UNIX Timesharing System 包含了运行内核的名称、版本、底层 体系结构类型等信息)用于系统标识,其中包含了 hostname 和域名 domainname ,它使得一个容器拥有属于自己 hostname 标识,这个主机名标识 独立于宿主机系统和其上的其他容器。
PID Namespace
Linux 系统中,有一个 PID 为 1 的进程(init/systemd)是其他所有进程的父进程,那么在每个 容器内也要有一个父进程来管理其下属的子进程,那么多个容器的进程通 PID namespace 进程 隔离(比如 PID 编号重复、器内的主进程生成与回收子进程等)。
Net Namespace
每一个容器都类似于虚拟机一样有自己的网卡、监听端口、TCP/IP 协议栈等, Docker 使用 network namespace 启动一个 vethX 接口,这样你的容器将拥有它 自己的桥接 ip 地址,通常是 docker0,而 docker0 实质就是 Linux 的虚拟网桥,网 桥是在 OSI 七层模型的数据链路层的网络设备,通过 mac 地址对网络进行划 分,并且在不同网络直接传递数据。
User Namespace
各个容器内可能会出现重名的用户和用户组名称,或重复的用户 UID 或者 GID,那么怎么隔离各个容器内的用户空间呢? User Namespace 允许在各个宿主机的各个容器空间内创建相同的用户名以及相 同的用户 UID 和 GID,只是会把用户的作用范围限制在每个容器内,即 A 容器 和 B 容器可以有相同的用户名称和 ID 的账户,但是此用户的有效范围仅是当前 容器内,不能访问另外一个容器内的文件系统,即相互隔离、互补影响、永不相见。
Linux control groups
在一个容器,如果不对其做任何资源限制,则宿主机会允许其占用无限大的内 存空间,有时候会因为代码 bug 程序会一直申请内存,直到把宿主机内存占 完,为了避免此类的问题出现,宿主机有必要对容器进行资源分配限制,比如 CPU、内存等,Linux Cgroups 的全称是 Linux Control Groups,它最主要的作用, 就是限制一个进程组能够使用的资源上限,包括 CPU、内存、磁盘、网络带宽等等。此外,还能够对进程进行优先级设置,以及将进程挂起和恢复等操作。
1.1.4 docker进阶
# 创建并进入docker容器
[root@redis1 ~]# docker run -it docker.io/centos bash
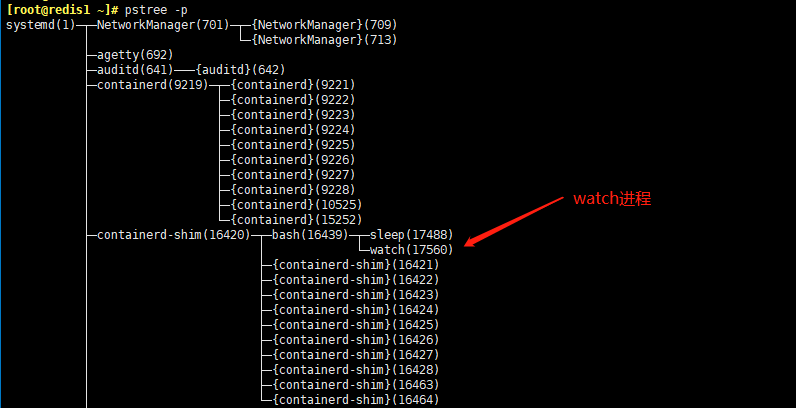
当我们在容器内部启动一个watch进程时,在外部宿主机上也能看见这个进程,只不过他们的PID是不同的。
查看进程树会发现宿主机上的watch进程是一个明未containerd-shim开启的子进程
containerd是什么?为什么docker运行的容器是containerd的进程?
为了保证容器生态的标准性和健康可持续发展,包括 Linux 基金会、Docker、微软、红 帽谷歌和、IBM、等公司在 2015 年 6 月共同成立了一个叫 open container(OCI) 的组织,其目的就是制定开放的标准的容器规范。Docker基于OCI规范实现了runc,它是container runtime的实现,不过在1.11版本,docker将runc集成到了containerd中。
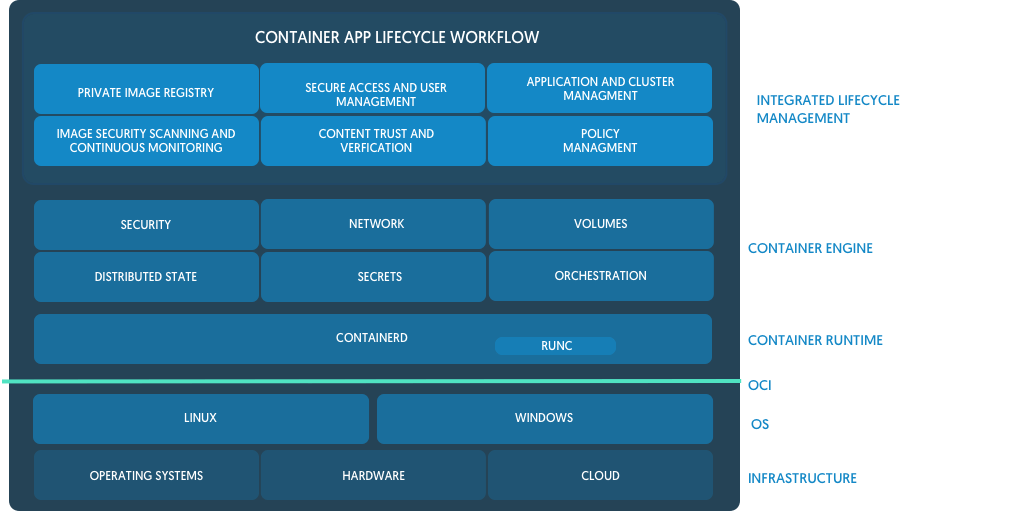
container runtime是容器运行的底层环境。它主要负责从容器仓库加载容器镜像,监控本地系统资源,隔离容器和管理容器。值得注意的是,容器引擎是用来管理单个容器的。docker的结构如下图:
从图中可以看出Docker根据OCI规范将与容器相关系统调用封装到CONTAINED中,让程序通过CONTAINED来管理容器,而不是使用clone() 或 mount() 的系统调用。
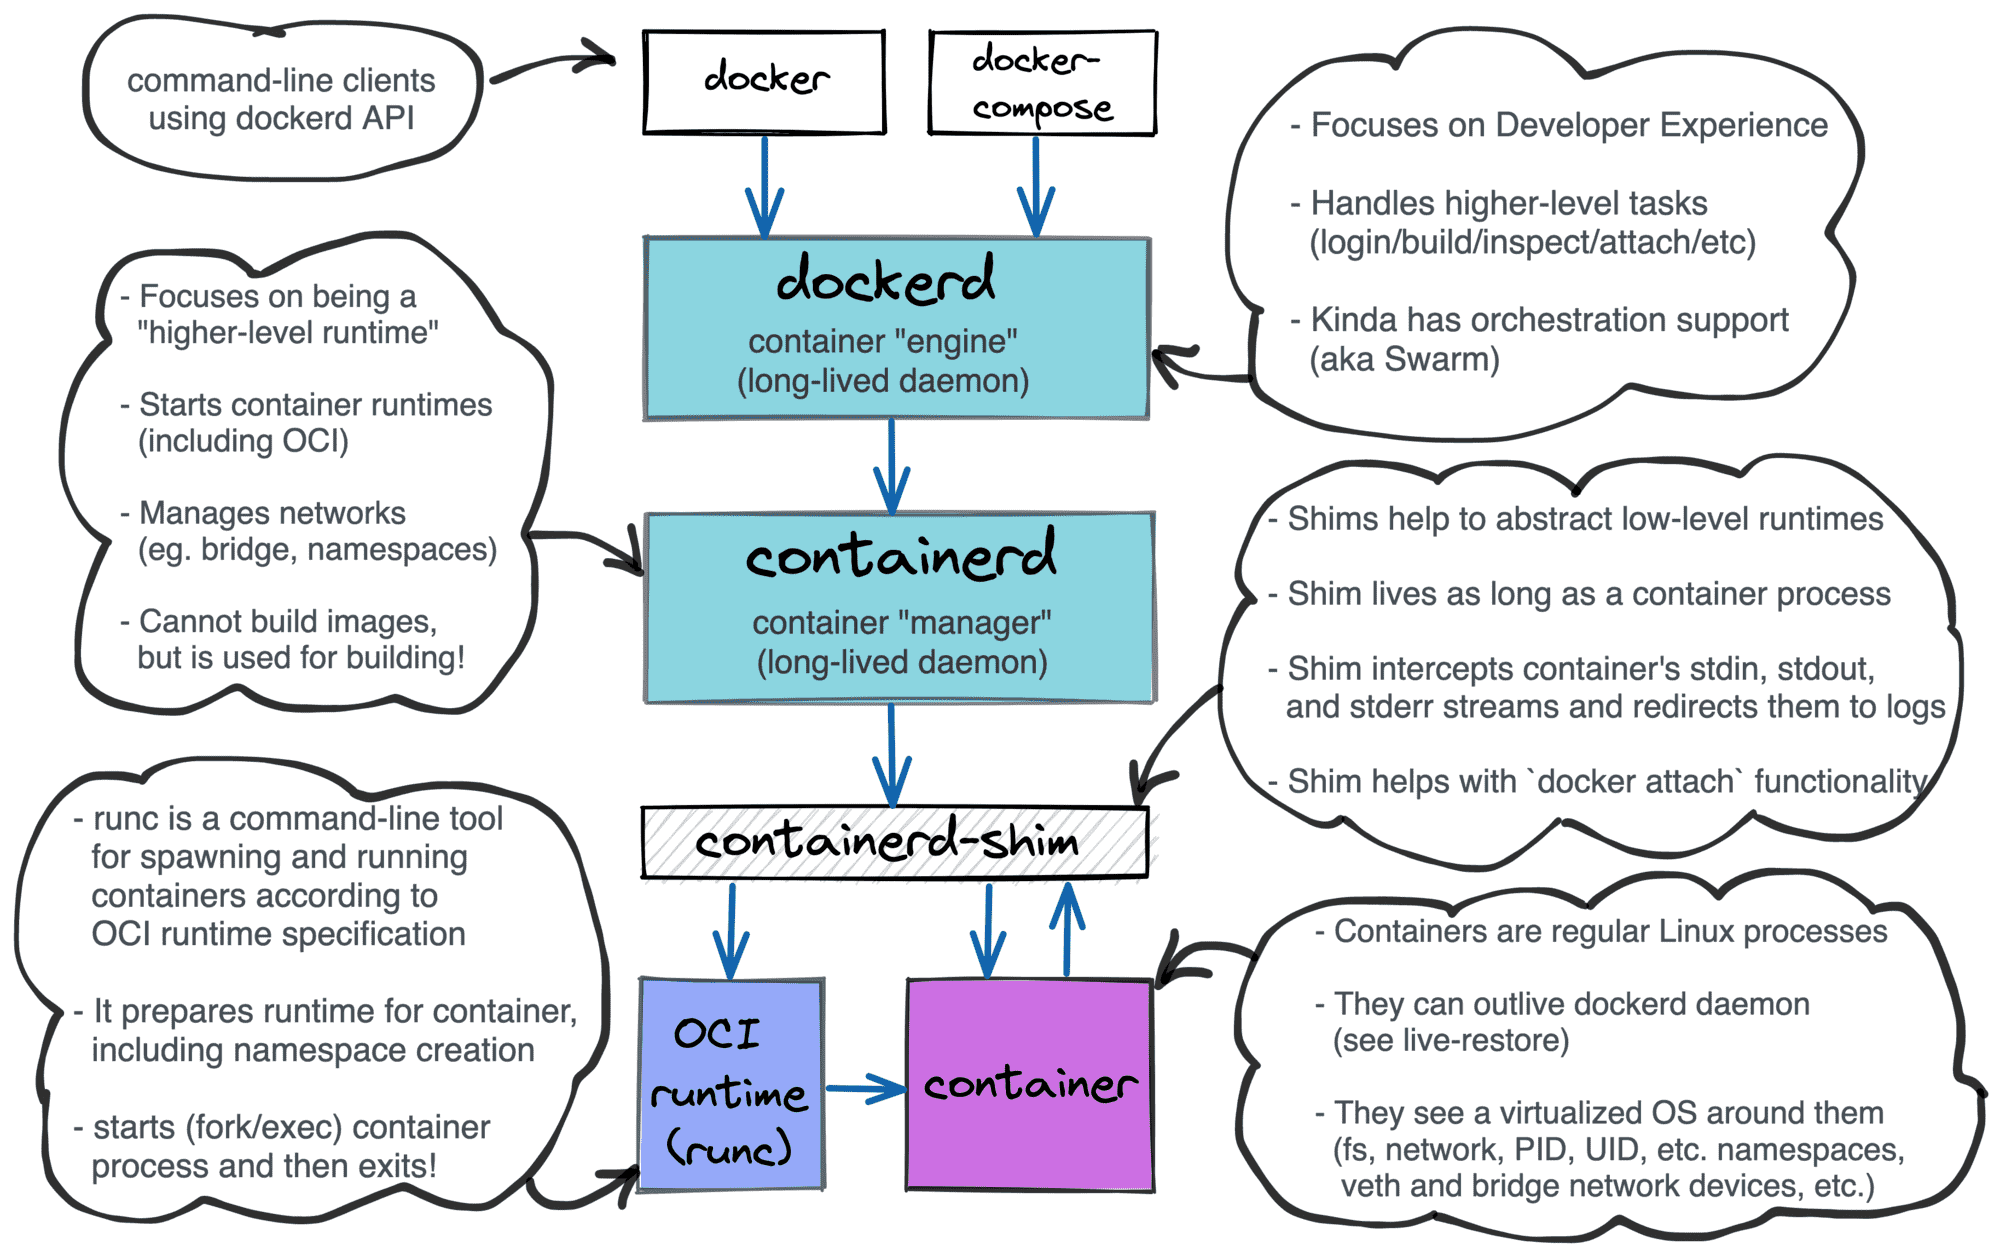
容器的创建与管理过程
通信流程:
1.dockerd 通过 grpc 和 containerd 模块通信(runc)交换,dockerd 和 containerd
通信的 socket 文件:/run/containerd/containerd.sock。
2. containerd 在 dockerd 启动时被启动,然后 containerd 启动 grpc 请求监听,
containerd 处理 grpc 请求,根据请求做相应动作。
/usr/bin/dockerd -H fd:// --containerd=/run/containerd/containerd.sock
3. 若是创建容器,containerd 拉起一个 container-shim 容器进程 , 并进行相应
的创建操作。
4. container-shim 被拉起后,start/exec/create 拉起 runC 进程,通过 exit、control
文件和 containerd 通信,通过父子进程关系和 SIGCHLD(信号)监控容器中进程状
态。
5. 在整个容器生命周期中,containerd 通过 epoll 监控容器文件,监控容器事
件。
使用strace命令追踪containerd
strace -f -p `pidof containerd` -o strace_log
也证明了通信流程确实如此
而且使用了namespace中的unshare API来实现容器隔离。
1.2 docker安装和命令
1.2.1 通过yum 源安装
centos7.9通过阿里镜像安装docker-ce(docker社区版)
# step 1: 安装必要的一些系统工具
sudo yum install -y yum-utils device-mapper-persistent-data lvm2
# Step 2: 添加软件源信息
sudo yum-config-manager --add-repo https://mirrors.aliyun.com/docker-ce/linux/centos/docker-ce.repo
# Step 3
sudo sed -i 's+download.docker.com+mirrors.aliyun.com/docker-ce+' /etc/yum.repos.d/docker-ce.repo
# Step 4: 更新并安装Docker-CE
sudo yum makecache fast
sudo yum -y install docker-ce
# Step 4: 开启Docker服务
sudo service docker start
# Step 1: 查找Docker-CE的版本:
yum list docker-ce.x86_64 --showduplicates | sort -r
# Step2: 安装指定版本的Docker-CE:
sudo yum -y install docker-ce-[VERSION]
查看service文件
[root@redis1 ~]# cat /lib/systemd/system/docker.service
[Unit]
Description=Docker Application Container Engine
Documentation=https://docs.docker.com
After=network-online.target firewalld.service containerd.service
Wants=network-online.target
Requires=docker.socket containerd.service
[Service]
Type=notify
# the default is not to use systemd for cgroups because the delegate issues still
# exists and systemd currently does not support the cgroup feature set required
# for containers run by docker
ExecStart=/usr/bin/dockerd -H fd:// --containerd=/run/containerd/containerd.sock
ExecReload=/bin/kill -s HUP $MAINPID
TimeoutSec=0
RestartSec=2
Restart=always
# Note that StartLimit* options were moved from "Service" to "Unit" in systemd 229.
# Both the old, and new location are accepted by systemd 229 and up, so using the old location
# to make them work for either version of systemd.
StartLimitBurst=3
# Note that StartLimitInterval was renamed to StartLimitIntervalSec in systemd 230.
# Both the old, and new name are accepted by systemd 230 and up, so using the old name to make
# this option work for either version of systemd.
StartLimitInterval=60s
# Having non-zero Limit*s causes performance problems due to accounting overhead
# in the kernel. We recommend using cgroups to do container-local accounting.
LimitNOFILE=infinity
LimitNPROC=infinity
LimitCORE=infinity
# Comment TasksMax if your systemd version does not support it.
# Only systemd 226 and above support this option.
TasksMax=infinity
# set delegate yes so that systemd does not reset the cgroups of docker containers
Delegate=yes
# kill only the docker process, not all processes in the cgroup
KillMode=process
OOMScoreAdjust=-500
[Install]
WantedBy=multi-user.target
查看socket文件
[root@redis1 ~]# cat /lib/systemd/system/docker.socket
[Unit]
Description=Docker Socket for the API
[Socket]
ListenStream=/var/run/docker.sock
SocketMode=0660
SocketUser=root
SocketGroup=docker
[Install]
WantedBy=sockets.target
1.2.2 通过rpm包安装docker
下载rpm包
官方镜像地址:https://download.docker.com/linux/centos/7/x86_64/stable/Packages/
阿里镜像地址:https://mirrors.aliyun.com/docker-ce/linux/static/stable/x86_64/
# 使用yum安装二进制包
[root@redis1 ~]# yum install /usr/local/src/docker-ce-cli-20.10.1-3.el7.x86_64.rpm
1.2.3 服务的启动和验证
[root@redis1 ~]# systemctl start docker
# 查看docker版本
[root@redis1 ~]# docker version
......
Server: Docker Engine - Community
Engine:
Version: 20.10.12
API version: 1.41 (minimum version 1.12)
Go version: go1.16.12
Git commit: 459d0df
Built: Mon Dec 13 11:44:05 2021
OS/Arch: linux/amd64
Experimental: false
containerd:
Version: 1.4.12
GitCommit: 7b11cfaabd73bb80907dd23182b9347b4245eb5d
runc:
Version: 1.0.2
GitCommit: v1.0.2-0-g52b36a2
docker-init:
Version: 0.19.0
GitCommit: de40ad0
# docker开启的虚拟网卡
[root@redis1 ~]# ifconfig
docker0: flags=4099<UP,BROADCAST,MULTICAST> mtu 1500
inet 172.17.0.1 netmask 255.255.0.0 broadcast 172.17.255.255
ether 02:42:b0:d4:66:d9 txqueuelen 0 (Ethernet)
RX packets 0 bytes 0 (0.0 B)
RX errors 0 dropped 0 overruns 0 frame 0
TX packets 0 bytes 0 (0.0 B)
TX errors 0 dropped 0 overruns 0 carrier 0 collisions 0
[root@redis1 ~]# docker info
Client:
Context: default
Debug Mode: false
Plugins:
app: Docker App (Docker Inc., v0.9.1-beta3)
buildx: Docker Buildx (Docker Inc., v0.7.1-docker)
scan: Docker Scan (Docker Inc., v0.12.0)
......
1.2.4 Docker存储引擎
目前 docker 的默认存储引擎为 overlay2,不同的存储引擎需要相应的系统支 持,如需要磁盘分区的时候传递 d-type 文件分层功能,即需要传递内核参数开 启格式化磁盘的时候的指定功能。
存储驱动类型:
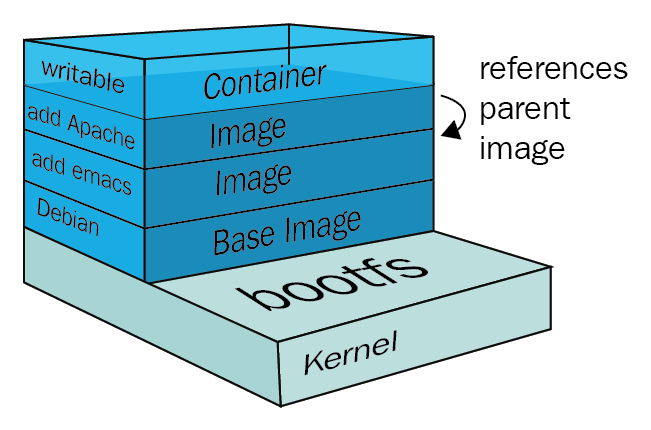
- AUFS(AnotherUnionFS)是一种 Union FS,是文件级的存储驱动。所谓 UnionFS 就是把不同物理位置的目录合并 mount 到同一个目录中。简单来说就是支持将 不同目录挂载到同一个虚拟文件系统下的文件系统。这种文件系统可以一层一 层地叠加修改文件。无论底下有多少层都是只读的,只有最上层的文件系统是 可写的。当需要修改一个文件时,AUFS 创建该文件的一个副本,使用 CoW 将 文件从只读层复制到可写层进行修改,结果也保存在可写层。在 Docker 中,底 下的只读层就是 image,可写层就是 Container,是 Docker 18.06 及更早版本的 首选存储驱动程序,在内核 3.13 上运行 Ubuntu 14.04 时不支持 overlay2。
- Overlay:一种 Union FS 文件系统,Linux 内核 3.18 后支持。
- overlay2: Overlay 的升级版,到目前为止,所有 Linux 发行版推荐使用的存储类型。
- devicemapper:是 CentOS 和 RHEL 的推荐存储驱动程序,因为之前的内核版本不支持 overlay2,但是当前较新版本的 CentOS 和 RHEL 现在已经支持 overlay2, 因此推荐使用 overlay2。
- ZFS(Sun-2005)/btrfs(Oracle-2007):目前没有广泛使用。
- vfs:用于测试环境,适用于无法使用 copy-on-write 文件系统的情况。 此存储 驱动程序的性能很差,通常不建议用于生产。
1.3 Docker 镜像管理
Docker 镜像含里面是一层层文件系统,叫做 Union File System(Union FS 联合 文件系统),2004 年由纽约州立大学石溪分校开发,联合文件系统可以将多个目录挂载到一起从而形成一整个虚拟文件系统,该虚拟文件系统的目录结构就 像普通 linux 的目录结构一样,docker 通过这些文件再加上宿主机的内核提供 了一个 linux 的虚拟环境,每一层文件系统我们叫做一层 layer,联合文件系统 可以对每一层文件系统设置三种权限,只读(readonly)、读写(readwrite)和 写出(whiteout-able),但是 docker 镜像中每一层文件系统都是只读的,构建镜像的时候,从一个最基本的操作系统开始,每个构建的操作都相当于做一层的修改,增加了一层文件系统,一层层往上叠加,上层的修改会覆盖底层该位置的可见 性,这也很容易理解,就像上层把底层遮住了一样,当使用镜像的时候,我们只 会看到一个完全的整体,不知道里面有几层也不需要知道里面有几层,结构如下:
docker 命令是最常使用的 docker 客户端命令,其后面可以加不同的参数以实 现相应的功能,常用的命令如下:
1.3.1 docker镜像命令
搜索镜像
[root@localhost ~]# docker search centos
NAME DESCRIPTION STARS OFFICIAL AUTOMATED
centos The official build of CentOS. 6974 [OK]
# 搜索指定版本镜像
[root@localhost ~]# docker search centos:7.2.1511
下载镜像
[root@localhost ~]# docker pull centos
# 下载指定版本镜像,推荐此方式下载
[root@localhost ~]# docker pull centos:7.9
查看本地镜像
[root@localhost ~]# docker images
REPOSITORY TAG IMAGE ID CREATED SIZE
ubuntu latest d13c942271d6 10 days ago 72.8MB
nginx latest 605c77e624dd 2 weeks ago 141MB
# REPOSITORY:镜像所属仓库名称
# TAG:镜像版本号,默认为latest
# IMAGE ID:镜像唯一的ID标识
# CREATED:镜像创建时间
# SIZE:镜像的大小
镜像导出
# 使用命令导出镜像
[root@localhost ~]# docker save centos -o /opt/centos.tar.gz
# 使用输出重定向导出镜像
[root@localhost ~]# docker save centos > /opt/centos-1.tar.gz
镜像导入
[root@docker-server2 ~]# docker load < /opt/centos.tar.gz
删除镜像
# 删除指定 ID 的镜像,通过镜像启动容器的时候镜像不能被删除,除非将容器全部关闭
docker rmi 镜像 ID/镜像名称
1.4 容器常用命令
1.4.1 Docker run
用于运行容器,其格式如下:
$ docker run [OPTIONS] IMAGE[:TAG|@DIGEST] [COMMAND] [ARG...]
# [OPTIONS]
-i 将标准输入传递给容器
-t 给容器分配一个tty终端,-i -t一般会配合使用,这样可以有一个tty终端在容器内执行相应命令
-d 将容器放到后台执行
-P 将宿主机的随机端口映射到容器
-p 指定宿主机映射到容器的端口
--name 指定容器的名称
范例:
# 从镜像启动一个容器,并进入容器
[root@localhost ~]# docker run -it centos /bin/bash
[root@5cdc4d5f599c /]#
# 前台启动并随机映射本地端口到容器的 80
# 随机端口映射,其实是默认从 32768 开始
[root@localhost ~]# docker run -P nginx
# 本地端口 81 映射到容器 80 端口
[root@localhost ~]# docker run -p 81:80 --name nginx-test-port1 nginx
# 本地 IP:本地端口:容器端口
[root@localhost ~]# docker run -p 192.168.10.205:82:80 --name nginx-test-port2 docker.io/nginx
# 本地 IP:本地随机端口:容器端口
[root@localhost ~]# docker run -p 192.168.10.205::80 --name nginx-test-port3 docker.io/nginx
# 本机 ip:本地端口:容器端口/协议,默认为 tcp 协议
[root@localhost ~]# docker run -p 192.168.10.205:83:80/udp --name nginx-test-port4 docker.io/nginx
# 一次性映射多个端口+协议
[root@localhost ~]# docker run -p 86:80/tcp -p 443:443/tcp -p 53:53/udp --name nginx-test-port5 docker.io/nginx
# 自定义容器名称
[root@localhost ~]# docker run -it --name nginx-test nginx
# 后台启动容器
[root@localhost ~]# docker run -d -it nginx
# 单次运行容器
[root@localhost ~]# docker run -it --rm --name nginx-delete-test docker.io/nginx
# 传递运行命令
# 容器需要有一个前台运行的进程才能保持容器的运行,通过传递运行参数是一种方式,另外也可以在构建镜像的时候指定容 # 器启动时运行的前台命令。
[root@localhost ~]# docker run -d centos /usr/bin/tail -f '/etc/hosts'
1.4.2 查看容器命令
# 查看正在运行的容器
[root@localhost ~]# docker ps
CONTAINER ID IMAGE COMMAND CREATED STATUS PORTS NAMES
8696c7faac6e centos "/bin/bash" 21 hours ago Up 21 hours goofy_williams
85527f599ab2 centos "/bin/bash" 21 hours ago Up 21 hours agitated_brattain
# 查看所有容器
[root@localhost ~]# docker ps -a
# 查看容器运行的端口,不过一般使用docker ps命令查看
[root@localhost ~]# docker port nginx-test-port5
# 查看容器访问日志
[root@localhost ~]# docker logs 5cdc4d5f599c
[root@5cdc4d5f599c /]# exit
exit
1.4.3 容器的管理
# 删除容器,即使容正在运行当中,也会被强制删除掉
[root@localhost ~]# docker rm --help
Usage: docker rm [OPTIONS] CONTAINER [CONTAINER...]
Remove one or more containers
Options:
-f, --force Force the removal of a running container (uses SIGKILL)
-l, --link Remove the specified link
-v, --volumes Remove anonymous volumes associated with the container
# 启动容器
docker start f821d0cd5a99
# 停止容器
docker stop f821d0cd5a99
# 批量关闭正在运行的容器
[root@localhost ~]# docker stop $(docker ps -a -q)
# 强制关闭正在运行的容器
docker kill $(docker ps -a -q)
# 批量删除所有容器
docker rm -f $(docker ps -a -q)
1.4.4 进入正在运行的容器
attach命令
显示,所有使用此方式进入容器的操作都是同步显示的且 exit 后容器将被关 闭,且使用 exit 退出后容器关闭,不推荐使用
[root@s1 ~]# docker attach 63fbc2d5a3ec
[root@63fbc2d5a3ec /]#
exec命令
执行单次命令与进入容器,虽然 exit 退出容器还在运行
[root@localhost ~]# docker exec -it 8696c7faac6e /bin/bash
[root@8696c7faac6e /]#
nsenter 命令
nsenter 命令需要通过 PID 进入到容器内部,不过可以使用docker inspect 获取到容器的 PID
# 获取容器PID
[root@localhost ~]# docker inspect -f "{{.State.Pid}}" 8696c7faac6e
2386
# 使用nsenter命令进入容器,该命令需使用yum命令安装
[root@localhost ~]# nsenter -t 2386 -m -u -i -n -p
2 Docker镜像制作
从镜像大小上面来说,一个比较小的镜像只有十几 MB,而内核文件需要一百 多兆, 因此镜像里面是没有内核的,镜像在被启动为容器后将直接使用宿主机 的内核,而镜像本身则只提供相应的 rootfs,即系统正常运行所必须的用户空间 的文件系统,比如/dev/,/proc,/bin,/etc 等目录,所以容器当中基本是没有/boot 目录的,而/boot 当中保存的就是与内核相关的文件和目录。
镜像的制作分为下面两种方式
- 交互式:进入容器内部部署相关软件
- 非交互式:利用dockerfile文件制作镜像
2.1 交互式制作编译版本Nginx1.16.1版本镜像
在centos基础镜像之上手动编译安装 nginx,然后再提交为镜像。
2.1.1 下载镜像
[root@localhost ~]# docker pull centos
[root@localhost ~]# docker run -it centos /bin/bash
[root@dd68ef15a939 /]# yum -y install wget
# 镜像地址改为阿里云,提升安装速度
[root@dd68ef15a939 /]# cat /etc/redhat-release
CentOS Linux release 8.4.2105
[root@dd68ef15a939 /]# wget -O /etc/yum.repos.d/CentOS-Base.repo https://mirrors.aliyun.com/repo/Centos-8.repo
# 配置epel源
[root@dd68ef15a939 /]# yum install -y https://mirrors.aliyun.com/epel/epel-release-latest-8.noarch.rpm
[root@dd68ef15a939 /]# sed -i 's|^#baseurl=https://download.example/pub|baseurl=https://mirrors.aliyun.com|' /etc/yum.repos.d/epel*
[root@dd68ef15a939 /]# sed -i 's|^metalink|#metalink|' /etc/yum.repos.d/epel*
[root@dd68ef15a939 /]# yum makecache
2.1.2 编译安装Nginx
# 安装环境依赖包
[root@dd68ef15a939 /]# yum install -y make vim lrzsz gcc gcc-c++ automake pcre pcre-devel zlib zlib-devel openssl openssl-devel
[root@dd68ef15a939 /]# cd /usr/local/src/
[root@dd68ef15a939 src]# wget http://nginx.org/download/nginx-1.16.1.tar.gz
[root@dd68ef15a939 src]# tar xvf nginx-1.16.1.tar.gz
[root@dd68ef15a939 src]# cd nginx-1.16.1
[root@dd68ef15a939 nginx-1.16.1]# ./configure --prefix=/apps/nginx --with-http_sub_module
[root@dd68ef15a939 nginx-1.16.1]# make -j 4 && make install
[root@dd68ef15a939 nginx-1.16.1]# cd /apps/nginx/
2.1.3 配置Nginx
# 在环境变量中创建软链接
[root@dd68ef15a939 nginx]# ln -sv /apps/nginx/sbin/nginx /usr/sbin/nginx
# 创建一个测试页面
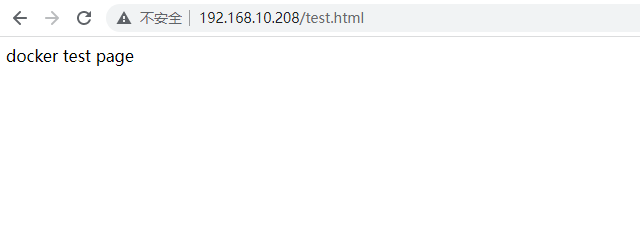
[root@dd68ef15a939 nginx]# echo "docker test page" > ./html/test.html
# 创建nginx运行用户
[root@dd68ef15a939 nginx]# useradd -u 2019 nginx -s /sbin/nologin
# 更改配置文件
[root@dd68ef15a939 nginx]# vim conf/nginx.conf
user nginx;
# 关闭后台nginx运行,否则容器在启动后会退出
daemon off;
# 更改文件权限
[root@dd68ef15a939 nginx]# chown nginx.nginx /apps/nginx/ -R
2.1.4 在宿主机提交镜像
注意:在提交镜像完成之前容器不能退出
[root@localhost ~]# docker commit --help
Usage: docker commit [OPTIONS] CONTAINER [REPOSITORY[:TAG]]
Create a new image from a container's changes
Options:
-a, --author string Author (e.g., "John Hannibal Smith <hannibal@a-team.com>")
-c, --change list Apply Dockerfile instruction to the created image
-m, --message string Commit message
-p, --pause Pause container during commit (default true)
[root@localhost ~]# docker commit -m "test nginx" dd68ef15a939 test-nginx:v1
sha256:77d448b75096314661f6367c7bb1196ad8dfa8eba79f1ca1a00000d36a516d19
# 查看生成的镜像
[root@localhost ~]# docker images
REPOSITORY TAG IMAGE ID CREATED SIZE
test-nginx v1 77d448b75096 About an hour ago 640MB
ubuntu latest d13c942271d6 10 days ago 72.8MB
nginx latest 605c77e624dd 2 weeks ago 141MB
centos latest 5d0da3dc9764 4 months ago 231MB
# 从镜像启动一个容器
[root@localhost ~]# docker run -d -p 80:80 --name centos_nginx test-nginx:v1 nginx
dbc8de9a485e39465042c6f99e7b854adc8bdc0fafea9a9fba8b7280cd7ae093
2.1.5 测试访问
2.2 DockerFile 制作编译版 nginx 1.16.1 镜像
DockerFile可以说是一种可以被Docker程序解释的脚本,和shell脚本非常类似,DockerFile也是由一条条命令组成的,每条命令对应Linux下面的一条命令,Dokcer程序将这些DockerFile指令翻译成真正的Linux命令,这样的好处就是实现了自动化生成镜像,当后续有额外的需求时,只要在之前的DockerFile文件中添加或者修改相应的操作即可重新生成新的Dokcer镜像。DockerFile常用指令如下:
ADD:将指定路径文件复制到容器当中,对于压缩文件,如果容器支持源文件的压缩格式,那么在复制时会将源文件解压为目录
FROM:Dockerfile必须以FROM指令开始,用于指定基础镜像
LABEL:为制作的镜像添加说明信息,可以使用引号和\,格式与命令行一致
EXPOSE:指定容器运行时监听的端口
RUN:在容器中运行指定的shell命令
CMD:一个docker只能有一个CMD指令,主要用于指定一个容器内默认运行的程序
ENV:设置容器的环境变量
更多说明可以参考官方文档:https://docs.docker.com/engine/reference/builder/
2.2.1 环境准备
# 按照业务类型或者系统类型来划分目录结构,这样当镜像较多的时候便于管理
[root@localhost ~]# mkdir /opt/dockerfile/{web/{nginx,tomcat,jdk,apache},system/{centos,ubuntu,redhat}} -pv
mkdir: created directory ‘/opt/dockerfile’
mkdir: created directory ‘/opt/dockerfile/web’
mkdir: created directory ‘/opt/dockerfile/web/nginx’
mkdir: created directory ‘/opt/dockerfile/web/tomcat’
mkdir: created directory ‘/opt/dockerfile/web/jdk’
mkdir: created directory ‘/opt/dockerfile/web/apache’
mkdir: created directory ‘/opt/dockerfile/system’
mkdir: created directory ‘/opt/dockerfile/system/centos’
mkdir: created directory ‘/opt/dockerfile/system/ubuntu’
mkdir: created directory ‘/opt/dockerfile/system/redhat
# 进入指定的目录
[root@localhost ~]# cd /opt/dockerfile/web/nginx/
2.2.2 编写 Dockerfile
[root@localhost nginx]# vim Dockerfile
FROM centos
LABEL bob 123@qq.com
ENV NGINX_VERSION 1.16.1
RUN yum -y install wget \
# 安装阿里镜像
&& wget -O /etc/yum.repos.d/CentOS-Base.repo https://mirrors.aliyun.com/repo/Centos-8.repo \
&& yum install -y https://mirrors.aliyun.com/epel/epel-release-latest-8.noarch.rpm \
&& sed -i 's|^#baseurl=https://download.example/pub|baseurl=https://mirrors.aliyun.com|' /etc/yum.repos.d/epel* \
&& sed -i 's|^metalink|#metalink|' /etc/yum.repos.d/epel* \
&& yum makecache; \
# 安装环境依赖
yum install -y make vim lrzsz gcc gcc-c++ automake pcre pcre-devel zlib zlib-devel openssl openssl-devel; \
cd /usr/local/src/; \
wget http://nginx.org/download/nginx-"$NGINX_VERSION".tar.gz \
&& tar xvf nginx-"$NGINX_VERSION".tar.gz \
&& cd nginx-"$NGINX_VERSION" \
&& ./configure --prefix=/apps/nginx --with-http_sub_module \
&& make -j $(lscpu | awk -F':' 'NR==4{print $2}' | sed -n "s# ##gp") && make install; \
# 配置nginx
ln -sv /apps/nginx/sbin/nginx /usr/sbin/nginx; \
echo "docker test page" > /apps/nginx/html/test.html; \
useradd -u 2019 nginx -s /sbin/nologin; \
chown nginx.nginx /apps/nginx/ -R
ADD nginx.conf /apps/nginx/conf/nginx.conf
EXPOSE 80 443
CMD ["nginx","-g","daemon off;"]
# 准备配置文件
[root@localhost nginx]# ls
Dockerfile nginx.conf
2.2.3 执行镜像构建
# 使用脚本构建镜像,便于后期维护
[root@localhost nginx]# vim build-command.sh
#!/bin/bash
docker build -t centos-nginx:v1 .
[root@localhost nginx]# bash build-command.sh
......
Successfully built 7ec2ad94ce49
Successfully tagged centos-nginx:v1
# 查看是否生成镜像
[root@localhost nginx]# docker images
REPOSITORY TAG IMAGE ID CREATED SIZE
centos-nginx v1 7ec2ad94ce49 40 seconds ago 640MB
test-nginx v1 aae51a5d111b 23 hours ago 640MB
ubuntu latest d13c942271d6 11 days ago 72.8MB
nginx latest 605c77e624dd 2 weeks ago 141MB
centos latest 5d0da3dc9764 4 months ago 231MB
2.2.4 从镜像启动容器
[root@localhost nginx]# docker run -d -p 80:80 centos-nginx:v1
24c590069077dedfb4842193ec958f7608743dc36abd9d28b1e408cf68bb8359
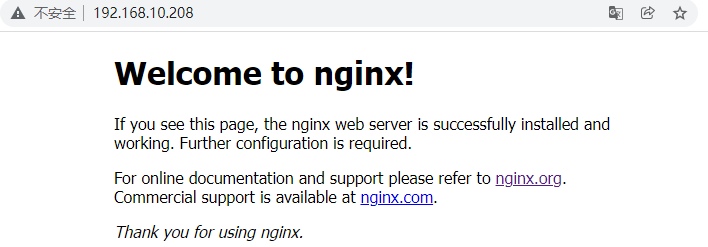
2.2.5 测试访问界面
5 Docker单机仓库Docker Registry
Docker Registry作为Docker 的核心组件之一负责镜像内容的存储与分发,客户端的docker pull 以及push命令都将直接与registry进行交互,最初版本的 registry 由Python实现,由于设计初期在安全性,性能以及API 的设计上有着诸多的缺陷, 该版本在 0.9 之后停止了开发,由新的项目distribution(新的 docker register 被 称为 Distribution)来重新设计并开发下一代 registry。另外,Registry 2.4 版本之后支持了回收站机制,也就是可以删除镜像了,所以使用时最好是大于 Registry 2.4 版本的。
接下来将通过docker registry镜像来搭建一套本地私有仓库环境
5.1 下载 docker registry镜像
[root@localhost ~]# docker pull registry
Using default tag: latest
latest: Pulling from library/registry
79e9f2f55bf5: Pull complete
0d96da54f60b: Pull complete
5b27040df4a2: Pull complete
e2ead8259a04: Pull complete
3790aef225b9: Pull complete
Digest: sha256:169211e20e2f2d5d115674681eb79d21a217b296b43374b8e39f97fcf866b375
Status: Downloaded newer image for registry:latest
docker.io/library/registry:latest
5.2 搭建单机仓库
镜像仓库配置参考:https://docs.docker.com/registry/configuration/
# 创建授权使用目录
[root@localhost ~]# mkdir /docker/auth -pv
mkdir: created directory ‘/docker’
mkdir: created directory ‘/docker/auth’
# 创建用户
[root@localhost ~]# cd /docker/
# 认证用户配置
# 镜像htpasswd配置基于Apache htpasswd file,而且密码的加密只支持bcrypt格式,因此先创建出Apache htpasswd # file
[root@localhost docker]# yum -y install httpd-tools
# -B:使用bcrypt加密,-b:从命令行获取密码,-n:将结果输出到标准输出
[root@localhost docker]# htpasswd -Bbn jack 123456 > auth/htpasswd
[root@localhost docker]# cat auth/htpasswd
jack:$2y$05$6fVoGfvR4HJxacL8wO8yLuMlvKq.Ne9DajelIV8Rzl50Zqouc1W8m
# 启动镜像仓库
[root@localhost docker]# docker run -d -p 5000:5000 --name registry1 -v /docker/auth:/auth \
> -e "REGISTRY_AUTH=htpasswd" \
> -e "REGISTRY_AUTH_HTPASSWD_REALM=Registry Realm" \
> -e "REGISTRY_AUTH_HTPASSWD_PATH=/auth/htpasswd" registry
300d74f1115898c38d56fad3609413e3057c7434807a7c5741d54d73af05f8fa
验证镜像仓库是否启动成功
测试能否登录仓库
# 注意由于之前做了用户认证,所以在登录前必须要开启insecure-registry选项或者配置TLS,否则将不能登录到仓库
# 出现下面报错
[root@localhost docker]# docker login 192.168.10.208:5000
Username: jack
Password:
Error response from daemon: Get https://192.168.10.208:5000/v2/: http: server gave HTTP response to HTTPS client
解决报错
# 修改启动文件,添加insecure-registry选项
[root@localhost ~]# vim /lib/systemd/system/docker.service
ExecStart=/usr/bin/dockerd -H fd:// --containerd=/run/containerd/containerd.sock --insecure-registry 192.168.10.208:5000
# 重启docker服务
[root@localhost ~]# systemctl daemon-reload
[root@localhost ~]# systemctl restart docker
# 启动镜像仓库
[root@localhost ~]# docker start 300d74f11158
300d74f11158
# 登录仓库
[root@localhost docker]# docker login 192.168.10.208:5000
Username: jack
Password:
WARNING! Your password will be stored unencrypted in /root/.docker/config.json.
Configure a credential helper to remove this warning. See
https://docs.docker.com/engine/reference/commandline/login/#credentials-store
Login Succeeded
尝试上传镜像到仓库中
# 设置镜像tag
[root@localhost docker]# docker tag centos-nginx:v2 192.168.10.208:5000/jack/nginx-1.6.1
# 上传镜像
[root@localhost docker]# docker tag centos-nginx:v2 192.168.10.208:5000/jack/nginx-1.6.1
[root@localhost docker]# docker push 192.168.10.208:5000/jack/nginx-1.6.1
Using default tag: latest
The push refers to repository [192.168.10.208:5000/jack/nginx-1.6.1]
a42e0a9ec5c8: Pushed
7cde698f6ded: Pushed
74ddd0ec08fa: Pushed
latest: digest: sha256:28c3d126af58c20959c3d6cb71f66fa09767011441a0f207e241453b29b1f4f9 size: 950
值得注意的是当使用docker login
登录过仓库镜像之后,会在用户家目录下生成一个文件用于存储认证的用户信息,因此,我们可以将该认证文件传输到其他宿主机对应目录下,从而实现跳过登录使用镜像仓库
[root@localhost ~]# pwd
/root
# 将下面文件传输到其他宿主机,这样可以使其他宿主机使用镜像仓库时无需再登录
[root@localhost ~]# cat .docker/config.json
{
"auths": {
"192.168.10.208:5000": {
"auth": "amFjazoxMjM0NTY="
}
}
6 docker 分布式仓库 Harbor
Harbor是一个用于存储和分发Docker镜像的企业级Registry 服务器,由vmware 开源,其通过添加一些企业必需的功能特性,例如安全、标识和管理等,扩展了开源 Docker Distribution。作为一个企业级私有 Registry 服务器,Harbor 提供了更 好的性能和安全。提升用户使用 Registry 构建和运行环境传输镜像的效率。Harbor 支持安装在多个Registry 节点的镜像资源复制,镜像全部保存在私有 Registry 中, 确保数据和知识产权在公司内部网络中管控,另外,Harbor也提供了高级的安全特性,诸如用户管理,访问控制和活动审计等。
6.1 官方站点和介绍
harbor 官方 github 地址:https://github.com/vmware/harbor
harbor 官方网址:https://goharbor.io/
nginx:harbor的一个反向代理组件,代理 registry、ui、token 等服务。这个代理会转发 harbor web 和 docker client 的各种请求到后端服务上。
harbor-adminserver:harbor 系统管理接口,可以修改系统配置以及获取系统信息。
harbor-db:存储项目的元数据、用户、规则、复制策略等信息。
harbor-jobservice:harbor 里面主要是为了镜像仓库之前同步使用的。
harbor-log:收集其他 harbor 的日志信息。
harbor-ui:一个用户界面模块,用来管理registry。
registry:存储docker images的服务,并且提供pull/push 服务。
redis:存储缓存信息
webhook:当registry中的 image 状态发生变化的时候去记录更新日志、复制等操作。
token service:在docker client 进行 pull/push 的时候负责 token 的发放。
6.2 安装 Harbor
6.2.1 安装环境要求
下载地址:https://github.com/vmware/harbor/releases
官方文档地址:https://goharbor.io/docs/2.0.0/install-config/installation-prereqs/
Docker引擎版本:17.06.0-ce+
Docker Compose:Version 1.18.0+
Openssl:Latest is preferred
下载Harbor 安装包
# 下载离线安装包,推荐使用这种方式,这样下载速度更快
[root@localhost src]# wget https://storage.googleapis.com/harbor-releases/release-1.7.0/harbor-offline-installer-v1.7.5.tgz
6.2.2 配置 Harbor
# 解压压缩包
[root@localhost src]# tar xvf harbor-offline-installer-v1.7.5.tgz
[root@localhost src]# cd harbor
# 查看docker版本
[root@localhost harbor]# docker version
Server: Docker Engine - Community
Engine:
Version: 18.09.6
API version: 1.39 (minimum version 1.12)
Go version: go1.10.8
Git commit: 481bc77
Built: Sat May 4 02:02:43 2019
OS/Arch: linux/amd64
Experimental: false
# 查看docker-compose版本
[root@localhost harbor]# docker-compose version
docker-compose version 1.18.0, build 8dd22a9
docker-py version: 2.6.1
CPython version: 3.6.8
OpenSSL version: OpenSSL 1.0.2k-fips 26 Jan 2017
# 编辑配置文件
[root@localhost harbor]# vim harbor.cfg
# 建议设置为域名
hostname = 192.168.10.208
harbor_admin_password = 12345
# 运行安装脚本
[root@localhost harbor]# ./install.sh
......
✔ ----Harbor has been installed and started successfully.----
Now you should be able to visit the admin portal at http://192.168.10.208.
For more details, please visit https://github.com/goharbor/harbor .
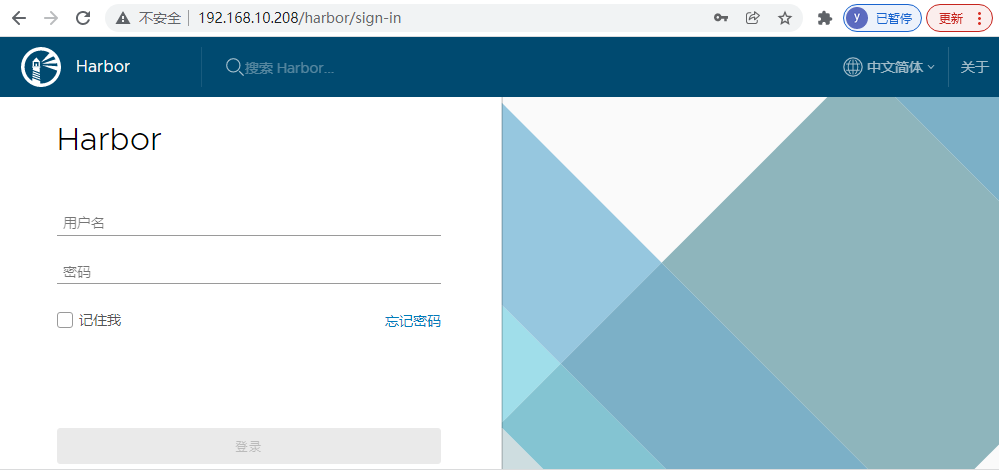
测试登录
这里登录的用户名为admin,密码则是先前在配置文件中设置的密码,也就是12345
如果 harbor 运行一段时间之后需要更改配置,则步骤如下:
# 停止harbor
[root@localhost harbor]# docker-compose stop
Stopping nginx ... done
Stopping harbor-portal ... done
Stopping harbor-jobservice ... done
Stopping harbor-core ... done
Stopping redis ... done
Stopping harbor-db ... done
Stopping registry ... done
Stopping harbor-adminserver ... done
Stopping registryctl ... done
Stopping harbor-log ... done
# 编辑配置文件
[root@localhost harbor]# vim harbor.cfg
# 清理之前配置并且生成新配置
[root@localhost harbor]# ./prepare
Clearing the configuration file: ./common/config/adminserver/env
Clearing the configuration file: ./common/config/core/env
Clearing the configuration file: ./common/config/core/app.conf
Clearing the configuration file: ./common/config/core/private_key.pem
Clearing the configuration file: ./common/config/db/env
Clearing the configuration file: ./common/config/jobservice/env
Clearing the configuration file: ./common/config/jobservice/config.yml
Clearing the configuration file: ./common/config/registry/config.yml
Clearing the configuration file: ./common/config/registry/root.crt
Clearing the configuration file: ./common/config/registryctl/env
Clearing the configuration file: ./common/config/registryctl/config.yml
Clearing the configuration file: ./common/config/nginx/nginx.conf
Clearing the configuration file: ./common/config/log/logrotate.conf
loaded secret from file: /data/secretkey
Generated configuration file: ./common/config/nginx/nginx.conf
Generated configuration file: ./common/config/adminserver/env
Generated configuration file: ./common/config/core/env
Generated configuration file: ./common/config/registry/config.yml
Generated configuration file: ./common/config/db/env
Generated configuration file: ./common/config/jobservice/env
Generated configuration file: ./common/config/jobservice/config.yml
Generated configuration file: ./common/config/log/logrotate.conf
Generated configuration file: ./common/config/registryctl/env
Generated configuration file: ./common/config/core/app.conf
Generated certificate, key file: ./common/config/core/private_key.pem, cert file: ./common/config/registry/root.crt
The configuration files are ready, please use docker-compose to start the service.
# 重新启动harbor
[root@localhost harbor]# docker-compose start
Starting log ... done
Starting registry ... done
Starting registryctl ... done
Starting postgresql ... done
Starting adminserver ... done
Starting core ... done
Starting portal ... done
Starting redis ... done
Starting jobservice ... done
Starting proxy ... done
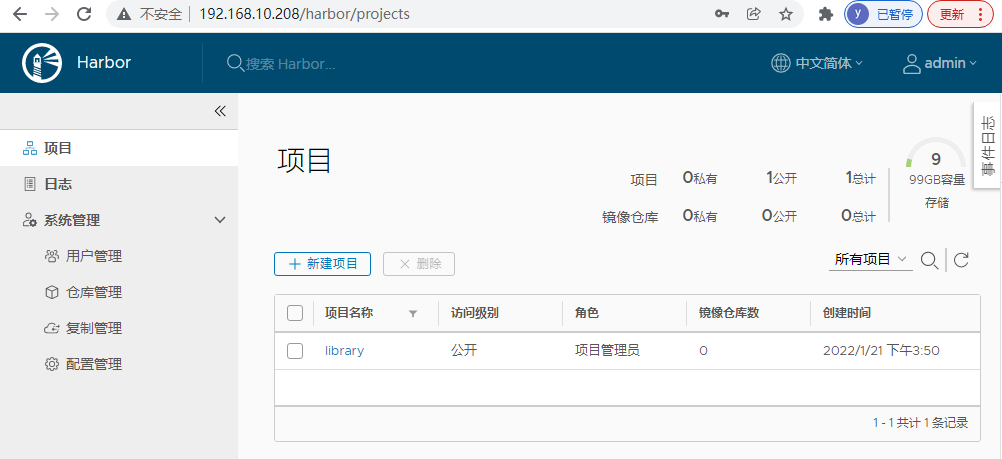
登录后界面
6.3 harbor 仓库上传下载镜像
6.3.1 编辑 docker 配置文件
注意:如果我们配置的是 https 的话,则可以跳过此步
[root@localhost harbor]# vim /lib/systemd/system/docker.service
ExecStart=/usr/bin/dockerd -H fd:// --containerd=/run/containerd/containerd.sock --insecure-registry 192.168.10.208
[root@localhost harbor]# systemctl daemon-reload
[root@localhost harbor]# systemctl restart docker
6.3.2 镜像的上传
# 测试能否正常登录
[root@localhost harbor]# docker login 192.168.10.208
Username: admin
Password:
WARNING! Your password will be stored unencrypted in /root/.docker/config.json.
Configure a credential helper to remove this warning. See
https://docs.docker.com/engine/reference/commandline/login/#credentials-store
Login Succeeded
# 给镜像打标签
[root@localhost nginx]# docker tag centos-nginx:v2 192.168.10.208/nginx/nginx-test:v1
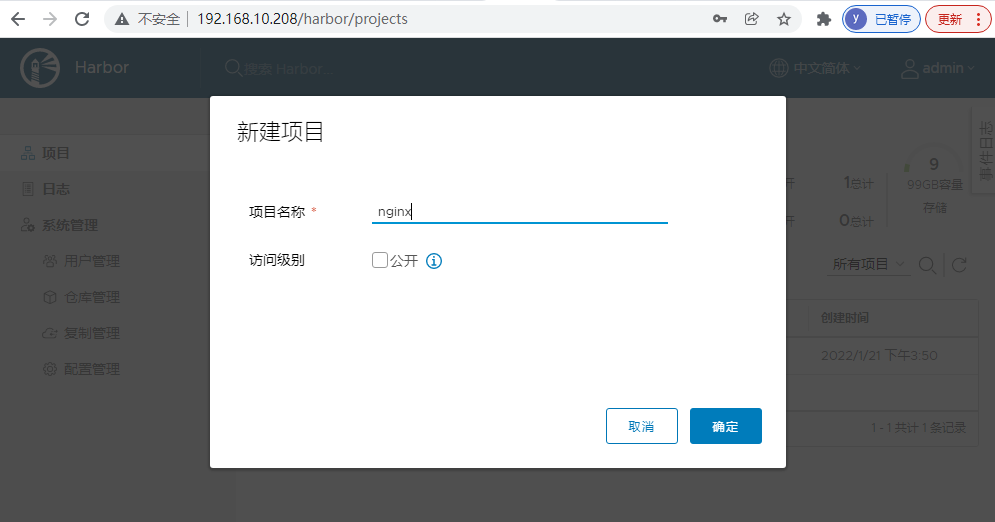
在web管理界面创建项目
上传打完标签的镜像
[root@localhost nginx]# docker push 192.168.10.208/nginx/nginx-test:v1
The push refers to repository [192.168.10.208/nginx/nginx-test]
968176844b74: Pushed
7cde698f6ded: Pushed
74ddd0ec08fa: Pushed
v1: digest: sha256:93bf241e000f1dcbdb4e3320720ebb2e8b4951dcf083effdf65f4b1cfc5206e1 size: 950
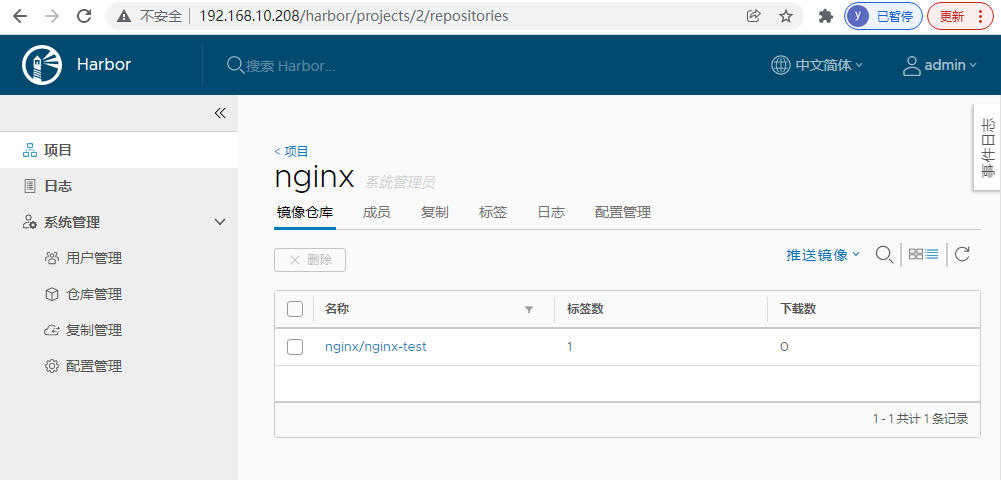
在web管理界面查看上传的镜像
6.4 实现高可用
Harbor 支持基于策略的 Docker 镜像复制功能,这类似于 MySQL 的主从同步, 其可以实现不同的数据中心、不同的运行环境之间同步镜像,并提供友好的管理 界面,大大简化了实际运维中的镜像管理工作,已经有用很多互联网公司使用 harbor 搭建内网 docker 仓库的案例,并且还有实现了双向复制的案列,本文将 实现单向复制的部署
6.4.1 配置另一个harbor仓库
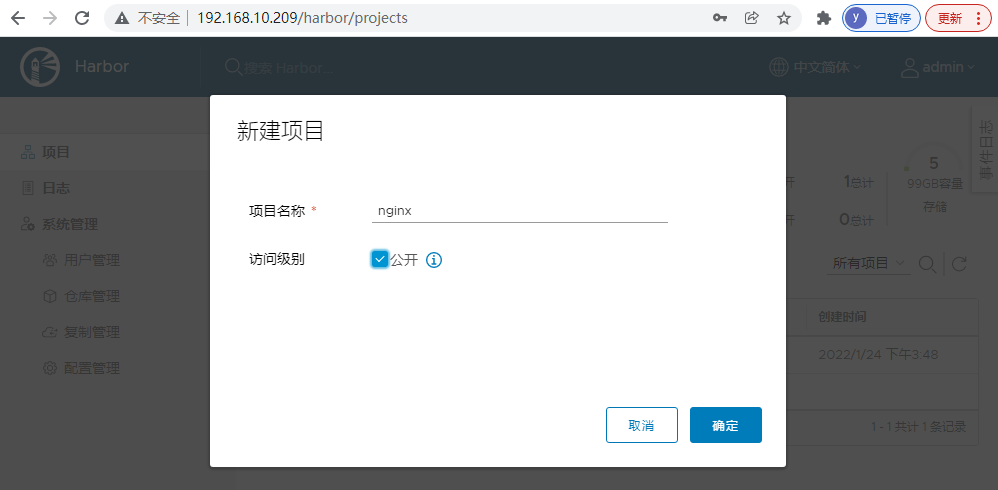
具体安装过程可以参考之前文档内容,在新仓库上创建一个与主 harbor 项目名称保持一致的项目
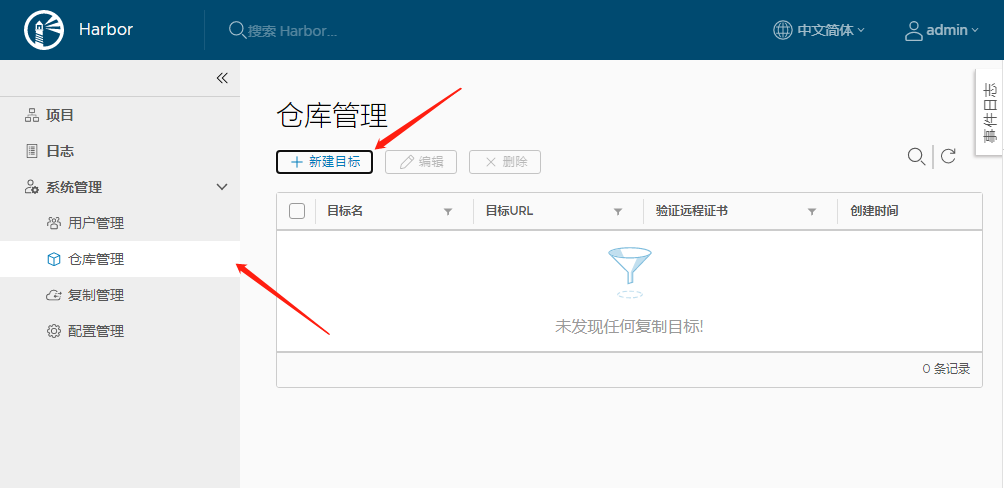
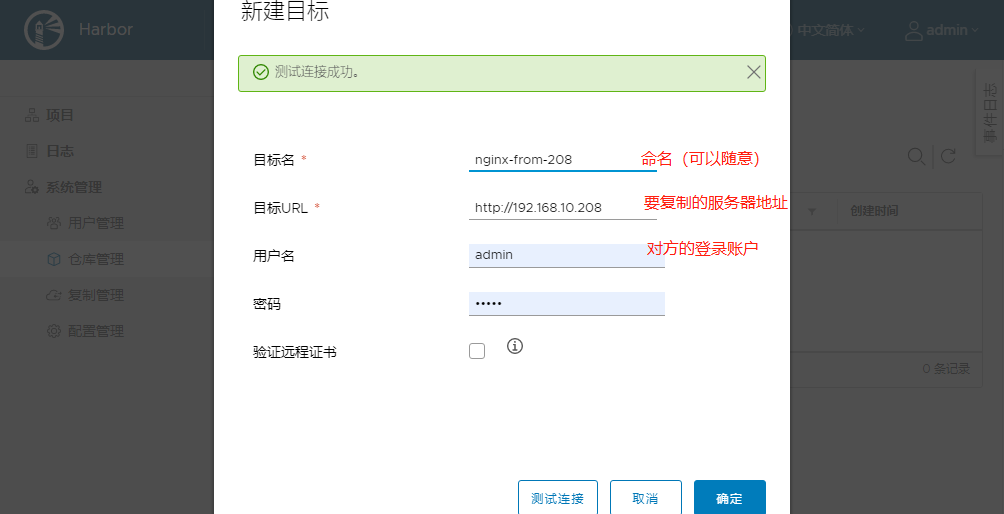
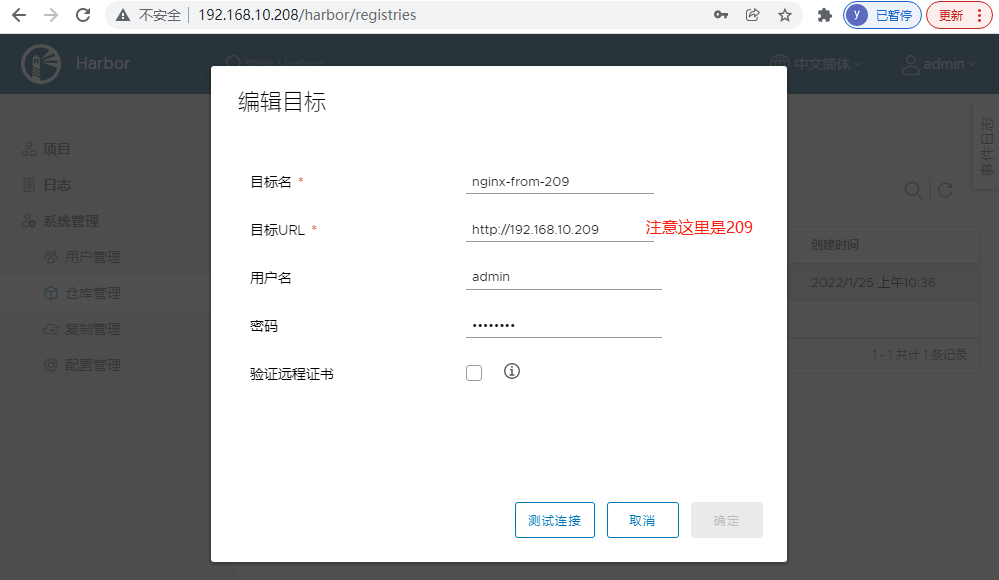
接着要在这个仓库新建管理对象
创建完成后测试连接
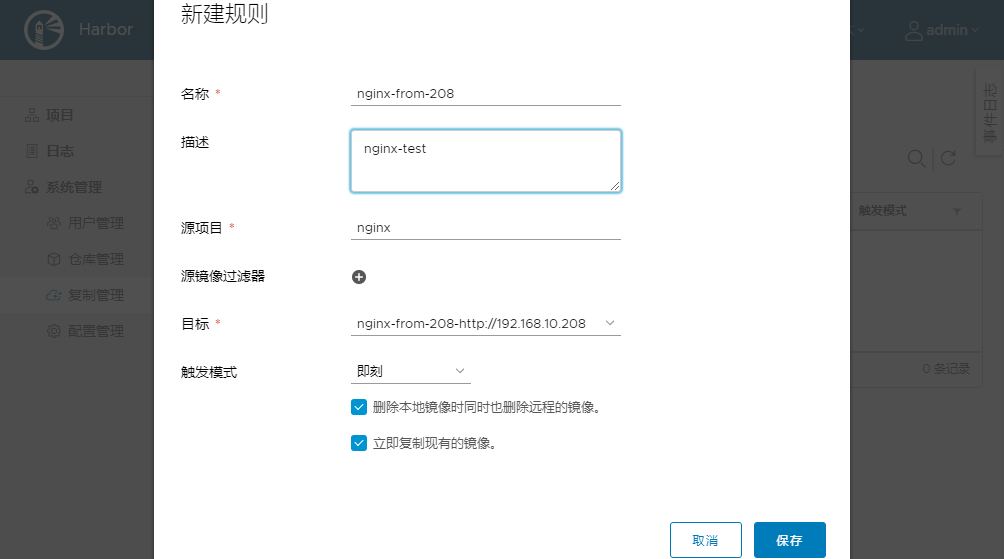
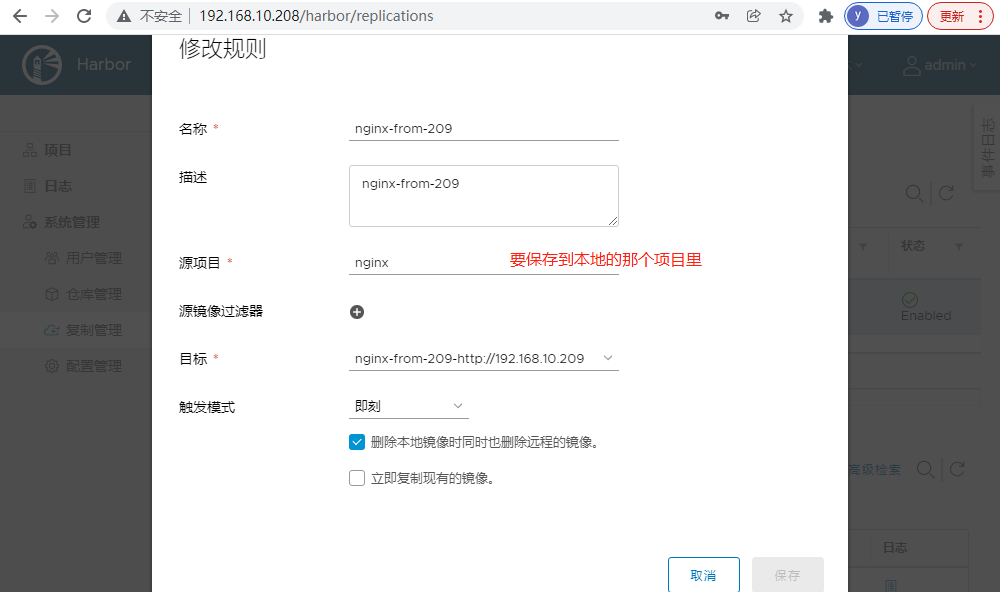
配置复制规则
6.4.2 配置原有harbor仓库
配置仓库对象
配置复制规则
6.4.3 测试同步效果
在208服务器上上传镜像
[root@localhost ~]# docker tag centos-nginx:v1 192.168.10.208/nginx/nginx-test:v2
[root@localhost ~]# docker push 192.168.10.208/nginx/nginx-test:v2
The push refers to repository [192.168.10.208/nginx/nginx-test]
0c68b6685ec0: Layer already exists
7cde698f6ded: Layer already exists
74ddd0ec08fa: Layer already exists
v2: digest: sha256:07c15fbe9e4b09d0b2dbb7ab9c4be42cb263618185eae9ddc15538831a058348 size: 950
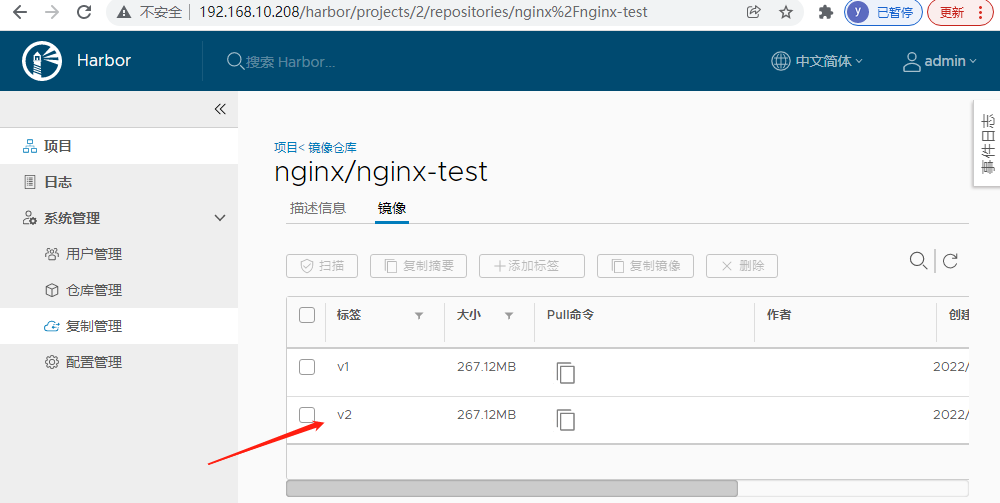
查看镜像是否上传成功
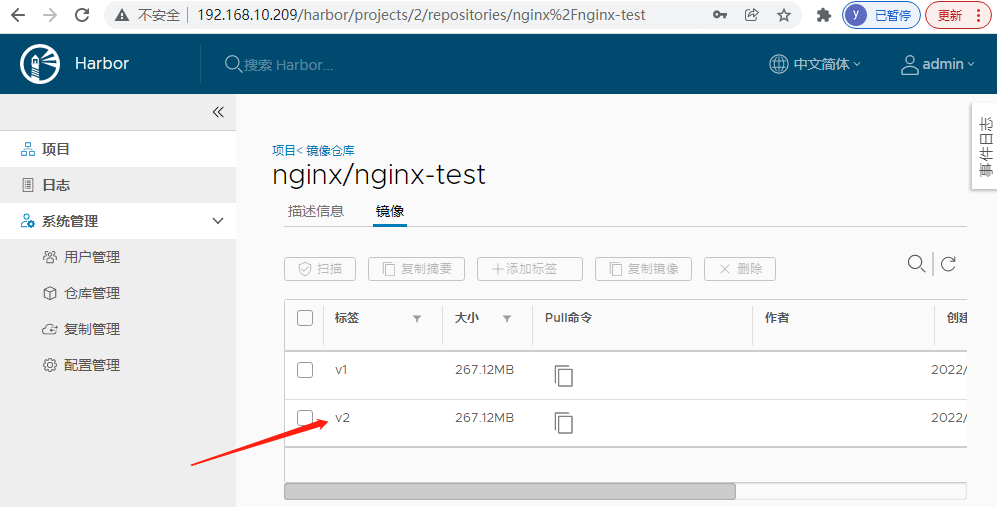
在209查看是否将镜像复制过来
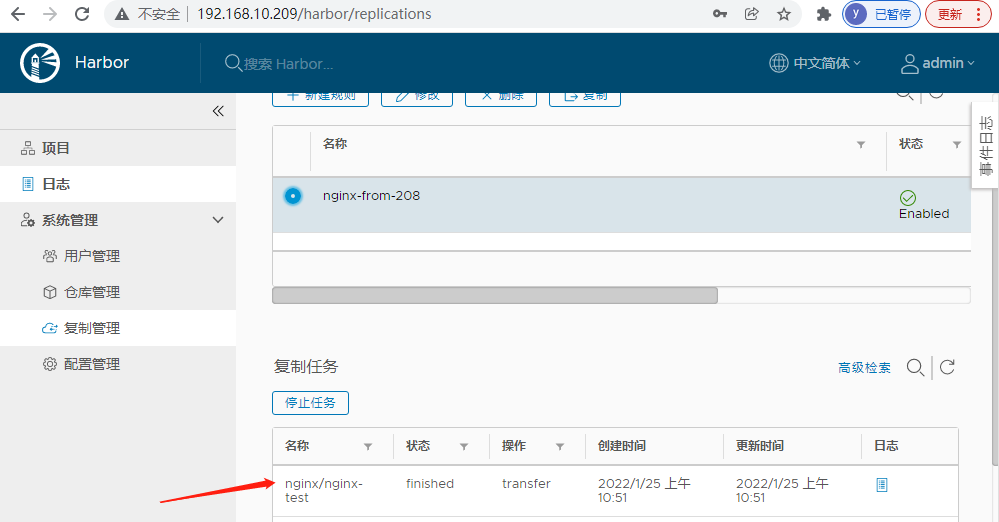
查看复制日志
这样就实现了harbor仓库双向同步,如果只想实现单向同步,那只需要在主harbor仓库上配置复制规则,随后主harbor仓库会自动将更新推送到配置规则中添加的从仓库当中。
文档参考链接
官方文档链接:https://docs.docker.com/
Namespace介绍:https://www.youtube.com/watch?v=-YnMr1lj4Z8
Redhat容器介绍:https://developers.redhat.com/blog/2018/02/22/container-terminology-practical-introduction#container
docker-blog:https://www.docker.com/blog/what-is-containerd-runtime/
docker-blog:https://www.docker.com/blog/oci-release-of-v1-0-runtime-and-image-format-specifications/
container-shim:https://iximiuz.com/en/posts/implementing-container-runtime-shim/
namespace:https://man7.org/linux/man-pages/man7/namespaces.7.html
unshare:https://man7.org/linux/man-pages/man2/unshare.2.html