ReentrantLock 的公平锁源码分析
// ReentrantLock 源码分析的几个关键点 以公平锁为例 t1 表示线程1 t2 表示线程2
1:t1 第一次获取锁是如何获取成功的?假设锁未被其他线程获取到
2:t1 第N次是如何成功获取锁的?假设锁未被其他线程获取到
3:当t1获取到锁的情况下,t2是怎么获取锁失败的,当t1 释放锁之后 t2 又如何获取到锁?
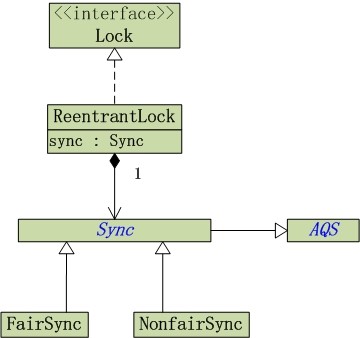
1:数据结构:
维护Sync 对象的引用: private final Sync sync;
Sync对象继承 AQS, Sync 分为两个类:处理公平锁锁和非公平锁:
FairSync NonfairSync
具体的类图如下:

2:接下来重点分析AQS这个类:AbstractQueuedSynchronizer:
private transient volatile Node head;   //AQS维护队列的头结点
private transient volatile Node tail;     // AQS维护队列的尾结点

private volatile int state;              // AQS 锁的状态  数量标识锁被获取的次数
Node内部数据结构:
static final class Node {

        static final Node SHARED = new Node();

        static final Node EXCLUSIVE = null;
        // 线程已被取消,对应的waitStatus的值
        static final int CANCELLED =  1;
        // “当前线程的后继线程需要被unpark(唤醒)”,对应的waitStatus的值。
        // 一般发生情况是:当前线程的后继线程处于阻塞状态,而当前线程被release或cancel掉,因此需要唤醒当前线程的后继线程。
        static final int SIGNAL    = -1;
        // 线程(处在Condition休眠状态)在等待Condition唤醒,对应的waitStatus的值
        static final int CONDITION = -2;
        // (共享锁)其它线程获取到“共享锁”,对应的waitStatus的值
        static final int PROPAGATE = -3;
                // waitStatus为“CANCELLED, SIGNAL, CONDITION, PROPAGATE”时分别表示不同状态,
            // 若waitStatus=0,则意味着当前线程不属于上面的任何一种状态。
        volatile int waitStatus;
                // 前一节点
        volatile Node prev;
                // 后一节点
        volatile Node next;
                // 节点所对应的线程
        volatile Thread thread;
                // nextWaiter是“区别当前CLH队列是 ‘独占锁’队列 还是 ‘共享锁’队列 的标记”
            // 若nextWaiter=SHARED,则CLH队列是“独占锁”队列;
            // 若nextWaiter=EXCLUSIVE,(即nextWaiter=null),则CLH队列是“共享锁”队列。
        Node nextWaiter;
                }
从NODE的数据结构可以看出来,AQS里面维护的队列的数据结构是双链表的形式;

下面对几个关键代码进行分析 以公平锁为例
public final void acquire(int arg) {
        if (!tryAcquire(arg) &&   //尝试获取锁,如果tryAcquire(arg)返回false 则 进入acquireQueued(addWaiter(Node.EXCLUSIVE), arg)这个逻辑
            acquireQueued(addWaiter(Node.EXCLUSIVE), arg))
            selfInterrupt();
    }
1:在tryAcquire(arg)中对第一次去获取锁线程的逻辑如下:
      int c = getState();  // 获取线程持有锁的次数  可重入锁的逻辑主要是在这里判断  state 表示可重入的次数
            if (c == 0) {   // 锁未被持有过
                if (!hasQueuedPredecessors() &&    //第一次获取锁返回false 进入下面的CAS逻辑
                    compareAndSetState(0, acquires)) { // 这里state更新为1
                    setExclusiveOwnerThread(current);  // 设置持有的线程为 当前线程t1
                    return true;                       //这里返回true 表明t1 获取锁成功
                }
            }
public final boolean hasQueuedPredecessors() {
        Node t = tail;  //CLH 尾节点
        Node h = head;  //CLH 头结点
        Node s;
        return h != t &&    //这里是判断CLH队列中是否存在排队节点  存在 返回 true  不存在返回false
            ((s = h.next) == null || s.thread != Thread.currentThread());
    }
int c = getState();   // c=n 进入以下的逻辑  这里的state是用volatile修饰的,保证了线程之间的可见性
            else if (current == getExclusiveOwnerThread()) {   // current=t1   getExclusiveOwnerThread()=t1
                int nextc = c + acquires;    // nextc=n+1
                if (nextc < 0)
                    throw new Error("Maximum lock count exceeded");
                setState(nextc);   //设置 state=n+1
                return true;   //锁获取成功
            }
3: t1 第一次获取锁成功了:此时 AQS中的成员变量:state=1 AbstractOwnableSynchronizer中的exclusiveOwnerThread 为t1,进入以下逻辑
else if (current == getExclusiveOwnerThread()) {} //current=t2 getExclusiveOwnerThread()=t1,这时tryAcquire(int acquires)=false
接下来进入 acquireQueued(addWaiter(Node.EXCLUSIVE), arg) 的逻辑处理,进入addWaiter(Node.EXCLUSIVE)的逻辑处理,Node.EXCLUSIVE表示独占锁
private Node addWaiter(Node mode) {
        Node node = new Node(Thread.currentThread(), mode);  //实例化一个维护当前线程引用的Node对象
        Node pred = tail;
    }
if (pred != null) {    //当tail!=null 时,进入以下的逻辑,以下逻辑是:将新建的node 节点添加到CLH的tail节点之后,并将新加入的node节点设置为tail节点,即将当前线程的节点添加到CLH的最后一个节点中
            node.prev = pred;
            if (compareAndSetTail(pred, node)) {
                pred.next = node;
                return node;
            }
        }
如果此时 CLH队列的tail 节点为null 则执行enq(node);这个方法
private Node enq(final Node node) {
        for (;;) { // 相当于 while
            Node t = tail;
            if (t == null) { // 再次判断CLH的tail节点是否为null,这里还是null
                if (compareAndSetHead(new Node())) //CAS方式设置 head节点为新建的Node节点
                    tail = head;  //tail 指向 新建的Node节点
            } else {   //第二次遍历会进入以下的逻辑
                node.prev = t;    //这里是将维护t2线程的Node对象放置到上一步新建的空Node对象 head=new Node  tail=Node(t2)
                if (compareAndSetTail(t, node)) {
                    t.next = node;
                    return t;
                }
            }
        }
    }
接下来进入 acquireQueued(addWaiter(Node.EXCLUSIVE), arg)) addWaiter(Node.EXCLUSIVE) 返回的是 t2 引用的node 对象,即CLH中的tail节点
for (;;) {  // 这里通过while循环获取锁
                final Node p = node.predecessor();  // 这里获取node节点的前继节点 p=head 节点
                if (p == head && tryAcquire(arg)) { // 这是再次 调用tryAcquire(arg) 尝试获取锁,如果t1持有的锁没有释放,则会获取失败tryAcquire(arg)返回false,再次进入while循环;若t1已经释放了锁,则这里获取锁成功,返回true
                    setHead(node);     //将tail 节点前移,设置为head 节点
                    p.next = null; // help GC
                    failed = false;
                    return interrupted;  //锁获取成功 返回false
                }
                if (shouldParkAfterFailedAcquire(p, node) &&
                    parkAndCheckInterrupt())
                    interrupted = true;
            }
如果 p != head 则进入另外一部分的逻辑 shouldParkAfterFailedAcquire(p, node)
//pred 前继节点   node 当前线程的节点   这段逻辑的主要是当前线程是否需要阻塞
         private static boolean shouldParkAfterFailedAcquire(Node pred, Node node) {
        int ws = pred.waitStatus;
        if (ws == Node.SIGNAL)
           return true;
        if (ws > 0) {
           do {
                node.prev = pred = pred.prev;
            } while (pred.waitStatus > 0);
            pred.next = node;
        } else {
            compareAndSetWaitStatus(pred, ws, Node.SIGNAL);
        }
        return false;
    }
// 如果上面判断当前线程需要阻塞后,则进入接下来的逻辑判断:parkAndCheckInterrupt()
    private final boolean parkAndCheckInterrupt() {
        LockSupport.park(this);   //挂起当前线程
        return Thread.interrupted();
    }
这个时候的重点放在分析 selfInterrupt(); 这个方法上;
进入这个方法的条件是 当前线程被中断过,并且获取锁成功了;
static void selfInterrupt() {
Thread.currentThread().interrupt(); //当前线程产生一个中断,真正被唤醒
}
到此为止,ReentrantLock 的公平锁源码分析结束。


