Silverlight & Blend动画设计系列九:动画(Animation)与视图状态管理(Visual State Manager)
Silverlight中的动画(Animation)与视图状态管理(Visual State Manager) 结合使用是非常常见的,动画用于管理对象在某段事件段内执行的动画动作,视图状态管理则用于控制对象在多个不同的视觉状态之间切换、导航。本篇主要介绍动画(Animation)与视图状态管理(Visual State Manager)的结合应用,关于视图状态管理的详细内容请大家查看相关资料。
举一个简单的示例,比如在开发一个项目中有一个按钮,当我点击这个按钮的时候就动态的从某个方向(如从上到下的方向,也就是从屏幕的上方动态的滑动到屏幕中)呈现出一个面板。
要实现这个简单示例,可以通过《Silverlight & Blend动画设计系列一:偏移动画(TranslateTransform)》里介绍的偏移动画特性去实现,为了效果上能够更加美观,可以增加一些其他的变换,比如在面板向下滑动出现的过程中动态的改变面板的透明度,从完全透明到不透明效果。当我们清楚了需求接下来就可以在Blend中进行设计了,首先布局界面(Button,Border[TextBlock])如下图所示:

添加Storyboard并选中第一秒时间线,设置border对象的Transform.Y为-296(这个值可以在设计中直接通过鼠标拖动Border对象确定),然后移动时间线到第三秒位置,设置Transfrom.Y为0。通过还可以在第一秒的时候设置border不透明度值为0%,第三秒的时候设置不透明度为100%,这样在动画过程中的效果会更好。

通过上图中布局的Button去触发动画开发,编译运行程序就可以查看到其效果,当点击按钮的时候就会看到一个面板从顶部已模糊到清晰的动画载入到界面上。另外可以将Border对象默认设置为不显示(Visibility="Collapsed"),当启动动画的时候将其设置为显示(Visibile)。
<DoubleAnimationUsingKeyFrames BeginTime="00:00:00" Storyboard.TargetName="border"
Storyboard.TargetProperty="(UIElement.RenderTransform).(TransformGroup.Children)[3].(TranslateTransform.Y)">
<EasingDoubleKeyFrame KeyTime="00:00:00" Value="-296"/>
<EasingDoubleKeyFrame KeyTime="00:00:01" Value="0"/>
</DoubleAnimationUsingKeyFrames>
<DoubleAnimationUsingKeyFrames BeginTime="00:00:00" Storyboard.TargetName="border"
Storyboard.TargetProperty="(UIElement.Opacity)">
<EasingDoubleKeyFrame KeyTime="00:00:00" Value="0.3"/>
<EasingDoubleKeyFrame KeyTime="00:00:01" Value="1"/>
</DoubleAnimationUsingKeyFrames>
<ObjectAnimationUsingKeyFrames BeginTime="00:00:00" Storyboard.TargetName="border"
Storyboard.TargetProperty="(UIElement.Visibility)">
<DiscreteObjectKeyFrame KeyTime="00:00:00">
<DiscreteObjectKeyFrame.Value>
<Visibility>Visible</Visibility>
</DiscreteObjectKeyFrame.Value>
</DiscreteObjectKeyFrame>
<DiscreteObjectKeyFrame KeyTime="00:00:01">
<DiscreteObjectKeyFrame.Value>
<Visibility>Visible</Visibility>
</DiscreteObjectKeyFrame.Value>
</DiscreteObjectKeyFrame>
</ObjectAnimationUsingKeyFrames>
</Storyboard>
以上的整个动画实现采用的是Border的位置变换实现的,接下来要介绍的就是如何通过视图状态管理(Visual State Manager)去实现和上面同样的功能。首先将界面设计为如下图所示界面,Border不透明度为30%,默认Y的位置为-298。

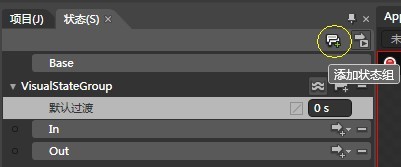
接下来就是进行状态的设计了,可以通过“窗口”菜单下的“状态”选项打开状态管理框,首先添加状态组,然后再状态组下添加两个状态,分别命名为In和Out。如下截图:

“In”状态用于完成面板从外动态的进入主界面,实际上也就是完成一个位置变换动画,详细如下截图所示:

“Out”状态与“In”状态相反,用于完成面板从主界面以动画的形式推出主界面,详细设计图下截图所示:

在整个进入和退出的动画状态中,为了增强用户体验以及达到更好的效果,我还特增加了模糊到透明的动画处理。最终生成的状态代码如下:
<VisualStateGroup x:Name="VisualStateGroup">
<VisualState x:Name="In">
<Storyboard>
<ObjectAnimationUsingKeyFrames BeginTime="00:00:00" Duration="00:00:00.0010000" Storyboard.TargetName="border"
Storyboard.TargetProperty="(UIElement.Visibility)">
<DiscreteObjectKeyFrame KeyTime="00:00:00">
<DiscreteObjectKeyFrame.Value>
<Visibility>Visible</Visibility>
</DiscreteObjectKeyFrame.Value>
</DiscreteObjectKeyFrame>
</ObjectAnimationUsingKeyFrames>
<DoubleAnimationUsingKeyFrames BeginTime="00:00:00" Storyboard.TargetName="border"
Storyboard.TargetProperty="(UIElement.RenderTransform).(TransformGroup.Children)[3].(TranslateTransform.Y)">
<EasingDoubleKeyFrame KeyTime="00:00:00" Value="-296"/>
<EasingDoubleKeyFrame KeyTime="00:00:01" Value="0"/>
</DoubleAnimationUsingKeyFrames>
<DoubleAnimationUsingKeyFrames BeginTime="00:00:00" Storyboard.TargetName="border"
Storyboard.TargetProperty="(UIElement.Opacity)">
<EasingDoubleKeyFrame KeyTime="00:00:00" Value="0.3"/>
<EasingDoubleKeyFrame KeyTime="00:00:01" Value="1"/>
</DoubleAnimationUsingKeyFrames>
</Storyboard>
</VisualState>
<VisualState x:Name="Out">
<Storyboard>
<ObjectAnimationUsingKeyFrames BeginTime="00:00:00" Duration="00:00:00.0010000" Storyboard.TargetName="border"
Storyboard.TargetProperty="(UIElement.Visibility)">
<DiscreteObjectKeyFrame KeyTime="00:00:00">
<DiscreteObjectKeyFrame.Value>
<Visibility>Visible</Visibility>
</DiscreteObjectKeyFrame.Value>
</DiscreteObjectKeyFrame>
</ObjectAnimationUsingKeyFrames>
<DoubleAnimationUsingKeyFrames BeginTime="00:00:00" Storyboard.TargetName="border"
Storyboard.TargetProperty="(UIElement.RenderTransform).(TransformGroup.Children)[3].(TranslateTransform.Y)">
<EasingDoubleKeyFrame KeyTime="00:00:00" Value="0"/>
<EasingDoubleKeyFrame KeyTime="00:00:01" Value="-298"/>
</DoubleAnimationUsingKeyFrames>
<DoubleAnimationUsingKeyFrames BeginTime="00:00:00" Storyboard.TargetName="border"
Storyboard.TargetProperty="(UIElement.Opacity)">
<EasingDoubleKeyFrame KeyTime="00:00:00" Value="1"/>
<EasingDoubleKeyFrame KeyTime="00:00:01" Value="0.3"/>
</DoubleAnimationUsingKeyFrames>
</Storyboard>
</VisualState>
</VisualStateGroup>
</VisualStateManager.VisualStateGroups>
完整的视图状态管理代码如上代码块,要进行状态间的切换可以通过VisualStateManager.GoToState()方法实现,如下代码块实现了进入与退出的状态切换:
{
VisualStateManager.GoToState(this, "In", false);
}
private void onOutClick(object sender, System.Windows.RoutedEventArgs e)
{
VisualStateManager.GoToState(this, "Out", false);
}
本篇中的示例可通过篇末提供的下载链接下载示例源代码,本篇只是简单的介绍了视图状态管理与动画结合的应用,关于视图状态管理的详细内容请大家查看相关资料进行学习,下面提供一些有帮助的文章链接。
推荐资源:
Expression Blend实例中文教程(11) - 视觉管理器快速入门Visual State Manager(VSM)
MSDN:http://msdn.microsoft.com/zh-cn/library/cc189090(VS.95).aspx
http://www.silverlight.net/learn/quickstarts/animations/


【推荐】国内首个AI IDE,深度理解中文开发场景,立即下载体验Trae
【推荐】编程新体验,更懂你的AI,立即体验豆包MarsCode编程助手
【推荐】抖音旗下AI助手豆包,你的智能百科全书,全免费不限次数
【推荐】轻量又高性能的 SSH 工具 IShell:AI 加持,快人一步
· 如何编写易于单元测试的代码
· 10年+ .NET Coder 心语,封装的思维:从隐藏、稳定开始理解其本质意义
· .NET Core 中如何实现缓存的预热?
· 从 HTTP 原因短语缺失研究 HTTP/2 和 HTTP/3 的设计差异
· AI与.NET技术实操系列:向量存储与相似性搜索在 .NET 中的实现
· 周边上新:园子的第一款马克杯温暖上架
· Open-Sora 2.0 重磅开源!
· .NET周刊【3月第1期 2025-03-02】
· 分享 3 个 .NET 开源的文件压缩处理库,助力快速实现文件压缩解压功能!
· [AI/GPT/综述] AI Agent的设计模式综述
2009-04-28 FMS3系列(五):通过FMS实现时时视频聊天(Flash|Flex)