
五、jsPlumb实现流程图配置--Connection
一、线条创建
在第一篇文章讲到过线条一共有四种类型Bezier、Straight、Flowchart、State Machine,以及每种类型的样子,接下来就演示如何创建线条。
创建一条连线有两种方式:通过代码创建;用户使用鼠标拖拽进行创建。
1. 通过代码创建
使用jsPlumb提供的connect API可以创建连线。
      <div
        class="rectangle-node items-center justify-center row"
        ref="node1"
        style="top: 100px; left: 100px"
      >
        节点1
      </div>

      <div
        class="rectangle-node items-center justify-center row"
        ref="node2"
        style="top: 100px; left: 300px"
      >
        节点2
      </div>
import {
  newInstance,
  BrowserJsPlumbInstance,
  StraightConnector,
} from '@jsplumb/browser-ui';

// ...省略部分

onMounted(() => {
  jsPlumb.value = newInstance({
    container: canvas.value,
  });
  jsPlumb.value.connect({
    source: node1.value,
    target: node2.value,
    connector: StraightConnector.type,
  });
});
以上就是最简单的创建线条的代码,参数source、target分别指定了起始节点和目的节点,connector指定了线条的类型。
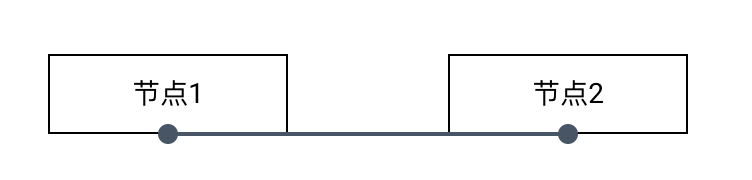
从图中可以看到,jsPlumb为节点们创建了默认的Endpoint和Anchor,然后才将他们连接起来。如果并不想用默认的Anchor连线位置,那么参数source/target也可以设置Endpoint对象,例如:
      <div
        class="rectangle-node items-center justify-center row"
        ref="node3"
        style="top: 100px; left: 500px"
      >
        节点3
      </div>

      <div
        class="rectangle-node items-center justify-center row"
        ref="node4"
        style="top: 100px; left: 700px"
      >
        节点4
      </div>
  const endpoint3 = jsPlumb.value.addEndpoint(node3.value, {
    endpoint: {
      type: 'Rectangle',
      options: {
        width: 10,
        height: 10,
      },
    },
    anchor: AnchorLocations.Right,
  });
  const endpoint4 = jsPlumb.value.addEndpoint(node4.value, {
    endpoint: {
      type: 'Dot',
      options: {
        radius: 5,
      },
    },
    anchor: AnchorLocations.Left,
  });

  jsPlumb.value.connect({
    source: endpoint3,
    target: endpoint4,
    connector: 'Flowchart',
  });
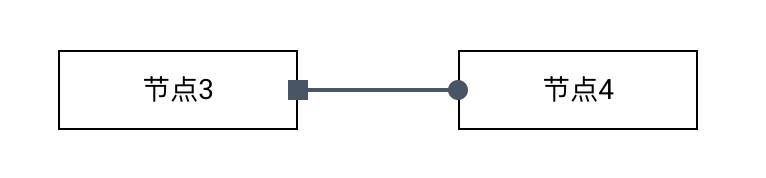
如上面代码所示,source/target参数传入的就是自己创建的Endpoint,connector参数也可以直接传入字符串。以上就是用代码创建线条最简单的方式了。
2. 鼠标连线
除了直接用代码连好连线,也可以把连线的交互交给用户,用户只需要拖动鼠标即可连线。要实现此功能,只需要在Endpoint创建时,新增参数source或target即可。
Endpoint中这两个参数的含义与Connector中的不同。Endpoint中source表示能否作为连线的起始点,target表示能否作为连线的目的点。
      <div
        class="rectangle-node items-center justify-center row"
        ref="node5"
        style="top: 300px; left: 100px"
      >
        节点5-source
      </div>
      <div
        class="rectangle-node items-center justify-center row"
        ref="node6"
        style="top: 300px; left: 300px"
      >
        节点6-target
      </div>
  const endpoint5 = jsPlumb.value.addEndpoint(node5.value, {
    endpoint: {
      type: 'Dot',
      options: {
        radius: 5,
      },
    },
    source: true,
    anchor: AnchorLocations.Right,
  });

  const endpoint6 = jsPlumb.value.addEndpoint(node6.value, {
    endpoint: {
      type: 'Dot',
      options: {
        radius: 5,
      },
    },
    target: true,
    anchor: AnchorLocations.Left,
  });
source/target参数为boolean类型,配置如代码所示,效果如图所示,可以从节点5连线到节点6:
但是这个配置,不能从节点6连线到节点5。因为节点5没有设置target=true,节点6没有设置source=true,如果想让一个Endpoint既可以作为起始点,又可以作为目的点,那就同时把source=true,target=true都设置。
二、线条的参数
介绍了简单创建线条的方式之后,接下来就说说如何设置线条的详细参数。jsPlumb中,每个类型的线条可用的参数不都相同,也就是说某些参数只对特定类型的线条能够生效。因此我们分开演示每个类型线条的参数。
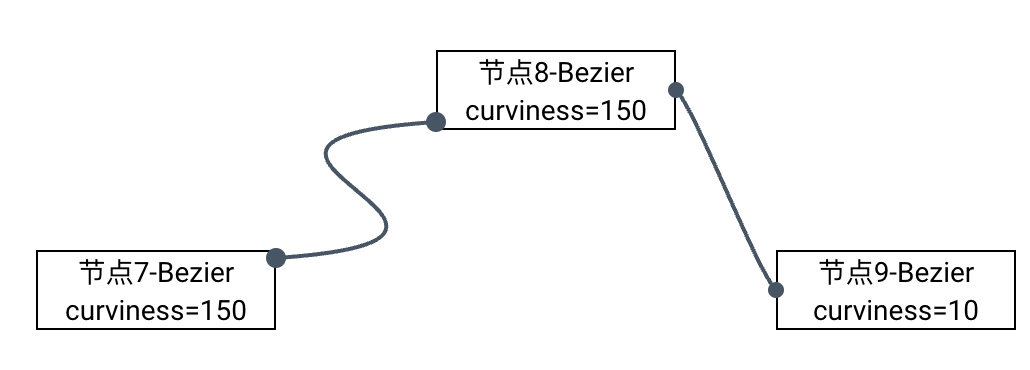
Beizier线条
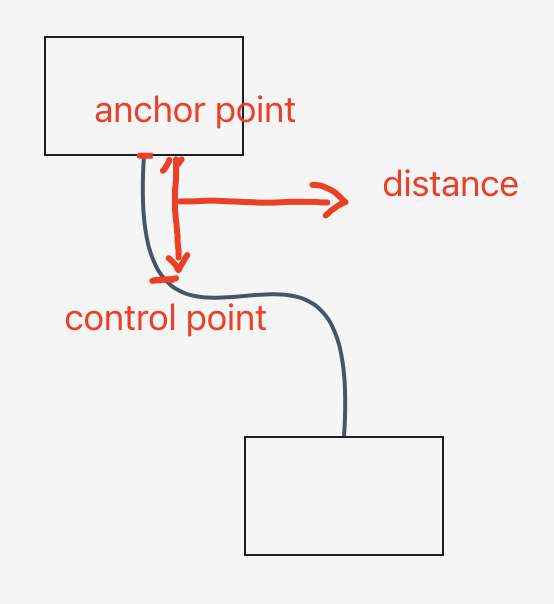
- curviness:官方文档上解释的是
control points到anchor points之间的距离(单位: px),就是指的锚点到曲线那个拐点的距离。不好理解,画图解释如下:
![]()
按个人理解,这个参数其实就是控制线条的曲度:值越小,曲线越平;值越大,曲线越弯曲,效果如图分别表示了curviness=150和curviness=10的效果:
![]()
配置代码:
      <div
        class="rectangle-node items-center justify-center column"
        ref="node7"
        style="top: 300px; left: 500px"
      >
        <span class="col">节点7-Bezier</span>
        <span class="col">curviness=150</span>
      </div>
      <div
        class="rectangle-node items-center justify-center column"
        ref="node8"
        style="top: 200px; left: 700px"
      >
        <span class="col">节点8-Bezier</span>
        <span class="col">curviness=150</span>
      </div>

      <div
        class="rectangle-node items-center justify-center column"
        ref="node9"
        style="top: 300px; left: 870px"
      >
        <span class="col">节点9-Bezier</span>
        <span class="col">curviness=10</span>
      </div>
  jsPlumb.value.connect({
    source: endpoint7,
    target: endpoint8,
    connector: {
      type: 'Bezier',
      options: {
        curviness: 150,
      },
    },
  });
  jsPlumb.value.connect({
    source: node8.value,
    target: node9.value,
    endpoint: {
      type: 'Dot',
      options: {
        radius: 4,
      },
    },
    anchors: [
      [1, 0.5, 1, 0],
      [0, 0.5, -1, 0],
    ],
    connector: {
      type: 'Bezier',
      options: {
        curviness: 10,
      },
    },
  });
节点8和节点9的连线代码,是不需要提前去创建Endpoint的,直接在创建连线的时候配置好了Endpoint、Anchor以及Connector的参数。Anchor配置使用的是
anchors而不是anchor,anchors参数只能接收两个anchor配置,代表的就是起始点位置跟目的点位置。
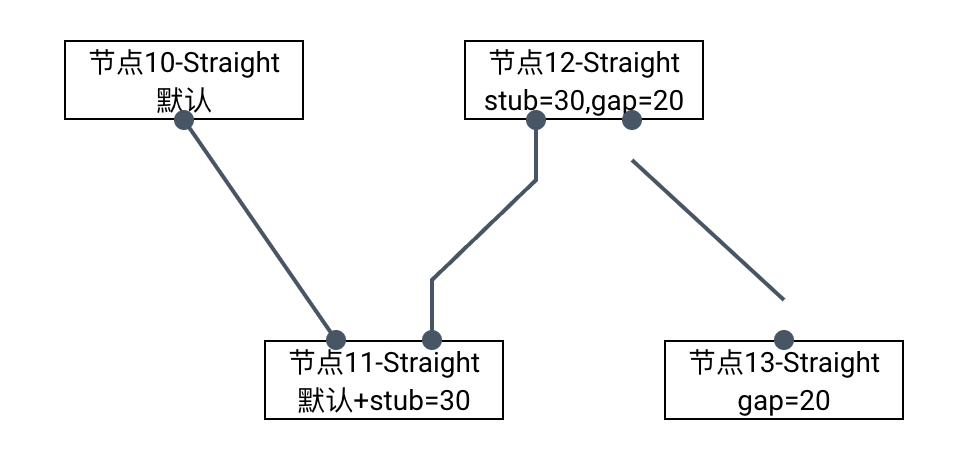
Straight线条
stub:有点类似curviness参数,用于控制锚点到线条拐点的距离,默认是0。gap:控制线条到锚点之间的间隔距离,默认是0。
用实际的示例演示:
![]()
示例代码:
      <div
        class="rectangle-node items-center justify-center column"
        ref="node10"
        style="top: 400px; left: 100px"
      >
        <span class="col">节点10-Straight</span>
        <span class="col">默认</span>
      </div>
      <div
        class="rectangle-node items-center justify-center column"
        ref="node11"
        style="top: 550px; left: 200px"
      >
        <span class="col">节点11-Straight</span>
        <span class="col">默认+stub=30</span>
      </div>
      <div
        class="rectangle-node items-center justify-center column"
        ref="node12"
        style="top: 400px; left: 300px"
      >
        <span class="col">节点12-Straight</span>
        <span class="col">stub=30,gap=20</span>
      </div>
      <div
        class="rectangle-node items-center justify-center column"
        ref="node13"
        style="top: 550px; left: 400px"
      >
        <span class="col">节点13-Straight</span>
        <span class="col">gap=20</span>
      </div>
  jsPlumb.value.connect({
    source: node10.value,
    target: node11.value,
    endpoint: 'Dot',
    anchors: ['Bottom', [0.3, 0, 0, -1]],
    connector: 'Straight',
  });

  jsPlumb.value.connect({
    source: node11.value,
    target: node12.value,
    endpoint: 'Dot',
    anchors: [
      [0.7, 0, 0, -1],
      [0.3, 1, 0, 1],
    ],
    connector: {
      type: 'Straight',
      options: {
        stub: 30,
      },
    },
  });
  jsPlumb.value.connect({
    source: node12.value,
    target: node13.value,
    endpoint: 'Dot',
    anchors: [[0.7, 1, 0, 1], 'Top'],
    connector: {
      type: 'Straight',
      options: {
        gap: 20,
      },
    },
  });
Flowchart线条
Flowchart线条大部份情况下,都会有两个拐点。与Straight不同,Straight如果不设置stub是不会有拐点出现的。因此Flowchart有些参数与Straight相似:
stub:指从锚点到拐点的最小距离。默认值是30alwaysRespectStubs:是否严格按照stub设置的参数来绘制,默认是false。一般情况,如果两个元素靠得很近,那么jsPlumb会根据实际距离去优化线条的绘制。如果此参数设置为true, 那么不论两个元素距离如何,线条都会从锚点出发至少stub距离后才进行折线。gap:这个与Straight的配置是一样的,锚点与线条的间隔距离。cornerRadius:把尖角变为圆角并设置其的弧度。midpoint:不知道干啥的......
Flowchart参数就不举例展示了,主要参数stub、gap效果和Straight类似。
State Machine线条
状态机线条看着就像是不那么弯曲的Bezier线条,有一些曲度,但整体比较平滑,而且线条只有一个弯曲的地方(Bezier有两个)。
margin:作用跟gap参数一样的,锚点与线条间隔距离,默认值5。不明白为啥要换个参数,增加了学习成本.....curviness:作用和Bezier线条的curviness参数一样,调整线条曲度,默认值10。proximityLimit:这是一个阈值,当两个节点直接的距离小于这个指,线条就会直接变为直线(无弯曲),默认是80px。
三、线条的样式
连线也是通过SVG绘制的,在调整连线的样式时,同样也分为全局设置跟局部设置,设置的参数是相同的,全局设置是在jsPlumb实例化的时候,而局部设置是在连线的时候。
全局设置:
  jsPlumb.value = newInstance({
    container: canvas.value,
    paintStyle: {
      stroke: '#40BDEC',
      outlineStroke: '#FFF',
      outlineWidth: 6,
    },
  });
局部设置:
  jsPlumb.value.connect({
    source: node14.value,
    target: node15.value,
    endpoint: 'Dot',
    anchors: ['Top', 'Top'],
    connector: 'Flowchart',
      paintStyle: {
      stroke: 'red',
      strokeWidth: 5,
      outlineStroke: 'blue',
      outlineWidth: 5,
     },
  });
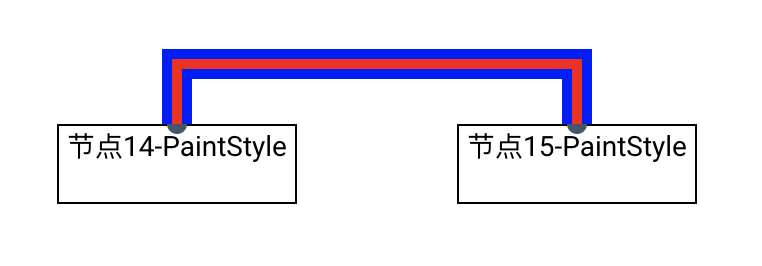
其中outlineStroke和outlineWidth属性设置线条的外边框宽度与颜色,在实际使用过程中,如果有需要点击线条的需求时,这个属性会很有用。因为实际使用中,线条宽度可能只有2px~3px,使用鼠标十分难以点击到,使用outlineWidth对线条加宽,并将颜色设置跟底色一样,就会让线条很好点击。
除了设置线条的样式,还可以设置线条hover时的样式。例如:
  jsPlumb.value.connect({
    source: node16.value,
    target: node17.value,
    endpoint: 'Dot',
    anchors: ['Top', 'Top'],
    connector: 'Flowchart',
    paintStyle: {
      stroke: '#40BDEC',
      strokeWidth: 2,
      outlineStroke: '#FFF',
      outlineWidth: 8,
    },
    hoverPaintStyle: {
      stroke: '#40BDEC',
      strokeWidth: 4,
      outlineStroke: '#FFF',
      outlineWidth: 8,
    },
  });
这样就可以实现鼠标只要移到线条周边,就可以完成对线条的选中。
四、连线的进阶使用
- 禁止断开连线
上面演示的节点3与节点4之间的连线,是通过connect创建,单用户实际也可以使用鼠标拖拽来断开连线,设置detachable:false后就无法使用鼠标断开连线了。
// 方式一:单条连线设置
  jsPlumb.value.connect({
    source: endpoint3,
    target: endpoint4,
    connector: 'Flowchart',
    detachable: false,
  });

// 方式二:全局设置
  jsPlumb.value = newInstance({
    container: canvas.value,
    connectionsDetachable: false,
  });

// 方式三:在Endpoint上设置
  const endpoint3 = jsPlumb.value.addEndpoint(node3.value, {
    endpoint: {
      type: 'Rectangle',
      options: {
        width: 10,
        height: 10,
      },
    },
    anchor: AnchorLocations.Right,
    connectionsDetachable: false,
  });
- 自动重连
如果说直接禁止用户的鼠标拖拽连线在交互上不友好,又不想让用户断开连线,那么可以考虑使用reattach: true配置。线条会自动重连到原本的Endpoint上,除非用户精确的把连线连到另外一个Endpint上。此项配置同样也有三种方式
// 方式一:单条连线设置
  jsPlumb.value.connect({
    source: endpoint3,
    target: endpoint4,
    connector: 'Flowchart',
    reattach: false,
  });

// 方式二:全局设置
  jsPlumb.value = newInstance({
    container: canvas.value,
    reattachConnections: false,
  });

// 方式三:在Endpoint上设置
  const endpoint3 = jsPlumb.value.addEndpoint(node3.value, {
    endpoint: {
      type: 'Rectangle',
      options: {
        width: 10,
        height: 10,
      },
    },
    anchor: AnchorLocations.Right,
    reattachConnections: false,
  });
- 自定义连接点
支持通过css样式来定位到DOM,从而将此DOM作为连线的起始/目的点,但仅仅是连线过程中的起始/目的点,最终连线完成时,线条连接的还是节点。
      <div
        class="rectangle-node items-center justify-center column"
        ref="node18"
        style="top: 400px; left: 500px"
      >
        <span class="col">节点18-Selector</span>
        <span class="dot source-selector"></span>
      </div>
      <div
        class="rectangle-node items-center justify-center column"
        ref="node19"
        style="top: 400px; left: 800px"
      >
        <span class="col">节点19-Selector</span>
        <span class="dot target-selector"></span>
      </div>
.dot {
    width: 20px;
    height: 20px;
    border-radius: 10px;
  }
  .source-selector {
    background-color: red;
  }
  .target-selector {
    background-color: blue;
  }
  jsPlumb.value.manage(node18.value);
  jsPlumb.value.manage(node19.value);

  jsPlumb.value.addSourceSelector('.source-selector', {
    endpoint: 'Dot',
    anchor: 'Top',
    connector: 'Flowchart',
  });
  jsPlumb.value.addTargetSelector('.target-selector', {
    endpoint: 'Dot',
    anchor: 'Top',
  });
addSourceSelectorAPI会将定位到的DOM作为连线的起始点,addTargetSelector就是添加目的点。在此之前,需要将节点使用manage纳入jsPlumb管理,否则不能连线。使用这种方式相当于自定义一个DOM元素用作连线,而不在需要去创建Endpoint。
addSourceSelector/addTargetSelectorAPI中的第二个参数,里面的配置项是结合了Endpoint和Connection的配置项。
- Redrop策略
当拖拽连线的起始点/目的点时,重新连接的策略。取值有以下几类:
any:只要松开连线起始点的时候,鼠标落在另一个起始点(这里的起始点是只要能作为source的元素都可以),就会自动连接;反之其他落点位置就会删除连线。
strict:这个是默认值,鼠标落点必须要在起始点/目的点上才会自动连接,否则线条会被删除。
anySource:基本与any策略一致,唯一不同点在于鼠标落点时所在的元素,必须是一个source selector或者其子元素里面有source selector才会自动连接。
anyTarget:与anySource含义一致,只是把起始点改为目的点。
anySourceOrTarget:anySource和anyTarget的结合体。
source selector和target selector就是分别用addSourceSelector和addTargetSelector创建的起始点/目的点。
关于detach和drop的区别
detach指的Connection与Endpoint分离,但此时Connection可能还存在,Endpoint可能也还存在,detach只是描述它们两分离了;同样attach也只是描述了Connection与Endpoint融合了。
drop是指的一种操作,在拖拽场景中,drop就是指的鼠标左键松开的那个操作。
五、总结
以上就介绍完了线条的创建、调整与样式,关于线条的内容比较多,在实际使用中线条的控制是占大部份的。本章的完整代码地址在此,后续还有关于线条的事件、拦截器等内容。

 浙公网安备 33010602011771号