
四、jsPlumb实现流程图配置--Anchor介绍
一、锚点的功能
刚开始的时候一直分不清楚锚点(Anchor)跟端点(Endpoint)有啥关系有啥区别。Anchor一句话概括就是:用于定义连线在节点上的位置。也就是说Anchor的作用就是用于定位。
根据官方文档,Anchor被分为四种类型:
- 静态的(Static)
- 动态的(Dynamic)
- 边框的(Perimeter)
- 连续性的(Continuous)
使用addEndpoint和connectAPI都可以创建Anchor。
二、静态锚点
(第一章)[https://www.cnblogs.com/bencakes/p/18054523]有讲到过静态锚点有9个默认的点: Top、TopLeft、Left、BottomLeft、Bottom、BottomRight、Right、TopRight。创建静态Anchor可以直接指定位置字符串或者使用jsPlumb提供的枚举值:
import {
  AnchorLocations
} from '@jsplumb/browser-ui';

 const endpoint1 = jsPlumb.value.addEndpoint(node1.value, {
    endpoint: {
      type: 'Dot',
      options: {
        radius: 10,
      },
    },
    anchor: 'Bottom'
  });
  const endpoint1_1 = jsPlumb.value.addEndpoint(node1.value, {
    endpoint: {
      type: 'Rectangle',
      options: {
        width: 10,
        height: 10
      },
    },
    anchor: AnchorLocations.Top
  });
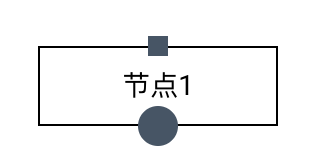
这样就可以比较快捷方便的使用这些常用的点位。静态Anchor除了可以直接使用字符串和已经定义好的类型外,还可以使用坐标的形式。但是坐标的形式不仅仅可以表达静态Anchor。
坐标轴是以节点的左上角为原点,向右是x轴正方向,向下是y轴正方向,节点的右边缘即x=1, 节点的底部即y=1,如图所示:
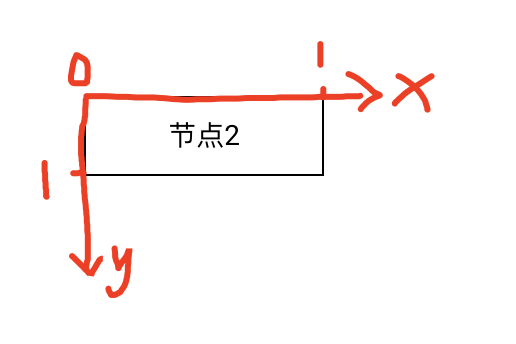
Anchor用坐标表示的格式为: [x, y, dx, dy]。dx用于表示连线在x轴的方向,dy表示连线在y轴的方向,例如[dx,dy]=[0,1]就表示向下,[dx,dy]=[-1,0]表示向左。这个朝向对于某些类型的连线时配置有用。
x,y的取值范围为[0,1],dx,dy只能取-1,0,1这三个值。
  const endpoint2 = jsPlumb.value.addEndpoint(node2.value, {
    endpoint: {
      type: 'Dot',
      options: {
        radius: 5,
      },
    },
    anchor: [0.5, 1, 0, 1], // Bottom
  });
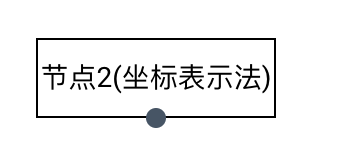
Top就可以用[0.5, 1, -1, 0]来表示,Right用[1, 0.5, 1, 0]表示。
如果只是单纯的要表达Anchor的位置,其实就使用
x,y就可以,dx,dy可以随意取值。但是对于一些类型的线条-例如Flowchart,这个朝向就很重要,朝向不对就会导致连线有变化。
那现在修改一个一个Bottom Anchor的朝向,让它不朝向下,而是朝向上的话,连线会是怎么样?
 jsPlumb.value.connect({
    source: endpoint1_1,
    target: endpoint2,
    connector: 'Flowchart',
  });
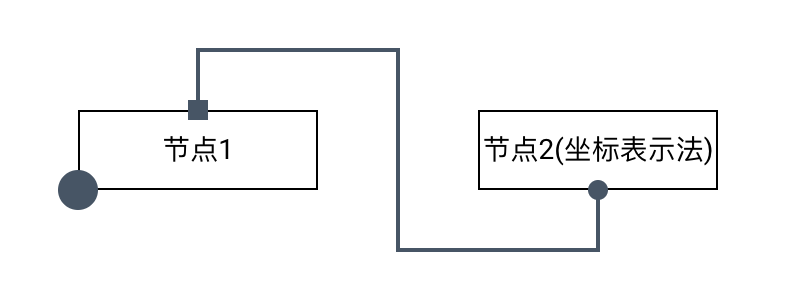
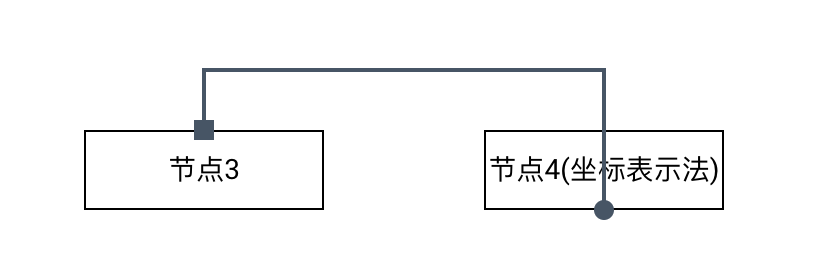
这是正常朝向时的连线,现在创建一个`拥有一个Bottom Anchor的节点,但是让它的Anchor朝向是向上的:
      <div
        class="rectangle-node items-center justify-center row"
        ref="node3"
        style="top: 300px; left: 100px"
      >
        节点3
      </div>

      <div
        class="rectangle-node items-center justify-center row"
        ref="node4"
        style="top: 300px; left: 300px"
      >
        节点4(坐标表示法)
      </div>
const endpoint3 = jsPlumb.value.addEndpoint(node3.value, {
    endpoint: {
      type: 'Rectangle',
      options: {
        width: 10,
        height: 10,
      },
    },
    anchor: AnchorLocations.Top,
  });
  const endpoint4 = jsPlumb.value.addEndpoint(node4.value, {
    endpoint: {
      type: 'Dot',
      options: {
        radius: 5,
      },
    },
    anchor: [0.5, 1, 0, -1], // Bottom,朝上
  });
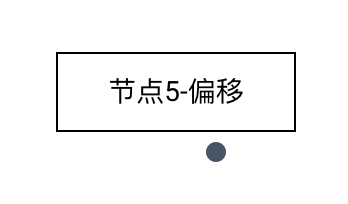
上面Anchor是用4个值的数组来表达的,还可以使用6个值的一个数组来表达[x, y, dx, dy, ox, oy]。ox, oy分别表示相对x轴和y轴的偏移量,例如[ 0.5, 1, 0, 1, 0, 50 ] 就表示锚点Bottom再向下偏移个50px。
  const endpoint5 = jsPlumb.value.addEndpoint(node5.value, {
    endpoint: {
      type: 'Dot',
      options: {
        radius: 5,
      },
    },
    anchor: [0.5, 1, 0, 1, 20, 10],
  });
将一个Bottom的Anchor在x轴偏移20px,y轴偏移10px。效果如图:
三、动态锚点
动态锚点就是在已经定义好了一些静态锚点的基础上,如果拖动节点,那么连线会根据节点的位置,自动选择最近的一个Anchor。默认情况下,有上、下、左、右四个Anchor用于动态变更。
  const endpoint6 = jsPlumb.value.addEndpoint(node6.value, {
    endpoint: {
      type: 'Dot',
      options: {
        radius: 5,
      },
    },
    anchor: 'AutoDefault',
  });
  jsPlumb.value.connect({
    source: endpoint5,
    target: endpoint6,
  });
也可以自己定义多个Anchor从而使动态变更更加丝滑:
const endpoint7 = jsPlumb.value.addEndpoint(node7.value, {
    endpoint: {
      type: 'Dot',
      options: {
        radius: 5,
      },
    },
    anchor: [
      [0.2, 0, 0, -1],
      [1, 0.1, 1, 0],
      [1, 0.2, 1, 0],
      [1, 0.2, 1, 0],
      [1, 0.3, 1, 0],
      [1, 0.4, 1, 0],
      [1, 0.5, 1, 0],
      [1, 0.6, 1, 0],
      [1, 0.7, 1, 0],
      [1, 0.8, 1, 0],
      [1, 0.9, 1, 0],
      [0.8, 1, 0, 1],
      [0, 0.8, -1, 0],
    ],
  });
  const endpoint8 = jsPlumb.value.addEndpoint(node8.value, {
    endpoint: {
      type: 'Dot',
      options: {
        radius: 5,
      },
    },
    anchor: [
      [0.2, 0, 0, -1],
      [1, 0.2, 1, 0],
      [0.8, 1, 0, 1],
      [0, 0.9, -1, 0],
      [0, 0.8, -1, 0],
      [0, 0.7, -1, 0],
      [0, 0.6, -1, 0],
      [0, 0.5, -1, 0],
      [0, 0.4, -1, 0],
      [0, 0.3, -1, 0],
      [0, 0.2, -1, 0],
      [0, 0.1, -1, 0],
    ],
  });
以此类推如果在每一条边都创建100个Anchor,那移动起来会更加平滑,甚至感受不到顿挫。但是如果要自己手动创建100个Anchor就太麻烦了,这种情况就可以创建边框性锚点
四、边框锚点
官方文档中提及一共提供了6种形状的图形,能使用边框性锚点。
- Circle
- Ellipse
- Triangle
- Diamond
- Rectangle
- Square
其中Rectangle和Square是一样的,Circle和Ellipse也是一样的。Square是特殊的Rectangle,Circle也是特殊的Ellipse。如下图演示边框性锚点的效果:
     <div
        class="circle-node items-center justify-center row"
        ref="node9"
        style="top: 500px; left: 500px"
      >
        节点9-Circle
      </div>
      <div
        class="rectangle-node items-center justify-center row"
        ref="node10"
        style="top: 500px; left: 700px"
      >
        节点10-Rectange
      </div>
const endpoint9 = jsPlumb.value.addEndpoint(node9.value, {
    endpoint: {
      type: 'Dot',
      options: {
        radius: 5,
      },
    },
    anchor: { type: 'Perimeter', options: { shape: 'Circle' } },
  });
  const endpoint10 = jsPlumb.value.addEndpoint(node10.value, {
    endpoint: {
      type: 'Dot',
      options: {
        radius: 5,
      },
    },
    anchor: { type: 'Perimeter', options: { shape: 'Rectangle' } },
  });
jsPlumb.value.connect({
    source: endpoint9,
    target: endpoint10,
  });
  .circle-node {
    position: absolute;
    border: 1px solid #000000;
    width: 80px;
    height: 80px;
    border-radius: 40px;
  }
五、连续性锚点
连续性锚点从效果上看感觉跟动态锚点差不多,都是根据节点之间的相对位置,来调节线条连接点的位置。
  const endpoint11 = jsPlumb.value.addEndpoint(node11.value, {
    anchor: 'Continuous',
    paintStyle: { fill: 'red' },
  });
  const endpoint12 = jsPlumb.value.addEndpoint(node12.value, {
    anchor: 'Continuous',
    paintStyle: { fill: 'blue' },
  });
  jsPlumb.value.connect({
    source: endpoint11,
    target: endpoint12,
  });
这类锚点也可以设置朝向,例如:
const endpoint13 = jsPlumb.value.addEndpoint(node13.value, {
    anchor: {
      type: 'Continuous',
      options: { faces: ['top', 'left'] },
    },
    paintStyle: { fill: 'red' },
  });
  const endpoint14 = jsPlumb.value.addEndpoint(node14.value, {
    anchor: { type: 'Continuous', options: { faces: ['bottom', 'right'] } },
    paintStyle: { fill: 'blue' },
  });
jsPlumb.value.connect({
    source: endpoint13,
    target: endpoint14,
  });
设置朝向之后,也就相当于锚点只会在指定的方向上移动。faces参数只能从top,bottom,right,left四个值中选取。
六、总结
连线的前提元素就已经讲完,接下来就是关于连线的内容。完整的项目代码地址

 浙公网安备 33010602011771号